Extjs5.0(7):根据路由跳转页面
上一篇博客我们已经响应了路由器的跳转,但是还没有实现具体的跳转,这里继续此功能:点击左侧导航栏,触发路由跳转,根据路由跳转地址,页面做相应改变。目前为止我们差最后一步:页面做相应改变。
在实现这个功能之前,我们先做一件事,就是把右侧内容区域单独出来。在view/main目录下,新创建ContentPanel.js
Ext.define('MyApp.view.main.ContentPanel', {
    extend: 'Ext.panel.Panel',
    xtype: 'app-contentPanel',
    autoScroll: true
});
在Main.js中使用ContentPanel'替换掉原来的右侧panel
Ext.define('MyApp.view.main.Main', {

    extend: 'Ext.container.Container',

    requires: [
        'MyApp.view.main.MainController',//引入controller
        'MyApp.view.main.MainModel',
        'MyApp.view.main.Header',//引入Header
        'MyApp.view.main.Navigation',//引入导航栏
        'MyApp.view.main.ContentPanel'//引入内容区域
    ],

    xtype: 'app-main',

    controller: 'main',//指定控制器

    viewModel: {
        type: 'main'
    },

    layout: {
        type: 'border'
    },

    items: [
        {
            region: 'north',
            xtype: 'app-header'//使用Header
        }, {
            xtype: 'app-navigation',
            region: 'west'
        }, {
            region: 'center',
            xtype: 'app-contentPanel'
        }]
});
浏览器运行项目,效果

接下来要做的就是点击左侧树节点,右侧内容区域做相应改变,我们在上一篇文章已经响应了左侧树节点的点击事件,并且跳转路由,这里我们需要做的就是根据路由器地址,做相应操作。
由于上一篇文章中对路由跳转前树节点的判断那段代码写得不是很好,我们这里修改一下。修改MainController.js中beforeHandleRoute函数
beforeHandleRoute: function (id, action) {
    var me = this,
        mainView = me.getView(),
        navigationTree = mainView.down('app-navigation'),
        store = navigationTree.getStore(),
        node = store.getNodeById(id);

    if (node) {
        action.resume();
    }else if(store.getCount() === 0){
        //在store load事件中判断节点,避免store数据未加载情况
        store.on('load', function () {
            node = store.getNodeById(id);
            if (node) {
                action.resume();
            }else {
                Ext.Msg.alert('路由跳转失败', '找不到id为' + id + ' 的组件');
                action.stop();
            }
        });
    }else {
        Ext.Msg.alert('路由跳转失败', '找不到id为' + id + ' 的组件');
        action.stop();
    }
},
这里修改了store未加载时的解决方法。
接下来在handleRoute函数中开始响应路由跳转,完成两步操作:1、左侧树定位到相应节点,2、右侧panel切换到相应页面。
1、 根据路由地址id,定位左侧树节点。
handleRoute: function (id) {
    var me = this,
        mainView = me.getView(),
        navigationTree = mainView.down('app-navigation'),
        store = navigationTree.getStore(),
        node = store.getNodeById(id);

    //响应路由,左侧树定位到相应节点
    navigationTree.getSelectionModel().select(node);
    navigationTree.getView().focusNode(node);

}
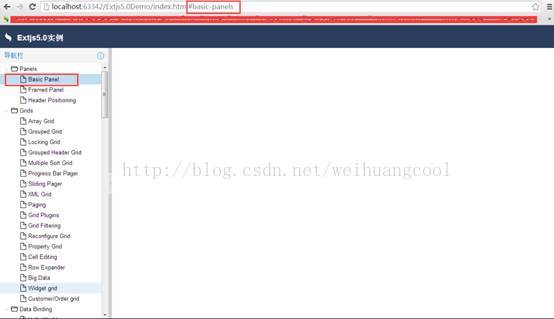
浏览器中打开项目,随便点击左侧某个树节点,例如我们这里点击Basic Panel这个节点,路由地址会做相应改变

然后我们再刷新页面,会发现,左侧树节点还是定位到Basic Panel这个节点上。
2、 右侧panel切换到相应页面,同时改变panel的title。
handleRoute函数中继续添加以下代码
contentPanel.removeAll(true);
    if (node.isLeaf()) {
        className = Ext.ClassManager.getNameByAlias('widget.' + id);
        cmp = Ext.create(className);
        contentPanel.add(cmp);
    }
    var text = node.get('text'),
        title = node.isLeaf() ? (node.parentNode.get('text') + ' - ' + text) : text;
    contentPanel.setTitle(title);
    document.title = document.title.split(' - ')[0] + ' - ' + text;
}
这里我只处理了点击叶子节点时的操作。上面的代码表示点击叶子节点时,通过节点id获取类名,然后通过这个类名创建一个实例,放在 contentPanel里面。由于我们现在还没有定义以节点id为别名的组件,所以这里点击节点时会报错。
下面我们建立一个以basic-panels为别名的组件
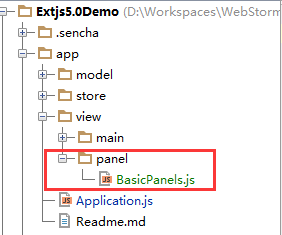
在view目录下建立panel目录,在panel目录下创建BasicPanel.js文件

BasicPanel.js代码
Ext.define('MyApp.view.panel.BasicPanels', {
    extend: 'Ext.Container',
    xtype: 'basic-panels',
    html:'hello'
});
浏览器中运行项目,点击Basic Panel节点

效果出来了,但是这个时候我们会发现控制台下有这么一个警告
字面意思是建议我们最好在Ext.onReady之前就引入BasicPanels.js,不要等到点击树节点时才引入。这虽然只是一个警告,但是却非常重要。如果你是手动创建的Extjs项目,要用到动态加载,那么这个警告可以忽略,而且你必须这么写才对,因为这就是动态加载的核心:“用到时才加载”,我们在点击树节点时,才需要加载对应的组件,这时候才load其js文件。但是如果是用sencha cmd生成的项目,那么必须解决掉这个警告,因为用sencha cmd生成的项目,等我们最终编写完成,要发布的时候,可以用sencha cmd来bulid我们的项目,最终会把项目的文件压缩到一个app.js文件中,这些store、view、model的目录都没了,也不需要动态加载,因为所有的js文件都压缩在app.js中了,如果使用动态加载,会提示找不到该文件,所以这里我们还是把这个警告给去除掉,以免留下麻烦。
修改handleRoute函数
handleRoute: function (id) {
    var me = this,
        mainView = me.getView(),
        navigationTree = mainView.down('app-navigation'),
        contentPanel = mainView.down('app-contentPanel'),
        store = navigationTree.getStore(),
        node = store.getNodeById(id),
        className,cmp,ViewClass;

    //响应路由,左侧树定位到相应节点
    navigationTree.getSelectionModel().select(node);
    navigationTree.getView().focusNode(node);

    //响应路由,改变右侧panel内容
    contentPanel.removeAll(true);
    if (node.isLeaf()) {
        className = Ext.ClassManager.getNameByAlias('widget.' + id);
        ViewClass = Ext.ClassManager.get(className);
        cmp = new ViewClass();
        contentPanel.add(cmp);
    }
    var text = node.get('text'),
        title = node.isLeaf() ? (node.parentNode.get('text') + ' - ' + text) : text;
    contentPanel.setTitle(title);
    document.title = document.title.split(' - ')[0] + ' - ' + text;
}
在Application.js中把view下面的文件都引入进来
Ext.define('MyApp.Application', {
    extend: 'Ext.app.Application',

    name: 'MyApp',

    requires:['MyApp.view.*'],//引入view目录下的所有文件

    stores: [
       'main.Navigation'
    ],

    launch: function () {

    },

    init: function() {
        var me = this;
        //设置默认路由
        me.setDefaultToken('all');
    }

});
再刷新页面,警告没了。
由于我们这里只有Basic Panel这个节点的id有对应的组件,所以只有点击Basic Panel这个节点才不会报错,点击其他节点会报错。
MainController.js完整代码
Ext.define('MyApp.view.main.MainController', {
    extend: 'Ext.app.ViewController',

    alias: 'controller.main',

    control: {
        'app-navigation': {//组件别名,表示要控制的是该组件
            selectionchange: 'onTreeNavSelectionChange'
        }
    },

    routes: {
        ':id': {
            action: 'handleRoute',//执行跳转
            before: 'beforeHandleRoute'//路由跳转前操作
        }
    },

    onTreeNavSelectionChange: function (selModel, records) {
        var record = records[0];
        if (record) {
            this.redirectTo(record.getId());
        }
    },

    beforeHandleRoute: function (id, action) {
        var me = this,
            mainView = me.getView(),
            navigationTree = mainView.down('app-navigation'),
            store = navigationTree.getStore(),
            node = store.getNodeById(id);

        if (node) {
            action.resume();
        }else if(store.getCount() === 0){
            //在store load事件中判断节点,避免store数据未加载情况
            store.on('load', function () {
                node = store.getNodeById(id);
                if (node) {
                    action.resume();
                }else {
                    Ext.Msg.alert('路由跳转失败', '找不到id为' + id + ' 的组件');
                    action.stop();
                }
            });
        }else {
            Ext.Msg.alert('路由跳转失败', '找不到id为' + id + ' 的组件');
            action.stop();
        }
    },

    handleRoute: function (id) {
        var me = this,
            mainView = me.getView(),
            navigationTree = mainView.down('app-navigation'),
            contentPanel = mainView.down('app-contentPanel'),
            store = navigationTree.getStore(),
            node = store.getNodeById(id),
            className,cmp,ViewClass;

        //响应路由,左侧树定位到相应节点
        navigationTree.getSelectionModel().select(node);
        navigationTree.getView().focusNode(node);

        //响应路由,改变右侧panel内容
        contentPanel.removeAll(true);
        if (node.isLeaf()) {
            className = Ext.ClassManager.getNameByAlias('widget.' + id);
            ViewClass = Ext.ClassManager.get(className);
            cmp = new ViewClass();
            contentPanel.add(cmp);
        }
        var text = node.get('text'),
            title = node.isLeaf() ? (node.parentNode.get('text') + ' - ' + text) : text;
        contentPanel.setTitle(title);
        document.title = document.title.split(' - ')[0] + ' - ' + text;
    }
最后为ContentPanel加个背景.
Ext.define('MyApp.view.main.ContentPanel', {
    extend: 'Ext.panel.Panel',
    xtype: 'app-contentPanel',
    layout:'center',
    autoScroll: true,
    bodyCls:'app-contentPanel-body'
});
这里用了名字为'app-contentPanel-body'的css样式,所以我们引入这个样式,在前面我们已经建立了一个css文件,我们把需要用到的样式写在里面即可

写上我们的样式
.app-contentPanel-body{
    background-image: url(images/square.gif)!important;
}
这里用到一张背景图片,大家可以自己定义,也可以用我上传的图片
放在resources/images目录

效果

下篇文章介绍Panel组件。
