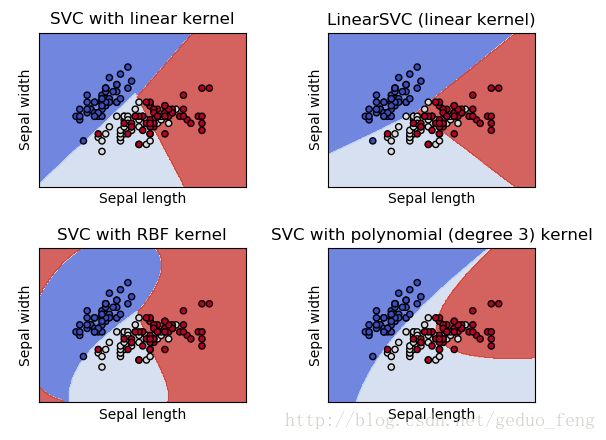
以SVM为例学习scikit-learn以及matplotlib绘图
- numpy库
- 1、np.meshgrid()
- 2、mgrid
- 3、np.ravel()和np.flatten()
- 4、np.r_ , np.c_
- 5、numpy.squeeze()
- matplotlib库
- 1、scatter
- 2、axis
- 3、contour与contourf
- 官方不同核函数SVM比较代码
numpy库
1、np.meshgrid()
作用:用坐标轴上的点生成网格
例如
xx, yy= meshgrid(x, y)
xx, yy,zz = meshgrid(x, y, z)
以 xx, yy= meshgrid(x, y)为例,将x覆盖的区域和y覆盖的区域,组合形成矩形xx,yy, xx的行向量是x的简单复制,yy的列向量是y的简单复制。
如果x是长度为m的向量,y是长度为n的向量,则矩阵xx,yy的维度为(n,m)。
代码演示如下
m, n = (5, 3)
x = np.linspace(0, 1, m)
y = np.linspace(0, 1, n)
xx, yy = np.meshgrid(x,y)
#x,y值
x
out:
array([ 0. , 0.25, 0.5 , 0.75, 1. ])
y
out:
array([ 0. , 0.5, 1. ])
#矩阵xx,yy的值
xx
out:
array([[ 0. , 0.25, 0.5 , 0.75, 1. ],
[ 0. , 0.25, 0.5 , 0.75, 1. ],
[ 0. , 0.25, 0.5 , 0.75, 1. ]])
yy
out:
array([[ 0. , 0. , 0. , 0. , 0. ],
[ 0.5, 0.5, 0.5, 0.5, 0.5],
[ 1. , 1. , 1. , 1. , 1. ]])
参考文献
2、mgrid
用法:返回多维结构,常见的如2D图形,3D图形。对比np.meshgrid,在处理大数据时速度更快.
ret = np.mgrid[ 第1维,第2维 ,第3维 , …]
返回多值,以多个矩阵的形式返回,第1返回值为第1维数据在最终结构中的分布,第2返回值为第2维数据在最终结构中的分布,以此类推。(分布以矩阵形式呈现)
例如xx,yy=np.mgrid[x , y]
样本(i,j)的坐标为 (X[i,j],Y[i,j]),X代表第1维,Y代表第2维,在此例中分别为横纵坐标。
例如1D结构(array),如下:
xx=np.mgrid[1:3:3j]# 最后一个数字3j是复数,表示产生序列的个数,实数时是间隔
#xx = array([ 1.,  2.,  3.])
二维结构
xx, yy = np.mgrid[1:2:2j, 3:5:3j]
#xx,yy的值
xx
out:
array([[ 1.,  1.,  1.],
       [ 2.,  2.,  2.]])
yy
out:
array([[ 3.,  4.,  5.],
       [ 3.,  4.,  5.]])
可见于meshgrid的不同之处在于复制方向不一样。xx,yy=np.mgrid[x , y] ,xx的列向量是x的简单复制,yy的行向量是y的简单复制。如果x是长度为m向量,y是长度n的向量,那么xx,yy的维度等于(m,n)。
参考文献
3、np.ravel()和np.flatten()
两者的功能是一致的,将多维数组降为一维,但是两者的区别是返回拷贝还是返回视图,np.flatten(0返回一份拷贝,对拷贝所做修改不会影响原始矩阵,而np.ravel()返回的是视图,修改时会影响原始矩阵
a = np.array([[1 , 2] , [3 , 4]])
b = a.flatten()
print 'flatten:' , b
c = a.ravel()
print'ravel:' , c
#输出结果如下
flatten: [1 2 3 4]
ravel: [1 2 3 4]
4、np.r_ , np.c_
用法:concatenation function
np.r_按row来组合array,
np.c_按colunm来组合array
>>> a = np.array([1,2,3])
>>> b = np.array([5,2,5])
>>> //测试 np.r_
>>> np.r_[a,b]
array([1, 2, 3, 5, 2, 5])
>>>
>>> //测试 np.c_
>>> np.c_[a,b]
array([[1, 5],
       [2, 2],
       [3, 5]])
>>> np.c_[a,[0,0,0],b]
5、numpy.squeeze()
从数组的形状中删除单维条目,即把shape中为1的维度去掉
x = np.array([[[0], [1], [2]]])

x.shape
Out[99]: (1, 3, 1)

np.squeeze(x).shape
Out[100]: (3,)
matplotlib库
1、scatter
用来画散点图的,对样本点着色。如下:X为一个n*2的矩阵,代表n个2维样本点,且每个样本点对应一个label y,用y来对颜色变量c赋值来区分颜色,按照cmap来布局。zoder控制绘图顺序,默认是顺序是patches, lines, text。
plt.scatter(X[:, 0], X[:, 1], c=y, zorder=10, cmap=plt.cm.Paired)
2、axis
用法:设置布局策略
例如: plt.axis(‘tight’) ,表明采用紧致方案,需要将样本的边缘作为画布的边缘。
3、contour与contourf
contour和contourf都是画三维等高线图的,不同点在于contourf会对等高线间的区域进行填充
用法:画轮廓
样例:plt.contour(XX, YY, Z, colors=[‘k’, ‘k’, ‘k’], linestyles=[‘–’, ‘-‘, ‘–’],levels=[-.5, 0, .5])
matplotlib的基本用法(九)——绘制等高线图
contour与contourf的区别
官方不同核函数SVM比较代码
官方链接
print(__doc__)

import numpy as np
import matplotlib.pyplot as plt
from sklearn import svm, datasets


def make_meshgrid(x, y, h=.02):
    """Create a mesh of points to plot in

    Parameters
    ----------
    x: data to base x-axis meshgrid on
    y: data to base y-axis meshgrid on
    h: stepsize for meshgrid, optional

    Returns
    -------
    xx, yy : ndarray
    """
    x_min, x_max = x.min() - 1, x.max() + 1
    y_min, y_max = y.min() - 1, y.max() + 1
    xx, yy = np.meshgrid(np.arange(x_min, x_max, h),
                         np.arange(y_min, y_max, h))
    return xx, yy


def plot_contours(ax, clf, xx, yy, **params):
    """Plot the decision boundaries for a classifier.

    Parameters
    ----------
    ax: matplotlib axes object
    clf: a classifier
    xx: meshgrid ndarray
    yy: meshgrid ndarray
    params: dictionary of params to pass to contourf, optional
    """
    Z = clf.predict(np.c_[xx.ravel(), yy.ravel()])
    Z = Z.reshape(xx.shape)
    out = ax.contourf(xx, yy, Z, **params)
    return out


# import some data to play with
iris = datasets.load_iris()
# Take the first two features. We could avoid this by using a two-dim dataset
X = iris.data[:, :2]
y = iris.target

# we create an instance of SVM and fit out data. We do not scale our
# data since we want to plot the support vectors
C = 1.0  # SVM regularization parameter
models = (svm.SVC(kernel='linear', C=C),
          svm.LinearSVC(C=C),
          svm.SVC(kernel='rbf', gamma=0.7, C=C),
          svm.SVC(kernel='poly', degree=3, C=C))
models = (clf.fit(X, y) for clf in models)

# title for the plots
titles = ('SVC with linear kernel',
          'LinearSVC (linear kernel)',
          'SVC with RBF kernel',
          'SVC with polynomial (degree 3) kernel')

# Set-up 2x2 grid for plotting.
fig, sub = plt.subplots(2, 2)
plt.subplots_adjust(wspace=0.4, hspace=0.4)

X0, X1 = X[:, 0], X[:, 1]
xx, yy = make_meshgrid(X0, X1)

for clf, title, ax in zip(models, titles, sub.flatten()):
    #画出预测结果
    plot_contours(ax, clf, xx, yy,
                  cmap=plt.cm.coolwarm, alpha=0.8)
    #把原始点画上去
    ax.scatter(X0, X1, c=y, cmap=plt.cm.coolwarm, s=20, edgecolors='k')
    ax.set_xlim(xx.min(), xx.max())
    ax.set_ylim(yy.min(), yy.max())
    ax.set_xlabel('Sepal length')
    ax.set_ylabel('Sepal width')
    ax.set_xticks(())
    ax.set_yticks(())
    ax.set_title(title)

plt.show()
