Ubuntu下detectron2 的安装使用笔记
安装使用了一波detectron2 ,感觉没有mmdetection好用…但是还是记一下安装和使用的过程
安装
确保你的python版本是3.6以上
查看你的机器的cuda版本(如果没安装的话安装),通过
nvcc --version
命令查看,然后去安装或者更新相应版本的pytorch。
比如我的cuda版本是10.0的,就执行以下命令安装或者更新对应cuda版本的pytorch,不然会报错
pip3 install torch==1.4.0+cu100 torchvision==0.5.0+cu100 -f https://download.pytorch.org/whl/torch_stable.html
然后继续安装
pip3 install opencv-python
pip3 install cython pyyaml==5.1
pip3 install -U 'git+https://github.com/cocodataset/cocoapi.git#subdirectory=PythonAPI'
然后clone
git clone https://github.com/zhanghang1989/detectron2-ResNeSt.git
编译
cd detectron2 && python3 -m pip install -e .
成功!
运行
# You may need to restart your runtime prior to this, to let your installation take effect
# Some basic setup:
# Setup detectron2 logger
import detectron2
from detectron2.utils.logger import setup_logger
setup_logger()

# import some common libraries
import numpy as np
import cv2
import os
import random
from matplotlib import pyplot as plt

# import some common detectron2 utilities
from detectron2 import model_zoo
from detectron2.engine import DefaultPredictor
from detectron2.config import get_cfg
from detectron2.utils.visualizer import Visualizer
from detectron2.data import MetadataCatalog
from detectron2.data import DatasetCatalog

#
from detectron2.data.datasets import register_coco_instances
先要注册你的COCO格式的数据集,比如我有一份训练集train.json和验证集val.json,我在detectron2里注册,并分别命名为mobile_train和mobile_val。
register_coco_instances("mobile_train", {}, "train.json", "/workspace/nas-data/train/")
register_coco_instances("mobile_val", {}, "/workspace/nas-data/fuck_china_moble/mnt/3/fuck_chinMobile_val.json", "/workspace/nas-data/train/")
说明一下
"/workspace/nas-data/train/"
是我的图像所在的绝对路径,比如我的annotations里面的images里面的是这样的
 {
      "file_name": "train_r1062.jpeg",
      "height": 216,
      "width": 235,
      "id": 1048
    },
那么
/workspace/nas-data/train/train_r1062.jpeg
这个就是我的这个图像的路径
可以看一下你的数据集有没有正确注册,通过下面这个代码检查一下
dataset_dicts = DatasetCatalog.get("mobile_val")
balloon_metadata = MetadataCatalog.get("mobile_val")
for d in random.sample(dataset_dicts, 1):
    img = cv2.imread(d["file_name"])
    visualizer = Visualizer(img[:, :, ::-1], metadata=balloon_metadata, scale=0.5)
    vis = visualizer.draw_dataset_dict(d)
    plt.figure(figsize=(12,12))
    plt.imshow(vis.get_image()[:, :, ::-1])
就会输出
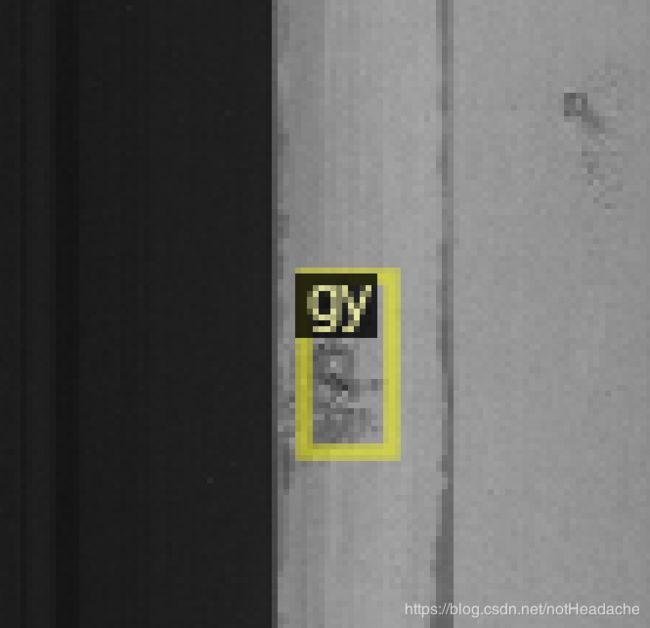
ok我们开始训练
from detectron2.engine import DefaultTrainer
from detectron2.config import get_cfg
import os

cfg = get_cfg()
#配置文件路径
cfg.merge_from_file(
    "/root/detectron2-ResNeSt/configs/COCO-Detection/faster_cascade_rcnn_ResNeSt_200_FPN_syncbn_range-scale_1x.yaml"
)
cfg.DATASETS.TRAIN = ("mobile_train",)
cfg.DATASETS.TEST = ()
cfg.DATALOADER.NUM_WORKERS = 2
#预训练文件
cfg.MODEL.WEIGHTS = "/root/detectron2-ResNeSt/faster_cascade_rcnn_ResNeSt_200_FPN_syncbn_range-scale_1x-1be2a87e.pth"  # initialize from model zoo
cfg.SOLVER.IMS_PER_BATCH = 4
cfg.SOLVER.BASE_LR = 0.00125 * 1 * 4
cfg.SOLVER.MAX_ITER = (int(34*8*89*2/4))
cfg.SOLVER.STEPS = (int(24*8*89*2/4), int(33*8*89*2/4))
cfg.MODEL.ROI_HEADS.BATCH_SIZE_PER_IMAGE = (
    512
)  # faster, and good enough for this toy dataset
cfg.MODEL.ROI_HEADS.NUM_CLASSES = 3
#输出权重目录
cfg.OUTPUT_DIR = "/root/detectron2-ResNeSt/output/baseline"

os.makedirs(cfg.OUTPUT_DIR, exist_ok=True)
trainer = DefaultTrainer(cfg)
trainer.resume_or_load(resume=False)
trainer.train()
训练完测试
cfg.MODEL.WEIGHTS = os.path.join(cfg.OUTPUT_DIR, "model_final.pth")
cfg.MODEL.ROI_HEADS.SCORE_THRESH_TEST = 0.5   # set the testing threshold for this model
cfg.DATASETS.TEST = ("mobile_val", )
predictor = DefaultPredictor(cfg)

from detectron2.utils.visualizer import ColorMode

for d in random.sample(dataset_dicts, 1):
    im = cv2.imread(d["file_name"])
    outputs = predictor(im)
    v = Visualizer(im[:, :, ::-1],
                   metadata=balloon_metadata,
                   scale=0.8,
#                    instance_mode=ColorMode.IMAGE_BW   # remove the colors of unsegmented pixels
    )
    v = v.draw_instance_predictions(outputs["instances"].to("cpu"))
    plt.imshow(v.get_image()[:, :, ::-1])
看mAP
from detectron2.evaluation import COCOEvaluator, inference_on_dataset
from detectron2.data import build_detection_test_loader

evaluator = COCOEvaluator("mobile_val", cfg, False, output_dir="./output/")
val_loader = build_detection_test_loader(cfg, "mobile_val")
inference_on_dataset(trainer.model, val_loader, evaluator)
DONE (t=0.05s).
Average Precision (AP) @[ IoU=0.50:0.95 | area= all | maxDets=100 ] = 0.334
Average Precision (AP) @[ IoU=0.50 | area= all | maxDets=100 ] = 0.655
Average Precision (AP) @[ IoU=0.75 | area= all | maxDets=100 ] = 0.285
Average Precision (AP) @[ IoU=0.50:0.95 | area= small | maxDets=100 ] = 0.305
Average Precision (AP) @[ IoU=0.50:0.95 | area=medium | maxDets=100 ] = 0.469
Average Precision (AP) @[ IoU=0.50:0.95 | area= large | maxDets=100 ] = 0.471
Average Recall (AR) @[ IoU=0.50:0.95 | area= all | maxDets= 1 ] = 0.250
Average Recall (AR) @[ IoU=0.50:0.95 | area= all | maxDets= 10 ] = 0.462
Average Recall (AR) @[ IoU=0.50:0.95 | area= all | maxDets=100 ] = 0.463
Average Recall (AR) @[ IoU=0.50:0.95 | area= small | maxDets=100 ] = 0.412
Average Recall (AR) @[ IoU=0.50:0.95 | area=medium | maxDets=100 ] = 0.551
Average Recall (AR) @[ IoU=0.50:0.95 | area= large | maxDets=100 ] = 0.490