从零开始java安全权限框架篇(一):spring security配置登录登出的配置
目录
一:安全权限框架的选取
二:功能
三:登录登出
四:代码注释
1.将登陆交由Spring security完成
2.前台明文密码加密,与数据库比对
3.关键配置
4.自定义用户异常
5.ajax请求处理陈宫和失败的
6.MD5加密和对象转成json就不用我说了吧
五:记住我功能的原理和实现
1.原理
2.代码
六:验证码功能的实现
七:三次错误密码锁定账户
一:安全权限框架的选取
目前主流的安全权限框架有:shiro和security以及自定义权限框架。本人在之前都是使用的shiro框架,在一定程度上shiro框架具有简单而又通用的优势。但是这里我为什么启用security框架呢?
首先从名字可以看出security是spring 家族的一员,具有天然无缝整合spring的优势。在之前本人接触到了springcloud-aouth2中使用了security来控制权限,因此这里我们本章就基于这个security框架。
这里我们将从以下几个方面来解决spring security涉及到的内容
(1)登录登出配置
(2)权限的管理
(3)记住我的功能
(4)登录超时
...
二:功能
spring security中对于登录登出功能的功能包含:
(1)登录交由security来检测
(2)权限配置交由sercurity来配置
(3)存储用户登录的缓存(即在spring容器的上下文中都可以在这里取得当前用户的信息)
三:登录登出
这里主要是3个配置以及主要的作用如下图所示

四:代码注释
1.将登陆交由Spring security完成
这里基本上没有什么的,结合上图就能看懂
package com.config.Seurity.service;

import java.util.ArrayList;
import java.util.Collection;
import java.util.List;

import org.apache.tomcat.util.security.MD5Encoder;
import org.springframework.beans.factory.annotation.Autowired;
import org.springframework.security.core.GrantedAuthority;
import org.springframework.security.core.authority.SimpleGrantedAuthority;
import org.springframework.security.core.userdetails.UserDetails;
import org.springframework.security.core.userdetails.UserDetailsService;
import org.springframework.security.core.userdetails.UsernameNotFoundException;
import org.springframework.stereotype.Service;

import com.moudle.user.model.Role;
import com.moudle.user.model.User;
import com.moudle.user.model.UserRole;
import com.moudle.user.service.UserRoleService;
import com.moudle.user.service.UserService;

import commons.utils.Md5Utils;

/*
 * 自定义用户登录授权service
 */
@Service("userDetailsService")
public class LoginService implements  UserDetailsService{

	@Autowired
	private UserService  userService;

	@Autowired
	private UserRoleService  userroleSerivce;

	@Override
	public UserDetails loadUserByUsername(String username) throws UsernameNotFoundException {

		List  userList = userService.login(username, null);

		if (userList == null || userList.isEmpty()) {
			throw new UsernameNotFoundException("该用户不存在!");
		}

		//添加权限
		UserRole  userRole=new UserRole();
		userRole.setUserId(userList.get(0).getFkUserId());
		List roleList=userroleSerivce.findUserRoleList(userRole).get(0).getRoleList();

		 Collection authorities = new ArrayList<>();
		for(Role role:roleList) {
			authorities.add(new SimpleGrantedAuthority(role.getRoleCode()));
		}

		return new org.springframework.security.core.userdetails.User(userList.get(0).getUserName(),
				userList.get(0).getPassword(), authorities);
	}

}
2.前台明文密码加密,与数据库比对
这里也没什么好说的,就是注意前台输入的面加密方式与存入数据库密码的方式,一致
package com.config.Seurity.pwdEnder;


import org.springframework.security.crypto.password.PasswordEncoder;

import commons.utils.Md5Utils;
import lombok.extern.slf4j.Slf4j;

/**
 * 自定义加密,在这里给前台密码加密,并且与数据库比对
 * ClassName: MyPasswordEncoder
 * Function: 一句话描述功能.
 * auth: monxz
 * date: 2019年8月28日 下午5:34:32
 *
 *
 */


@Slf4j
public class MyPasswordEncoder  implements PasswordEncoder {
    @Override
    public String encode(CharSequence charSequence) {

        return Md5Utils.hash(charSequence.toString());
    }

    @Override
    public boolean matches(CharSequence charSequence, String s) {
    	log.info("前端铭文密码:"+charSequence.toString()+",数据库密码:"+s);
        return s.equals(Md5Utils.hash(charSequence.toString()));
    }
}
3.关键配置
注意:我这里登录方法是以ajax提交的,如果用form表单提交的释放form表单登录注释,ajax登录添加注释即可
package com.config.Seurity.config;

import org.springframework.beans.factory.annotation.Autowired;
import org.springframework.context.annotation.Configuration;
import org.springframework.security.config.annotation.authentication.builders.AuthenticationManagerBuilder;
import org.springframework.security.config.annotation.method.configuration.EnableGlobalMethodSecurity;
import org.springframework.security.config.annotation.web.builders.HttpSecurity;
import org.springframework.security.config.annotation.web.builders.WebSecurity;
import org.springframework.security.config.annotation.web.configuration.EnableWebSecurity;
import org.springframework.security.config.annotation.web.configuration.WebSecurityConfigurerAdapter;


import com.config.Seurity.hander.AjaxSuccessHander;
import com.config.Seurity.hander.AjaxfailHander;
import com.config.Seurity.pwdEnder.MyPasswordEncoder;
import com.config.Seurity.service.LoginService;


/**
 * spring security的配置
 * ClassName: SecurityConfig
 * Function: 一句话描述功能.
 * auth: monxz
 * date: 2019年8月28日 上午10:04:50
 *
 *
 */
@Configuration
@EnableWebSecurity
@EnableGlobalMethodSecurity(prePostEnabled = true)
public class SecurityConfig extends WebSecurityConfigurerAdapter{

		@Autowired
		private LoginService loginService;


		//登录执行的逻辑
		 @Autowired
		 public void configureGlobalSecurity(AuthenticationManagerBuilder auth) throws Exception {
		      auth.userDetailsService(loginService).passwordEncoder(new MyPasswordEncoder());

		  }


		//配置信息
		 @Override
		    protected void configure(HttpSecurity http) throws Exception {
			 	String[]  allowedUrl= {"/api/**"};

			 	//配置访问权限
		        http.authorizeRequests()
		        		//允许匿名访问(如api)
		                .antMatchers(allowedUrl).permitAll()
		                //其他地址的访问均需验证权限
		                .anyRequest().authenticated();


		         //配置登录以及成功失败的处理方式
		         http.formLogin()
		                //指定登录页是"/view/login"
		                .loginPage("/view/login").permitAll()    //


		                //ajax方式登录
		                .successHandler(new AjaxSuccessHander())
		                .failureHandler(new AjaxfailHander())
		                .loginProcessingUrl("/login")
		                .usernameParameter("username")  //ajax请求必须的
		                .passwordParameter("password");

		                //form表单请求登录
//		                .defaultSuccessUrl("/view/index")       //登录成功后默认跳转到路径"


		         //注销 ,直接访问   ip:port/logout
		         http .logout()
		                .logoutSuccessUrl("/view/login")          //退出登录后跳转到登录主界面"
		                .permitAll();


		                //跨域以及其他的一些配置
		         http .csrf().disable()   // 关闭CSRF跨域
		                .headers().frameOptions().sameOrigin();  // 允许加载frame子菜单


		    }

		 //静态资源
		 @Override
		  public void configure(WebSecurity web) throws Exception {
			 	String[] allowedRes= {"/static/**","/css/**","/js/**","/my/**","/img/**","/ajax/**","favicon.ico"};

		        // 设置拦截忽略文件夹,可以对静态资源放行
		        web.ignoring().antMatchers(allowedRes);
		   }

}
4.自定义用户异常
package com.config.Seurity.exception;

/**
 * 用户名不存在
 * ClassName: UsernameNotFoundException
 * Function: 一句话描述功能.
 * auth: monxz
 * date: 2019年8月28日 上午10:17:02
 *
 *
 */

public class UserException extends RuntimeException{
	private String retCd ;  //异常对应的返回码
	private String msgDes;  //异常对应的描述信息

	public UserException() {
		super();
	}

	public UserException(String message) {
		super(message);
		msgDes = message;
	}

	public UserException(String retCd, String msgDes) {
		super();
		this.retCd = retCd;
		this.msgDes = msgDes;
	}

	public String getRetCd() {
		return retCd;
	}

	public String getMsgDes() {
		return msgDes;
	}


}
5.ajax请求处理陈宫和失败的
package com.config.Seurity.hander;

import java.io.IOException;
import java.io.PrintWriter;
import java.util.HashMap;
import java.util.Map;

import javax.servlet.ServletException;
import javax.servlet.http.HttpServletRequest;
import javax.servlet.http.HttpServletResponse;


import org.springframework.security.core.AuthenticationException;
import org.springframework.security.web.authentication.SimpleUrlAuthenticationFailureHandler;


import commons.json.JSON;

import lombok.extern.slf4j.Slf4j;


/**
 * 登录失败的ajax
 * ClassName: AjaxSuccessHander
 * Function: 一句话描述功能.
 * auth: monxz
 * date: 2019年8月28日 下午3:58:29
 *
 *
 */
@Slf4j
public class AjaxfailHander extends SimpleUrlAuthenticationFailureHandler{
	@Override
    public void onAuthenticationFailure(HttpServletRequest request, HttpServletResponse response, AuthenticationException exception) throws IOException, ServletException {
        String message = "账号或密码输入错误,请重新输入!";

        response.setCharacterEncoding("utf-8");
        response.setContentType("application/json; charset=utf-8");
        PrintWriter writer = response.getWriter();
        Map map=new HashMap();
        map.put("success", false);
        map.put("message", message);
        writer.write(JSON.mapJson(map));
    }
}
package com.config.Seurity.hander;

import java.io.IOException;
import java.io.PrintWriter;
import java.util.HashMap;
import java.util.Map;

import javax.servlet.ServletException;
import javax.servlet.http.HttpServletRequest;
import javax.servlet.http.HttpServletResponse;

import org.apache.tomcat.util.http.ResponseUtil;
import org.springframework.security.core.Authentication;
import org.springframework.security.web.authentication.SimpleUrlAuthenticationSuccessHandler;

import com.alibaba.druid.support.json.JSONUtils;

import commons.json.JSON;
import commons.json.JSONObject;
import commons.result.DataResult;
import lombok.extern.slf4j.Slf4j;


/**
 * 登录成功的ajax
 * ClassName: AjaxSuccessHander
 * Function: 一句话描述功能.
 * auth: monxz
 * date: 2019年8月28日 下午3:58:29
 *
 *
 */
@Slf4j

public class AjaxSuccessHander extends SimpleUrlAuthenticationSuccessHandler{
	 @Override
	    public void onAuthenticationSuccess(HttpServletRequest request, HttpServletResponse response, Authentication authentication) throws IOException, ServletException {

		 response.setCharacterEncoding("utf-8");
	        response.setContentType("application/json; charset=utf-8");
	        PrintWriter writer = response.getWriter();
	        Map  map=new HashMap();
	        map.put("success", true);
	        writer.write(JSON.mapJson(map));
	    }
}
6.MD5加密和对象转成json就不用我说了吧
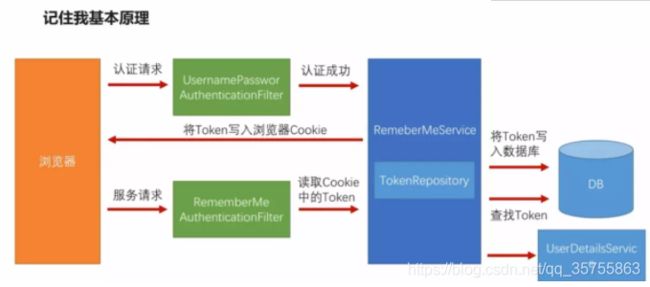
五:记住我功能的原理和实现
1.原理
这个原理图是从网上百度的。。。但是很容易看明白
2.代码
(1)前端页面
注意点就2个![]()
(2)SercurityConfig中配置
加入数据库的应用
@Autowired
		private DataSource dataSource;
添加到数据库㕜
//记住我功能的Token存储在数据库中
		@Bean
	    public PersistentTokenRepository persistentTokenRepository() {
	        JdbcTokenRepositoryImpl jdbcTokenRepository = new JdbcTokenRepositoryImpl();
	        // 配置数据源
	        jdbcTokenRepository.setDataSource(dataSource);
	        // 第一次启动的时候自动建表(可以不用这句话,自己手动建表,源码中有语句的)
	         jdbcTokenRepository.setCreateTableOnStartup(true);
	        return jdbcTokenRepository;
	    }
配置信息中配置
//配置信息
		 @Override
		    protected void configure(HttpSecurity http) throws Exception {
			 	String[]  allowedUrl= {"/api/**"};

			 	//配置访问权限
		        http.authorizeRequests()
		        		//允许匿名访问(如api)
		                .antMatchers(allowedUrl).permitAll()
		                //其他地址的访问均需验证权限
		                .anyRequest().authenticated();


		         //配置登录以及成功失败的处理方式
		         http.formLogin()
		                //指定登录页是"/view/login"
		                .loginPage("/view/login").permitAll()    //


		                //ajax方式登录
		                .successHandler(new AjaxSuccessHander())
		                .failureHandler(new AjaxfailHander())
		                .loginProcessingUrl("/login")
		                .usernameParameter("username")  //ajax请求必须的
		                .passwordParameter("password");

		                //form表单登录
//		                .defaultSuccessUrl("/view/index")       //登录成功后默认跳转到路径"


		         //注销 ,直接访问   ip:port/logout
		         http .logout()
		                .logoutSuccessUrl("/view/login")          //退出登录后跳转到登录主界面"
		                .deleteCookies()						//有记住我功能,删除cookie
		                .permitAll();


		         //记住我
		         http.rememberMe()
		          		.tokenRepository(persistentTokenRepository())
		          		.tokenValiditySeconds(60);

		                //跨域以及其他的一些配置
		         http .csrf().disable()   // 关闭CSRF跨域
		                .headers().frameOptions().sameOrigin();  // 允许加载frame子菜单


		    }
注意:当你的数据库存在persistent_logins表,请注释掉 第一次启动自动建表下的那句话
说明=====》这里我们目前只是实现功能,在后面我们会将这里的tokne集中存放在redis中的
六:验证码功能的实现
本来是想做一个基于spring security的验证码功能的,但是考虑到那种验证码功能是真的恶心,这里直接使用前段js插件sliderImgPuzzle.js实现图片拖动时验证,关于后端的验证,会在后面的网关模块做修改。这里直接贴出我下载的地址吧
https://github.com/chen9091/jq_slideImage
七:三次错误密码锁定账户
这里先说明一下思路吧,使用缓存,设置失效时间(即为锁定时间),因为考虑到上面的一些问题,我会在下下张整合到redis中一起实现。