Linux 启动引导与修复
目录
系统运行级别
运行级别
系统默认运行级别
/etc/rc.d/rc.local 文件
启动引导程序(Boot Loader)
/boot/grub 目录
Grub 的配置文件
grub 的配置文件
grub 加密
grub 菜单整体加密
系统修复模式
单用户模式
单用户模式常见的错误修复
光盘修复模式
光盘修复模式常见的错误修复
系统运行级别
运行级别
- Linux 默认有 7 个运行级别
| 运行级别 | 含 义 |
| 0 | 关机 |
| 1 | 单用户模式,可以想象为 windows 的安全模式,主要用于系统修复 |
| 2 | 不完全的命令行模式,不含 NFS 服务 |
| 3 | 完全的命令行模式,就是标准字符界面 |
| 4 | 系统保留 |
| 5 | 图形模式 |
| 6 | 重启动 |
- 在 Linux 系统中可以使用 runlevel 命令来查看系统的运行级别,命令如下:
[root@localhost ~]# runlevel
N 3
#N 代表进入这个级别前,上一个是哪个级别。3 代表当前级别- 在这个命令的结果中,“N 3”中的 N 代表进入这个级别前,上一个级别是什么,3 代表当前级别。“N”就是 None 的意思,也就是说系统是开机直接进入的 3 运行级别,没有上一个运行级别。那如果是从图形界面切换到字符界面的话,再查看运行级别,就应该是这样的:
[root@localhost ~]# runlevel
5 3
#代表是由 5 级别进入的 3 级别- 那么可以手工改变当前的运行级别吗?当然可以了,只要使用 init 命令(注意着不是 init 进程)即可,命令如下:
[root@localhost ~]# init 5
#进入图形界面,当然要已经安装了图形界面才可以
[root@localhost ~]# init 0
#关机
[root@localhost ~]# init 6
#重启动- 不过要注意使用 init 命令关机和重启动,并不是太安全,容易造成数据丢失。所以推荐使用 shutdown 命令进行关机和重启。
系统默认运行级别
- 知道了运行级别的作用,我们回到系统启动过程中来。/etc/init/rcS.conf 配置文件调用/etc/inittab 配置文件的目的就是为了确定系统的默认运行级别,也就是系统一开机后会进入那个运行级别。这个文件的内容如下:
[root@localhost ~]# vim /etc/inittab
# inittab is only used by upstart for the default runlevel.
#
# ADDING OTHER CONFIGURATION HERE WILL HAVE NO EFFECT ON YOUR SYSTEM.
#
# System initialization is started by /etc/init/rcS.conf
#系统会先调用/etc/init/rcS.conf
# Individual runlevels are started by /etc/init/rc.conf
#再调用/etc/init/rc.conf,在不同的运行级别启动不同的服务
# Ctrl-Alt-Delete is handled by /etc/init/control-alt-delete.conf
#通过这个配置文件判断 Ctrl+Alt+Delete 热启动键是否可用
# Terminal gettys are handled by /etc/init/tty.conf and /etc/init/serial.conf,
# with configuration in /etc/sysconfig/init.
#判断系统可以启动的本地终端数量,及终端的基本设置(如颜色)
# For information on how to write upstart event handlers, or how
# upstart works, see init(5), init(8), and initctl(8).
#
# Default runlevel. The runlevels used are:
# 0 - halt (Do NOT set initdefault to this)
# 1 - Single user mode
# 2 - Multiuser, without NFS (The same as 3, if you do not have networking)
# 3 - Full multiuser mode
# 4 - unused
# 5 - X11
# 6 - reboot (Do NOT set initdefault to this)
#很眼熟吧,就是刚刚的 0-6 的运行级别的说明
id:3:initdefault:
#这就是系统的默认运行级别,也就是系统开机后直接进入哪个运行级别- 注意这里的默认运行级别只能写 3 或 5,其他的级别要不就是关机重启,要不就是保留或单用户,都不能作为系统默认运行级别的。
/etc/rc.d/rc.local 文件
- 这个配置文件会在用户登陆之前读取,这个文件中写入什么命令,在每次系统启动时都会执行一次。也就是说,如果有任何需要在系统启动就运行的工作,只需要写入/etc/rc.d/rc.local 这个配置文件即可。这个文件内容如下:
[root@localhost ~]# ll /etc/rc.local
lrwxrwxrwx. 1 root root 13 4 月 10 21:46 /etc/rc.local -> rc.d/rc.local
#有个链接文件,两个文件修改哪一个都可以
[root@localhost ~]# vi /etc/rc.d/rc.local
#!/bin/sh
#
# This script will be executed *after* all the other init scripts.
# You can put your own initialization stuff in here if you don't
# want to do the full Sys V style init stuff.
touch /var/lock/subsys/local
#默认会 touch 这个文件,每次系统启动时 touch 这个文件,这个文件的修改时间就是系统的启动时间了。
/etc/rc.d/init.d/httpd start
#如果写入 RPM 包安装的 apache 的启动命令,apache 服务就会开机时自动启动了。
启动引导程序(Boot Loader)
- 早期的 Lilo 引导程序已经不是很常见了,grub 相比来讲有很多优势,主要有:
- 支持更多的文件系统;
- grub 的主程序可以直接在文件系统中查找内核文件;
- 在系统启动时,可以利用 grub 的交互界面编辑和修改启动选项;
- 可以动态的修改 grub 的配置文件,这样在修改配置文件之后不需要重新安装 grub,而只需要重新启动就可以生效了。
/boot/grub 目录
- grub 的作用有以下几个:
- 第一是加载操作系统的内核;
- 第二是拥有一个可以让用户选择的菜单,来选择到底启动哪个系统;
- 第三还可以调用其他的启动引导程序,来实现多系统引导。
- grub 的配置文件主要是放置在/boot/grub/目录中的,这个目录下到底有哪些文件:
[root@localhost ~]# cd /boot/grub/
[root@localhost grub]# ll -h
总用量 274K
-rw-r--r--. 1 root root 63 4 月 10 21:49 device.map
#grub 中硬盘的设备文件名与系统的设备文件名的对应文件
-rw-r--r--. 1 root root 14K 4 月 10 21:49 e2fs_stage1_5
#ext2/ext3 文件系统的 stage 1.5 文件
-rw-r--r--. 1 root root 13K 4 月 10 21:49 fat_stage1_5
#FAT 文件系统的 stage 1.5 文件
-rw-r--r--. 1 root root 12K 4 月 10 21:49 ffs_stage1_5
#FFS 文件系统的 stage 1.5 文件
-rw-------. 1 root root 737 4 月 10 21:49 grub.conf
#grub 的配置文件
-rw-r--r--. 1 root root 12K 4 月 10 21:49 iso9660_stage1_5
#iso9660 文件系统的 Stage 1.5 文件
-rw-r--r--. 1 root root 13K 4 月 10 21:49 jfs_stage1_5
#jfs 文件系统的 Stage 1.5 文件
lrwxrwxrwx. 1 root root 11 4 月 10 21:49 menu.lst -> ./grub.conf
#grub 的配置文件。和 grub.conf 是软链接,所以两个文件修改哪个都可以
-rw-r--r--. 1 root root 12K 4 月 10 21:49 minix_stage1_5
#minix 文件系统的 Stage 1.5 文件
-rw-r--r--. 1 root root 15K 4 月 10 21:49 reiserfs_stage1_5
#reiserfs 文件系统的 Stage 1.5 文件
-rw-r--r--. 1 root root 1.4K 11 月 15 2010 splash.xpm.gz
#系统启动时,grub 程序的背景图像
-rw-r--r--. 1 root root 512 4 月 10 21:49 stage1
#安装到引导扇区中的 stage1 的备份文件
-rw-r--r--. 1 root root 124K 4 月 10 21:49 stage2
#stage2 的备份文件
-rw-r--r--. 1 root root 12K 4 月 10 21:49 ufs2_stage1_5
#UFS 文件系统的 Stage 1.5 文件
-rw-r--r--. 1 root root 12K 4 月 10 21:49 vstafs_stage1_5
#vstafs 文件系统的 Stage 1.5 文件
-rw-r--r--. 1 root root 14K 4 月 10 21:49 xfs_stage1_5
#xfs 文件系统的 Stage 1.5 文件- 其实这个目录中主要就是 grub 的配置文件和各种文件系统的 stage1.5 文件。
- 不过 grub 的配置文件有两个/boot/grub/grub.conf 和/boot/grub/menu.lst,这两个配置文件是软链接,所以修改哪一个都可以,更习惯 grub.conf 这个文件。
Grub 的配置文件
- 在 grub 中分区的表示方法
- 第一块 SCSI 硬盘
- 第一个主分区 /dev/sda1(分区)(Linux 中设备文件名) hd(0,0)(Grub 中设备文件名)
- 第二个主分区 /dev/sda2 hd(0,1)
- 扩展分区 /dev/sda3 hd(0,2)
- 第一个逻辑分区 /dev/sda5 hd(0,4)
- 第二块 SCSI 硬盘
- 第一个主分区 /dev/sdb1 hd(1,0)
- 第二个主分区 /dev/sdb2 hd(1,1)
- 扩展分区 /dev/sdb3 hd(1,2)
- 第一个逻辑 /dev/sdb5 hd(1,4)
- 第一块 SCSI 硬盘
grub 的配置文件
[root@localhost ~]# vi /boot/grub/grub.conf
default=0
timeout=5
splashimage=(hd0,0)/grub/splash.xpm.gz
hiddenmenu
#以上为 grub 整体设置
title CentOS (2.6.32-279.el6.i686)
 root (hd0,0)
 kernel /vmlinuz-2.6.32-279.el6.i686 ro
root=UUID=b9a7a1a8-767f-4a87-8a2b-a535edb362c9 rd_NO_LUKS KEYBOARDTYPE=pc KEYTABLE=us
rd_NO_MD crashkernel=auto LANG=zh_CN.UTF-8 rd_NO_LVM rd_NO_DM rhgb quiet
#以上 4 行为一行,只是内容过多的自动换行
initrd /initramfs-2.6.32-279.el6.i686.img- default=0
- 默认启动第一个系统。也就是如果在等待时间结束后,用户没有选择进入哪一个系统,那么系统会默认进入第一个系统。如果有多系统并存,那么每个系统都会有自己的 title 字段,如果想要默认进入第二个系统,这里就可以设为 default=1。
- timeout=5
- 等待时间,默认是 5 秒。也就是进入系统时,如果 5 秒内用户没有按下任意键,那么系统会进入 default 字段定义的系统。当然可以手工修改这个等待时间,如果 timeout=0 则不会等待直接进入系统,timeout=-1 则是一直等待用户输入,而不会自动进入系统。
- splashimage=(hd0,0)/grub/splash.xpm.gz
- 这里是指定 grub 启动时的背景图像文件的保存位置的。记得 CentOS 6.x 启动时后台的蓝色图像吧,就是这个文件的作用哦。不过这个文件具体在哪里啊?已经说过了 hd(0,0)代表第一个硬盘的第一个分区,而超哥的系统安装时/boot 分区就是第一个分区,所以这个背景图像的实际位置就是/boot/grub/splash.xpm.gz。
- hiddenmenu
- 隐藏菜单。启动时默认只能看到读秒,而不能看到菜单,如果想要看到菜单需要按任意键。如果注释了这句话,那么启动时就能直接看到菜单了。
- 以上就是 grub 的整体设置,下面介绍 CentOS 系统的启动设置:
- title CentOS (2.6.32-279.el6.i686)
- title 就是标题的意思,也就是说在 title 后面写入的是什么,那么系统启动时在 grub 的启动菜单中看到的就是什么。
- root (hd0,0)
- 是指启动程序的保存分区。这里要注意啊,这个 root 并不是管理员哦。在我的系统中,/boot分区是独立划分的,而且设备文件名为/dev/sda1,所以在 grub 中,就被描述为 hd(0,0)。
- kernel /vmlinuz-2.6.32-279.el6.i686 ro root=UUID=b9a7a1a8-767f-4a87-8a2b-a535edb362c9 rd_NO_LUKS KEYBOARDTYPE=pc KEYTABLE=us rd_NO_MD crashkernel=auto LANG=zh_CN.UTF-8 rd_NO_LVM rd_NO_DM rhgb quiet
- /vmlinuz-2.6.32-279.el6.i686:指定了内核文件的位置,这里的/是指/boot 分区。
- ro:启动时以只读方式挂载根文件系统,这是为了不让启动过程影响磁盘内的文件系统。
- root=UUID=b9a7a1a8-767f-4a87-8a2b-a535edb362c9:指定根文件系统的所在位置。这里和以前的 Linux 版本不太一样了,不再是通过分区的设备文件名或卷标号来指定,而是通过分区的 UUID 来进行指定。那么如何查询分区的 UUID 号呢?方法有很多种,最简单的办法就是查询/etc/fstab 文件,命令如下:
[root@localhost ~]# cat /etc/fstab | grep "/ "
UUID=b9a7a1a8-767f-4a87-8a2b-a535edb362c9 / ext4 defaults 1 1- 可以看到“/”分区的 UUID 和 kernel 行中的 UUID 是匹配的。注意一下,grep 后的“/ ”,在/后是有空格的。
- rd_NO_LUKS:禁用 LUKS,LUKS 用于给磁盘加密。
- rd_NO_MD:禁用软 RAID。
- rd_NO_DM:禁用硬 RAID。
- rd_NO_LVM:禁用 LVM。以上禁用都只是在启动过程中禁用,是为了加速系统启动的。
- KEYBOARDTYPE=pc KEYTABLE=us:键盘类型。
- crashkernel=auto:自动为 crashkernel 预留内存。
- LANG=zh_CN.UTF-8:语言环境
- rhgb:(redhat graphics boot)用图片来代替启动过程中的文字信息。启动完成之后可以使用 dmesg 命令来查看这些文字信息。
- quiet:隐藏启动信息,只显示重要信息。
- initrd /initramfs-2.6.32-279.el6.i686.img:指定了 initramfs 内存文件系统镜像文件的所在位置。
grub 加密
[root@localhost ~]# grub-md5-crypt
Password:
Retype password:
#输入两次密码
$1$Y84LB1$8tMY2PibScmuOCc8z8U35/
#生成加密密码字串- 这样就可以生成加密密码字串,这个字串是采用 md5 加密的,就是你的密码经 md5 编码之后的。我们会利用这个加密密码字串来加密 grub 配置文件。
grub 菜单整体加密
- 如果只是加密单个启动菜单,grub 的编辑模式是不能锁定的,还是可以按“e”键进入编辑模式。而且进入编辑模式后,是可以删除 password 字段的,再按“b”(boot 启动)键就可以不用密码直接进入系统。这时就需要给 grub 菜单整体加密了,整体加密后,如果想进入 grub 编辑界面必须输入正确的密码。加密方法其实只是把 password 字段换个位置而已,具体方法如下:
[root@localhost ~]# vi /boot/grub/grub.conf
default=0
timeout=5
password --md5 $1$Y84LB1$8tMY2PibScmuOCc8z8U35/
#password 选项放在整体设置处。
splashimage=(hd0,0)/grub/splash.xpm.gz- 但是这样加密,启动 CentOS 时,是不需要密码就能正常启动的。那我如果既需要 grub 的整体加密,又需要系统启动时输入正确的密码。那应该怎么做呢?很简单,方法如下:
default=0
timeout=5
password --md5 $1$Y84LB1$8tMY2PibScmuOCc8z8U35/
splashimage=(hd0,0)/grub/splash.xpm.gz
hiddenmenu
title CentOS (2.6.32-279.el6.i686)
lock
#在 title 字段,加入 lock。代表锁死,如果不输入正确的 grub 密码也不能启动- 不要加lock
系统修复模式
单用户模式
- 我们先来看看单用户模式是怎么使用的吧。Linux 的单用户模式有些类似 Windows 的安全模式,只启动最少的程序用于系统修复。在单用户模式(运行级别为 1)中,Linux 引导进入根 shell,网络被禁用,只有少数进程运行。单用户模式可以用来修改文件系统损坏、还原配置文件、移动用户数据等。
- 单用户模式操作
- 输入空格,再输入1
- 按b键
- 输入新密码,然后reboot重启
单用户模式常见的错误修复
- 我们已经进入单用户模式了,那么我们在单用户模式中主要可以修复哪些系统错误呢?举几个例子。
- 遗忘 root 密码
- 这是管理员最容易犯的错误,那么应该如何修复呢?当然是使用单用户模式进行修复了,进入单用户模式最大的特点就是不需要输入用户名和密码就能登录。既然已经登录了单用户模式,那么直接给 root 用户设定新密码即可。命令如下:
[root@localhost /]# passwd root- 修改系统默认运行级别
- 如果我们把系统的默认运行级别修改错误,比如改为了 0 或 6,系统就不能正常启动了。这时也可以利用单用户模式进行修复,只要直接修改默认运行级别配置文件/etc/inittab,把系统默认运行级别修改回来即可。命令如下:
[root@localhost /]# vi /etc/inittab
id:3:initdefault:
#把默认运行级别修改为 3 或 5。注意系统的默认运行级别只能使用 3 或 5- 绝大多数系统错误都可以通过单用户模式进行修复,理论上是只要能够进入单用户模式,那么系统错误就可以被单用户模式修复。当然判断系统到底是哪里出现了问题,是需要不断的经验积累的。
光盘修复模式
- 如何进入光盘修复模式
- 如何进入光盘修复模式呢?首先你需要有系统光盘,或系统修复光盘。我们这里只需要把 CentOS 6.x 的第一张光盘放入光驱,然后重启系统。
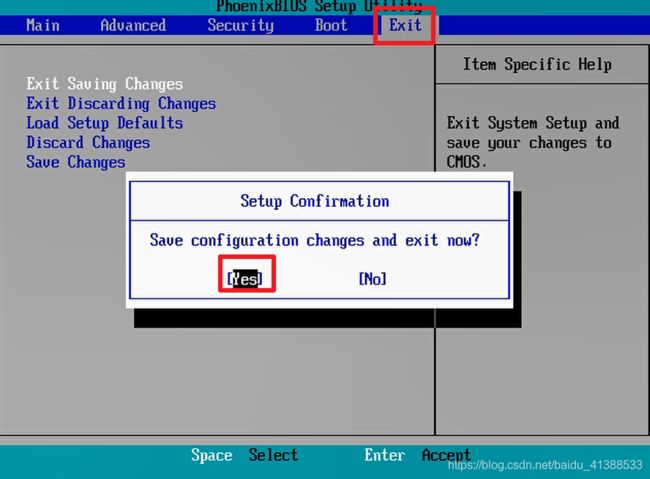
- 修改 BIOS 的启动顺序,让系统从光盘启动(具体方法参考系统安装章节)。就会看到如图所示的光盘启动界面:
- 按 + 将其变为第一项
- 保存退出
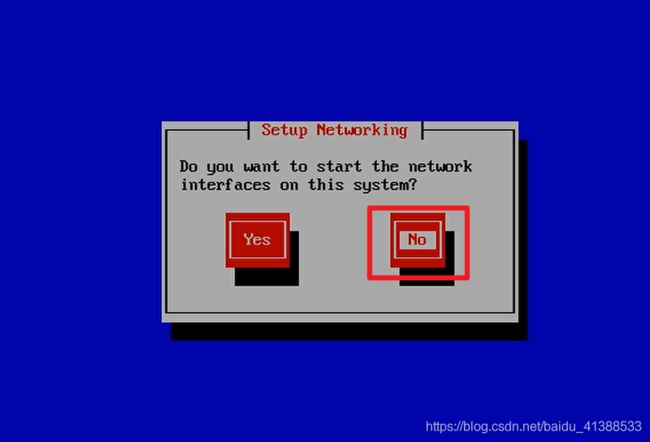
- 按TAB键切换,回车确认
光盘修复模式常见的错误修复
- 我们在光盘修复模式中主要可以修复什么错误呢?其实能在单用户模式中修复的错误,都能在光盘修复模式中修复。当然还可以修复一些在单用户模式下无法修复的错误,我们举几个例子。
- 重要系统文件丢失,导致系统无法启动
- 如果系统中的重要系统文件丢失,当然会导致系统无法正常启动。这时也可以利用光盘修复模式修复。我们假设把/etc/inittab 文件丢失了,我们通过系统启动过程知道这个文件是定义系统默认运行级别的,如果丢失了这个文件,系统当然不能正常启动,这时就需要进入光盘修复模式中了。然后需要利用 chroot 命令。命令格式如下:
[root@localhost ~]# chroot 目录名- chroot 命令的作用是“change root directory”改变系统根目录的意思。也就是可以把根目录暂时移动到某个目录当中。
- 我们是通过光盘启动的光盘修复模式,所以我们现在所在的根目录不是真正的系统根目录,而是光盘的模拟根目录。
- 系统根目录被当成外来设备放在了/mnt/sysimage/目录中。这时就需要 chroot 命令把我们现在的所在目录移动成真正的系统根目录。命令如下:
bash-4.1# chroot /mnt/sysimage- 这条命令执行之后,当前的根目录就已经是真正的系统根目录了。如果系统有任何错误都可以直接修复。
- 比如/etc/inittab 文件丢失了。这时如果我们曾经备份过系统重要文件,只需要把备份文件重新复制到/etc/目录下即可。
- 如果没有备份的文件,就需要从 rpm 包中提取 inittab 文件,然后复制了。具体命令如下:
bash-4.1# chroot /mnt/sysimage
#改变主目录
sh-4.1# cd /root
#进入 root 目录。因为默认进入的是/目录,如果不进入 root,一会提取的 inittab 文件会
#报错
sh-4.1# rpm -qf /etc/inittab
initscripts-9.03.31-2.el6.centos.i686
#查询下/etc/inittab 文件属于哪个包。如果系统中文件丢失不能查询,需要通过其他 Linux
#系统查询
sh-4.1# mkdir /mnt/cdrom
#建立挂载点
sh-4.1# mount /dev/sr0 /mnt/cdrom
#挂载光盘
sh-4.1# rpm2cpio /mnt/cdrom/Packages/initscripts-9.03.31-2.el6.centos.i686.rpm
| cpio -idv ./etc/inittab
#提取 inittab 文件到当前目录
sh-4.1# cp etc/inittab /etc/inittab
#复制 inittab 文件到指定位置- 注意此命令执行时不能将文件直接恢复至/etc 目录,只能提取到当前目录下,且恢复的文件名称所在路径要写完整的绝对路径。提取文件成功后,将其复制到根分区所在的/mnt/sysimage 目录下相应位置即可。
【注】:参考尚硅谷沈超老师教程


