音视频数据处理入门:原始视频格式YUV,NV12,NV21,YV12,YU12(I420)
我们知道,在Camera中设置Preview的回调函数onPreviewFrame时谷歌推荐我们使用NV21,YV12两种格式,因为这两种格式几乎在所有的设备里都通用。然而,视频的格式远远不止这俩种,有时可能需要转成NV12,YU12(I420)。。。。。那么,我们就需要理解如何将这些码流格式实现互相转换。
我们首先先了解什么是YUV,什么是RGB,因为这是构成图像的基本元素。音视频编码颜色模型中就包括两种RGB和YUV。
1.什么是YUV,什么是RGB
1.1 什么是RGB
RGB我们比较熟悉,它就是我们常说的颜色三原色,三原色表示某个点的颜色的分量,一个点的颜色用红绿蓝三个分量表示。而RGB的类型也是有很多的,以及具体的使用场景可参考我的上一篇博客颜色透明度换算,这里不做过多的介绍。
1.2 什么是YUV
YUV也是一种颜色编码方式,也分成三个分量分量,“Y”表示灰度值,明亮程度;而“U”和“V” 表示色彩信息,分别代表了颜色的色调Cr(V)和饱和度Cb(U),没有UV时颜色为黑白色。YUV不像RGB那样要求三个独立的视频信号同时传输,所以用YUV方式传送占用极少的频宽。YUV和RGB可以相互转化,所以通过获取到的YUV可以还原每个点的颜色值。
YUV细分又可以分为俩大类:planar和packed
1.2.1YUV格式两大类
- 对于planar的YUV格式,先连续存储所有像素点的Y,紧接着存储所有像素点的U,随后是所有像素点的V。
- 对于packed的YUV格式,每个像素点的Y,U,V是连续交替存储的
使用YUV的优点有两个:
- 彩色YUV图像转黑白YUV图像转换非常简单,这一特性用在于电视信号上。
- YUV是数据总尺寸小于RGB格式
2.YUV采样方式
YUV码流的采样方式主要有三种,分别是YUV4:4:4,YUV4:2:2,YUV4:2:0。
- YUV 4:4:4采样,每一个Y对应一组UV分量。
每一个Y对应一组UV分量8+8+8 = 24bits,3个字节。 - YUV 4:2:2采样,每两个Y共用一组UV分量。
每两个Y共用一组UV分量,一个YUV占8+4+4 = 16bits 2个字节。 - YUV 4:2:0采样,每四个Y共用一组UV分量。
每四个Y共用一组UV分量,一个YUV占8+2+2 = 12bits 1.5个字节。
所以YUV采样方式主要有:YUV444,YUV422,YUV420,三种YUV采样模式的表示大致如下:
-
YUV444
(1)YUV444p:YYYYYYYYY VVVVVVVVV UUUUUUUU -
YUV422
(1)YUV422p:YYYYYYYY VVVV UUUU
(2)YUVY:YUYV YUYV YUYV YUYV
(3)UYVY:UYVY UYVY UYVY UYVY -
YUV420
YUV420又可以分为YUV420p和YUV420sp ,对应关系如下:(1)YUV420p: YV12:YYYYYYYY VV UU YU12(I420):YYYYYYYY UU VV (2)YUV420sp: NV12:YYYYYYYY UVUV NV21:YYYYYYYY VUVU
由于日常开发中,常用比较多的是YUV420,今天主要讲解一下YUV420。
3.YUV420 存储方式
从上面的采样方式中可以知道YUV420又分为YUV420P和YUV420sp,YUV420p中包含YV12,I420,YUV420sp中包含NV12和NV21,这些格式被称为存储方式,是真正存储数据的格式。
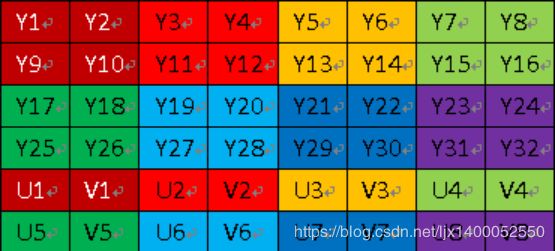
YUV420sp格式如下图:

YUV420p格式如下图:

-
YU12和YV12是一种Plane模式,将Y、U、V分量分别打包,依次存储。其每一个像素点的YUV数据提取遵循YUV420格式的提取方式,即4个Y分量共用一组UV
-
NV12和NV21是一种two-plane模式,即Y和UV分为两个Plane,但是UV(CbCr)为交错存储,而不是分为三个plane
4.Android中对应的编码器颜色模式
编码器需要指定相应的颜色格式,否则编码得到的数据可能会出现花屏、叠影、颜色失真等现象。
| 原始数据 | 编码器 |
|---|---|
| NV12(YUV420sp) | COLOR_FormatYUV420PackedSemiPlanar |
| NV21 | COLOR_FormatYUV420SemiPlanar |
| YV12(I420) | COLOR_FormatYUV420Planar |
5.颜色格式转化
我们知道,Camera预览的格式为NV21、YV12;MediaCodec的编解码格式为:YUV420Planar/I420SemiPlanner ;由于他们在存储格式的不同,会导致视频编解码后颜色异常,所以就需要转码,把一种YUV的存储格式转化成另外一种。
NV21转I420:
public byte[] nv21ToI420(byte[] data, int width, int height) {
    byte[] ret = globalBuffer;
    int total = width * height;

    ByteBuffer bufferY = ByteBuffer.wrap(ret, 0, total);
    ByteBuffer bufferU = ByteBuffer.wrap(ret, total, total / 4);
    ByteBuffer bufferV = ByteBuffer.wrap(ret, total + total / 4, total / 4);

    bufferY.put(data, 0, total);
    for (int i=total; i<data.length; i+=2) {
        bufferV.put(data[i]);
        bufferU.put(data[i+1]);
    }

    return ret;
}
NV21转NV12
用MediaCodec编码h264时,因为MediaCodec编码视频只支持yuv420sp的nv12,需要将nv21转为nv12
private void NV21ToNV12(byte[] nv21,byte[] nv12,int width,int height){
   if(nv21 == null || nv12 == null)return;
   int framesize = width*height;
   int i = 0,j = 0;
   System.arraycopy(nv21, 0, nv12, 0, framesize);
   for(i = 0; i < framesize; i++){
      nv12[i] = nv21[i];
   }
   for (j = 0; j < framesize/2; j+=2)
   {
      nv12[framesize + j-1] = nv21[j+framesize];
   }
   for (j = 0; j < framesize/2; j+=2)
   {
      nv12[framesize + j] = nv21[j+framesize-1];
   }
}
另外,可以补充一下,如何利用ffmpeg将nv21直接转成H264,以及快速将nv21转420p格式:
- ffmpeg将nv21转成H264
先编写h264解码器,代码如下ffmpeg_h264.cpp:
extern "C"{
#include "ffmpeg_h264.h"
void ffmpeg_h264::start() {
int in_w=480,in_h=272;
const char* out_file = "/sdcard/ds.h264";
av_register_all();
pFormatCtx = avformat_alloc_context();
fmt = av_guess_format(NULL,out_file,NULL);
pFormatCtx->oformat = fmt;
if(avio_open(&pFormatCtx->pb,out_file,AVIO_FLAG_READ_WRITE)<0){
LOGD("写初始化失败");
return;
}
video_st = avformat_new_stream(pFormatCtx,0);
video_st->time_base.num = 1;
video_st->time_base.den = 25;
if(video_st == NULL){
LOGD("video_st初始化失败");
return;
}
pCodecCtx = video_st->codec;
pCodecCtx->codec_id = fmt->video_codec;
pCodecCtx->codec_type = AVMEDIA_TYPE_VIDEO;
pCodecCtx->pix_fmt = AV_PIX_FMT_YUV420P;
pCodecCtx->width = in_w;
pCodecCtx->height = in_h;
pCodecCtx->time_base.num = 1;
pCodecCtx->time_base.den = 25;
pCodecCtx->bit_rate = 400000;
pCodecCtx->gop_size = 250;
pCodecCtx->qmin = 10;
pCodecCtx->qmax = 51;
pCodecCtx->max_b_frames = 3;
AVDictionary *param = 0;
if(pCodecCtx->codec_id == AV_CODEC_ID_H264){
av_dict_set(¶m,"preset","slow",0);
av_dict_set(¶m,"tune","zerolatency",0);
}
if(pCodecCtx->codec_id == AV_CODEC_ID_H265){
av_dict_set(¶m,"preset","ultrafast",0);
av_dict_set(¶m,"tune","zero-latency",0);
}
av_dump_format(pFormatCtx,0,out_file,1);
pCodec = avcodec_find_encoder(pCodecCtx->codec_id);
if(!pCodec){
LOGD("decoder失败");
return;
}
if(avcodec_open2(pCodecCtx,pCodec,¶m)<0){
LOGD("open2 失败");
return;
}
pFrame = av_frame_alloc();
picture_size = avpicture_get_size(pCodecCtx->pix_fmt,pCodecCtx->width,pCodecCtx->height);
picture_buf = (uint8_t *) av_malloc((size_t) picture_size);
avpicture_fill((AVPicture *) pFrame, picture_buf, pCodecCtx->pix_fmt, pCodecCtx->width, pCodecCtx->height);
avformat_write_header(pFormatCtx,NULL);
av_new_packet(&pkt,picture_size);
y_size = pCodecCtx->width * pCodecCtx->height;
FILE* in_file = fopen("/sdcard/ds_480x272.yuv","r+");
int i = 0;
while(1){
if(fread(picture_buf, 1, (size_t) (y_size * 3 / 2), in_file) <= 0){
LOGD("文件读取完毕");
break;
}else if(feof(in_file)){
break;
}
//y
memcpy(pFrame->data[0], picture_buf, (size_t) y_size);
// pFrame->data[0] = picture_buf;
//u
memcpy(pFrame->data[1],picture_buf + y_size, (size_t) (y_size / 4));
// pFrame->data[1] = picture_buf + y_size;
//v
memcpy(pFrame->data[2],picture_buf+y_size*5/4, (size_t) (y_size / 4));
// pFrame->data[2] = picture_buf + y_size*5/4;
pFrame->pts = i;
i++;
int got_picture = 0;
int ret = avcodec_encode_video2(pCodecCtx,&pkt,pFrame,&got_picture);
if(ret<0){
LOGD("解码失败");
continue;
}else{
LOGD("解码成功");
}
if(got_picture == 1){
LOGD("Succeed to encode frame: %5d\tsize:%5d\n",framecnt,pkt.size);
framecnt++;
pkt.stream_index = video_st->index;
ret = av_write_frame(pFormatCtx,&pkt);
av_free_packet(&pkt);
}
}
int ret = flush_encoder(pFormatCtx,0);
if(ret<0){
LOGD("flush_encoder 失败");
return;
}
av_write_trailer(pFormatCtx);
if(video_st){
avcodec_close(video_st->codec);
av_free(pFrame);
av_free(picture_buf);
}
avio_close(pFormatCtx->pb);
avformat_free_context(pFormatCtx);
fclose(in_file);
}
int ffmpeg_h264::flush_encoder(AVFormatContext *fmt_ctx, unsigned int stream_index) {
int ret;
int got_frame;
AVPacket enc_pkt;
if (!(fmt_ctx->streams[stream_index]->codec->codec->capabilities &
CODEC_CAP_DELAY))
return 0;
while (1) {
enc_pkt.data = NULL;
enc_pkt.size = 0;
av_init_packet(&enc_pkt);
ret = avcodec_encode_video2 (fmt_ctx->streams[stream_index]->codec, &enc_pkt,
NULL, &got_frame);
av_frame_free(NULL);
if (ret < 0)
break;
if (!got_frame){
ret=0;
break;
}
LOGD("Flush Encoder: Succeed to encode 1 frame!\tsize:%5d\n",enc_pkt.size);
/* mux encoded frame */
ret = av_write_frame(fmt_ctx, &enc_pkt);
if (ret < 0)
break;
}
return ret;
}
void ffmpeg_h264::start_encode(char *data) {
uint8_t* ui = (uint8_t *) data;
//y
memcpy(pFrame->data[0], ui, (size_t) y_size);
// pFrame->data[0] = picture_buf;
//u
memcpy(pFrame->data[1],ui + y_size, (size_t) (y_size / 4));
// pFrame->data[1] = picture_buf + y_size;
//v
memcpy(pFrame->data[2],ui+y_size*5/4, (size_t) (y_size / 4));
// pFrame->data[2] = picture_buf + y_size*5/4;
pFrame->pts = i;
i++;
int got_picture = 0;
int ret = avcodec_encode_video2(pCodecCtx,&pkt,pFrame,&got_picture);
if(ret<0){
LOGD("解码失败 %5d",ret);
}else{
LOGD("解码成功");
}
if(got_picture == 1){
LOGD("Succeed to encode frame: %5d\tsize:%5d\n",framecnt,pkt.size);
framecnt++;
pkt.stream_index = video_st->index;
ret = av_write_frame(pFormatCtx,&pkt);
av_free_packet(&pkt);
}
}
void ffmpeg_h264::end() {
int ret = flush_encoder(pFormatCtx,0);
if(ret<0){
LOGD("flush_encoder 失败");
return;
}
av_write_trailer(pFormatCtx);
if(video_st){
avcodec_close(video_st->codec);
av_free(pFrame);
av_free(picture_buf);
}
avio_close(pFormatCtx->pb);
avformat_free_context(pFormatCtx);
}
}
好了,接下来,看具体的头文件代码ffmpeg_h264.h:
extern "C"{
#include "jni.h"
#include "libavutil/opt.h"
#include "libavcodec/avcodec.h"
#include "libavformat/avformat.h"
#include "android/log.h"

#define LOGD(...) __android_log_print(3,"NDK",__VA_ARGS__)

class ffmpeg_h264 {
private:
    AVFormatContext* pFormatCtx;
    AVOutputFormat* fmt;
    AVStream* video_st;
    AVCodecContext* pCodecCtx;
    AVCodec* pCodec;
    AVFrame* pFrame;
    int picture_size;
    uint8_t* picture_buf;
    AVPacket pkt;
    int y_size;
    int framecnt;
    int i;
public:
    ffmpeg_h264():pFormatCtx(NULL),fmt(NULL),video_st(NULL),pCodecCtx(NULL),pCodec(NULL),pFrame(NULL),framecnt(0),i(0){};

public:
    void start();
    void start_encode(char* data);
    void end();


private:
    int flush_encoder(AVFormatContext *fmt_ctx,unsigned int stream_index);
};

}
好了,接下来准备编写编码器
extern "C" {
#include "nv21_h264.h"
/**
* 初始化参数
*/
int nv21_h264::init(int width, int height) {
m_width = width;
m_height = height;
m_size = width * height;
//存储 文件
const char *out_file = "/sdcard/ds.h264";
//ffmpeg 注册复用器,编码器
av_register_all();
pFormatCtx = avformat_alloc_context();
fmt = av_guess_format(NULL, out_file, NULL);
//编码流
pFormatCtx->oformat = fmt;
if (avio_open(&pFormatCtx->pb, out_file, AVIO_FLAG_READ_WRITE) < 0) {
LOGD("打开编码器失败");
return -1;
}
video_st = avformat_new_stream(pFormatCtx, 0);
//time_base 时基。通过该值可以把PTS,DTS转化为真正的时间
video_st->time_base.num = 1;
video_st->time_base.den = 25;
if (video_st == NULL) {
LOGD("video_st初始化失败");
return -1;
}
pCodecCtx = video_st->codec;
pCodecCtx->codec_id = fmt->video_codec;
pCodecCtx->codec_type = AVMEDIA_TYPE_VIDEO;
pCodecCtx->pix_fmt = AV_PIX_FMT_YUV420P;
//由于 nv21 数据是顺时针旋转了90度,所以要最终数据要逆时针旋转90度,长度变宽度,宽度变长度,
//所以 将最终编码的宽度设置为源数据的高度,高度设置为源数据的宽度
pCodecCtx->width = m_height;
pCodecCtx->height = m_width;
pCodecCtx->time_base.num = 1;
pCodecCtx->time_base.den = 25;
pCodecCtx->bit_rate = 400000;
pCodecCtx->gop_size = 250;
pCodecCtx->qmin = 10;
pCodecCtx->qmax = 51;
pCodecCtx->max_b_frames = 3;
AVDictionary *param = 0;
if (pCodecCtx->codec_id == AV_CODEC_ID_H264) {
av_dict_set(¶m, "preset", "slow", 0);
av_dict_set(¶m, "tune", "zerolatency", 0);
}
if (pCodecCtx->codec_id == AV_CODEC_ID_H265) {
av_dict_set(¶m, "preset", "ultrafast", 0);
av_dict_set(¶m, "tune", "zero-latency", 0);
}
av_dump_format(pFormatCtx, 0, out_file, 1);
pCodec = avcodec_find_encoder(pCodecCtx->codec_id);
if (!pCodec) {
LOGD("decoder失败");
return -1;
}
if (avcodec_open2(pCodecCtx, pCodec, ¶m) < 0) {
LOGD("open2 失败");
return -1;
}
pFrame = av_frame_alloc();
picture_size = avpicture_get_size(pCodecCtx->pix_fmt, pCodecCtx->width, pCodecCtx->height);
picture_buf = (uint8_t *) av_malloc((size_t) picture_size);
avpicture_fill((AVPicture *) pFrame, picture_buf, pCodecCtx->pix_fmt, pCodecCtx->width,
pCodecCtx->height);
avformat_write_header(pFormatCtx, NULL);
av_new_packet(&pkt, picture_size);
//y格式文件
file_y = fopen("/sdcard/test_y.y", "w+");
return 1;
}
void nv21_h264::add_nv21(char *data) {
// memcpy(pFrame->data[0], data, (size_t) m_size);
// char* u = (char *) pFrame->data[1];
// char* v = (char *) pFrame->data[2];
// int in = m_size>>2;
// int j = 0;
// for(int i = 0;i
// *(u + j) = data[m_size+i+1];
// *(v + j) = data[m_size+i];
// j++;
// }
//
// char *y = (char *) pFrame->data[0];
// for(int i = 0;i
// for(int k = 0;k
// y[i*k+k] = data[m_height*(k + 1) -(1 + i)];
// }
// }
char *yuv_420 = new char[m_size * 3 / 2];
//nv21 转 420p
NV21ToI420(yuv_420, data, m_width, m_height);
char *yuv_420_spin = new char[m_size * 3 / 2];
//420p 逆时针旋转90度算法
n420_spin(yuv_420_spin, yuv_420, m_width, m_height);
//y
memcpy(pFrame->data[0], yuv_420_spin, (size_t) m_size);
//u
memcpy(pFrame->data[1], yuv_420_spin + m_size, (size_t) (m_size >> 2));
//v
memcpy(pFrame->data[2], yuv_420_spin + (m_size >> 2), (size_t) (m_size >> 2));
pFrame->pts = index;
index++;
int got_picture = 0;
int ret = avcodec_encode_video2(pCodecCtx, &pkt, pFrame, &got_picture);
if (ret < 0) {
LOGD("解码失败");
return;
}
if (got_picture == 1) {
LOGD("Succeed to encode frame: %5d\tsize:%5d\n", index, pkt.size);
pkt.stream_index = video_st->index;
ret = av_write_frame(pFormatCtx, &pkt);
av_free_packet(&pkt);
}
free(yuv_420);
free(yuv_420_spin);
}
void nv21_h264::end() {
int ret = flush_encoder(pFormatCtx, 0);
if (ret < 0) {
LOGD("flush_encoder 失败");
return;
}
av_write_trailer(pFormatCtx);
if (video_st) {
avcodec_close(video_st->codec);
av_free(pFrame);
av_free(picture_buf);
}
avio_close(pFormatCtx->pb);
avformat_free_context(pFormatCtx);
}
int nv21_h264::flush_encoder(AVFormatContext *fmt_ctx, unsigned int stream_index) {
int ret;
int got_frame;
AVPacket enc_pkt;
if (!(fmt_ctx->streams[stream_index]->codec->codec->capabilities &
CODEC_CAP_DELAY))
return 0;
while (1) {
enc_pkt.data = NULL;
enc_pkt.size = 0;
av_init_packet(&enc_pkt);
ret = avcodec_encode_video2(fmt_ctx->streams[stream_index]->codec, &enc_pkt,
NULL, &got_frame);
av_frame_free(NULL);
if (ret < 0)
break;
if (!got_frame) {
ret = 0;
break;
}
LOGD("Flush Encoder: Succeed to encode 1 frame!\tsize:%5d\n", enc_pkt.size);
/* mux encoded frame */
ret = av_write_frame(fmt_ctx, &enc_pkt);
if (ret < 0)
break;
}
return ret;
}
void nv21_h264::NV21ToI420(char *dstyuv, char *data, int imageWidth, int imageHeight) {
int Ustart = imageWidth * imageHeight;
//y
memcpy(dstyuv, data, (size_t) Ustart);
//u v 长度
int in = Ustart >> 2;
for (int i = 0; i < in; i++) {
//u
dstyuv[Ustart + i] = data[Ustart + i + 1];
//v
dstyuv[Ustart + in + i] = data[Ustart + i];
}
}
void nv21_h264::n420_spin(char *dstyuv, char *srcdata, int imageWidth, int imageHeight) {
int i = 0, j = 0;
int index = 0;
int tempindex = 0;
int div = 0;
for (i = 0; i < imageWidth; i++) {
div = i + 1;
tempindex = 0;
for (j = 0; j < imageHeight; j++) {
tempindex += imageWidth;
dstyuv[index++] = srcdata[tempindex - div];
}
}
//写y 格式数据
fwrite(dstyuv, 1, (size_t) m_size, file_y);
//u起始位置
int start = imageWidth * imageHeight;
//u v 数据的长度
int udiv = start >> 2;
//u v 数据宽度
int uWidth = imageWidth >> 1;
//u v 数据高度
int uHeight = imageHeight >> 1;
//数据 下标位置
index = start;
for (i = 0; i < uWidth; i++) {
div = i + 1;
tempindex = start;
for (j = 0; j < uHeight; j++) {
tempindex += uHeight;
dstyuv[index] = srcdata[tempindex - div];
dstyuv[index + udiv] = srcdata[tempindex - div + udiv];
index++;
}
}
}
}
编码器的头文件:
extern "C"{
#include "jni.h"
#include "libavutil/opt.h"
#include "libavcodec/avcodec.h"
#include "libavformat/avformat.h"
#include "android/log.h"

#define LOGD(...) __android_log_print(3,"NDK",__VA_ARGS__)

class nv21_h264 {
private:
    int m_width;
    int m_height;
    int m_size;
    AVFormatContext* pFormatCtx;
    AVOutputFormat* fmt;
    //存储每一个视频/音频流信息的结构体
    AVStream* video_st;
    AVCodecContext* pCodecCtx;
    AVCodec* pCodec;
    AVFrame* pFrame;
    int picture_size;
    uint8_t* picture_buf;
    AVPacket pkt;
    int index;
    FILE* file_y;
public:
    nv21_h264():m_width(0),m_height(0),m_size(0),pFormatCtx(NULL),fmt(NULL),video_st(NULL),pCodecCtx(NULL),index(0){};

public:
    int init(int width,int height);
    void add_nv21(char* data);
    void end();
private:
    int flush_encoder(AVFormatContext *fmt_ctx, unsigned int stream_index);
    //nv21 转 420p格式
    void NV21ToI420(char* dstyuv,char* data, int imageWidth, int imageHeight);
    //逆时针旋转420p  90度
    void n420_spin(char* dstyuv,char* srcdata, int imageWidth, int imageHeight);
};
}
- ffmpeg将nv21转成420p
直接调用上面编码器的NV21ToI420方法即可:
 //nv21 转 420p格式
    void NV21ToI420(char* dstyuv,char* data, int imageWidth, int imageHeight);
6.YUV和RGB互转
RGB和YUV也可以相互转化:
-
RGB 转换成 YUV
Y = (0.257 * R) + (0.504 * G) + (0.098 * B) + 16
Cr = V = (0.439 * R) - (0.368 * G) - (0.071 * B) + 128
Cb = U = -( 0.148 * R) - (0.291 * G) + (0.439 * B) + 128 -
YUV 转换成 RGB
B = 1.164(Y - 16) + 2.018(U - 128)
G = 1.164(Y - 16) - 0.813(V - 128) - 0.391(U - 128)
R = 1.164(Y - 16) + 1.596(V - 128)
RGB取值范围均为0255,Y=0255,U=-122+122,V=-157+157
7.YUV快速转换NV21
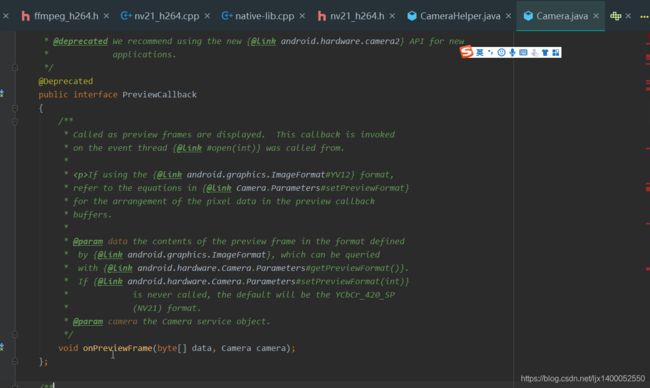
在做相机开发的过程中,我们经常会设计到一些转换工作,尤其是Android开发的同学,在Camera1中,研究相机源码,你会发现onPreviewFrame函数给我回调的结果如下

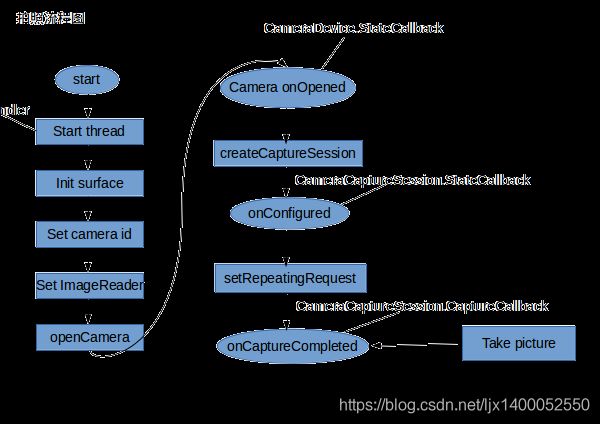
这里的byte[] data其实就是nv21,所以不需要我们转成nv21,但是,在Camera2中就不同了,我们仔细看一下Camera2的源码你就知道了,大致流程如下图所示:

看了整个流程,你会发现Camera1和Camera2的差别还是很大的,Camera2的预览和拍照数据都是使用CameraCaptureSession会话来请求的,并没有实现Camera1的PreviewCallback,那么Camera2如何实现预览帧数据,然后转成对应的nv21了?大致流程如下。
- 开启相机的预览
我们使用TextureView显示相机预览数据,Camera2的预览和拍照数据都是使用CameraCaptureSession会话来请求的
private void startPreview() {
        setupImageReader();
        SurfaceTexture mSurfaceTexture = textureView.getSurfaceTexture();
        //设置TextureView的缓冲区大小
        mSurfaceTexture.setDefaultBufferSize(mPreviewSize.getWidth(), mPreviewSize.getHeight());
        //获取Surface显示预览数据
        mPreviewSurface = new Surface(mSurfaceTexture);
        try {
            getPreviewRequestBuilder();
            //创建相机捕获会话,第一个参数是捕获数据的输出Surface列表,第二个参数是CameraCaptureSession的状态回调接口,当它创建好后会回调onConfigured方法,第三个参数用来确定Callback在哪个线程执行,为null的话就在当前线程执行
            mCameraDevice.createCaptureSession(Arrays.asList(mPreviewSurface, mImageReader.getSurface()), new CameraCaptureSession.StateCallback() {
                @Override
                public void onConfigured(CameraCaptureSession session) {
                    mCaptureSession = session;
                    repeatPreview();
                }

                @Override
                public void onConfigureFailed(CameraCaptureSession session) {

                }
            }, null);
        } catch (CameraAccessException e) {
            e.printStackTrace();
        }
    }
- 实现PreviewCallback
虽然Camera2没有提供Camera中的PreviewCallback,但是在Camera2中提供了CameraCaptureSession.CaptureCallback:
private CameraCaptureSession.CaptureCallback mPreviewCaptureCallback = new CameraCaptureSession.CaptureCallback() {
    @Override
    public void onCaptureCompleted(@NonNull CameraCaptureSession session, @NonNull CaptureRequest request, @NonNull TotalCaptureResult result) {

    }

    @Override
    public void onCaptureProgressed(@NonNull CameraCaptureSession session, @NonNull CaptureRequest request, @NonNull CaptureResult partialResult) {

    }
};
- 创建一个ImageReader,并监听它的事件:
    private class OnImageAvailableListenerImpl implements ImageReader.OnImageAvailableListener {
        private byte[] y;
        private byte[] u;
        private byte[] v;
        private ReentrantLock lock = new ReentrantLock();

        @Override
        public void onImageAvailable(ImageReader reader) {
            Image image = reader.acquireNextImage();
            // Y:U:V == 4:2:2
            if (camera2Listener != null && image.getFormat() == ImageFormat.YUV_420_888) {
                Image.Plane[] planes = image.getPlanes();
                // 加锁确保y、u、v来源于同一个Image
                lock.lock();
                // 重复使用同一批byte数组,减少gc频率
                if (y == null) {
                    y = new byte[planes[0].getBuffer().limit() - planes[0].getBuffer().position()];
                    u = new byte[planes[1].getBuffer().limit() - planes[1].getBuffer().position()];
                    v = new byte[planes[2].getBuffer().limit() - planes[2].getBuffer().position()];
                }
                if (image.getPlanes()[0].getBuffer().remaining() == y.length) {
                    planes[0].getBuffer().get(y);
                    planes[1].getBuffer().get(u);
                    planes[2].getBuffer().get(v);
                    camera2Listener.onPreview(y, u, v, mPreviewSize, planes[0].getRowStride());
                }
                lock.unlock();
            }
            image.close();
        }
    }
注意:
一般情况下,大多设备其实只支持ImageFormat.YUV_420_888和ImageFormat.JPEG格式的预览数据,而ImageFormat.JPEG是压缩格式,一般适用于拍照的场景,而不适合直接用于算法检测,因此我们一般取ImageFormat.YUV_420_888作为我们获取预览数据的格式
yuv快速转nv21
 void yuyv_to_nv12(char * image_in, char* image_out, int width, int height, unsigned long int filesize)
  {
       /* 计算循环次数,YUYV 一个像素点占2个字节*/
	   int pixNUM = width * height;
	   unsigned int cycleNum = filesize /pixNUM/2;
	   printf("cycleNUM = %d\n",cycleNum);

	  /*单帧图像中 NV12格式的输出图像 Y分量 和 UV 分量的起始地址,并初始化*/
	  char *y = image_out;
	  char *uv = image_out + pixNUM ;

	  char *start = image_in;
          unsigned int i =0;
	  int j =0,k =0;

	  /*处理Y分量*/
	  for(i= 0; i<cycleNum ;i++)
	  {
		int index =0;
		for(j =0; j< pixNUM*2; j=j+2) //YUYV单行中每两个字节一个Y分量
		{
			*(y+index) = *(start + j);
			index ++;
		}
		start = image_in + pixNUM*2*i;
		y= y + pixNUM*3/2;
	  }

      /**处理UV分量**/
	  start = image_in;
	  for(i= 0; i<cycleNum ;i++)
	  {
	    int uv_index = 0;
		for(j=0; j< height; j =j+2)  // 隔行, 我选择保留偶数行
		{
			for(k = j*width*2+1; k< width*2*(j+1); k=k+4) //YUYV单行中每四个字节含有一对UV分量
			{
				*(uv+ uv_index) = *(start + k);
				*(uv +uv_index+1) = *(start +k +2);
				uv_index += 2;
			}
		}
	    start = image_in + pixNUM*2*i;
	    uv =uv + pixNUM*3/2;
	  }
 }
知道了如何快速将YUV快速转成nv21,接下来,讲述快速将nv21转成bitmap。
8.nv21转bitmap的俩种方式:
nv21转成bitmap大概有俩种方式,这里分别列出俩种方式,但是,更加推荐使用第二种,因为第二种方式更加高效,第二种转换效率大概是第一种的百分之九十。
- nv21转bitmap方式一
    /**
     * 通过YuvImage把nv21转为bitmap
     * @param nv21
     * @param width
     * @param height
     * @return
     */
    private static Bitmap nv21ByYuvImageToBitmap(byte[] nv21, int width, int height) {
        Bitmap bitmap = null;
        try {
            YuvImage image = new YuvImage(nv21, ImageFormat.NV21, width, height, null);
            ByteArrayOutputStream stream = new ByteArrayOutputStream();
            image.compressToJpeg(new Rect(0, 0, width, height), 80, stream);
            bitmap = BitmapFactory.decodeByteArray(stream.toByteArray(), 0, stream.size());
            stream.close();
        } catch (IOException e) {
            e.printStackTrace();
        }
        return bitmap;
    }
- nv21转bitmap方式二
 private RenderScript rs;
    private ScriptIntrinsicYuvToRGB yuvToRgbIntrinsic;
    private Type.Builder yuvType, rgbaType;
    private Allocation in, out;

    public NV21ToBitmap(Context context) {
        rs = RenderScript.create(context);
        yuvToRgbIntrinsic = ScriptIntrinsicYuvToRGB.create(rs, Element.U8_4(rs));
    }

    public Bitmap nv21ToBitmap(byte[] nv21, int width, int height){
        if (yuvType == null){
            yuvType = new Type.Builder(rs, Element.U8(rs)).setX(nv21.length);
            in = Allocation.createTyped(rs, yuvType.create(), Allocation.USAGE_SCRIPT);

            rgbaType = new Type.Builder(rs, Element.RGBA_8888(rs)).setX(width).setY(height);
            out = Allocation.createTyped(rs, rgbaType.create(), Allocation.USAGE_SCRIPT);
        }
        in.copyFrom(nv21);
        yuvToRgbIntrinsic.setInput(in);
        yuvToRgbIntrinsic.forEach(out);

        Bitmap bmpout = Bitmap.createBitmap(width, height, Bitmap.Config.ARGB_8888);
        out.copyTo(bmpout);

        return bmpout;

    }
9.YUV420 数据旋转
如果设置摄像头的角度为90度,获取其他角度会发现利用MediaCodec获取到的编码H264数据可能和预览画面不一样,具体就是设置了摄像头旋转多少角度,就需要对获取到的原始YUV数据进行旋转多少度。
特别注意
如果你需要旋转90度或者270度,那么需要把宽和高对调,否则会花屏(就是图片会重复显示某个位置的数据,然后画面时花的)。为什么要宽高对调呢,如果某个画面要旋转90或者270后才是我们想要的结果,那就说明如果我们想要横屏的画面,则旋转之前是竖屏的画面,但是最终需要的是横屏的,所以旋转之前要把宽高对调,旋转后才是需要的数据。
yuv420sp的分两种,nv21和nv12。Android 取摄像头中的数据 ,当使用camera1.0 时,onPreviewFrame返回的数据yuv420sp的nv21,并且camera中取出的数据显示时是偏转的,需要将其旋转顺时针旋转270或逆时针旋转90,注:旋转后宽高对调。
- 顺时针旋转90度
  /**
 * 此处为顺时针旋转旋转90度
 * @param data 旋转前的数据
 * @param imageWidth 旋转前数据的宽
 * @param imageHeight 旋转前数据的高
 * @return 旋转后的数据
 */
private byte[] rotateYUV420Degree90(byte[] data, int imageWidth, int imageHeight)
{
    byte [] yuv = new byte[imageWidth*imageHeight*3/2];
    // Rotate the Y luma
    int i = 0;
    for(int x = 0;x < imageWidth;x++)
    {
        for(int y = imageHeight-1;y >= 0;y--)
        {
            yuv[i] = data[y*imageWidth+x];
            i++;
        }
    }
    // Rotate the U and V color components
    i = imageWidth*imageHeight*3/2-1;
    for(int x = imageWidth-1;x > 0;x=x-2)
    {
        for(int y = 0;y < imageHeight/2;y++)
        {
            yuv[i] = data[(imageWidth*imageHeight)+(y*imageWidth)+x];
            i--;
            yuv[i] = data[(imageWidth*imageHeight)+(y*imageWidth)+(x-1)];
            i--;
        }
    }
    return
- 顺时针旋转180度
  /**
 * 此处为顺时针旋转旋转90度
 * @param data 旋转前的数据
 * @param imageWidth 旋转前数据的宽
 * @param imageHeight 旋转前数据的高
 * @return 旋转后的数据
 */
private byte[] rotateYUV420Degree180(byte[] data, int imageWidth, int imageHeight){

    byte[] yuv =new byte[imageWidth*imageHeight*3/2];

    int i =0;int count =0;

    for(i = imageWidth * imageHeight -1; i >=0; i--){
        yuv[count]= data[i];
        count++;}

    i = imageWidth * imageHeight *3/2-1;for(i = imageWidth * imageHeight *3/2-1; i >= imageWidth
            * imageHeight; i -=2){
        yuv[count++]= data[i -1];
        yuv[count++]= data[i];
    }return yuv;
}
- 顺时针旋转270
/**
 * 此处为顺时针旋转270
 * @param data 旋转前的数据
 * @param imageWidth 旋转前数据的宽
 * @param imageHeight 旋转前数据的高
 * @return 旋转后的数据
 */
private byte[] rotateYUV420Degree270(byte[] data, int imageWidth, int imageHeight){

    byte[] yuv =new byte[imageWidth*imageHeight*3/2];

    // Rotate the Y luma

    int i =0;

    for(int x = imageWidth-1;x >=0;x--){

        for(int y =0;y < imageHeight;y++){

            yuv[i]= data[y*imageWidth+x];
            i++;

        }
    }// Rotate the U and V color components
    i = imageWidth*imageHeight;

    for(int x = imageWidth-1;x >0;x=x-2){

        for(int y =0;y < imageHeight/2;y++){
            yuv[i]= data[(imageWidth*imageHeight)+(y*imageWidth)+(x-1)];
            i++;
            yuv[i]= data[(imageWidth*imageHeight)+(y*imageWidth)+x];
            i++;
        }
    }
    return yuv;
}
因为预览其实是镜子成像原理,就是左右颠倒的,所以要做一下镜像的出里
- 镜像处理
 //镜像
    private void Mirror(byte[] yuv_temp, int w, int h) {
        int i, j;

        int a, b;
        byte temp;
        //mirror y
        for (i = 0; i < h; i++) {
            a = i * w;
            b = (i + 1) * w - 1;
            while (a < b) {
                temp = yuv_temp[a];
                yuv_temp[a] = yuv_temp[b];
                yuv_temp[b] = temp;
                a++;
                b--;
            }
        }
        //mirror u
        int uindex = w * h;
        for (i = 0; i < h / 2; i++) {
            a = i * w / 2;
            b = (i + 1) * w / 2 - 1;
            while (a < b) {
                temp = yuv_temp[a + uindex];
                yuv_temp[a + uindex] = yuv_temp[b + uindex];
                yuv_temp[b + uindex] = temp;
                a++;
                b--;
            }
        }
        //mirror v
        uindex = w * h / 4 * 5;
        for (i = 0; i < h / 2; i++) {
            a = i * w / 2;
            b = (i + 1) * w / 2 - 1;
            while (a < b) {
                temp = yuv_temp[a + uindex];
                yuv_temp[a + uindex] = yuv_temp[b + uindex];
                yuv_temp[b + uindex] = temp;
                a++;
                b--;
            }
        }
    }
好了,关于yuv先关的介绍大概就是这么多,如果不好的地方,欢迎大佬们指正,具体的介绍可以参考一下资料:
我的博客:
图像实战 - RGB、YUV图像格式介绍
第三方资源:
yuv纤细介绍