STS创建Spring Boot项目实战(Rest接口、数据库、用户认证、分布式Token JWT、Redis操作、日志和统一异常处理)
非常感谢 http://blog.csdn.net/he90227/article/details/53308222
单点登录原理技术学习,更多知识请访问https://www.itkc8.com
1.项目创建
1、新建工程

2、选择打包方式,这边可以选择为打包为Jar包,或者传统的打包为War包

3、选择开发过程中使用到的技术,这边我选择的是Rest Repositories

4、新建测试用Controller

文件内容如下
[java] view plain copy
- package com.xiaofangtech.example;
- import org.springframework.web.bind.annotation.RequestMapping;
- import org.springframework.web.bind.annotation.RestController;
- @RestController
- public class HelloController {
- @RequestMapping("/greeting")
- public String hello()
- {
- return "Hello world";
- }
- }
5、以Srping Boot App 方式运行

正常运行后控制台如下

6、测试运行

至此,一个最简单的hello world的工程创建运行完成
7、打包部署
7.1 打包为可运行jar包
使用mvn package 进行打包


然后run ,运行成功后如下生成jar包


7.2 打包为传统的war包
当第2步中选择的打包方式为war时,执行7.1中mvn package时,生成的包就是war包

运行war包跟运行jar包一样,找到war包所在目录,注解运行war包
D:\new_tech\spring-suite-tool\workspace\workspace1\demo1\target>Java -jar demo1-0.0.1-SNAPSHOT.war
访问服务接口: localhost:8080/greeting
2.代码实现连接数据实现Rest接口和Basic 基础认证
0.引入pom依赖
[html] view plain copy
- <dependency>
- <groupId>org.projectlombokgroupId>
- <artifactId>lombokartifactId>
- dependency>
- <dependency>
- <groupId>org.springframework.bootgroupId>
- <artifactId>spring-boot-starter-data-jpaartifactId>
- dependency>
- <dependency>
- <groupId>mysqlgroupId>
- <artifactId>mysql-connector-javaartifactId>
- dependency>
1.代码整体结构

2.注册Filter过滤器的两种方式:
1.在自定义的Filter上使用注解:
[java] view plain copy
- /*
- * Filter实现简单的Http Basic 认证
- */
- @Component
- @WebFilter(filterName = "httpBasicAuthorizedFilter", urlPatterns="/user/*")
- public class HttpBasicAuthorizeFilter implements Filter {
2.在配置类中定义Filter
[java] view plain copy
- @Bean
- public FilterRegistrationBean filterRegistrationBean() {
- FilterRegistrationBean registrationBean = new FilterRegistrationBean();
- HttpBasicAuthorizeFilter httpBasicFilter = new HttpBasicAuthorizeFilter();
- registrationBean.setFilter(httpBasicFilter);
- List
urlPatterns = new ArrayList (); - urlPatterns.add("/user/*");
- registrationBean.setUrlPatterns(urlPatterns);
- return registrationBean;
- }
3.数据库和Rest接口操作效果展示:

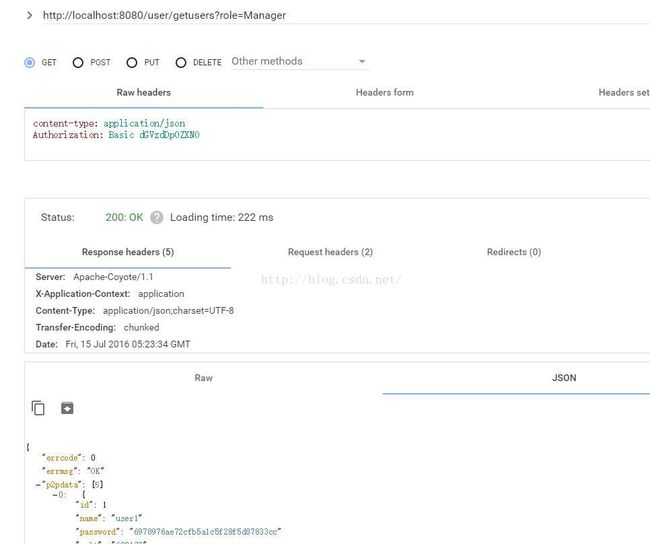
4.过滤器效果展示
代码中固定用户名密码都为test,所以对接口进行请求时,需要添加以下认证头信息
Authorization: Basic dGVzdDp0ZXN0
dGVzdDp0ZXN0 为 test:test 经过base64编码后的结果
如果未添加认证信息或者认证信息错误,返回没有权限的错误信息

当认证信息正确,返回请求结果
3.自定义Properties解析类和分布式Token JWT用户校验
1.自定义Properties解析类的使用规则
1.定义Properties配置文件 ---- jwt.properties
[html] view plain copy
- jwt.info.clientId=098f6bcd4621d373cade4e832627b4f6
- jwt.info.base64Secret=MDk4ZjZiY2Q0NjIxZDM3M2NhZGU0ZTgzMjYyN2I0ZjY=
- jwt.info.name=restapiuser
- jwt.info.expiresSecond=172800
2.自定义解析类 ---- JwtInfo.java 指定配置文件地址和配置前缀,属性是前缀之后的名称
[java] view plain copy
- package com.jay.properties;
- import org.springframework.boot.context.properties.ConfigurationProperties;
- /*
- * 自定义配置文件的解析类
- */
- @ConfigurationProperties(prefix = "jwt.info", locations = "classpath:/config/jwt.properties")
- public class JwtInfo {
- private String clientId;
- private String base64Secret;
- private String name;
- private int expiresSecond;
- public String getClientId() {
- return clientId;
- }
- public void setClientId(String clientId) {
- this.clientId = clientId;
- }
- public String getBase64Secret() {
- return base64Secret;
- }
- public void setBase64Secret(String base64Secret) {
- this.base64Secret = base64Secret;
- }
- public String getName() {
- return name;
- }
- public void setName(String name) {
- this.name = name;
- }
- public int getExpiresSecond() {
- return expiresSecond;
- }
- public void setExpiresSecond(int expiresSecond) {
- this.expiresSecond = expiresSecond;
- }
- }
3.启动类或配置类中,指定自定义Properties解析类
[java] view plain copy
- package com.jay;
- import org.springframework.boot.SpringApplication;
- import org.springframework.boot.autoconfigure.SpringBootApplication;
- import org.springframework.boot.autoconfigure.security.oauth2.resource.ResourceServerProperties.Jwt;
- import org.springframework.boot.context.properties.EnableConfigurationProperties;
- import org.springframework.boot.web.servlet.ServletComponentScan;
- import com.jay.properties.JwtInfo;
- @SpringBootApplication
- @EnableConfigurationProperties(JwtInfo.class) //加载自定义的properties解析类
- public class Demo1Application {
- public static void main(String[] args) {
- SpringApplication.run(Demo1Application.class, args);
- }
- }
4.输出配置文件信息 ---- JwtInfoController.java
[java] view plain copy
- package com.jay.controller;
- import org.springframework.beans.factory.annotation.Autowired;
- import org.springframework.web.bind.annotation.RequestMapping;
- import org.springframework.web.bind.annotation.RequestMethod;
- import org.springframework.web.bind.annotation.RestController;
- import com.jay.properties.JwtInfo;
- import com.jay.vo.ResultMsg;
- import com.jay.vo.ResultStatusCode;
- @RestController
- @RequestMapping("/jwt")
- public class JwtInfoController {
- @Autowired
- private JwtInfo jwtInfo;
- @RequestMapping(value = "/info", method = RequestMethod.GET)
- public Object getJwtInfo() {
- return new ResultMsg
(true, ResultStatusCode.OK.getErrorCode(), ResultStatusCode.OK.getErrorMsg(), jwtInfo); - }
- }
5.效果展示

2.使用分布式token JWT进行用户认证
jwt(json web token)
用户发送按照约定,向服务端发送 Header、Payload 和 Signature,并包含认证信息(密码),验证通过后服务端返回一个token,之后用户使用该token作为登录凭证,适合于移动端和api
jwt使用流程

1.添加 JWT依赖
[html] view plain copy
- <dependency>
- <groupId>io.jsonwebtokengroupId>
- <artifactId>jjwtartifactId>
- <version>0.7.0version>
- dependency>
2.编写Jwt解析类和Jwt过滤器
[java] view plain copy
- package com.jay.util.jwt;
- import java.security.Key;
- import java.util.Date;
- import javax.crypto.spec.SecretKeySpec;
- import javax.xml.bind.DatatypeConverter;
- import io.jsonwebtoken.Claims;
- import io.jsonwebtoken.JwtBuilder;
- import io.jsonwebtoken.Jwts;
- import io.jsonwebtoken.SignatureAlgorithm;
- /*
- * 构造及解析jwt的工具类
- */
- public class JwtHelper {
- public static Claims parseJWT(String jsonWebToken, String base64Security){
- try
- {
- Claims claims = Jwts.parser()
- .setSigningKey(DatatypeConverter.parseBase64Binary(base64Security))
- .parseClaimsJws(jsonWebToken).getBody();
- return claims;
- }
- catch(Exception ex)
- {
- return null;
- }
- }
- /**
- * 生成token
- *
- * @author hetiewei
- * @date 2016年10月18日 下午2:51:38
- * @param name keyId
- * @param userId
- * @param role
- * @param audience 接收者
- * @param issuer 发行者
- * @param TTLMillis 过期时间(毫秒)
- * @param base64Security
- * @return
- */
- public static String createJWT(String name, String userId, String role,
- String audience, String issuer, long TTLMillis, String base64Security)
- {
- SignatureAlgorithm signatureAlgorithm = SignatureAlgorithm.HS256;
- long nowMillis = System.currentTimeMillis();
- Date now = new Date(nowMillis);
- //生成签名密钥
- byte[] apiKeySecretBytes = DatatypeConverter.parseBase64Binary(base64Security);
- Key signingKey = new SecretKeySpec(apiKeySecretBytes, signatureAlgorithm.getJcaName());
- //添加构成JWT的参数
- JwtBuilder builder = Jwts.builder().setHeaderParam("typ", "JWT")
- .claim("role", role)
- .claim("unique_name", name)
- .claim("userid", userId)
- .setIssuer(issuer)
- .setAudience(audience)
- .signWith(signatureAlgorithm, signingKey);
- //添加Token过期时间
- if (TTLMillis >= 0) {
- long expMillis = nowMillis + TTLMillis;
- Date exp = new Date(expMillis);
- builder.setExpiration(exp).setNotBefore(now);
- }
- //生成JWT
- return builder.compact();
- }
- }
[java] view plain copy
- package com.jay.filter;
- import java.io.IOException;
- import javax.servlet.Filter;
- import javax.servlet.FilterChain;
- import javax.servlet.FilterConfig;
- import javax.servlet.ServletException;
- import javax.servlet.ServletRequest;
- import javax.servlet.ServletResponse;
- import javax.servlet.http.HttpServletRequest;
- import javax.servlet.http.HttpServletResponse;
- import org.springframework.beans.factory.annotation.Autowired;
- import org.springframework.web.context.support.SpringBeanAutowiringSupport;
- import com.fasterxml.jackson.databind.ObjectMapper;
- import com.jay.properties.JwtInfo;
- import com.jay.util.jwt.JwtHelper;
- import com.jay.vo.ResultMsg;
- import com.jay.vo.ResultStatusCode;
- /*
- * 用于JWT认证的过滤器
- */
- public class JwtAuthorizeFilter implements Filter{
- /*
- * 注入配置文件类
- */
- @Autowired
- private JwtInfo jwtInfo;
- @Override
- public void destroy() {
- }
- @Override
- public void doFilter(ServletRequest request, ServletResponse response, FilterChain chain)
- throws IOException, ServletException {
- ResultMsg
- HttpServletRequest httpRequest = (HttpServletRequest)request;
- String auth = httpRequest.getHeader("Authorization");
- if ((auth != null) && (auth.length() > 7))
- {
- String HeadStr = auth.substring(0, 6).toLowerCase();
- if (HeadStr.compareTo("bearer") == 0)
- {
- auth = auth.substring(7, auth.length());
- if (JwtHelper.parseJWT(auth, jwtInfo.getBase64Secret()) != null)
- {
- chain.doFilter(request, response);
- return;
- }
- }
- }
- //验证不通过
- HttpServletResponse httpResponse = (HttpServletResponse) response;
- httpResponse.setCharacterEncoding("UTF-8");
- httpResponse.setContentType("application/json; charset=utf-8");
- httpResponse.setStatus(HttpServletResponse.SC_UNAUTHORIZED);
- //将验证不通过的错误返回
- ObjectMapper mapper = new ObjectMapper();
- resultMsg = new ResultMsg
- httpResponse.getWriter().write(mapper.writeValueAsString(resultMsg));
- return;
- }
- @Override
- public void init(FilterConfig filterConfig) throws ServletException {
- SpringBeanAutowiringSupport.processInjectionBasedOnServletContext(this, filterConfig.getServletContext());
- }
- }
3.在Jwt配置类中,添加过滤器
[java] view plain copy
- package com.jay.config;
- import java.util.ArrayList;
- import java.util.List;
- import org.springframework.boot.context.embedded.FilterRegistrationBean;
- import org.springframework.context.annotation.Bean;
- import org.springframework.context.annotation.Configuration;
- import com.jay.filter.JwtAuthorizeFilter;
- /*
- * 注册jwt认证过滤器
- */
- @Configuration
- public class JwtConfig {
- /*
- * 注册过滤器类和过滤的url
- */
- @Bean
- public FilterRegistrationBean basicFilterRegistrationBean(){
- FilterRegistrationBean registrationBean = new FilterRegistrationBean();
- JwtAuthorizeFilter filter = new JwtAuthorizeFilter();
- registrationBean.setFilter(filter);
- List
urlPatterns = new ArrayList<>(); - urlPatterns.add("/user/*");
- registrationBean.setUrlPatterns(urlPatterns);
- return registrationBean;
- }
- }
4.效果展示:
1. 获取token,传入用户认证信息

2.使用上面获取的token进行接口调用, 未使用token,获取token错误,或者token过期时

3.使用正确的token时

特别注意:
JWT使用时,可以通过Cookie机制,自动的传递!!!
4.Redis + Cookie 机制,进行验证码的校验
1.添加redis和captcha库依赖
[html] view plain copy
- <dependency>
- <groupId>org.springframework.bootgroupId>
- <artifactId>spring-boot-starter-redisartifactId>
- dependency>
- <dependency>
- <groupId>cn.apiclub.toolgroupId>
- <artifactId>simplecaptchaartifactId>
- <version>1.2.2version>
- dependency>
2.redis配置
[html] view plain copy
- ##Redis配置
- spring.redis.database=1
- spring.redis.host=localhost
- #spring.redis.password=password
- spring.redis.port=6379
- spring.redis.timeout=2000
- spring.redis.pool.max-idle=8
- spring.redis.pool.min-idle=0
- spring.redis.pool.max-active=8
- spring.redis.pool.max-wait=-1
3.Redis配置类,实例化Redis模板
[java] view plain copy
- package com.jay.config;
- import org.springframework.context.annotation.Bean;
- import org.springframework.context.annotation.Configuration;
- import org.springframework.data.redis.connection.RedisConnectionFactory;
- import org.springframework.data.redis.core.RedisTemplate;
- import org.springframework.data.redis.core.StringRedisTemplate;
- import org.springframework.data.redis.serializer.Jackson2JsonRedisSerializer;
- import com.fasterxml.jackson.annotation.JsonAutoDetect;
- import com.fasterxml.jackson.annotation.PropertyAccessor;
- import com.fasterxml.jackson.databind.ObjectMapper;
- @Configuration
- public class RedisConfig {
- // 定义Redis模板
- @Bean
- public RedisTemplate
- StringRedisTemplate template = new StringRedisTemplate(factory);
- // 设置序列化工具, 这样缓存的Bean就不需要再试下Serializable接口
- setSerrializer(template);
- template.afterPropertiesSet();
- return template;
- }
- // 设置序列化
- private void setSerrializer(StringRedisTemplate template) {
- Jackson2JsonRedisSerializer jackson2JsonRedisSerializer = new Jackson2JsonRedisSerializer(Object.class);
- ObjectMapper om = new ObjectMapper();
- om.setVisibility(PropertyAccessor.ALL, JsonAutoDetect.Visibility.ANY);
- om.enableDefaultTyping(ObjectMapper.DefaultTyping.NON_FINAL);
- jackson2JsonRedisSerializer.setObjectMapper(om);
- template.setValueSerializer(jackson2JsonRedisSerializer);
- }
- }
4.Controller层操作代码
[java] view plain copy
- package com.jay.controller;
- import java.io.ByteArrayOutputStream;
- import java.io.IOException;
- import java.util.UUID;
- import java.util.concurrent.TimeUnit;
- import javax.imageio.ImageIO;
- import javax.servlet.http.Cookie;
- import javax.servlet.http.HttpServletRequest;
- import javax.servlet.http.HttpServletResponse;
- import org.springframework.beans.factory.annotation.Autowired;
- import org.springframework.data.redis.core.RedisTemplate;
- import org.springframework.http.HttpRequest;
- import org.springframework.http.MediaType;
- import org.springframework.stereotype.Controller;
- import org.springframework.web.bind.annotation.PathVariable;
- import org.springframework.web.bind.annotation.RequestMapping;
- import org.springframework.web.bind.annotation.RequestMethod;
- import org.springframework.web.bind.annotation.ResponseBody;
- import com.jay.util.CookieUtils;
- import com.jay.vo.ResultMsg;
- import com.jay.vo.ResultStatusCode;
- import cn.apiclub.captcha.Captcha;
- import cn.apiclub.captcha.backgrounds.GradiatedBackgroundProducer;
- import cn.apiclub.captcha.gimpy.FishEyeGimpyRenderer;
- import io.swagger.annotations.ApiOperation;
- @Controller
- @RequestMapping("/redis")
- public class RedisCaptchaController {
- @Autowired
- private RedisTemplate
- private static int captchaExpires = 3 * 60; // 超时时间3min,验证码超时,自动冲redis中删除
- private static int captchaW = 200;
- private static int captchaH = 60;
- private static String cookieName = "CaptchaCode";
- @RequestMapping(value = "getcaptcha", method = RequestMethod.GET, produces = MediaType.IMAGE_PNG_VALUE)
- public @ResponseBody byte[] getCaptcha(HttpServletResponse response) {
- // 生成验证码
- String uuid = UUID.randomUUID().toString();
- Captcha captcha = new Captcha.Builder(captchaW, captchaH).addText()
- .addBackground(new GradiatedBackgroundProducer()).gimp(new FishEyeGimpyRenderer()).build();
- // 将验证码以
- redisTemplate.opsForValue().set(uuid, captcha.getAnswer(), captchaExpires, TimeUnit.SECONDS);
- // 将验证码key,及验证码的图片返回
- Cookie cookie = new Cookie(cookieName, uuid);
- response.addCookie(cookie);
- ByteArrayOutputStream bao = new ByteArrayOutputStream();
- try {
- ImageIO.write(captcha.getImage(), "png", bao);
- return bao.toByteArray();
- } catch (IOException e) {
- return null;
- }
- }
- /*
- * 说明:
- * 1.captchaCode来自客户端的Cookie,在访问时,通过服务端设置
- * 2.captcha是用户填写的验证码,将用户填写的验证码和通过captchaCode从redis中获取的验证码进行对比即可
- *
- */
- @ApiOperation(value = "验证码校验")
- @RequestMapping(value = "/captcha/check/{captcha}")
- @ResponseBody
- public ResultMsg
- String captchaCode = CookieUtils.getCookie(request, cookieName);
- ResultMsg
- try{
- if (captcha == null)
- {
- throw new Exception();
- }
- //redis中查询验证码
- String captchaValue = redisTemplate.opsForValue().get(captchaCode);
- if (captchaValue == null) {
- throw new Exception();
- }
- if (captchaValue.compareToIgnoreCase(captcha) != 0) {
- throw new Exception();
- }
- //验证码匹配成功,redis则删除对应的验证码
- redisTemplate.delete(captchaCode);
- return new ResultMsg
- }catch (Exception e) {
- result = new ResultMsg
- }
- return result;
- }
- }
5.效果展示
1.访问生成验证码

2.验证验证码

项目源码下载:下载地址
单点登录原理技术学习,更多知识请访问https://www.itkc8.com