Python+OpenCV实现增强现实!快来召唤你的库洛牌!!!
相信大家都看过或者听过《摩卡少女樱》这部动漫,是不是非常羡慕小樱能够从库洛牌中召唤出各种各样会有魔法的人呀?!
今天,博主就来教教大家如何实现召唤吧!!!学会以后相信你一定可以召唤神龙滴!!
召唤其实是一种几何投影,将虚拟三维模型投射到图像上。它需要先对图像(也就是库洛牌)进行标定,确定投影和图像的相对位置,保证即使图像方向变了,大小变了,也可以实现召唤!!!然后我们设置一些相机参数,让我们真实世界的三维空间和图像上的二维空间对应上。最后,我们将三维图像(会魔法的人)投影到图像(库洛牌)上的指定区域就完成了召唤!!!废话不多说,直接上代码!!!
Step1:召唤一个立方体
from pylab import *
from PIL import Image
import pickle
# 如果您安装了PCV,这些导入应该有效
from PCV.geometry import homography, camera
from PCV.localdescriptors import sift

def cube_points(c, wid):
    """ 创建用于绘制立方体的一个点列表。 (前5个点是底部正方形,一些边重合了)。 """
    p = []
    # 底部
    p.append([c[0]-wid, c[1]-wid, c[2]-wid])
    p.append([c[0]-wid, c[1]+wid, c[2]-wid])
    p.append([c[0]+wid, c[1]+wid, c[2]-wid])
    p.append([c[0]+wid, c[1]-wid, c[2]-wid])
    p.append([c[0]-wid, c[1]-wid, c[2]-wid]) #为了绘制闭合图像,和第一个相同

    # 顶部
    p.append([c[0]-wid, c[1]-wid, c[2]+wid])
    p.append([c[0]-wid, c[1]+wid, c[2]+wid])
    p.append([c[0]+wid, c[1]+wid, c[2]+wid])
    p.append([c[0]+wid, c[1]-wid, c[2]+wid])
    p.append([c[0]-wid, c[1]-wid, c[2]+wid]) #为了绘制闭合图像,和第一个相同

    # 竖直边
    p.append([c[0]-wid, c[1]-wid, c[2]+wid])
    p.append([c[0]-wid, c[1]+wid, c[2]+wid])
    p.append([c[0]-wid, c[1]+wid, c[2]-wid])
    p.append([c[0]+wid, c[1]+wid, c[2]-wid])
    p.append([c[0]+wid, c[1]+wid, c[2]+wid])
    p.append([c[0]+wid, c[1]-wid, c[2]+wid])
    p.append([c[0]+wid, c[1]-wid, c[2]-wid])

    return array(p).T


def my_calibration(sz):
    """
   本例中使用的相机(iPhone4)的校准功能。
    """
    row, col = sz
    fx = 2555*col/2592
    fy = 2586*row/1936
    K = diag([fx, fy, 1])
    K[0, 2] = 0.5*col#标定中心点
    K[1, 2] = 0.5*row#标定中心点
    return K


# 计算特征点
sift.process_image('D:/test/book_frontal.JPG', 'im0.sift')
l0, d0 = sift.read_features_from_file('im0.sift')

sift.process_image('D:/test/book_perspective.JPG', 'im1.sift')
l1, d1 = sift.read_features_from_file('im1.sift')


#匹配特征,并计算单应性矩阵
matches = sift.match_twosided(d0, d1)
ndx = matches.nonzero()[0]
fp = homography.make_homog(l0[ndx, :2].T)
ndx2 = [int(matches[i]) for i in ndx]
tp = homography.make_homog(l1[ndx2, :2].T)

model = homography.RansacModel()
H, inliers = homography.H_from_ransac(fp, tp, model)

#计算照相机标定矩阵
K = my_calibration((747, 1000))

# 位于边长为0.2,z=0平面上的三维点
box = cube_points([0, 0, 0.1], 0.1)

# 投影第一幅图像上底部的正方形
cam1 = camera.Camera(hstack((K, dot(K, array([[0], [0], [-1]])))))
# 底部正方形上的点
box_cam1 = cam1.project(homography.make_homog(box[:, :5]))


#使用H将点变换到第二幅图像上
box_trans = homography.normalize(dot(H,box_cam1))

#从cam1和H中计算第二个张相机矩阵
cam2 = camera.Camera(dot(H, cam1.P))
A = dot(linalg.inv(K), cam2.P[:, :3])
A = array([A[:, 0], A[:, 1], cross(A[:, 0], A[:, 1])]).T
cam2.P[:, :3] = dot(K, A)

# 使用第二个照相机矩阵投影
box_cam2 = cam2.project(homography.make_homog(box))


# 可视化
im0 = array(Image.open('D:/test/book_frontal.JPG'))
im1 = array(Image.open('D:/test/book_perspective.JPG'))

#底部正方形的二维投影
figure()
imshow(im0)
plot(box_cam1[0, :], box_cam1[1, :], linewidth=3)
title('2D projection of bottom square')
axis('off')

#使用H对二维投影进行变换
figure()
imshow(im1)
plot(box_trans[0, :], box_trans[1, :], linewidth=3)
title('2D projection transfered with H')
axis('off')

#三维立方体
figure()
imshow(im1)
plot(box_cam2[0, :], box_cam2[1, :], linewidth=3)
title('3D points projected in second image')
axis('off')

show()
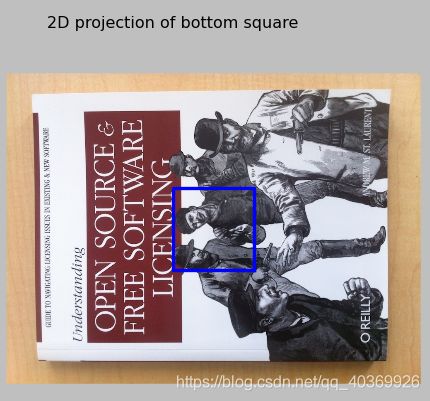
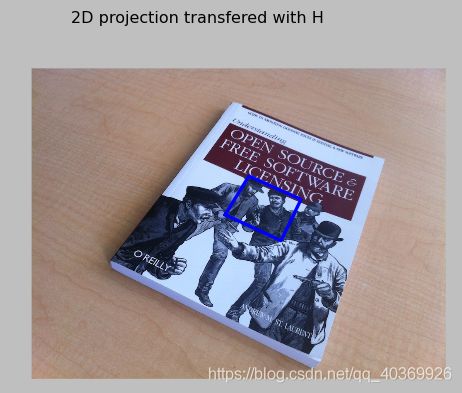
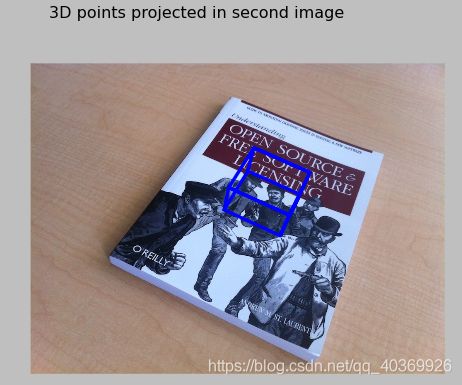
首先,我们在第一张图像标定出一个正方形。然后,我们通过sift特征匹配和单应性变换(博主之前已经详细讲述过啦,传送通道:https://blog.csdn.net/qq_40369926/article/details/88597406 https://blog.csdn.net/qq_40369926/article/details/88918489)找到第一张图片和第二张图像的对应关系,将第一张图像标定的正方形标定到第二张图像上,我们可以看到第一张图像中正方形和书的位置和大小对应关系,和第二张图像中正方形的大小对应关系是一致的。最后,我们以第二张图像的正方形为底面投影出一个正方体,这样就实现了简单的三维立方体的召唤!!!
Step2:召唤一个茶壶
from OpenGL.GL import *
from OpenGL.GLU import *
from OpenGL.GLUT import *
import pygame,pygame.image
from pygame.locals import *
import pickle
import math
from pylab import *
from PCV.geometry import homography, camera
from PCV.localdescriptors import sift

def cube_points(c, wid):
    """ 创建用于绘制立方体的一个点列表。 (前5个点是底部正方形,一些边重合了)。 """
    p = []
    # 底部
    p.append([c[0]-wid, c[1]-wid, c[2]-wid])
    p.append([c[0]-wid, c[1]+wid, c[2]-wid])
    p.append([c[0]+wid, c[1]+wid, c[2]-wid])
    p.append([c[0]+wid, c[1]-wid, c[2]-wid])
    p.append([c[0]-wid, c[1]-wid, c[2]-wid]) #为了绘制闭合图像,和第一个相同

    # 顶部
    p.append([c[0]-wid, c[1]-wid, c[2]+wid])
    p.append([c[0]-wid, c[1]+wid, c[2]+wid])
    p.append([c[0]+wid, c[1]+wid, c[2]+wid])
    p.append([c[0]+wid, c[1]-wid, c[2]+wid])
    p.append([c[0]-wid, c[1]-wid, c[2]+wid]) #为了绘制闭合图像,和第一个相同

    # 竖直边
    p.append([c[0]-wid, c[1]-wid, c[2]+wid])
    p.append([c[0]-wid, c[1]+wid, c[2]+wid])
    p.append([c[0]-wid, c[1]+wid, c[2]-wid])
    p.append([c[0]+wid, c[1]+wid, c[2]-wid])
    p.append([c[0]+wid, c[1]+wid, c[2]+wid])
    p.append([c[0]+wid, c[1]-wid, c[2]+wid])
    p.append([c[0]+wid, c[1]-wid, c[2]-wid])

    return array(p).T

def my_calibration(sz):
    """
   本例中使用的相机(iPhone4)的校准功能。
    """
    row, col = sz
    fx = 2555*col/2592
    fy = 2586*row/1936
    K = diag([fx, fy, 1])
    K[0, 2] = 0.5*col#标定中心点
    K[1, 2] = 0.5*row#标定中心点
    return K

def set_projection_from_camera(K):
    """从照相机标定矩阵获得视图"""

    glMatrixMode(GL_PROJECTION)
    glLoadIdentity()
    fx=K[0,0]
    fy=K[1,1]
    fovy=2*math.atan(0.5*height/fy)*180/math.pi
    aspect=(width*fy)/(height*fx)

    #定义近的和远的剪裁平面
    near=0.1
    far=100.0

    #设定透视
    gluPerspective(fovy,aspect,near,far)
    glViewport(0,0,width,height)


def set_modelview_from_camera(Rt):
    """从照相机姿态中获得模拟视图矩阵"""

    glMatrixMode(GL_MODELVIEW)
    glLoadIdentity()

    #围绕x轴将茶壶旋转90度,使z轴向上
    Rx=np.array([[1,0,0],[0,0,-1],[0,1,0]])

    #获得旋转的最佳逼近
    R=Rt[:,:3]
    U,S,V=linalg.svd(R)
    R=dot(U,V)
    R[0,:]=-R[0,:]#改变x轴的符号

    #获得平移量
    t=Rt[:,3]

    #获得4*4的模拟视图矩阵
    M=eye(4)
    M[:3,:3]=dot(R,Rx)
    M[:3,3]=t

    #转置并压平以获取序列数值
    M=M.T
    m=M.flatten()

    #将模拟视图矩阵替换为新的矩阵
    glLoadMatrixf(m)

def draw_background(imname):
    """使用四边形绘制背景图像"""
    #载入背景图像(应该是.bmp格式),转换为OpenGL纹理
    bg_image=pygame.image.load(imname).convert()
    bg_data=pygame.image.tostring(bg_image,"RGBX",1)

    glMatrixMode(GL_MODELVIEW)
    glLoadIdentity()
    glClear(GL_COLOR_BUFFER_BIT | GL_DEPTH_BUFFER_BIT)

    #绑定纹理
    glEnable(GL_TEXTURE_2D)
    glBindTexture(GL_TEXTURE_2D,glGenTextures(1))
    glTexImage2D(GL_TEXTURE_2D,0,GL_RGBA,width,height,0,GL_RGBA,GL_UNSIGNED_BYTE,bg_data)
    glTexParameterf(GL_TEXTURE_2D,GL_TEXTURE_MAG_FILTER,GL_NEAREST)
    glTexParameterf(GL_TEXTURE_2D,GL_TEXTURE_MIN_FILTER,GL_NEAREST)

    #创建四方形填充整个窗口
    glBegin(GL_QUADS)
    glTexCoord2f(0.0,0.0);glVertex3f(-1.0,-1.0,-1.0)
    glTexCoord2f(1.0,0.0);glVertex3f(1.0,-1.0,-1.0)
    glTexCoord2f(1.0,1.0);glVertex3f(1.0,1.0,-1.0)
    glTexCoord2f(0.0,1.0);glVertex3f(-1.0,1.0,-1.0)
    glEnd()

    #清除纹理
    glDeleteTextures(1)


def draw_teapot(size):
    """在原点处绘制红色茶壶"""

    glEnable(GL_LIGHTING)
    glEnable(GL_LIGHT0)
    glEnable(GL_DEPTH_TEST)
    glClear(GL_DEPTH_BUFFER_BIT)

    #绘制红色茶壶
    glMaterialfv(GL_FRONT,GL_AMBIENT,[0,0.2,0.2,0])#材质的环境颜色
    glMaterialfv(GL_FRONT,GL_DIFFUSE,[0.8,0.8,0.8,1.0])#材质的散射颜色
    glMaterialfv(GL_FRONT,GL_SPECULAR,[0.7,0.6,0.6,0.0])#材料的镜面反射颜色
    glMaterialfv(GL_FRONT,GL_SHININESS,0.25*128.0)#镜面反射指数
    glutSolidTeapot(size)

width,height=1000,747

def setup():
    """"设置窗口和pygame环境"""
    pygame.init()
    pygame.display.set_mode((width,height),OPENGL | DOUBLEBUF)
    pygame.display.set_caption('OpenGL AR demo')

# 计算特征点
sift.process_image('D:/test/book_frontal.JPG', 'im0.sift')
l0, d0 = sift.read_features_from_file('im0.sift')

sift.process_image('D:/test/book_perspective.JPG', 'im1.sift')
l1, d1 = sift.read_features_from_file('im1.sift')

#匹配特征,并计算单应性矩阵
matches = sift.match_twosided(d0, d1)
ndx = matches.nonzero()[0]
fp = homography.make_homog(l0[ndx, :2].T)
ndx2 = [int(matches[i]) for i in ndx]
tp = homography.make_homog(l1[ndx2, :2].T)

model = homography.RansacModel()
H, inliers = homography.H_from_ransac(fp, tp, model)

#计算照相机标定矩阵
K = my_calibration((747, 1000))

# 位于边长为0.2,z=0平面上的三维点
box = cube_points([0, 0, 0.1], 0.1)

# 投影第一幅图像上底部的正方形
cam1 = camera.Camera(hstack((K, dot(K, array([[0], [0], [-1]])))))
# 底部正方形上的点
box_cam1 = cam1.project(homography.make_homog(box[:, :5]))


#使用H将点变换到第二幅图像上
box_trans = homography.normalize(dot(H,box_cam1))

#从cam1和H中计算第二个张相机矩阵
cam2 = camera.Camera(dot(H, cam1.P))
A = dot(linalg.inv(K), cam2.P[:, :3])
A = array([A[:, 0], A[:, 1], cross(A[:, 0], A[:, 1])]).T
cam2.P[:, :3] = dot(K, A)

Rt=dot(linalg.inv(K),cam2.P)


setup()
draw_background('D:/test/book_perspective.bmp')
set_projection_from_camera(K)
set_modelview_from_camera(Rt)
draw_teapot(0.10)

pygame.display.flip()
while True:
    event=pygame.event.poll()
    if event.type ==pygame.QUIT:
            sys.exit()
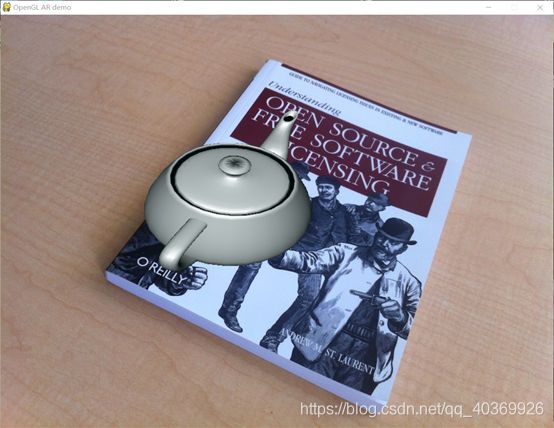
召唤茶壶和召唤立方体的前两步是一样的,只是最后一步投影的不是一个立方体,而是一个茶壶,茶壶比立方体要复杂一些。我们先要对茶壶这个模型有一些基础的设置,比如大小、颜色、表面纹理等。
Step3:召唤一只狐狸(动态投影)
1.objloader_simple.py
objloader_simple.py用于在python中载入obj模型(3D模型),前面的茶壶就是一个obj模型,我们可以在http://www.oyonale.com/modeles.php?lang=en&format=OBJ中下载你想要的各种obj模型。
class OBJ:
    def __init__(self, filename, swapyz=False):
        """Loads a Wavefront OBJ file. """
        self.vertices = []
        self.normals = []
        self.texcoords = []
        self.faces = []
        material = None
        for line in open(filename, "r"):
            if line.startswith('#'): continue
            values = line.split()
            if not values: continue
            if values[0] == 'v':
                v = map(float, values[1:4])
                if swapyz:
                    v = v[0], v[2], v[1]
                self.vertices.append(v)
            elif values[0] == 'vn':
                v = map(float, values[1:4])
                if swapyz:
                    v = v[0], v[2], v[1]
                self.normals.append(v)
            elif values[0] == 'vt':
                self.texcoords.append(map(float, values[1:3]))
            #elif values[0] in ('usemtl', 'usemat'):
                #material = values[1]
            #elif values[0] == 'mtllib':
                #self.mtl = MTL(values[1])
            elif values[0] == 'f':
                face = []
                texcoords = []
                norms = []
                for v in values[1:]:
                    w = v.split('/')
                    face.append(int(w[0]))
                    if len(w) >= 2 and len(w[1]) > 0:
                        texcoords.append(int(w[1]))
                    else:
                        texcoords.append(0)
                    if len(w) >= 3 and len(w[2]) > 0:
                        norms.append(int(w[2]))
                    else:
                        norms.append(0)
                #self.faces.append((face, norms, texcoords, material))
                self.faces.append((face, norms, texcoords))
2.main.py
# Useful links
# http://www.pygame.org/wiki/OBJFileLoader
# https://rdmilligan.wordpress.com/2015/10/15/augmented-reality-using-opencv-opengl-and-blender/
# https://clara.io/library

# TODO -> Implement command line arguments (scale, model and object to be projected)
#      -> Refactor and organize code (proper funcition definition and separation, classes, error handling...)

import argparse

import cv2
import numpy as np
import math
import os
from objloader_simple import *

# Minimum number of matches that have to be found
# to consider the recognition valid
MIN_MATCHES = 10


def main():
    """
    This functions loads the target surface image,
    """
    homography = None
    # matrix of camera parameters (made up but works quite well for me)
    camera_parameters = np.array([[800, 0, 320], [0, 800, 240], [0, 0, 1]])
    # create ORB keypoint detector
    orb = cv2.ORB_create()
    # create BFMatcher object based on hamming distance
    bf = cv2.BFMatcher(cv2.NORM_HAMMING, crossCheck=True)
    # load the reference surface that will be searched in the video stream
    dir_name = os.getcwd()
    model = cv2.imread(os.path.join(dir_name, 'D:/test/models.jpg'), 0)
    # Compute model keypoints and its descriptors
    kp_model, des_model = orb.detectAndCompute(model, None)
    # Load 3D model from OBJ file
    obj = OBJ(os.path.join(dir_name, 'D:/test/models/fox.obj'), swapyz=True)
    # init video capture
    cap = cv2.VideoCapture(0)

    while True:
        # read the current frame
        ret, frame = cap.read()
        if not ret:
            print "Unable to capture video"
            return
        # find and draw the keypoints of the frame
        kp_frame, des_frame = orb.detectAndCompute(frame, None)
        # match frame descriptors with model descriptors
        matches = bf.match(des_model, des_frame)
        # sort them in the order of their distance
        # the lower the distance, the better the match
        matches = sorted(matches, key=lambda x: x.distance)

        # compute Homography if enough matches are found
        if len(matches) > MIN_MATCHES:
            # differenciate between source points and destination points
            src_pts = np.float32([kp_model[m.queryIdx].pt for m in matches]).reshape(-1, 1, 2)
            dst_pts = np.float32([kp_frame[m.trainIdx].pt for m in matches]).reshape(-1, 1, 2)
            # compute Homography
            homography, mask = cv2.findHomography(src_pts, dst_pts, cv2.RANSAC, 5.0)
            if args.rectangle:
                # Draw a rectangle that marks the found model in the frame
                h, w = model.shape
                pts = np.float32([[0, 0], [0, h - 1], [w - 1, h - 1], [w - 1, 0]]).reshape(-1, 1, 2)
                # project corners into frame
                dst = cv2.perspectiveTransform(pts, homography)
                # connect them with lines
                frame = cv2.polylines(frame, [np.int32(dst)], True, 255, 3, cv2.LINE_AA)
            # if a valid homography matrix was found render cube on model plane
            if homography is not None:
                try:
                    # obtain 3D projection matrix from homography matrix and camera parameters
                    projection = projection_matrix(camera_parameters, homography)
                    # project cube or model
                    frame = render(frame, obj, projection, model, False)
                    #frame = render(frame, model, projection)
                except:
                    pass
            # draw first 10 matches.
            if args.matches:
                frame = cv2.drawMatches(model, kp_model, frame, kp_frame, matches[:10], 0, flags=2)
            # show result
            cv2.imshow('frame', frame)
            if cv2.waitKey(1) & 0xFF == ord('q'):
                break

        else:
            print "Not enough matches found - %d/%d" % (len(matches), MIN_MATCHES)

    cap.release()
    cv2.destroyAllWindows()
    return 0

def render(img, obj, projection, model, color=False):
    """
    Render a loaded obj model into the current video frame
    """
    vertices = obj.vertices
    scale_matrix = np.eye(3) * 3
    h, w = model.shape

    for face in obj.faces:
        face_vertices = face[0]
        points = np.array([vertices[vertex - 1] for vertex in face_vertices])
        points = np.dot(points, scale_matrix)
        # render model in the middle of the reference surface. To do so,
        # model points must be displaced
        points = np.array([[p[0] + w / 2, p[1] + h / 2, p[2]] for p in points])
        dst = cv2.perspectiveTransform(points.reshape(-1, 1, 3), projection)
        imgpts = np.int32(dst)
        if color is False:
            cv2.fillConvexPoly(img, imgpts, (137, 27, 211))
        else:
            color = hex_to_rgb(face[-1])
            color = color[::-1]  # reverse
            cv2.fillConvexPoly(img, imgpts, color)

    return img

def projection_matrix(camera_parameters, homography):
    """
    From the camera calibration matrix and the estimated homography
    compute the 3D projection matrix
    """
    # Compute rotation along the x and y axis as well as the translation
    homography = homography * (-1)
    rot_and_transl = np.dot(np.linalg.inv(camera_parameters), homography)
    col_1 = rot_and_transl[:, 0]
    col_2 = rot_and_transl[:, 1]
    col_3 = rot_and_transl[:, 2]
    # normalise vectors
    l = math.sqrt(np.linalg.norm(col_1, 2) * np.linalg.norm(col_2, 2))
    rot_1 = col_1 / l
    rot_2 = col_2 / l
    translation = col_3 / l
    # compute the orthonormal basis
    c = rot_1 + rot_2
    p = np.cross(rot_1, rot_2)
    d = np.cross(c, p)
    rot_1 = np.dot(c / np.linalg.norm(c, 2) + d / np.linalg.norm(d, 2), 1 / math.sqrt(2))
    rot_2 = np.dot(c / np.linalg.norm(c, 2) - d / np.linalg.norm(d, 2), 1 / math.sqrt(2))
    rot_3 = np.cross(rot_1, rot_2)
    # finally, compute the 3D projection matrix from the model to the current frame
    projection = np.stack((rot_1, rot_2, rot_3, translation)).T
    return np.dot(camera_parameters, projection)

def hex_to_rgb(hex_color):
    """
    Helper function to convert hex strings to RGB
    """
    hex_color = hex_color.lstrip('#')
    h_len = len(hex_color)
    return tuple(int(hex_color[i:i + h_len // 3], 16) for i in range(0, h_len, h_len // 3))


# Command line argument parsing
# NOT ALL OF THEM ARE SUPPORTED YET
parser = argparse.ArgumentParser(description='Augmented reality application')

parser.add_argument('-r','--rectangle', help = 'draw rectangle delimiting target surface on frame', action = 'store_true')
parser.add_argument('-mk','--model_keypoints', help = 'draw model keypoints', action = 'store_true')
parser.add_argument('-fk','--frame_keypoints', help = 'draw frame keypoints', action = 'store_true')
parser.add_argument('-ma','--matches', help = 'draw matches between keypoints', action = 'store_true')
# TODO jgallostraa -> add support for model specification
#parser.add_argument('-mo','--model', help = 'Specify model to be projected', action = 'store_true')

args = parser.parse_args()

if __name__ == '__main__':
    main()
实现动态投影第一步也是先输入一张图像,确定标定指定位置,然后从摄像头输入图像,实现摄像头获取的图像和第一张图像的映射。最后,将狐狸投射到书上。这样就实现了狐狸跃然书上,这里博主偷了一个小懒,没有设置狐狸的纹理等信息,你们可以参考茶壶的设置,按照自己的喜欢,修改狐狸的各种参数设置。从视频中可以看出,当我们移动书的时候,狐狸会随书而动,它和书的相对位置基本没发生改变,说明我们基本实现了召唤,再也不用羡慕小樱啦,甚至还可以召唤神龙!!!!
