Python自学笔记:Ch0 Python知识串讲
一、基本知识
1.print函数:
>>> a=100
>>> b="Hello,world!"
>>> print("point=%s\n\"%s\""%(a,b))
point=100
 " Hello,world! "
2.输入函数input:
a=input(‘输入提示语句:’),返回类型是字符串
>>> a=int(input('输入提示语句:'))    #输入进行类型转换
输入提示语句:1
>>> a
1
>>> a=int(input('输入提示语句:'))
输入提示语句:1.2
Traceback (most recent call last):
  File "", line 1, in
ValueError: invalid literal for int() with base 10: '1.2'

>>>a=eval(input('输入提示语句:'))    #输入当成有效的表达式来求值并返回计算结果
输入提示语句:1
>>> a
1
>>> a=eval(input('输入提示语句:'))
输入提示语句:1+1
>>> a
2
- PY文件当中是不支持中文的,即使你输入的注释是中文也不行,为了解决这个问题,就需要把文件编码类型改为UTF-8的类型,输入这个代码就可以让PY源文件里面有中文了。
#coding:utf-8
3.符号
- 运算符:**:幂运算,//:整除,取整数部分。
- 逻辑符号:==等于,!=不等于,and 与,or 或。
- \可作为续行符
4.序列
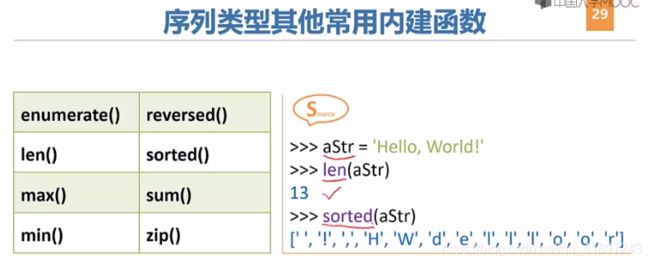
序列类型包括字符串(单双引号括起)、列表、元组、集合和字典,序列具有索引0至N-1,-n表示从后数第n个。
标准类型运算符:


序列类型运算符:


二、列表 list
- list是一种有序的集合,可以随时添加和删除其中的元素。
- 用索引来访问list中每一个位置的元素,记得索引是从0开始的。
>>> classmates = ['Michael', 'Bob', 'Tracy']
>>> classmates
['Michael', 'Bob', 'Tracy']
>>> classmates[0]
'Michael'
>>> classmates[1]
'Bob'
>>> classmates[2]
'Tracy'
- 用-1做索引,直接获取最后一个元素,以此类推,可以获取倒数第2个、倒数第3个。
>>> classmates[-1]
'Tracy'
- 可用[起:止]进行切片,前闭后开。
- [起:止:步长]可切出带步长的切片(步长可为负数)。
- 列表名 [n] 第 n 个元素
- 列表名[:n] 前 n 个元素
- 列表名[-n:] 最后 n 个元素
- 列表名[n:m ] 从 第 n+1 个元素一直到第 m 个元 素
- 列表名[1:-1] 除 了第一个和最后一个以外的所有元素
import math

my_list1=['haha',True, math.pi,56,7,8]

#列表元素切取
print('\n')
first_three=my_list1[:3]
print(first_three)
last_three=my_list1[-3:]
print(last_three)
without_first_last=my_list1[1:-1]
print(without_first_last)

y=my_list1[1:3]
print(y)


['haha', True, 3.141592653589793]
[56, 7, 8]
[True, 3.141592653589793, 56, 7]
[True, 3.141592653589793]
- 列表可以是数值、字符串、列表等的混搭。
>>> c=[1,"d",classmates]
- 修改:列表名[索引号]=新值。
- 删除:del 列表名[索引号]
- 插入:列表名,insert(插入位置索引号,新元素)
>>> c=[1,2,3,"4"]
>>> c
[1, 2, 3, '4']
>>> del c[3]
>>> c
[1, 2, 3]
>>> c.insert(1,'2')
>>> c
[1, '2', 2, 3]
>>> c[0]='1'
>>> c
['1', '2', 2, 3]
>>> c.append('hehe')
>>> c
['1', '2', 2, 3, 'hehe']
- in操作符:确认列表成员
>>> x=[1,2,3]
>>> print(1 in x)
True
>>> print('haha' in x)
False
- 列表相加:
>>> x=[1,2,3]
>>> print(x+x)
[1, 2, 3, 1, 2, 3]
三、元组 tuple
另一种有序列表叫元组:tuple。tuple和list非常类似,但是tuple一旦初始化就不能修改。可以正常地使用classmates[0],classmates[-1],但不能赋值成另外的元素。
元组使用圆括号或无括号界定:
>>> classmates = ('Michael', 'Bob', 'Tracy')
>>> classmates[1]
'Bob'
>>> x=(1,2,3)
>>> y=4,5
>>> print(x,y)
(1, 2, 3) (4, 5)
>>> try:
...     x[1]='haha'
... except TypeError:
...     print('Error')
...
Error
>>> print(x)
(1, 2, 3)
注:函数多重返回值
>>> x,y=[1,True]
>>> print(x,y)
1 True
>>> y,x=x,y
>>> print(x,y)
True 1
四、字典 dict
dict全称dictionary,在其他语言中也称为map,使用键-值(key-value)存储,具有极快的查找速度。
字典使用大括号界定,方括号访问:
>>> d = {'Michael': 95, 'Bob': 75, 'Tracy': 85}
>>> d['Michael']
95
- 修改:字典名[键]=新值。
- 删除:del 字典名[键]。
- 插入:字典名[新键]=新值。
>>> x={}
>>> y=dict()
>>> z={'haha':80,'wuwu':20}
>>> my_score=z['haha']
>>> print(my_score)
80
>>> print('xixi' in z)
False
>>> z['haha']=90
>>> z['hehe']=10
>>> print(z)
{'haha': 90, 'wuwu': 20, 'hehe': 10}
>>> print(z.keys())
dict_keys(['haha', 'wuwu', 'hehe'])
>>> print(z.values())
dict_values([90, 20, 10])
>>> print(z.items())
dict_items([('haha', 90), ('wuwu', 20), ('hehe', 10)])
五、集合 set
集合存放不重复元素,且无顺序定义。
#set
my_set={'123','456',89,True}
print(my_set)

{89, '456', '123', True}
六、条件语句
缩进的语句体前有四个空格。
age = 3
if age >= 18:
    print('adult')
elif age >= 6:
    print('teenager')
else:
    print('kid')
- 注意:input()返回的数据类型是str,str不能直接和整数比较,必须先把str转换成整数。
- Python提供了int()函数来完成这件事情。
- 经验证,Python2.7.15不进行转换也可运行,而Python3.7.0需要转换。
s = input('birth: ')
birth = int(s)
if birth < 2000:
    print('00前')
else:
    print('00后')
七、循环语句
(1)for 变量 in range (开始值,结束值):
其中的括号内的开始、结束值也为前闭后开区间。
>>> for x in range(1,10):
...     sum = sum+x
...
>>> sum
45
(2)for 变量 in 列表名:
>>> names = ['Michael', 'Bob', 'Tracy']
>>> for name in names:
...     print(name)
...
Michael
Bob
Tracy
(3)while 条件 :
>>> sum = 0
>>> n = 99
>>> while n > 0:
...     sum = sum + n
...     n = n - 2
...
>>> sum
2500
(4)终止循环用 break
八、turtle 模块
import turtle                   #导入turtle模块
t = turtle.Pen ( )              #用turtle模块中的Pen类,实例化出一个叫做t的对象
							    #注意“Pen”的大小写
t.forward ( 像素点 )             # 让 t 向前走多少个像素点
t.backward ( 像素点 )            # 让 t 向前走多少个像素点
t.left ( 角度 )                  #让 t 左转多少角度
t.right ( 角度 )                 #让 t 右转多少角度
t.reset ( )                     #让 t 复位
九、函数
#定义
def hi_name (yourname):
	print ”Hello %s” yourname

#使用
 hi_name(”zhangsan”)

#输出
Hello zhangsan
十、模块 module 包
模块(module):是一个Python 文件,以 .py 结尾,包含了Python函数等语句。 先导入,再使用,用模块 .函数名调用。
>>> import time
>>> time.asctime()
'Tue Mar 19 09:19:57 2019'
包包含多个模块,调用时加上from:
from PIL import Image
十一、类 对象 面向对象
(1)实例化
实例化:对象 = 类()
t = turtle.Pen()
子类实例化出来的对象,可以使用自身和父函数与变量。
(2)类
类的定义:
class  类名 (父类名):
	pass
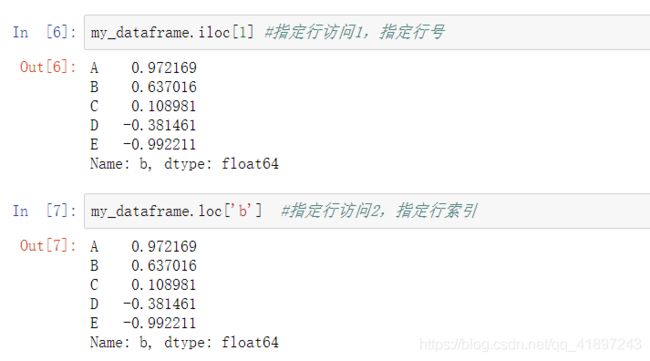
十二、DataFrame
十三、可变可迭代对象修改
迭代过程存在指针:
lst = [1,2,4,3,5]
for x in lst:
    if x % 2 == 0:
        lst.remove(x)
print(lst)

运行结果:
[1, 4, 3, 5]
故创建一个list的浅拷贝:
lst = [1,2,4,3,5]
for x in lst[:]:
    if x % 2 == 0:
        lst.remove(x)
print(lst)

运行结果:
[1, 3, 5]
深拷贝:
x = [1, 2, 3]
y = x
y[0] = 4
print(x)

运行结果:
[4, 2, 3]
多级拷贝:
x = [1, 2, [3, 4]]
y = x.copy()
y[0], y[2][0] = 9, 9
print(y)
print(x)

运行结果:
[9, 2, [9, 4]]
[1, 2, [9, 4]]
import copy

x = [1, 2, [3, 4]]
y = copy.deepcopy(x)
y[0], y[2][0] = 9, 9
print(y)
print(x)

运行结果:
[9, 2, [9, 4]]
[1, 2, [3, 4]]
Python序列默认为浅拷贝。
十四、本地数据
1.打开文件
- -1为默认缓冲区大小;
- r+=r+w;w+=w+r;a+=a+r;加b表示二进制读写;
2.文件相关函数
with open('D:\\code\\Python\\a.txt','w') as f:
	f.write('hello')
	# 文件会自动关闭
读文件:
with open('D:\\code\\Python\\a.txt') as f:
    p1 = f.read(2)
    p2 = f.read()
print(p1,p2)


