Unity学习:获取模型对应的贴图中的像素点,修改颜色
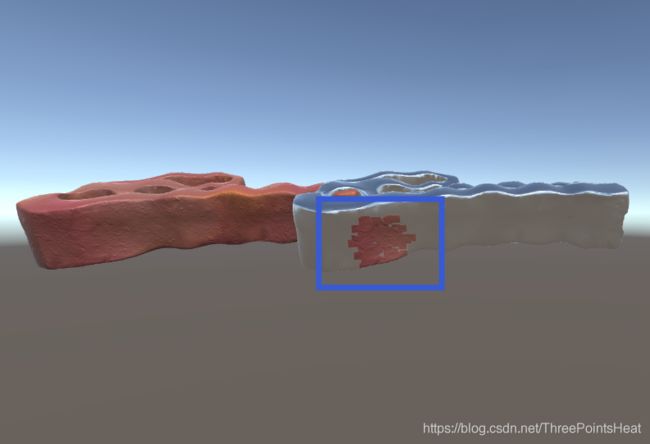
最近项目中,出现一个非常变态的需求:用户使用鼠标点击某个物体,在物体上滑动鼠标,鼠标在物体上所过的地方贴图像素会变成其他贴图。类似于这种效果:
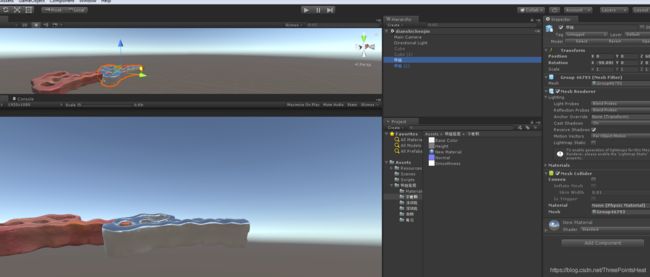
首先先准备两个模型或者创建两个Cube,然后创建两个带贴图的材质球分别给物体。
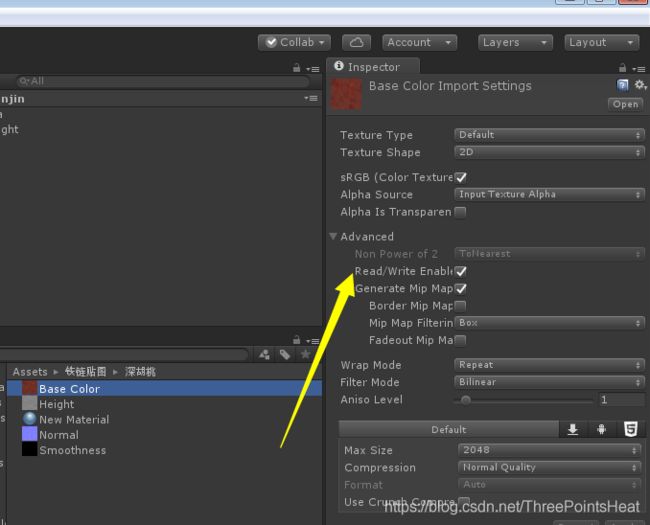
注意:贴图可读写要勾上
下面开始贴完整的代码:
/*
获取模型对应的贴图中的像素点,修改颜色
*/
using System.Collections;
using System.Collections.Generic;
using UnityEngine;
public class Pen : MonoBehaviour
{
public Camera modelCamera;
public GameObject obj;
public GameObject obj1;
public Material mat;
//[HideInInspector]
public bool isDrawBegin;
private GameObject _m_obj;
public GameObject m_obj
{
get { return _m_obj; }
set
{
if (_m_obj != null)
{
ReSetTexutre();
}
if (value != null)
{
GetMatTextureOnModel(value);
}
_m_obj = value;
}
}
private Material m_material;
private Texture2D m_texture;
private Texture2D smoothness_texture;
private Texture2D normal_texture;
private Texture2D height_texture;
private Material _target_mat;
public Material target_mat
{
get { return _target_mat; }
set
{
if (value != null)
{
GetTargetMatTextures(value);
}
_target_mat = value;
}
}
private Texture2D target_m_tex;
private Texture2D target_smoothness_tex;
private Texture2D target_normal_tex;
private Texture2D target_height_tex;
public int size = 3;
private Color[] m_textureColorsStart;
private Color[] smoothness_textureColorsStart;
private Color[] normal_textureColorsStart;
private Color[] height_textureColorsStart;
void Start()
{
m_obj = obj;
target_mat = mat;
}
void Update()
{
if (Input.GetMouseButton(0) && m_obj != null && isDrawBegin == true)
{
Ray ray = modelCamera.ScreenPointToRay(Input.mousePosition);
RaycastHit hit;
if (Physics.Raycast(ray, out hit))
{
if (hit.transform.name == m_obj.name)
{
//在碰撞位置处的UV纹理坐标。
Vector2 pixelUV = hit.textureCoord;
//以像素为单位的纹理宽度
pixelUV.x *= m_texture.width;
pixelUV.y *= m_texture.height;
//贴图UV坐标以右上角为原点
for (float i = pixelUV.x - 1; i < pixelUV.x + size; i++)
{
for (float j = pixelUV.y - 1; j < pixelUV.y + size; j++)
{
Color c = target_m_tex.GetPixel((int)i, (int)j);
Color c1 = target_smoothness_tex.GetPixel((int)i, (int)j);
Color c2 = target_normal_tex.GetPixel((int)i, (int)j);
Color c3 = target_height_tex.GetPixel((int)i, (int)j);
m_texture.SetPixel((int)i, (int)j, c);
smoothness_texture.SetPixel((int)i, (int)j, c1);
normal_texture.SetPixel((int)i, (int)j, c2);
height_texture.SetPixel((int)i, (int)j, c3);
}
}
m_texture.Apply();
smoothness_texture.Apply();
normal_texture.Apply();
height_texture.Apply();
#region 方法二
计算笔刷所覆盖的区域
//int PuX = Mathf.FloorToInt(pixelUV.x * m_tex.width);
//int PuY = Mathf.FloorToInt(pixelUV.y * m_tex.height);
//int x = Mathf.Clamp(PuX - size / 2, 0, m_tex.width - 1);
//int y = Mathf.Clamp(PuY - size / 2, 0, m_tex.height - 1);
//int width = Mathf.Clamp((PuX + size / 2), 0, m_tex.width) - x;
//int height = Mathf.Clamp((PuY + size / 2), 0, m_tex.height) - y;
//Color[] terrainBay = m_tex.GetPixels(x, y, width, height, 0);//获取Control贴图被笔刷所覆盖的区域的颜色
//Texture2D TBrush = target_tex as Texture2D;//获取笔刷性状贴图
//float[] brushAlpha = new float[size * size];//笔刷透明度
根据笔刷贴图计算笔刷的透明度
//for (int i = 0; i < size; i++)
//{
// for (int j = 0; j < size; j++)
// {
// brushAlpha[j * size + i] = TBrush.GetPixelBilinear(((float)i) / size, ((float)j) / size).a;
// }
//}
计算绘制后的颜色
//for (int i = 0; i < height; i++)
//{
// for (int j = 0; j < width; j++)
// {
// int index = (i * width) + j;
// float Stronger = brushAlpha[Mathf.Clamp((y + i) - (PuY - size / 2), 0, size - 1) * size + Mathf.Clamp((x + j) - (PuX - size / 2), 0, size - 1)] * 1;
// Color targetColor = new Color(1f, 0f, 0f, 0f);
// terrainBay[index] = Color.Lerp(terrainBay[index], targetColor, Stronger);
// }
//}
//m_tex.SetPixels(x, y, width, height, terrainBay, 0);//把绘制后的Control贴图保存起来
//m_tex.Apply();
#endregion
}
}
}
if (Input.GetKeyDown(KeyCode.Escape))
{
ReSetTexutre();
}
}
private void OnDisable()
{
ReSetTexutre();
}
///
/// 获取挂在模型上的材质贴图
///
/// 模型物体
public void GetMatTextureOnModel(GameObject obj)
{
m_material = obj.GetComponent
m_texture = m_material.mainTexture as Texture2D;
smoothness_texture = m_material.GetTexture("_MetallicGlossMap") as Texture2D;
normal_texture = m_material.GetTexture("_BumpMap") as Texture2D;
height_texture = m_material.GetTexture("_ParallaxMap") as Texture2D;
//从纹理中获取像素颜色
m_textureColorsStart = m_texture.GetPixels();
smoothness_textureColorsStart = smoothness_texture.GetPixels();
normal_textureColorsStart = normal_texture.GetPixels();
height_textureColorsStart = height_texture.GetPixels();
}
///
/// 获取目标材质上的所有贴图
///
/// 目标材质
public void GetTargetMatTextures(Material mat)
{
target_m_tex = mat.mainTexture as Texture2D;
target_smoothness_tex = mat.GetTexture("_MetallicGlossMap") as Texture2D;
target_normal_tex = mat.GetTexture("_BumpMap") as Texture2D;
target_height_tex = mat.GetTexture("_ParallaxMap") as Texture2D;
}
///
/// 贴图还原
///
public void ReSetTexutre()
{
if (m_texture!=null)
{
m_texture.SetPixels(m_textureColorsStart);
smoothness_texture.SetPixels(smoothness_textureColorsStart);
normal_texture.SetPixels(normal_textureColorsStart);
height_texture.SetPixels(height_textureColorsStart);
m_texture.Apply();
smoothness_texture.Apply();
normal_texture.Apply();
height_texture.Apply();
}
}
}
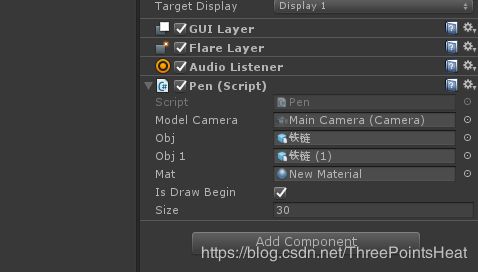
脚本可以挂在任何物体上,我这里偷了个懒,所有变量属性全是public,最好不要全部public,不方便以后项目迁移。
obj是你需要点击的换贴图像素点的物体
obj1是用来做对比的
mat是需要换的贴图像素点
IsDrawBegin必须勾上
size是调节像素点大小


