服务器部署vue+flask+mongodb网站(gunicorn+nginx)
文章目录
- 背景
- 整体流程
- 服务器跑后端
- 运行
- 检测
- 服务器加载前端
- 主要涉及到的指令
背景
在本地做完的flask后端和vue前端工程,需要将前后端打包到服务器上去跑。
整体流程
我们平时写前后端的时候是flask跑起来,有一个地址,例如localhost:5000
然后前端通过这个localhost:5000来和后端连接进行数据交互。同时前端再提供一个地址例如localhost:8080,打开浏览器进入localhost:8080就可以访问前端的页面。
首先是将整个后端的代码上传到服务器,使用gunicorn让后端代码跑起来;然后前端vue项目通过npm run build打包成dist的文件夹。将这个文件夹放到服务器,然后配置nginx告诉nginx我们把这个dist文件夹放在哪里了。
使用gunicorn是为了让后端遇到异常的时候不至于停下来,同时可以通过gunicorn的日志文件查看前后端的交互情况。
服务器上有两种接口数据交互:一种是我们本地的浏览器去访问服务器前端的网页时,需要向服务器发送页面请求的url地址;另外一种是服务器前端向后端索要数据时传递的api地址。服务器上的api地址会被nginx截获,所以我们需要配置nginx让它知道哪些是传给前端的地址,哪些是传给后端的地址。
这里需要注意两个点:
- 后端:所有上传到服务器的.py文件的第一行开头都必须添加:
# coding=utf-8
注意不能写成这种形式:
# coding = utf-8
这么做是为了告诉服务器上的python我们的文字编码格式为utf-8,不注释这一行的话会报错
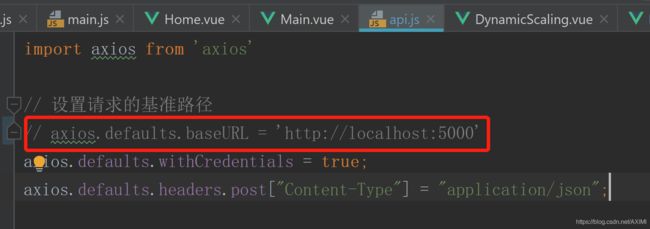
2.前端,我们平时码代码的时候会使用axios设置基准路径,这个url地址是前端和后端数据交互的地址:

使用npm run build打包成dist文件夹之前需要将这个代码注释掉,因为配置nginx的时候自身会定义地址。如果不注释掉或删掉这个axios路径,后面我们是无法访问页面的,会显示跨域访问的问题。
服务器跑后端
运行
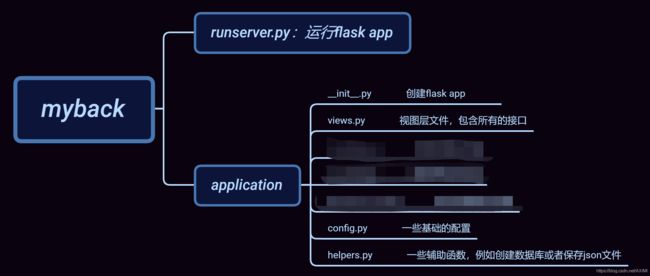
我后端flask的代码结构如下:

其中runserver是整个后端项目的入口文件,长这个样子:
# coding=utf-8

from application import app
if __name__ == "__main__":
    app.run(
        host='0.0.0.0',
        debug=True)
服务器上先用python安装gunicorn。(一般保存在/usr/local/bin路径下)
安装好之后,使用gunicorn启动后端。有两种方式,一种是直接给指令:
gunicorn -D -w 4 -b 0.0.0.0:5000 runserver:app
参数含义如下:
| 参数 | 含义 |
|---|---|
| -D | 后台运行 |
| -w 4 | 进程数量为4 |
| -b | 后端绑定的IP和端口号 |
| runserver | 整个后端的启动文件 |
| app | 将该gunicorn运行的程序命名为app |
也可以通过配置gunicorn的配置文件来运行。写个gunicorn_conf.py(gunicorn的配置文件必须是.py结尾的文件):
# 并行工作进程数
workers = 4

# 绑定的IP和端口号
bind = '127.0.0.1:5000'

# 后台运行
daemon = 'true'

# 设置进程文件目录
pidfile = './/gunicorn.pid'
# 设置访问日志和错误信息日志路径
accesslog = './acess.log'
errorlog = './error.log'
然后通过下面的指令运行gunicorn:
gunicorn -c gunicorn_conf.py runserver:app
检测
可以通过下面的指令查看gunicorn是否成功运行:
pstree -ap | grep gunicorn
kill -HUP gunicorn_pid
其中gunicorn_pid是前面通过pstree查出来的gunicorn的进程号
同时终止gunicorn的命令如下:
kill -9 gunicorn_pid
服务器加载前端
前端代码注释掉axios的路由路径后,使用npm run dev打包成dist文件,只需要将该dist文件传到服务器即可。
然后安装nginx,打开nginx的配置文件(一般在/etc/nginx/nginx.conf这个地方),配置如下:
user www-data;
worker_processes auto;
pid /run/nginx.pid;
include /etc/nginx/modules-enabled/*.conf;

events {
	worker_connections 768;
	# multi_accept on;
}

http {
	##
	# Basic Settings
	##
    log_format access  '{'
        '"time": "$time_iso8601", '
        '"auth_project": "$http_x_auth_project", '
        '"auth_user": "$cookie_AUTH_USER", '
        '"remote_addr": "$remote_addr", '
        '"host": "$host", '
        '"hostname": "$hostname", '
        '"referer": "$http_referer", '
        '"request": "$request", '
        '"request_method": "$request_method", '
        '"request_uri": "$uri", '
        '"request_args": "$args", '
        '"response_time": $request_time, '
        '"size": $body_bytes_sent, '
        '"status": $status, '
        '"trace_id": "$http_trace_id", '
        '"upstream": "$upstream_addr", '
        '"proxy_host": "$proxy_host", '
        '"xff": "$http_x_forwarded_for"'
    '}';

    access_log  /var/log/nginx/access.log  access;

	sendfile on;
	tcp_nopush on;
	tcp_nodelay on;
	keepalive_timeout 65;
	types_hash_max_size 2048;

	include /etc/nginx/mime.types;
	default_type application/octet-stream;

	##
	# SSL Settings
	##

	ssl_protocols TLSv1 TLSv1.1 TLSv1.2; # Dropping SSLv3, ref: POODLE
	ssl_prefer_server_ciphers on;

    log_format error  '{'
        '"time": "$time_iso8601", '
        '"auth_project": "$http_x_auth_project", '
        '"auth_user": "$cookie_AUTH_USER", '
        '"remote_addr": "$remote_addr", '
        '"host": "$host", '
        '"hostname": "$hostname", '
        '"referer": "$http_referer", '
        '"request": "$request", '
        '"request_method": "$request_method", '
        '"request_uri": "$uri", '
        '"request_args": "$args", '
        '"response_time": $request_time, '
        '"size": $body_bytes_sent, '
        '"status": $status, '
        '"trace_id": "$http_trace_id", '
        '"upstream": "$upstream_addr", '
        '"proxy_host": "$proxy_host", '
        '"xff": "$http_x_forwarded_for"'
    '}';
	error_log /var/log/nginx/error.log error;

	##
	# Gzip Settings
	##

	gzip on;
	gzip_disable "msie6";

    server {
        listen 80;
        server_name localhost;
        #root /home/zhouxianming/html;
        #index index.html;
        location / {
            root /path/to/your/dist/file;
            index index.html;
        }
        location /api/ {
            proxy_pass http://127.0.0.1:5000;
        }
    }
}
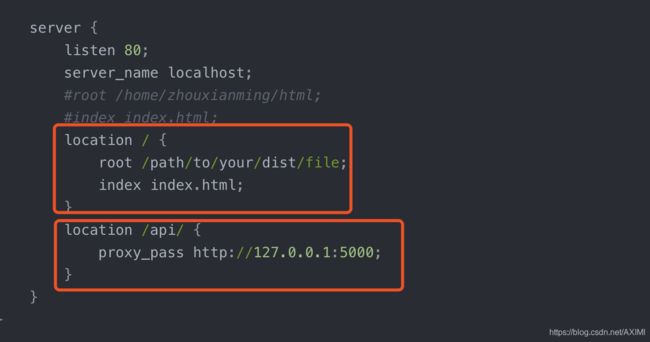
比较主要的配置是这个地方:

当nginx检测到/api/开头的路由请求会发送给后端(服务器监听5000端口)
当nxinx检测到其他的路由请求时,会发送给前端的文件dist。
如果前端重写,重新生成上传了dist文件,需要重新加载一下nginx:
nginx -r reload
主要涉及到的指令
gunicorn
gunicorn -c gunicorn_conf.py runserver:app

gunicorn -D -w 4 -b 0.0.0.0:5000 runserver:app

pstree -ap | grep gunicorn

kill -HUP gunicorn_pid
kill -9 gunicorn_pid
nginx
sudo nginx
service nginx start
sudo service nginx restart
sudo nginx -s reload

sudo nginx -s stop
ps aux | grep nginx
查看所有IP、端口的使用情况
sudo nestat -tulpn
