Electron 从入门到实践07之实战 相机应用
Electron 从入门到实践之实战-照相机的开发
1、初始化项目
新建一个目录用于存放第一个e-camera
mkdir e-camera #注意 windows没有mkdir命令,直接新建文件夹即可
j进入目录后,初始化
npm init # 这里要根据提示输入相关内容
创建好必要文件
touch index.html
touch main.js
touch event.js  #注意 windows没有touch命令,直接新建文件即可
修改packge.json
{
  "name": "e-camera",
  "productName": "electron相机应用",
  "author": "admin",
  "version": "1.0.0",
  "description": "e-camera",
  "main": "main.js",
  "scripts": {
    "start": "electron ."
  },
  "license": "ISC",
  "devDependencies": {
    "electron": "^5.0.4"
  },
  "dependencies": {
    "electron-packager": "^14.0.0",
    "electron-updater": "^4.0.6",
    "electron": "^5.0.4"
  }
}
安装依赖
由于是在国内,建议使用cnpm
cnpm intall -g
下载好font-awesome的字体css放在 新建的static文件夹里面
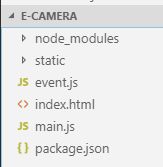
安装之后的完整项目结构为:

2、编写入口文件main.js
const { app, BrowserWindow, Menu, Tray, ipcMain } = require('electron')  // 引入electron

// 保持对window对象的全局引用,如果不这么做的话,当JavaScript对象被
// 垃圾回收的时候,window对象将会自动的关闭
let win

function createWindow () {
  win = new BrowserWindow({
    // 设置窗口大小
    width: 800,
    height: 500,
    webPreferences: {
      nodeIntegration: true
    }
  })
  console.log('system edition:', process.platform)
  // 使用模版创建菜单
  const template = [{
        label: '文件',   // 设置菜单项文本
        submenu: [    // 设置子菜单
          {
              label: '关于',
              role: 'about',       // 设置菜单角色(关于),只针对 Mac  OS X 系统
              click: (menuItem, browserWindow, event)=>{     // 设置单击菜单项的动作(弹出一个新的模态窗口)
                  var aboutWin = new BrowserWindow({width:300,height:200,parent:win,modal: true});
                  aboutWin.loadURL('https://blog.csdn.net/haeasringnar');
                  console.log('role:', menuItem.role)
                }
          },
          {
              type: 'separator'       // 在此处为菜单加分隔栏
          },
          {
              label: '关闭',
              accelerator: 'Ctrl+Q',      // 设置菜单快捷键
              click: ()=>{win.close()}
          }
        ]
    },
    {
      label: '编辑',
      submenu: [
          {
              label: '撤销',
              role:'undo',
              click:()=>{win.webContents.undo()} // 在点击时执行撤销命令
          },
          {
              label: '重做',
              role:'redo',
              click:()=>{win.webContents.redo()} // 在点击时执行重做命令
          },
          {
            type:'separator'   // 设置菜单项分隔条
          },
          {
              label: '剪切',
              role:'cut',
              click:()=>{win.webContents.cut()}
          },
          {
              label: '复制',
              role:'copy',
              click:()=>{win.webContents.copy()} // 在点击时执行复制命令
          },
          {
              label: '粘贴',
              role:'paste',
              click:()=>{win.webContents.paste()} // 在点击时执行粘贴命令
          }
      ]
  }];

  const menu = Menu.buildFromTemplate(template);
  //  开始设置菜单
  Menu.setApplicationMenu(menu);

  // 加载index.html文件
  win.loadFile('index.html')

  // 打开调试工具
  // win.webContents.openDevTools()


  // 监听窗口关闭的事件,监听到时将一个消息发送给渲染进程
  win.on('close', (e) => {
    e.preventDefault();
    // 给渲染进程发消息
    win.webContents.send('action', 'exiting');
  });

  // 当 window 被关闭,这个事件会被触发。
  win.on('closed', () => {
    // 取消引用 window 对象,如果你的应用支持多窗口的话,
    // 通常会把多个 window 对象存放在一个数组里面,
    // 与此同时,你应该删除相应的元素。
    win = null
  })
}

// Electron 会在初始化后并准备
// 创建浏览器窗口时,调用这个函数。
// 部分 API 在 ready 事件触发后才能使用。
app.on('ready', createWindow)

// 当全部窗口关闭时退出。
app.on('window-all-closed', () => {
  // 在 macOS 上,除非用户用 Cmd + Q 确定地退出,
  // 否则绝大部分应用及其菜单栏会保持激活。
  if (process.platform !== 'darwin') {
    app.quit()
  }
})

app.on('activate', () => {
  // 在macOS上,当单击dock图标并且没有其他窗口打开时,
  // 通常在应用程序中重新创建一个窗口。
  if (win === null) {
    createWindow()
  }
})

// 监听与渲染进程的通讯,监听来自渲染进程的消息,当监听到确定关闭时,将所有窗口退出
ipcMain.on('reqaction', (event, arg) => {
  console.log('zhu jin cheng:', arg)
  switch(arg){
    case 'exit':
      app.exit()  // 退出所有窗口,注意这里使用 app.quit() 无效
      break;
  }
});
3、编写index.html
e-camera
![]()
![]()
4、编写event.js
// 引入对话框
const remote = require('electron').remote;
const ipcRenderer = require('electron').ipcRenderer;
const dialog = remote.dialog;
const Menu = remote.Menu;
const fs = require('fs');

// 用来解释主进程和渲染进程的实例
// 流程:先在主进程中监听窗口的close事件,然后当发生点击时,将消息从主进程发送到渲染进程。渲染进程收到消息后执行某些操作后,将消息发回主进程,由主进程执行剩下的操作
function eventQuit() {
    var options = {};
    options.title = '信息对话框';
    options.message = '确定退出吗?';
    options.type = 'none';
    options.buttons = ['Yes', 'No'];
    dialog.showMessageBox(options, (response) => {
        console.log('当前被单击的按钮索引是' + response);
        if (response == 0) {
            ipcRenderer.send('reqaction', 'exit');
        }
    })
}

//监听与主进程的通信
ipcRenderer.on('action', (event, arg) => {
    switch (arg) {
        case 'exiting':
            eventQuit();
            break;
    }
});

let photoData;
let video;
//弹出对话框保存图像
function savePhoto(filePath) {
    if (filePath) {
        //向文件写入 base 64 格式的图像数据
        fs.writeFile(filePath, photoData, 'base64', (err) => {
            if (err) alert(`保存图像有问题: ${err.message}`);
            photoData = null;
        });
    }
}
//用于初始化视频流
function initialize() {
    document.getElementsByTagName('body')[0].style.height = window.innerHeight+'px';
    video = window.document.querySelector('video');
    window.navigator.mediaDevices.getUserMedia({
        video: { facingMode: "user", width: 640, height: 360 } // 调用前置摄像头并设置尺寸大小 后置摄像头使用video: { facingMode: { exact: "environment" }
    }).then(function(stream) {
        console.log(stream);
        video.srcObject = stream
        video.play();
    }).catch(function(err) {
        console.log(`连接视频流错误: ${err}`);
    })
}
//拍照
function takePhoto() {
    var now_time = new Date().getTime()
    var file_path = String(now_time) + '.jpg'
    let canvas = window.document.querySelector('canvas');
    //将当前的视频图像绘制在 canvas 上
    canvas.getContext('2d').drawImage(video, 0, 0, 640, 360);
    //获取  base64 格式的图像数据
    photoData = canvas.toDataURL('image/png').replace(/^data:image\/(png|jpg|jpeg);base64,/, '');
    // 将照片以base64的方式生成缩略图
    const willshow = document.getElementById('willshow');
    console.log(willshow.src)
    willshow.src = 'data:image/png;base64,' + photoData
    //显示保存对话框保存图像
    dialog.showSaveDialog({
        title: "保存照片",
        defaultPath: file_path,
        buttonLabel: '保存'
    }, savePhoto);
}


// 查看照片
function showPhoto() {
    const showPhoto = document.getElementById('showPhoto');
    showPhoto.src = 'data:image/png;base64,' + photoData
    if (showPhoto.style.display === "none" || showPhoto.style.display === "") {
        showPhoto.style.display = "block"
    } else {
        showPhoto.style.display = "none"
    }
}

function onload() {
    initialize()
}

window.onresize = function(){
    document.getElementsByTagName('body')[0].style.height = window.innerHeight+'px';
}
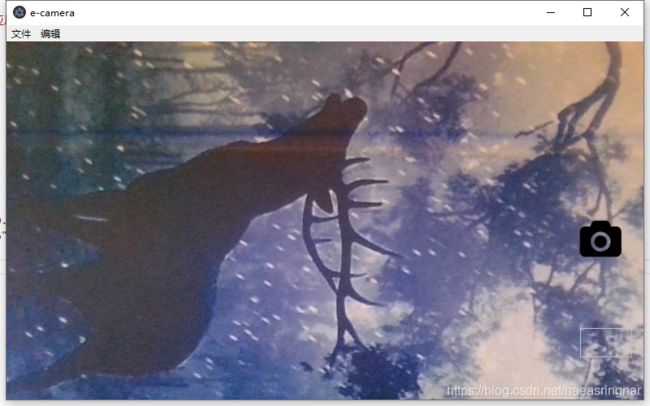
5、本地运行
electron .
或
npm start
6、打包
查看是否使用electron-packager命令
electron-packager --version
有正常返回表示可以使用该命令
否则,安装electron-packager
cnpm install -g electron-packager
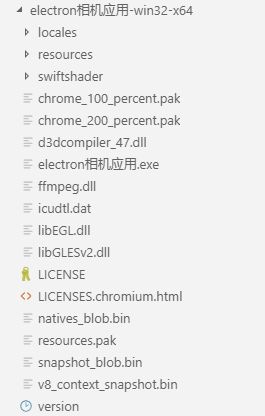
运行打包命令
electron-packager .

