Android学习之在8.0以上的系统弹出Notification(通知)和设计Icon
文章目录
- 1.前言
- 2.弹出Notification
- 2.1Android8.0以下弹出Notification
- 2.2Android8.0(含)以上弹出Notification
- 3.效果展示
- 4.Notification的icon制作
- 5.Demo
- 6.参考资料
1.前言
在Android开发中,Notification常常被使用于各种app中,作为Android的特色功能,我们都应掌握。
但随着Android版本的不断更新,各类功能的用法也在不断改变,因此写下这篇文章用于记录Notification在安卓8.0(API26)以上的系统中该怎么弹出,也用于分享给各位,少走弯路。
2.弹出Notification
2.1Android8.0以下弹出Notification
第一次碰到Notification这个概念是在郭霖的《第一行代码》第2版中,据说第三版马上就要出了。在书中,要实现弹出一个Notification并不难,仅仅以下代码即可实现
private void sendNotification(String text){
        NotificationManager notificationManager = (NotificationManager)
                getSystemService(Context.NOTIFICATION_SERVICE);
        Notification notification = new NotificationCompat.Builder(this)
                .setContentTitle("NotificationDemo")
                .setContentText(text)
                .setWhen(System.currentTimeMillis())
                .setSmallIcon(R.drawable.icon_small)
                .setLargeIcon(BitmapFactory.decodeResource(getResources(),R.drawable.icon_big))
                .build();
        notificationManager.notify(10086,notification);
    }
但是,如果把这段代码打在Android Studio中,编辑器会把NotificationCompat.Builder(this) 标记为不推荐使用的代码。
2.2Android8.0(含)以上弹出Notification
这是因为,Google从Android8.0开始,加入了一个新的概念------Channel(频道)
只是我觉得这个翻译更好一些,把它称为渠道也行,个人理解就好。
如果继续使用这段代码,那么app在Android8.0(含)以上的手机是无法弹出Notification的,新版本规定必须在Builder中传入一个CHANNEL_ID,作为app发送Notification的一个属性
传入方法很简单,就在Builder(this)中再加入一个参数channel_id即可。
你无需担心引入channel_id会对8.0以下的系统运行app造成意料之外的影响,因为在旧版本中运行会自动忽略这个channel_id的引入
Notification notification = new NotificationCompat.Builder(this,channel_id)
                .setContentTitle("NotificationDemo")
                .setContentText(text)
                .setWhen(System.currentTimeMillis())
                .setSmallIcon(R.drawable.icon_small)
                .setLargeIcon(BitmapFactory.decodeResource(getResources(),R.drawable.icon_big))
                .setPriority(NotificationCompat.PRIORITY_DEFAULT)
                .build();
你可能会疑惑,这个channel怎么来的。下边就是channel构造的方法
在Android8.0(代号O)以下的版本中,由于支持库版本旧,是不可以构造channel的,需要做判断否则会崩溃。
	private String channel_id = "myChannelId";
    private String channel_name = "myChannelName";
    private String description = "this is myChannel's description";
    private NotificationManager notificationManager;

	private void createNotificationChannel(){
	        //Android8.0(API26)以上需要调用下列方法,但低版本由于支持库旧,不支持调用,需做判断
	        if(Build.VERSION.SDK_INT >= Build.VERSION_CODES.O){
	            int importance = NotificationManager.IMPORTANCE_DEFAULT;
	            NotificationChannel channel = new NotificationChannel(channel_id,channel_name,importance);
	            channel.setDescription(description);
	            notificationManager = (NotificationManager)
	                    getSystemService(Context.NOTIFICATION_SERVICE);
	            notificationManager.createNotificationChannel(channel);
	        }

	    }
channel_id、channel_name、description为String类型的变量
展示一下区别,channel_id应该是需要唯一的,一般加上包名(如com.example.notificationdemo.channel)
int importance;是消息的重要程度(常量NotificationManager.IMPORTANCE_)根据重要程度系统会选择播放铃声等,8.0(含)以上强制要求给channel指定一个importance。但是仍然需要在.build()之前使用.setPriority()支持8.0以下的系统

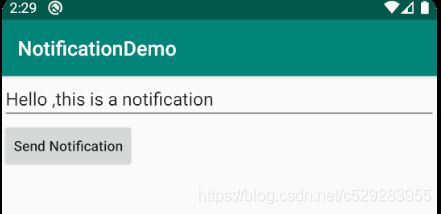
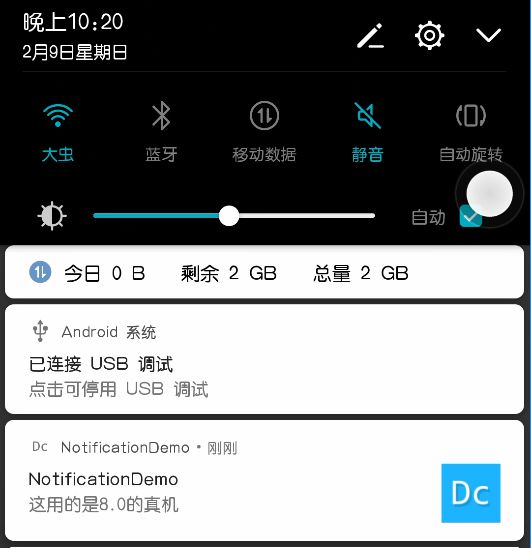
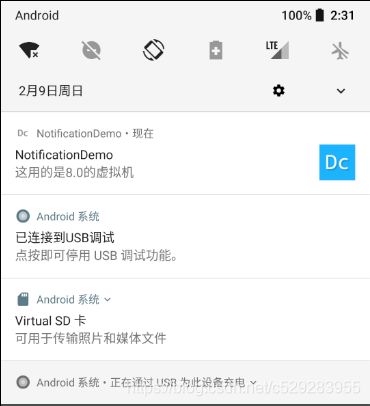
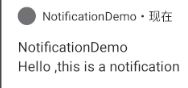
3.效果展示
app界面
Android10(Q)

Android8.0(O)
华为荣耀V8
AVD虚拟机
Android5.0(L)

4.Notification的icon制作
从Android8.0开始,Google原生的Android系统中,Notification的smallIcon需要制作为背景透明,主体为纯白色的图片,否则通知栏的小图标会将 非白色 替换为 白色,也就是↓两张图的样子。我用了.setSmallIcon(R.mipmap.ic_launcher),所以变成了纯白,但是在Android5.0的系统中就不会,在真机上也不会,估计是厂商对这部分做了改进

我这里用的是108x108大小的png图片作为smallicon,只有白色,背景透明

LargeIcon就没有这种要求,因此正常设计就好

用Ps随便设计一下就可以了
效果就是上一小节 效果展示的图
5.Demo
MainActivity.java代码
package com.example.notificationdemo;

import androidx.appcompat.app.AppCompatActivity;
import androidx.core.app.NotificationCompat;

import android.app.Notification;
import android.app.NotificationChannel;
import android.app.NotificationManager;
import android.content.Context;
import android.graphics.BitmapFactory;
import android.os.Build;
import android.os.Bundle;
import android.view.View;
import android.widget.Button;
import android.widget.EditText;

public class MainActivity extends AppCompatActivity {
    Button btn_sendNotification;
    EditText edit_text;
    String channel_id="myChannelId";
    String channel_name="myChannelName";
    String description = "this is myChannel's description";
    NotificationManager notificationManager;
    @Override
    protected void onCreate(Bundle savedInstanceState) {
        super.onCreate(savedInstanceState);
        setContentView(R.layout.activity_main);
        createNotificationChannel();
        btn_sendNotification=findViewById(R.id.btn_sendNotification);
        edit_text=findViewById(R.id.edit_text);
        btn_sendNotification.setOnClickListener(new View.OnClickListener() {
            @Override
            public void onClick(View v) {
                sendNotification(edit_text.getText().toString());
            }
        });

    }

    private void createNotificationChannel(){
        //Android8.0(API26)以上需要调用下列方法,但低版本由于支持库旧,不支持调用
        if(Build.VERSION.SDK_INT >= Build.VERSION_CODES.O){
            int importance = NotificationManager.IMPORTANCE_DEFAULT;
            NotificationChannel channel = new NotificationChannel(channel_id,channel_name,importance);
            channel.setDescription(description);
            notificationManager = (NotificationManager)
                    getSystemService(Context.NOTIFICATION_SERVICE);
            notificationManager.createNotificationChannel(channel);
        }else{
            notificationManager = (NotificationManager)
                    getSystemService(Context.NOTIFICATION_SERVICE);
        }

    }

    private void sendNotification(String text){
        Notification notification = new NotificationCompat.Builder(this,channel_id)
                .setContentTitle("NotificationDemo")
                .setContentText(text)
                .setWhen(System.currentTimeMillis())
                .setSmallIcon(R.drawable.icon_small)
                .setLargeIcon(BitmapFactory.decodeResource(getResources(),R.drawable.icon_big))
                .setPriority(NotificationCompat.PRIORITY_DEFAULT)
                .build();
        notificationManager.notify(10086,notification);
    }
}
布局文件
<LinearLayout xmlns:android="http://schemas.android.com/apk/res/android"
    xmlns:app="http://schemas.android.com/apk/res-auto"
    xmlns:tools="http://schemas.android.com/tools"
    android:layout_width="match_parent"
    android:layout_height="match_parent"
    android:orientation="vertical"
    tools:context=".MainActivity">

    <EditText
        android:layout_width="match_parent"
        android:layout_height="wrap_content"
        android:id="@+id/edit_text"
        android:text="Hello ,this is a notification"
        >
    EditText>

    <Button
        android:layout_width="wrap_content"
        android:layout_height="wrap_content"
        android:textAllCaps="false"
        android:text="Send Notification"
        android:id="@+id/btn_sendNotification">

    Button>

LinearLayout>
6.参考资料
开发者帮助文档:https://developer.android.google.cn/training/notify-user/build-notification?hl=en
Notifications provide short, timely information about events in your app while it's not in use. This page teaches you how to create a notification with various features for Android 4.0 (API level 14) and higher. For an introduction to how notifications appear on Android, see the Notifications Overview. For sample code that uses notifications, see the Android Notifications Sample.
Notice that the code on this page uses the NotificationCompat APIs from the Android support library. These APIs allow you to add features available only on newer versions of Android while still providing compatibility back to Android 4.0 (API level 14). However, some new features such as the inline reply action result in a no-op on older versions.
Add the support library
Although most projects created with Android Studio include the necessary dependencies to use NotificationCompat, you should verify that your module-level build.gradle file includes the following dependency:
dependencies {
    implementation "com.android.support:support-compat:28.0.0"
}
Create a basic notification
A notification in its most basic and compact form (also known as collapsed form) displays an icon, a title, and a small amount of content text. In this section, you'll learn how to create a notification that the user can click on to launch an activity in your app.

Figure 1. A notification with a title and text
For more details about each part of a notification, read about the notification anatomy.
Set the notification content
To get started, you need to set the notification's content and channel using a NotificationCompat.Builder object. The following example shows how to create a notification with the following:
- A small icon, set by
setSmallIcon(). This is the only user-visible content that's required. - A title, set by
setContentTitle(). - The body text, set by
setContentText(). - The notification priority, set by
setPriority(). The priority determines how intrusive the notification should be on Android 7.1 and lower. (For Android 8.0 and higher, you must instead set the channel importance—shown in the next section.)
NotificationCompat.Builder builder = new NotificationCompat.Builder(this, CHANNEL_ID)
        .setSmallIcon(R.drawable.notification_icon)
        .setContentTitle(textTitle)
        .setContentText(textContent)
        .setPriority(NotificationCompat.PRIORITY_DEFAULT);
Notice that the NotificationCompat.Builder constructor requires that you provide a channel ID. This is required for compatibility with Android 8.0 (API level 26) and higher, but is ignored by older versions.
By default, the notification's text content is truncated to fit one line. If you want your notification to be longer, you can enable an expandable notification by adding a style template with setStyle(). For example, the following code creates a larger text area:
NotificationCompat.Builder builder = new NotificationCompat.Builder(this, CHANNEL_ID)
        .setSmallIcon(R.drawable.notification_icon)
        .setContentTitle("My notification")
        .setContentText("Much longer text that cannot fit one line...")
        .setStyle(new NotificationCompat.BigTextStyle()
                .bigText("Much longer text that cannot fit one line..."))
        .setPriority(NotificationCompat.PRIORITY_DEFAULT);
For more information about other large notification styles, including how to add an image and media playback controls, see Create a Notification with Expandable Detail.
Create a channel and set the importance
Before you can deliver the notification on Android 8.0 and higher, you must register your app's notification channel with the system by passing an instance of NotificationChannel to createNotificationChannel(). So the following code is blocked by a condition on the SDK_INT version:
private void createNotificationChannel() {
    // Create the NotificationChannel, but only on API 26+ because
    // the NotificationChannel class is new and not in the support library
    if (Build.VERSION.SDK_INT >= Build.VERSION_CODES.O) {
        CharSequence name = getString(R.string.channel_name);
        String description = getString(R.string.channel_description);
        int importance = NotificationManager.IMPORTANCE_DEFAULT;
        NotificationChannel channel = new NotificationChannel(CHANNEL_ID, name, importance);
        channel.setDescription(description);
        // Register the channel with the system; you can't change the importance
        // or other notification behaviors after this
        NotificationManager notificationManager = getSystemService(NotificationManager.class);
        notificationManager.createNotificationChannel(channel);
    }
}
Because you must create the notification channel before posting any notifications on Android 8.0 and higher, you should execute this code as soon as your app starts. It's safe to call this repeatedly because creating an existing notification channel performs no operation.
Notice that the NotificationChannel constructor requires an importance, using one of the constants from the NotificationManager class. This parameter determines how to interrupt the user for any notification that belongs to this channel—though you must also set the priority with setPriority() to support Android 7.1 and lower (as shown above).
Although you must set the notification importance/priority as shown here, the system does not guarantee the alert behavior you'll get. In some cases the system might change the importance level based other factors, and the user can always redefine what the importance level is for a given channel.
For more information about what the different levels mean, read about notification importance levels.
Set the notification’s tap action
Every notification should respond to a tap, usually to open an activity in your app that corresponds to the notification. To do so, you must specify a content intent defined with a PendingIntent object and pass it to setContentIntent().
The following snippet shows how to create a basic intent to open an activity when the user taps the notification:
// Create an explicit intent for an Activity in your app
Intent intent = new Intent(this, AlertDetails.class);
intent.setFlags(Intent.FLAG_ACTIVITY_NEW_TASK | Intent.FLAG_ACTIVITY_CLEAR_TASK);
PendingIntent pendingIntent = PendingIntent.getActivity(this, 0, intent, 0);

NotificationCompat.Builder builder = new NotificationCompat.Builder(this, CHANNEL_ID)
        .setSmallIcon(R.drawable.notification_icon)
        .setContentTitle("My notification")
        .setContentText("Hello World!")
        .setPriority(NotificationCompat.PRIORITY_DEFAULT)
        // Set the intent that will fire when the user taps the notification
        .setContentIntent(pendingIntent)
        .setAutoCancel(true);
Notice this code calls setAutoCancel(), which automatically removes the notification when the user taps it.
The setFlags() method shown above helps preserve the user's expected navigation experience after they open your app via the notification. But whether you want to use that depends on what type of activity you're starting, which may be one of the following:
- An activity that exists exclusively for responses to the notification. There's no reason the user would navigate to this activity during normal app use, so the activity starts a new task instead of being added to your app's existing task and back stack. This is the type of intent created in the sample above.
- An activity that exists in your app's regular app flow. In this case, starting the activity should create a back stack so that the user's expectations for the Back and Up buttons is preserved.
For more about the different ways to configure your notification's intent, read Start an Activity from a Notification.
Show the notification
To make the notification appear, call NotificationManagerCompat.notify(), passing it a unique ID for the notification and the result of NotificationCompat.Builder.build(). For example:
NotificationManagerCompat notificationManager = NotificationManagerCompat.from(this);

// notificationId is a unique int for each notification that you must define
notificationManager.notify(notificationId, builder.build());
Remember to save the notification ID that you pass to NotificationManagerCompat.notify() because you'll need it later if you want to update or remove the notification.