自定义 ViewGroup 支持无限循环翻页之一(重写 onLayout以及 dispatchDraw)
大家如果喜欢我的博客,请关注一下我的微博,请点击这里(http://weibo.com/kifile),谢谢
转载请标明出处,再次感谢
#######################################################################
自定义 ViewGroup 支持无限循环翻页系列
自定义 ViewGroup 支持无限循环翻页之一(重写 onLayout以及 dispatchDraw)
自定义 ViewGroup 支持无限循环翻页之二(处理触摸事件)
自定义 ViewGroup 支持无限循环翻页之三(响应回调事件)
#######################################################################
之前由于公司产品需求,需要一个可以无限循环滑动的布局,来展示图片,从网上找了很多样例都不能很好的满足我们亲爱的产品汪的要求,在首页以及尾页的切换时会出现不太连续的问题,于是我就自己手动写了一份自定义的 ViewGroup 来支持,我对这个布局的命名为 SerialScreenLayout(连续的屏幕布局)
这个布局的代码,我放到了 Github 上,项目地址:https://github.com/KiFile/Sample,这里是我平时的 Demo, SerialScreenLayout 的具体位置是在https://github.com/KiFile/Sample/tree/master/Widget/src/main/java/com/kifile/widget
首先我们来看看产品需求,我们所需要的是一个可以无限滑动的 ViewGroup, 并且我们要求对于放置在 ViewGroup 中的每一个 View, 我们都将它视为单独的一页,它能够根据一些布局属性,设置 gravity 位置.对于这种情况,我想到了 FrameLayout,FrameLayout 中每个布局的位置都是只与父布局的位置有关,与同一级的兄弟布局基本没有关系,那么我们直接让SerialScreenLayout 继承自 FrameLayout, 这样我们就不必自己写 onMeasure 方法来衡量每个子布局的大小了
虽然我们继承自 FrameLayout, 但是由于我们希望每一个子 View 作为单独的一屏作为展示,那么我们就需要重写布局的 onLayout 函数,对每一个子 View 的位置进行一个偏移量设定,保证每个 View 都处于一个单独的界面中.
具体代码如下:
@Override
    protected void onMeasure(int widthMeasureSpec, int heightMeasureSpec) {
        super.onMeasure(widthMeasureSpec, heightMeasureSpec);
        mWidth = getMeasuredWidth();
    }

    @Override
    protected void onLayout(boolean changed, int l, int t, int r, int b) {
        final int count = getChildCount();
        int left = l + getPaddingLeft();
        int right = r - l - getPaddingRight();
        int top = t + getPaddingTop();
        int bottom = b - t - getPaddingTop();
        for (int i = 0; i < count; i++) {
            final View child = getChildAt(i);
            if (child.getVisibility() != GONE) {
                final LayoutParams lp = (LayoutParams) child.getLayoutParams();
                final int width = child.getMeasuredWidth();
                final int height = child.getMeasuredHeight();
                int childLeft;
                int childTop;
                int gravity = lp.gravity;
                if (gravity == -1) {
                    gravity = Gravity.TOP | Gravity.START;
                }

                switch (gravity & Gravity.HORIZONTAL_GRAVITY_MASK) {
                    case Gravity.CENTER_HORIZONTAL:
                        childLeft = left + (right - left - width) / 2 +
                                lp.leftMargin - lp.rightMargin;
                        break;
                    case Gravity.RIGHT:
                        childLeft = right - width - lp.rightMargin;
                        break;
                    case Gravity.LEFT:
                    default:
                        childLeft = left + lp.leftMargin;
                }

                switch (gravity & Gravity.VERTICAL_GRAVITY_MASK) {
                    case Gravity.TOP:
                        childTop = top + lp.topMargin;
                        break;
                    case Gravity.CENTER_VERTICAL:
                        childTop = top + (bottom - top - height) / 2 +
                                lp.topMargin - lp.bottomMargin;
                        break;
                    case Gravity.BOTTOM:
                        childTop = bottom - height - lp.bottomMargin;
                        break;
                    default:
                        childTop = top + lp.topMargin;
                }
                child.layout(childLeft, childTop, childLeft + width, childTop + height);
                left += mWidth;
                right += mWidth;
            }
        }
    }
这里的主要代码,也是参考的 FrameLayout 的布局代码,唯一做出的改动就是在每次布局结束的时候,对于 left 以及 right 变量做一次屏幕宽度的变化,使得每个子 View 都占据一个屏幕的范围的大小,而屏幕的宽度,则是在 onMeasure 中,在执行完 super.onMeasure 方法之后,进行获取的.
这样一来,我们其实在整个布局控件的画布上就按照了每个子 View 的属性定义,根据他们的顺序,逐个摆放到了了属于他们的位置去.
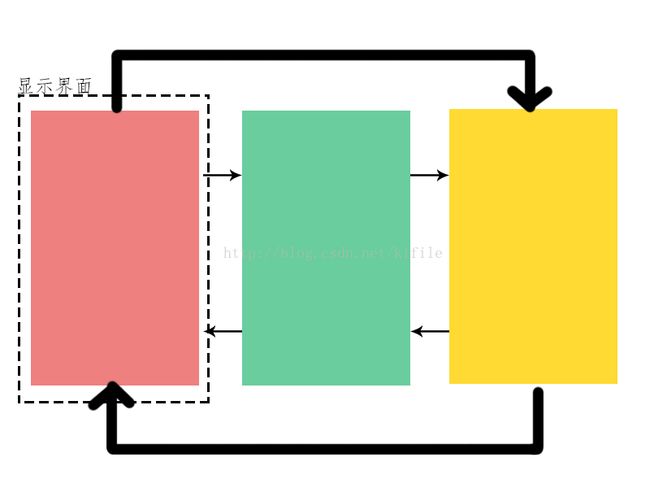
现在的界面布局如下:
但是如果仅仅是这样的话,可能会出现一种情况,当滑动尾页到了某个位置,突然尾页消失,首页突兀的出现.这是由于你目前布局时是通过按顺序排列子 View 的位置,那么系统在绘制整个 ViewGroup 的时候,就会按照你所设定的顺序来进行绘制,那么首页和尾页本身就不连续,必然会出现两者切换闪屏的情况.
为了保证图像的连续性,我们就考虑在绘制图像的时候,在当前 ViewGroup 的尾部以及首部多绘制一份图片,这样当界面滑动到超过首尾的时候,你可以自然而然的看到下一张图片,而不必担心界面突然闪屏.
那么我们所希望看到绘制的界面是这样的:
实现的代码如下:
 @Override
    protected void dispatchDraw(Canvas canvas) {
        super.dispatchDraw(canvas);
        canvas.save();
        canvas.translate(mWidth * getChildCount(), 0);
        super.dispatchDraw(canvas);
        canvas.restore();
        canvas.save();
        canvas.translate(-mWidth * getChildCount(), 0);
        super.dispatchDraw(canvas);
        canvas.restore();
    }
在这里,我们通过重写 ViewGroup 的 dispatchDraw 方法,在里面进行 canvas 的坐标平移变换,然后调用三次 dispatchDraw 来实现在屏幕上绘制三段长度相同,位置不同的ViewGroup
由于 Android 本身的绘制机制,他不会绘制不能显示在界面上的 view,所以虽然我们调用了三次 super.dispatchDraw, 但是却并不代表他本身的绘制效率会降低.
在设计这里的时候,我也曾经担心过调用三次 dispatchDraw 可能带来的效率问题,因此,有一个测试版的 dispatchDraw,如下:
@Override
    protected void dispatchDraw(Canvas canvas) {
        int position = getScrollX() / mWidth;
        drawChildAtPosition(canvas, position);
        drawChildAtPosition(canvas, position + 1);
        drawChildAtPosition(canvas, position - 1);
    }

    private void drawChildAtPosition(Canvas canvas, int position) {
        int offset = position / getChildCount();
        if (position < 0) {
            offset -= 1;
        }
        position = formatPosition(position);
        canvas.save();
        canvas.translate(getChildCount() * mWidth * offset, 0);
        drawChild(canvas, getChildAt(position), getDrawingTime());
        canvas.restore();
    }
测试发现,通过上面的代码只对当前位置的左中右三个位置的子 View 进行绘制,所耗费的时间与之前的时间其实是一致的,既然两者之间的效率一致,就使用了上面的代码,以确保底部逻辑同 android 本身的 dispatch 相符合.如果各位有什么好的建议, 请告诉我,看看能够如何进行优化.
到了这里,我们对整个自定义布局的位置摆放和绘制已经做了处理, 我们已经成功生成了一个首尾页连续的 ViewGroup, 接下来我们就要开始针对 ViewGoup 的点击事件进行处理,这将被我放在下一篇博客中,欢迎持续关注.

