1、Springboot 入门-配置和原理
**一、**Spring Boot 入门
<artifactId>spring-boot-maven-pluginartifactId>
将这个应用打成jar包,直接使用java -jar的命令进行执行;
1、启动器
<dependency>
    <groupId>org.springframework.bootgroupId>
    <artifactId>spring-boot-starter-webartifactId>
dependency>
Spring Boot将所有的功能场景都抽取出来,做成一个个的starters(启动器),只需要在项目里面引入这些starter相关场景的所有依赖都会导入进来。要用什么功能就导入什么场景的启动器
2、主程序类
@SpringBootApplication: Spring Boot应用标注在某个类上说明这个类是SpringBoot的主配置类,SpringBoot就应该运行这个类的main方法来启动SpringBoot应用;
J2EE的整体整合解决方案和自动配置都在spring-boot-autoconfigure-1.5.9.RELEASE.jar;
1、配置文件
SpringBoot使用一个全局的配置文件,配置文件名是固定的;
•application.properties
•application.yml
我们可以导入配置文件处理器,以后编写配置就有提示了
		<dependency>
			<groupId>org.springframework.bootgroupId>
			<artifactId>spring-boot-configuration-processorartifactId>
			<optional>trueoptional>
		dependency>
2、@Value VS @ConfigurationProperties
@Value:只是在某个业务逻辑中需要获取一下配置文件中的某项值,;
@ConfigurationProperties:我们专门编写了一个javaBean来和配置文件进行映射;
4、@PropertySource VS @ImportResource
@PropertySource:加载指定的配置文件;
@ImportResource:导入Spring的配置文件,
@ImportResource(locations = {"classpath:beans.xml"})
导入Spring的配置文件让其生效
spring给容器中注入组件的几种方式
1.包扫描+组件标注注解(@Controller/@Service/@Repository/@Component)适用于把自己写的类加入组件(默认ID类名首字母小写)
2.@Bean[导入的第三方包里面的组件] (注意一定要在这个配置类上加上@Configuration)
3.@Import[快速给容器中导入一个组件]
4.使用Spring提供的 FactoryBean(工厂Bean);
2、Profile
1、多Profile文件
我们在主配置文件编写的时候,文件名可以是 application-{profile}.properties/yml 默认使用application.properties的配置;
3、激活指定profile
1、在配置文件中指定 spring.profiles.active=dev
2、命令行:java -jar XXX.jar --spring.profiles.active=dev;
3、虚拟机参数;-Dspring.profiles.active=dev
3、配置文件加载位置
springboot 启动会扫描以下位置的application.properties或者application.yml文件作为Spring boot的默认配置文件
–file:./config/
–file:./
–classpath:/config/(mvn项目 resources 目录就是默认的classpath)
–classpath:/
优先级由高到底,高优先级的配置会覆盖低优先级的配置,SpringBoot会从这四个位置全部加载主配置文件;互补配置;可通过spring.config.location来改变默认配置文件位置
java -jar XXX.jar --spring.config.location=G:/application.properties
4、外部配置加载顺序
1.命令行参数**
2.来自java:comp/env的JNDI属性
3.Java系统属性(System.getProperties())
4.操作系统环境变量
5.RandomValuePropertySource配置的random.*属性值
6.jar包外部的application-{profile}.properties或application.yml(带spring.profile)配置文件
7.jar包内部的application-{profile}.properties或application.yml(带spring.profile)配置文件
8.jar包外部的application.properties或application.yml(不带spring.profile)配置文件
9.jar包内部的application.properties或application.yml(不带spring.profile)配置文件
10.@Configuration注解类上的@PropertySource
11.通过SpringApplication.setDefaultProperties指定的默认属性
二、自动配置原理
@Target(ElementType.TYPE)
@Retention(RetentionPolicy.RUNTIME)
@Documented
@Inherited
@SpringBootConfiguration
@EnableAutoConfiguration
@ComponentScan(excludeFilters = {
      @Filter(type = FilterType.CUSTOM, classes = TypeExcludeFilter.class),
      @Filter(type = FilterType.CUSTOM, classes = AutoConfigurationExcludeFilter.class) })
public @interface SpringBootApplication {
1、自动配置原理:
1)、SpringBoot启动的时候加载主配置类,开启了自动配置功能
@SpringBootConfiguration:Spring Boot的配置类;
—@Configuration:配置类;
——@Component 配置类也是容器中的一个组件;
2)、@EnableAutoConfiguration 作用:
@EnableAutoConfiguration
—@AutoConfigurationPackage:自动配置包: 将主配置类(@SpringBootApplication标注的类)的所在包及下面所有子包里面的所有组件扫描到Spring容器;
—@Import(AutoConfigurationImportSelector.class): 给容器中导入组件,AutoConfigurationImportSelector:导入组件选择器;将所有需要导入的组件以全类名的方式返回;这些组件就会被添加到容器中:
- —selectImports()方法:
- ——List configurations = getCandidateConfigurations(, );获取候选的配置
-
SPI机制传送门:深入理解SPI机制List configurations = SpringFactoriesLoader.loadFactoryNames(this.getSpringFactoriesLoaderFactoryClass(), this.getBeanClassLoader()); SPI技术:扫描所有jar包类路径下 META-INF/spring.factories
spring.factories中每一个 xxxAutoConfiguration类都是容器中的一个组件,都加入到容器中;用他们来做自动配置;
-
3)、每一个自动配置类进行自动配置功能;
4)、以**HttpEncodingAutoConfiguration(Http编码自动配置)**为例解释自动配置原理;
@Configuration   //表示这是一个配置类,以前编写的配置文件一样,也可以给容器中添加组件
@EnableConfigurationProperties(HttpEncodingProperties.class)  //启动指定类的ConfigurationProperties功能;将配置文件中对应的值和HttpEncodingProperties绑定起来;并把HttpEncodingProperties加入到ioc容器中

@ConditionalOnWebApplication //Spring底层@Conditional注解(Spring注解版),根据不同的条件,如果满足指定的条件,整个配置类里面的配置就会生效;    判断当前应用是否是web应用,如果是,当前配置类生效

@ConditionalOnClass(CharacterEncodingFilter.class)  //判断当前项目有没有这个类CharacterEncodingFilter;SpringMVC中进行乱码解决的过滤器;

@ConditionalOnProperty(prefix = "spring.http.encoding", value = "enabled", matchIfMissing = true)  //判断配置文件中是否存在某个配置  spring.http.encoding.enabled;如果不存在,判断也是成立的
//即使我们配置文件中不配置pring.http.encoding.enabled=true,也是默认生效的;
public class HttpEncodingAutoConfiguration {

  	//他已经和SpringBoot的配置文件映射了
  	private final HttpEncodingProperties properties;

   //只有一个有参构造器的情况下,参数的值就会从容器中拿
  	public HttpEncodingAutoConfiguration(HttpEncodingProperties properties) {
		this.properties = properties;
	}

    @Bean   //给容器中添加一个组件,这个组件的某些值需要从properties中获取
	@ConditionalOnMissingBean(CharacterEncodingFilter.class) //判断容器没有这个组件?
	public CharacterEncodingFilter characterEncodingFilter() {
		CharacterEncodingFilter filter = new OrderedCharacterEncodingFilter();
		filter.setEncoding(this.properties.getCharset().name());
		filter.setForceRequestEncoding(this.properties.shouldForce(Type.REQUEST));
		filter.setForceResponseEncoding(this.properties.shouldForce(Type.RESPONSE));
		return filter;
	}
根据当前不同的条件判断,决定这个配置类是否生效
一但这个配置类生效;这个配置类就会给容器中添加各种组件;这些组件的属性是从对应的properties类中获取的,这些类里面的每一个属性又是和配置文件绑定的;
5)、所有在配置文件中能配置的属性都是在xxxxProperties类中封装者‘;配置文件能配置什么就可以参照某个功能对应的这个属性类
精髓:
1)、SpringBoot启动会加载大量的自动配置类
2)、我们看我们需要的功能有没有SpringBoot默认写好的自动配置类;
3)、我们再来看这个自动配置类中到底配置了哪些组件;(只要我们要用的组件有,我们就不需要再来配置了)
4)、给容器中自动配置类添加组件的时候,会从properties类中获取某些属性。我们就可以在配置文件中指定这些属性的值;
xxxxAutoConfigurartion:自动配置类;
给容器中添加组件 :@Bean
xxxxProperties:封装配置文件中相关属性;
2、细节
自动配置类必须在一定的条件下才能生效;我们怎么知道哪些自动配置类生效;
我们可以通过启用 debug=true属性;来让控制台打印自动配置报告,这样我们就可以很方便的知道哪些自动配置类生效
三、日志
1、日志框架
异步模式、自动归档。
一个统一的接口层:日志门面(日志的一个抽象层);给项目中导入具体的日志实现就行了;
市面上的日志框架;
| 日志门面 (日志的抽象层) | 日志实现 |
|---|---|
| Log4j JUL(java.util.logging) Log4j2 Logback |
左边选一个门面(抽象层)、右边来选一个实现;
SpringBoot默认 SLF4j和logback;
2、SLF4j使用
1、如何在系统中使用SLF4j
开发的时候,日志记录方法的调用,不应该来直接调用日志的实现类,而是调用日志抽象层里面的方法;
给系统里面导入slf4j的jar和 logback的jar
import org.slf4j.Logger;
import org.slf4j.LoggerFactory;

public class HelloWorld {
  public static void main(String[] args) {
    Logger logger = LoggerFactory.getLogger(HelloWorld.class);
    logger.info("Hello World");
  }
}
2、遗留问题
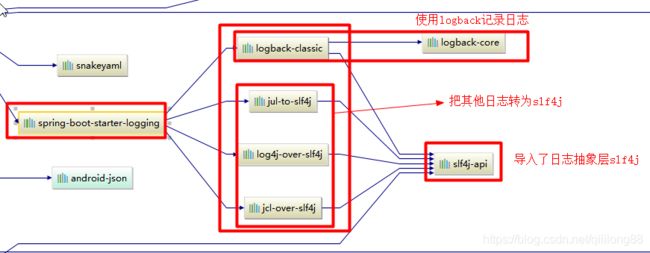
如何让系统中所有的日志都统一到slf4j;
1、将系统中其他日志框架先排除出去;
2、用中间包来替换原有的日志框架;
3、我们导入slf4j其他的实现
底层依赖关系
总结:
1)、SpringBoot底层也是使用slf4j+logback的方式进行日志记录
2)、SpringBoot也把其他的日志都替换成了slf4j;
3)、中间替换包
@SuppressWarnings("rawtypes")
public abstract class LogFactory {

    static String UNSUPPORTED_OPERATION_IN_JCL_OVER_SLF4J = "http://www.slf4j.org/codes.html#unsupported_operation_in_jcl_over_slf4j";

    static LogFactory logFactory = new SLF4JLogFactory();
4、日志使用;
1、默认配置
SpringBoot默认帮我们配置好了日志;
//日志由低到高 tracelogging.level.com.atguigu=trace
给类路径下放上每个日志框架自己的配置文件即可;SpringBoot就不使用他默认配置的了
三、嵌入式Servlet容器原理
SpringBoot默认使用Tomcat作为嵌入式的Servlet容器;
1)、如何定制和修改Servlet容器的相关配置;
1、修改和server有关的配置(ServerProperties【也是EmbeddedServletContainerCustomizer】);
server.port=8081
server.context-path=/crud
server.tomcat.uri-encoding=UTF-8
//通用的Servlet容器设置
server.xxx
//Tomcat的设置
server.tomcat.xxx
2、编写一个嵌入式的Servlet容器的定制器;来修改Servlet容器的配置
2)、注册Servlet三大组件【Servlet、Filter、Listener】
由于SpringBoot默认是以jar包的方式启动嵌入式的Servlet容器来启动SpringBoot的web应用,没有web.xml文件。
注册三大组件用以下方式
ServletRegistrationBean
//注册三大组件
@Bean
public ServletRegistrationBean myServlet(){
    ServletRegistrationBean registrationBean = new ServletRegistrationBean(new MyServlet(),"/myServlet");
    return registrationBean;
}
FilterRegistrationBean
@Bean
public FilterRegistrationBean myFilter(){
    FilterRegistrationBean registrationBean = new FilterRegistrationBean();
    registrationBean.setFilter(new MyFilter());
    registrationBean.setUrlPatterns(Arrays.asList("/hello","/myServlet"));
    return registrationBean;
}
ServletListenerRegistrationBean
@Bean
public ServletListenerRegistrationBean myListener(){
    ServletListenerRegistrationBean<MyListener> registrationBean = new ServletListenerRegistrationBean<>(new MyListener());
    return registrationBean;
}
SpringBoot帮我们自动MVC的时候,自动注册SpringMVC的前端控制器;DIspatcherServlet;
DispatcherServletAutoConfiguration中:
@Bean(name = DEFAULT_DISPATCHER_SERVLET_REGISTRATION_BEAN_NAME)
@ConditionalOnBean(value = DispatcherServlet.class, name = DEFAULT_DISPATCHER_SERVLET_BEAN_NAME)
public ServletRegistrationBean dispatcherServletRegistration(
      DispatcherServlet dispatcherServlet) {
   ServletRegistrationBean registration = new ServletRegistrationBean(
         dispatcherServlet, this.serverProperties.getServletMapping());
    //默认拦截: /  所有请求;包静态资源,但是不拦截jsp请求;   /*会拦截jsp
    //可以通过server.servletPath来修改SpringMVC前端控制器默认拦截的请求路径

   registration.setName(DEFAULT_DISPATCHER_SERVLET_BEAN_NAME);
   registration.setLoadOnStartup(
         this.webMvcProperties.getServlet().getLoadOnStartup());
   if (this.multipartConfig != null) {
      registration.setMultipartConfig(this.multipartConfig);
   }
   return registration;
}
默认支持:引入web模块默认就是使用嵌入式的Tomcat作为Servlet容器;
嵌入式Servlet容器启动原理;
什么时候创建嵌入式的Servlet容器工厂?什么时候获取嵌入式的Servlet容器并启动Tomcat;
获取嵌入式的Servlet容器工厂:
1)、SpringBoot应用启动运行run方法
2)、refreshContext(context);SpringBoot刷新IOC容器【创建IOC容器对象,并初始化容器,创建容器中的每一个组件】
3)、refresh(context);刷新刚才创建好的ioc容器;
4)、 onRefresh(); web的ioc容器重写了onRefresh方法
由 refresh() 可知,重写方法的执行顺序为:postProcessBeanFactory()、onRefresh()、finishRefresh()。
.postProcessBeanFactory()
- 添加后置处理器 WebApplicationContextServletContextAwareProcessor
- 忽略自动装配以来接口 ServletContextAware
- 注册 web 应用的作用域
.onRefresh()
- 调用父类的 onRefresh() 方法
- 创建 Web 服务器
onRefresh() 创建 Web 服务器时,首先从 BeanFactory 获取 ServletWebServerFactory 类型的 Bean,即Tomcat/Jetty/Undertow ,默认 TomcatServletWebServerFactory。利用这个工厂类的方法public WebServer getWebServer(ServletContextInitializer... initializers)来创建 TomcatWebServer,这个方法主要就是为 TomcatWebServer 创建 Tomcat 实例。此外,注意其入参 ServletContextInitializer 是函数式接口,可以将其方法作为参数传入,初始化 TomcatWebServer 时,调用 Tomcat.start() 启动 Server,以异步的方式执行该函数接口的实现类,即执行 onStartup() 方法。
创建 Tomcat 实例这一步完成初始化的工作,其生命周期状态变化为:NEW->INITIALIZING->INITIALIZED,INITIALIZED表示已经初始化的状态。
.finishBeanFactoryInitialization(beanFactory)
从 BeanFactory 获取 name 为 requestMappingHandlerMapping 的 Bean,并初始化这个 Bean,过程中执行其实现的接口方法 InitializingBean.afterPropertiesSet(),该方法遍历所有可用的 Bean,找到 @Controller 或者 @RequestMapping 注解的类,利用反射技术,遍历出这些类的方法及其请求 URL 的映射关系进行缓存。
.finishRefresh()
真正完成启动 Tomcat,其生命周期状态变化为:INITIALIZED->STARTING_PREP->STARTING->STARTED,即表示启动成功。
9、使用外置的Servlet容器
嵌入式Servlet容器:应用打成可执行的jar
优点:简单、便携;
缺点:默认不支持JSP、优化定制比较复杂(自己编写嵌入式Servlet容器的创建工厂);
外置的Servlet容器:外面安装Tomcat—应用war包的方式打包;
流程:
1)、启动Tomcat
2)、spring-web-4.3.14.RELEASE.jar!\META-INF\services\javax.servlet.ServletContainerInitializer:
Spring的web模块里面有这个文件:org.springframework.web.SpringServletContainerInitializer
3)、SpringServletContainerInitializer将@HandlesTypes(WebApplicationInitializer.class)标注的所有这个类型的类都传入到onStartup方法的Set
4)、每一个WebApplicationInitializer都调用自己的onStartup;
 .png)]
5)、相当于我们的SpringBootServletInitializer的类会被创建对象,并执行onStartup方法
6)、SpringBootServletInitializer实例执行onStartup的时候会createRootApplicationContext;创建容器
7)、Spring的应用就启动并且创建IOC容器
启动Servlet容器,再启动SpringBoot应用
#Docker
docker主机(Host):安装了Docker程序的机器(Docker直接安装在操作系统之上);
docker客户端(Client):连接docker主机进行操作;
docker仓库(Registry):用来保存各种打包好的软件镜像;
docker镜像(Images):软件打包好的镜像;放在docker仓库中;
docker容器(Container):镜像启动后的实例称为一个容器;容器是独立运行的一个或一组应用
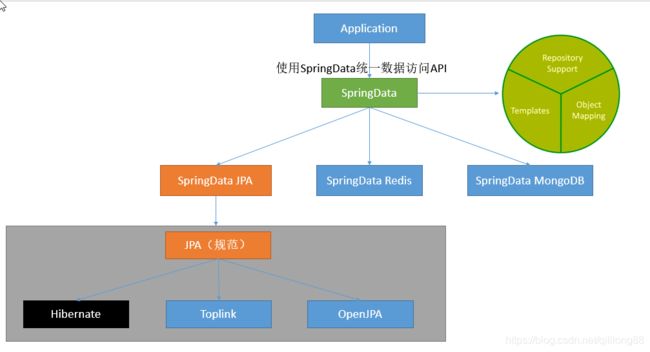
1)、SpringData简介
[外链图片转存失败,源站可能有防盗链机制,建议将图片保存下来直接上传(img-b93b42EV-1591340161211)(images/搜狗截图 .png)]
自定义starter:
2、如何编写自动配置
@Configuration  //指定这个类是一个配置类
@ConditionalOnXXX  //在指定条件成立的情况下自动配置类生效
@AutoConfigureAfter  //指定自动配置类的顺序
@Bean  //给容器中添加组件

@ConfigurationPropertie结合相关xxxProperties类来绑定相关的配置
@EnableConfigurationProperties //让xxxProperties生效加入到容器中

自动配置类要能加载
将需要启动就加载的自动配置类,配置在META-INF/spring.factories
org.springframework.boot.autoconfigure.EnableAutoConfiguration=\
org.springframework.boot.autoconfigure.admin.SpringApplicationAdminJmxAutoConfiguration,\
org.springframework.boot.autoconfigure.aop.AopAutoConfiguration,\
3、模式:
启动器只用来做依赖导入;
专门来写一个自动配置模块;
别人只需要引入启动器(starter),启动器依赖自动配置:自定义启动器名-spring-boot-starter
步骤:
- 编写属性类: HelloProperties
- 编写服务类 :HelloService
- 编写配置类:
@Configuration
@ConditionalOnWebApplication //web应用才生效
@EnableConfigurationProperties(HelloProperties.class)
public class HelloServiceAutoConfiguration {

    @Autowired
    HelloProperties helloProperties;
    @Bean
    public HelloService helloService(){
        HelloService service = new HelloService();
        service.setHelloProperties(helloProperties);
        return service;
    }
}
4 编写spring.factories 文件
5.mvn install 打到本地仓库
