Spring Boot
SpringBoot 四大神器
- starters-起步依赖
- auto-configuration-自动配置
- cli-命令行界面
- actuator-监控
注解
@RequestMapping
可以加到类上,起到一个前缀的作用。注意不要用错成@RestController(”/user")
@RequestBody
用在接收参数为Json格式时,让spring将其转化为对象。
Spring-data-jpa
实体类中必须要有无参构造器
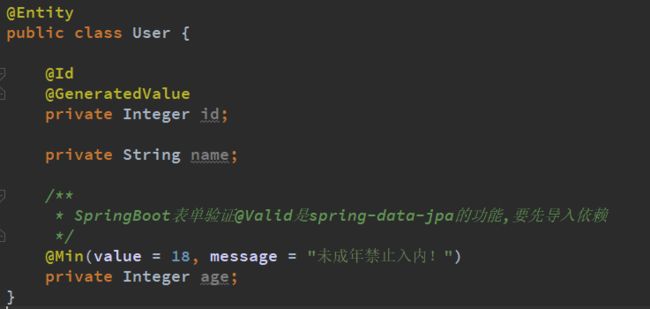
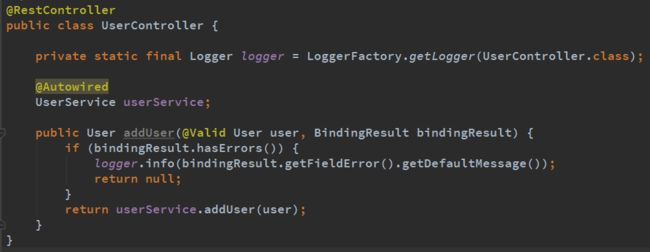
表单验证
使用spring-data-jpa的表单验证需要先导入如下依赖
    org.springframework.boot
    spring-boot-starter-data-jpa
Spring Boot项目中设置Content-Type的方法
一种比较简单优雅的方法是在注解@RequestMapping中添加produces参数即可
@RestController
@RequestMapping("/api")
public class ApiController {
    @RequestMapping(value = "/collection", produces="application/json;charset=UTF-8")
    public String home(String op) {

    }
异常
spring只会对RuntimeException进行异常回滚所以编写自定义异常时都应该让其继承自Runtime Exception
统一异常处理
请求结果封装
为了统一格式,一般会对请求结果进行一次封装
请求结果枚举
package com.example.springbootstudynote.enums;

/**
 * @Description: 请求结果枚举,方便对请求结果的统一维护
 * @Auther: Administrator
 * @date: 2018/7/24:21:47
 */
public enum ResultEnum {

    SUCCESS(0, "成功"),
    UNKONW_ERROR(-1, "未知错误");

    private Integer code;

    private String msg;

    ResultEnum(Integer code, String msg) {
        this.code = code;
        this.msg = msg;
    }

    public Integer getCode() {
        return code;
    }

    public String getMsg() {
        return msg;
    }
}
请求结果封装类
package com.example.springbootstudynote.dto;

import com.example.springbootstudynote.enums.ResultEnum;

/**
 * @Description: 请求结果封装类
 * @Auther: Administrator
 * @date: 2018/7/24:21:34
 */
public class Result<T> {
    /**
     * 错误码
     */
    private Integer code;
    /**
     * 提示信息
     */
    private String msg;
    /**
     * 请求结果数据
     */
    private T data;

    public Result() {
    }

    public Result(ResultEnum resultEnum) {
        this.code = resultEnum.getCode();
        this.msg = resultEnum.getMsg();
    }

    public Result(Integer code, String msg) {
        this.code = code;
        this.msg = msg;
    }

    public Integer getCode() {
        return code;
    }

    public void setCode(Integer code) {
        this.code = code;
    }

    public String getMsg() {
        return msg;
    }

    public void setMsg(String msg) {
        this.msg = msg;
    }

    public T getData() {
        return data;
    }

    public void setData(T data) {
        this.data = data;
    }
}
请求结果工具类
package com.example.springbootstudynote.utils;

import com.example.springbootstudynote.dto.Result;
import com.example.springbootstudynote.enums.ResultEnum;

/**
 * @Description: 请求结果工具类,方便代码复用
 * @Auther: Administrator
 * @date: 2018/7/24:21:39
 */
public class ResultUtil {

    public static Result success(Object object) {
        Result result = new Result<>(ResultEnum.SUCCESS);
        result.setData(object);
        return result;
    }

    public static Result success(){
        return success(null);
    }

    public static Result error(Integer code, String message) {
        return new Result(code, message);
    }

    public static Result error(ResultEnum resultEnum) {
        return new Result<>(resultEnum);
    }
}
自定义异常
package com.example.springbootstudynote.exception;

import com.example.springbootstudynote.enums.ResultEnum;

/**
 * @Description: 自定义异常
 * @Auther: Administrator
 * @date: 2018/7/24:21:33
 */
public class StudyNoteException extends RuntimeException{
    /**
     * 错误码
     */
    private Integer code;

    public StudyNoteException() {
    }

    public StudyNoteException(ResultEnum resultEnum) {
        super(resultEnum.getMsg());
        this.code = resultEnum.getCode();
    }

    public StudyNoteException(String message, Integer code) {
        super(message);
        this.code = code;
    }

    public Integer getCode() {
        return code;
    }

    public void setCode(Integer code) {
        this.code = code;
    }
}
统一异常处理类
package com.example.springbootstudynote.exception.handle;

import com.example.springbootstudynote.dto.Result;
import com.example.springbootstudynote.enums.ResultEnum;
import com.example.springbootstudynote.exception.StudyNoteException;
import com.example.springbootstudynote.utils.ResultUtil;
import org.slf4j.Logger;
import org.slf4j.LoggerFactory;
import org.springframework.web.bind.annotation.ControllerAdvice;
import org.springframework.web.bind.annotation.ExceptionHandler;
import org.springframework.web.bind.annotation.ResponseBody;

/**
 * @Description: 统一异常处理类
 * @Auther: Administrator
 * @date: 2018/7/24:21:31
 */
@ControllerAdvice
public class ExceptionHandle {

    private final Logger logger = LoggerFactory.getLogger(ExceptionHandle.class);

    @ExceptionHandler(value = Exception.class)
    @ResponseBody
    public Result<String> handle(Exception e) {
        if (e instanceof StudyNoteException){
            StudyNoteException studyNoteException = (StudyNoteException) e;
            return ResultUtil.error(studyNoteException.getCode(), studyNoteException.getMessage());
        }else{
            logger.error("【系统异常】{}", e);  // 记录异常
            return ResultUtil.error(ResultEnum.UNKONW_ERROR);
        }
    }
}
单元测试
对service进行测试
Gson的使用
详解Gson使用
Json字符串转换为Map
/**
     * JSON转Map
     *
     * @param jsonString
     * @return
     */
public static Map<String, String> toMap(String jsonString) {
    Gson gson = new GsonBuilder().enableComplexMapKeySerialization().create();
    Type type = new TypeToken<Map<String, String>>() {
    }.getType();
    return gson.fromJson(jsonString, type);
}
日志打印时格式化Json字符串
/**
     * 更好的打印JSON字符串,增强日志的可读性
     *
     * @param object
     * @return
     */
public static String prettyPrinting(Object object) {
    GsonBuilder gsonBuilder = new GsonBuilder();
    gsonBuilder.setPrettyPrinting();
    Gson gson = gsonBuilder.create();
    return gson.toJson(object);
}
Json字符串转JsonObject
Gson中的JsonObject与json-lib中的JSONObject不是同一个类
JsonObject的get方法获得的是一个JsonElement
而JsonElement的toString和getAsString方法需要注意区分,toString方法得到的字符串带有引号,getAsString方法得到的是字符串内的值。
public void toJsonObject(){
    String jsonString = "{\"openId\":\"oGZUI0egBJY1zhBYw2KhdUfwVJJE\",\"nickName\":\"Band\",\"gender\":1,\"language\":\"zh_CN\",\"city\":\"Guangzhou\",\"province\":\"Guangdong\",\"country\":\"CN\",\"avatarUrl\":\"http://wx.qlogo.cn/mmopen/vi_32/aSKcBBPpibyKNicHNTMM0qJVh8Kjgiak2AHWr8MHM4WgMEm7GFhsf8OYrySdbvAMvTsw3mo8ibKicsnfN5pRjl1p8HQ/0\",\"unionId\":\"ocMvos6NjeKLIBqg5Mr9QjxrP1FA\",\"watermark\":{\"timestamp\":1477314187,\"appid\":\"wx4f4bc4dec97d474b\"}}";
    JsonObject jsonObject = JsonUtil.toJsonObject(jsonString);
    log.info(jsonObject.get("openId").toString());
    // "oGZUI0egBJY1zhBYw2KhdUfwVJJE"
    log.info(jsonObject.get("openId").getAsString());
    // oGZUI0egBJY1zhBYw2KhdUfwVJJE
}
RestTemplate的使用
RestTemplate 官方 API
详解 RestTemplate 操作
getForObject
RestTemplate restTemplate = new RestTemplate();
// 发起请求
String response = restTemplate.getForObject(url, String.class);
log.info("response={}", response);
SpringBoot整合Redis
SpringBoot(六):SpringBoot整合Redis
SpringBoot整合Redis
数据源
Hikari
springboot 2.0 使用Hikari连接池(号称java平台最快的,替换druid)
Springboot 2.0选择HikariCP作为默认数据库连接池的五大理由
Spring Boot中的异步执行
Spring Boot—(4)SpringBoot异步处理任务
Spring Boot 异步执行方法- 掘金
How To Do @Async in Spring | Baeldung
异步任务spring @Async注解源码解析- 只会一点java - 博客园
简单使用
- 启动类上添加注解
@EnableAsync - 方法上添加注解
@Async
注意:1. 方法必须为public方法,2. 该方法不能再本类中调用。
自定义线程池
spring在未指定线程池的情况下使用的是默认的线程池SimpleAsyncTaskExecutor来处理异步任务。如果要设置线程池的具体属性(如最大线程数、线程空闲时间等),就需要通过自定义线程池来实现。
方法层面
@Configuration
@EnableAsync
public class ThreadPoolTaskConfig {

    private static final int corePoolSize = 10;            // 核心线程数(默认线程数)
    private static final int maxPoolSize = 300;                // 最大线程数
    private static final int keepAliveTime = 10;            // 允许线程空闲时间(单位:默认为秒)
    private static final int queueCapacity = 200;            // 缓冲队列数
    private static final String threadNamePrefix = "Async-Service-"; // 线程池名前缀

    @Bean("taskExecutor") // bean的名称,默认为首字母小写的方法名
    public ThreadPoolTaskExecutor taskExecutor() {
        ThreadPoolTaskExecutor executor = new ThreadPoolTaskExecutor();
        executor.setCorePoolSize(corePoolSize);
        executor.setMaxPoolSize(maxPoolSize);
        executor.setQueueCapacity(queueCapacity);
        executor.setKeepAliveSeconds(keepAliveTime);
        executor.setThreadNamePrefix(threadNamePrefix);

        // 线程池对拒绝任务的处理策略
        executor.setRejectedExecutionHandler(new ThreadPoolExecutor.CallerRunsPolicy());
        // 初始化
        executor.initialize();
        return executor;
    }
}
使用时在注解中指定线程池的名字,如:@Async("taskExecutor")
应用层面
通过实现接口AsyncConfigurer来替换默认的线程池
@Configuration
@EnableAsync
public class SpringAsyncConfig implements AsyncConfigurer {

    @Override
    public Executor getAsyncExecutor() {
        return new ThreadPoolTaskExecutor();
    }
}
SpringBoot 启动流程
SpringBoot启动结构图| ProcessOn免费在线作图,在线流程图,在线思维 …
SpringBoot源码分析之SpringBoot的启动过程
SpringBoot启动流程简析(一)
- 构造一个SpringApplication的实例
- 调用这个实例的run方法
构造SpringApplication的时候会进行初始化的工作:
- 把启动类的class对象设置到
SpringApplication属性中 - 判断是否是web程序,并设置到webEnvironment这个boolean属性中
- 找出所有的初始化器,设置到initializers属性中
- 找出所有的应用程序监听器,设置到listeners属性中
- 找出运行的主类(main class)
启动SpringApplication.run方法执行的时候会做以下几件事:
- 构造一个StopWatch,观察SpringApplication的执行
- 找出所有的SpringApplicationRunListener并封装到SpringApplicationRunListeners中,用于监听run方法的执行。监听的过程中会封装成事件并广播出去让初始化过程中产生的应用程序监听器进行监听
- 构造Spring容器(ApplicationContext),并返回
3.1 创建Spring容器的判断是否是web环境,是的话构造AnnotationConfigEmbeddedWebApplicationContext,否则构造AnnotationConfigApplicationContext
3.2 初始化过程中产生的初始化器在这个时候开始工作
3.3 Spring容器的刷新(完成bean的解析、各种processor接口的执行、条件注解的解析等等) - 从Spring容器中找出ApplicationRunner和CommandLineRunner接口的实现类并排序后依次执行


