《深入理解Spring原理》 05-Spring AOP 底层实现详解
spring家族包含了很多不同领域的模块,spring-aop是开发者比较常用的一个模块,那么本节将基于源码debug方式一起学习spring-aop底层原理。
本文结构如下:
- 扫描xml中配置的bean.将xml配置转为Bean
- Spring-aop拦截的Bean是如何注入到IOC的
- Spring-aop执行流程
如下图所示是需要使用到的简单案例,该案例主要功能是使用Spring-AOP拦截 Demo中的get方法,在get方法执行前后分别打印日志。通过这个简单demo来学习spring-aop的流程。
public class DemoApplication {

    public static void main(String[] args) {
        ApplicationContext applicationContext = new ClassPathXMlApplicationContext("classpath:applicationContext.xml");
        Demo demo = (Demo) applicationContext.getBean("demo");
        demo.get();
    }
}

public class Demo {
    public void get() {
        System.out.println("invoke Demo.get()");
    }
}


public class TestAop {

    public void test() {}

    public void before() {
        System.out.println("============ 开始执行方法 =============");
    }

    public void after() {
        System.out.println("============= 执行方法结束 =============");
    }
}
Step1:扫描xml中配置的bean.将xml配置转为Bean
IOC启动第一步肯定是要将xml配置转为能被Spring识别的Bean,关于Spring是如何将xml转为Bean的不再本篇概述,感兴趣的读者可以阅读笔者 《深入理解Spring原理》 02-Bean定义详解。
但是由于xml中配置了spring-aop相关的bean ,所以在解析时又会有些许差别。
如下图所示是解析xml到Bean的方法入口,其中 if (delegate.isDefaultNamespace(ele)) 逻辑主要是判断当前xml中定义的bean是否是beans命名空间下的。当扫描到aop先关的bean时,if判断肯定不通过,所以会走到下面的else逻辑 parseCustomElement
protected void parseBeanDefinitions(Element root, BeanDefinitionParserDelegate delegate) {
    if (delegate.isDefaultNamespace(root)) {
        NodeList nl = root.getChildNodes();
        for (int i = 0; i < nl.getLength(); i++) {
            Node node = nl.item(i);
            if (node instanceof Element) {
                Element ele = (Element) node;
                if (delegate.isDefaultNamespace(ele)) {
                    parseDefaultElement(ele, delegate);
                } else {
                    delegate.parseCustomElement(ele);
                }
            }
        }
    } else {
        delegate.parseCustomElement(root);
    }
}
如下图所示是解析其他命名空间的方法入口,在本案例中处理beans命名空间外的就只有aop了。
所以会找到aop先关的处理器,通过debug找到 ConfigBeanDefinitionParse
public BeanDefinition parseCustomElement(Element ele, @Nullable BeanDefinition containingBd) {
    //获取xml中的命名空间uri
    String namespaceUri = getNamespaceURI(ele);
    if (namespaceUri == null) {
        return null;
    }
    //通过uri获取到指定的处理器
    NamespaceHandler handler = this.readerContext.getNamespaceHandlerResolver().resolve(namespaceUri);
    if (handler == null) {
        error("Unable to locate Spring NamespaceHandler for XML schema namespace [" + namespaceUri + "]", ele);
        return null;
    }
    //使用相应的处理器解析xml中定义的bean
    return handler.parse(ele, new ParserContext(this.readerContext, this, containingBd));
}
如下图所示是解析spring-aop bean xml配置,至于详细的解析流程本文将不再赘述。
public BeanDefinition parse(Element element, ParserContext parserContext) {
    CompositeComponentDefinition compositeDef = new CompositeComponentDefinition(element.getTagName(), parserContext.extractSource(element));
    parserContext.pushContainingComponent(compositeDef);

    configureAutoProxyCreator(parserContext, element);

    List < Element > childElts = DomUtils.getChildElements(element);
    for (Element elt: childElts) {
        String localName = parserContext.getDelegate().getLocalName(elt);
        if (POINTCUT.equals(localName)) {
            parsePointcut(elt, parserContext);
        } else if (ADVISOR.equals(localName)) {
            parseAdvisor(elt, parserContext);
        } else if (ASPECT.equals(localName)) {
            parseAspect(elt, parserContext);
        }
    }

    parserContext.popAndRegisterContainingComponent();
    return null;
}
Step2:Spring-aop拦截的Bean是如何注入到IOC的
当Ste1中将xml转为bean后,相当于完成了AbstractApplicationContext.refresh()方法的 ConfigurableListableBeanFactory beanFactory = obtainFreshBeanFactory(); 通过debug再往下走流程则走到了 refresh()方法的registerBeanPostProcessors(beanFactory); .
那么就看一下这个方法在使用spring-aop后有什么不同的变化:
该方法第一步尝试获取将xml解析为beanDefinition中的bean是否存在实现BeanPostProcessor的bean,通过debug发现我们xml中的一个BeanPostProcessor : 即xml中配置的
public static void registerBeanPostProcessors(ConfigurableListableBeanFactory beanFactory, AbstractApplicationContext applicationContext) {
    //获取beanDefinition中是否有BeanPostProcessor类型的Bean
    String[] postProcessorNames = beanFactory.getBeanNamesForType(BeanPostProcessor.class, true, false);

    int beanProcessorTargetCount = beanFactory.getBeanPostProcessorCount() + 1 + postProcessorNames.length;
    beanFactory.addBeanPostProcessor(new BeanPostProcessorChecker(beanFactory, beanProcessorTargetCount));

    List < BeanPostProcessor > priorityOrderedPostProcessors = new ArrayList < >();
    List < BeanPostProcessor > internalPostProcessors = new ArrayList < >();
    List < String > orderedPostProcessorNames = new ArrayList < >();
    List < String > nonOrderedPostProcessorNames = new ArrayList < >();
    for (String ppName: postProcessorNames) {
        //判断是否是实现 PriorityOrdered接口的Bean
        if (beanFactory.isTypeMatch(ppName, PriorityOrdered.class)) {
            BeanPostProcessor pp = beanFactory.getBean(ppName, BeanPostProcessor.class);
            priorityOrderedPostProcessors.add(pp);
            if (pp instanceof MergedBeanDefinitionPostProcessor) {
                internalPostProcessors.add(pp);
            }
        }
        //判断是否是实现 Ordered接口的Bean
        else if (beanFactory.isTypeMatch(ppName, Ordered.class)) {
            orderedPostProcessorNames.add(ppName);
        } else {
            nonOrderedPostProcessorNames.add(ppName);
        }
    }

    sortPostProcessors(priorityOrderedPostProcessors, beanFactory);
    registerBeanPostProcessors(beanFactory, priorityOrderedPostProcessors);

    List < BeanPostProcessor > orderedPostProcessors = new ArrayList < >();
    for (String ppName: orderedPostProcessorNames) {
        BeanPostProcessor pp = beanFactory.getBean(ppName, BeanPostProcessor.class);
        orderedPostProcessors.add(pp);
        if (pp instanceof MergedBeanDefinitionPostProcessor) {
            internalPostProcessors.add(pp);
        }
    }
    sortPostProcessors(orderedPostProcessors, beanFactory);
    registerBeanPostProcessors(beanFactory, orderedPostProcessors);

    // Now, register all regular BeanPostProcessors.
    List < BeanPostProcessor > nonOrderedPostProcessors = new ArrayList < >();
    for (String ppName: nonOrderedPostProcessorNames) {
        BeanPostProcessor pp = beanFactory.getBean(ppName, BeanPostProcessor.class);
        nonOrderedPostProcessors.add(pp);
        if (pp instanceof MergedBeanDefinitionPostProcessor) {
            internalPostProcessors.add(pp);
        }
    }
    registerBeanPostProcessors(beanFactory, nonOrderedPostProcessors);

    // Finally, re-register all internal BeanPostProcessors.
    sortPostProcessors(internalPostProcessors, beanFactory);
    registerBeanPostProcessors(beanFactory, internalPostProcessors);

    // Re-register post-processor for detecting inner beans as ApplicationListeners,
    // moving it to the end of the processor chain (for picking up proxies etc).
    beanFactory.addBeanPostProcessor(new ApplicationListenerDetector(applicationContext));
}
registerBeanPostProcessors 方法执行完之后,再往下走就应该是初始化Bean: finishBeanFactoryInitialization
关于Bean是如何注入的也不再本文赘述,感兴趣的读者可以阅读 《深入理解Spring原理》 03-IOC容器初始化之Bean注入详解
本文关注的重点是使用aop之后与不使用的区别:
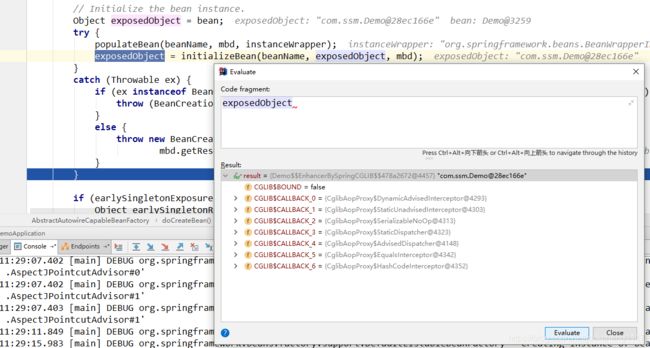
最终会到 AbstractAutowireCapableBeanFactory.doCreateBean()进行Bean的实例化,该方法最终调用 exposedObject = initializeBean(beanName, exposedObject, mbd); 对Bean进行初始化,在Spring-aop后,该方法的执行发生了变化:
还记得前面注入的 AnnotationAwareAspectJAutoProxyCreator 吗?
该方法的主要作用是执行Bean实现 Aware接口、BeanPostProcessor接口、init方法。
既然上面提到注入了一个 AnnotationAwareAspectJAutoProxyCreator BeanPostProcessor.那么在这个方法中执行BeanPostProcessor流程时肯定会执行 AnnotationAwareAspectJAutoProxyCreator 的实现。
protected Object initializeBean(final String beanName, final Object bean, @Nullable RootBeanDefinition mbd) {
if (System.getSecurityManager() != null) {
AccessController.doPrivileged((PrivilegedAction通过debug发现,在 执行postProcessAfterInitialization时调用了 wrapIfNecessary方法:
那么接下来我们就看一下wrapIfNecessary方法做了什么事情
public Object postProcessAfterInitialization(@Nullable Object bean, String beanName) throws BeansException {
    if (bean != null) {
        Object cacheKey = getCacheKey(bean.getClass(), beanName);
        if (!this.earlyProxyReferences.contains(cacheKey)) {
            return wrapIfNecessary(bean, beanName, cacheKey);
        }
    }
    return bean;
}
通过debug找到该方法的实现 : AbstractAutoProxyCreator
由于我们使用了aop,所以直接跳到了aop的实现类中,如下图所示可以发现该方法首先判断该bean是否需要被aop拦截
即 : 第三个if判断中的 shouldSkip()方法。
protected Object wrapIfNecessary(Object bean, String beanName, Object cacheKey) {
    if (StringUtils.hasLength(beanName) && this.targetSourcedBeans.contains(beanName)) {
        return bean;
    }
    if (Boolean.FALSE.equals(this.advisedBeans.get(cacheKey))) {
        return bean;
    }
    if (isInfrastructureClass(bean.getClass()) || shouldSkip(bean.getClass(), beanName)) {
        this.advisedBeans.put(cacheKey, Boolean.FALSE);
        return bean;
    }

    //根据bean查找拦截器
    Object[] specificInterceptors = getAdvicesAndAdvisorsForBean(bean.getClass(), beanName, null);
    if (specificInterceptors != DO_NOT_PROXY) {
        this.advisedBeans.put(cacheKey, Boolean.TRUE);
        Object proxy = createProxy(bean.getClass(), beanName, specificInterceptors, new SingletonTargetSource(bean));
        this.proxyTypes.put(cacheKey, proxy.getClass());
        return proxy;
    }

    this.advisedBeans.put(cacheKey, Boolean.FALSE);
    return bean;
}
如下图所示是shouldSkip()方法的实现:
该方法首先尝试获取了ioc中的Advisor,若Advisor还没有注入,则进行注入后返回。即 findCandidateAdvisors 这个方法会将我们在xml中定义的aop的 pointCut、beforeAspect、afterAspect注入到IOC 中。注入之后再继续判断正在注入的demo bean是否需要拦截。(是否需要拦截:判断当前beanName是否与我们定义的TestAop 的beanName相等,若不相等则进行拦截)
protected boolean shouldSkip(Class < ?>beanClass, String beanName) {
    // 尝试获取ioc中的Advisor
    List < Advisor > candidateAdvisors = findCandidateAdvisors();
    for (Advisor advisor: candidateAdvisors) {
        if (advisor instanceof AspectJPointcutAdvisor && ((AspectJPointcutAdvisor) advisor).getAspectName().equals(beanName)) {
            return true;
        }
    }
    return super.shouldSkip(beanClass, beanName);
}
由于当前注入的beanName=demo,并不等于 testAop,所以该bean是需要进行拦截的。然后会继续往下执行: Object[] specificInterceptors = getAdvicesAndAdvisorsForBean(beanClass, beanName, targetSource);
该方法主要是查找当前Bean的advice和advisor。主要实现是调用了 findEligibleAdvisors 方法,那我们就一下这个方法做了什么事情
protected Object[] getAdvicesAndAdvisorsForBean(Class < ?>beanClass, String beanName, @Nullable TargetSource targetSource) {

    List < Advisor > advisors = findEligibleAdvisors(beanClass, beanName);
    if (advisors.isEmpty()) {
        return DO_NOT_PROXY;
    }
    return advisors.toArray();
}
从下图可以看到 findEligibleAdvisors 方法主要是获取到 IOC中的 advisors,然后遍历这些advisors并将需要拦截Bean的Advisor返回,那这个advisors是如何判断需不需要拦截正在注入的Bean呢?
public static List < Advisor > findAdvisorsThatCanApply(List < Advisor > candidateAdvisors, Class < ?>clazz) {
    if (candidateAdvisors.isEmpty()) {
        return candidateAdvisors;
    }
    List < Advisor > eligibleAdvisors = new ArrayList < >();
    for (Advisor candidate: candidateAdvisors) {
        if (candidate instanceof IntroductionAdvisor && canApply(candidate, clazz)) {
            eligibleAdvisors.add(candidate);
        }
    }
    boolean hasIntroductions = !eligibleAdvisors.isEmpty();
    for (Advisor candidate: candidateAdvisors) {
        if (candidate instanceof IntroductionAdvisor) {
            // already processed
            continue;
        }
        if (canApply(candidate, clazz, hasIntroductions)) {
            eligibleAdvisors.add(candidate);
        }
    }
    return eligibleAdvisors;
}
需不需要拦截主要是 canApply 方法决定的,如下图所示是它的实现:
该方法主要是获取到正在注入的Bean的所有方法,然后判断我们写的aop的expression是否可以匹配到方法。然后将可以拦截到Bean的方法的aop拦截器进行返回。
public static boolean canApply(Pointcut pc, Class < ?>targetClass, boolean hasIntroductions) {
    Assert.notNull(pc, "Pointcut must not be null");
    if (!pc.getClassFilter().matches(targetClass)) {
        return false;
    }

    MethodMatcher methodMatcher = pc.getMethodMatcher();
    if (methodMatcher == MethodMatcher.TRUE) {
        // No need to iterate the methods if we're matching any method anyway...
        return true;
    }

    IntroductionAwareMethodMatcher introductionAwareMethodMatcher = null;
    if (methodMatcher instanceof IntroductionAwareMethodMatcher) {
        introductionAwareMethodMatcher = (IntroductionAwareMethodMatcher) methodMatcher;
    }

    Set < Class < ?>>classes = new LinkedHashSet < >();
    if (!Proxy.isProxyClass(targetClass)) {
        classes.add(ClassUtils.getUserClass(targetClass));
    }
    classes.addAll(ClassUtils.getAllInterfacesForClassAsSet(targetClass));

    for (Class < ?>clazz: classes) {
        //获取当前正在注入的Bean的方法
        Method[] methods = ReflectionUtils.getAllDeclaredMethods(clazz);
        for (Method method: methods) {
            if (introductionAwareMethodMatcher != null ? introductionAwareMethodMatcher.matches(method, targetClass, hasIntroductions) :
            //遍历方法判断aop中的expression表达式是否可以拦截到该方法
            methodMatcher.matches(method, targetClass)) {
                return true;
            }
        }
    }

    return false;
}
如下图所示,返回拦截器后将开始创建代理对象:

最终会调用 DefaultAopProxyFactory获取相应的AopProxy进行代理对象创建:
如下图所示首先会判断使用哪种方式创建代理对象:
若bean是接口则进行jdk代理、若是类则进行Cglib代理.
public AopProxy createAopProxy(AdvisedSupport config) throws AopConfigException {
    if (config.isOptimize() || config.isProxyTargetClass() || hasNoUserSuppliedProxyInterfaces(config)) {
        Class < ?>targetClass = config.getTargetClass();
        if (targetClass == null) {
            throw new AopConfigException("TargetSource cannot determine target class: " + "Either an interface or a target is required for proxy creation.");
        }
        if (targetClass.isInterface() || Proxy.isProxyClass(targetClass)) {
            return new JdkDynamicAopProxy(config);
        }
        return new ObjenesisCglibAopProxy(config);
    } else {
        return new JdkDynamicAopProxy(config);
    }
}
最后将生成的代理对象注入到IOC中:
Step3: Spring-aop执行流程
由于本例中是使用Cglib生成的代理对象,所以就以Cglib代理分析aop的执行流程。
Step2执行完之后就完成了Bean的注入,然后返回main方法执行:
 Demo demo = (Demo) applicationContext.getBean("demo");
 demo.get();
由于最终返回的Demo Bean是一个代理对象,所以就以demo.get()这个方法为入口进行debug.
由于是demo是cglib代理生成的,所以通过debug会先走到CglibAopProxy.intercept()这个方法:
如下图所示:该方法第一个 if 判断就判断了 exposeProxy是否为true.若为true的话会将当前代理设置到 AopContext中。
那么我们就可以在代码中使用 AopProxy.currentProxy()获取到当前的代理对象,这点是非常方便的。
由于demo这个bean是需要被aop拦截的,所以 : this.advised.getInterceptorsAndDynamicInterceptionAdvice()这个肯定会获取到
chain.那么理所当然会走到 else 逻辑中的 retVal = new CglibMethodInvocation(proxy, target, method, args, targetClass, chain, methodProxy).proceed();
public Object intercept(Object proxy, Method method, Object[] args, MethodProxy methodProxy) throws Throwable {
    Object oldProxy = null;
    boolean setProxyContext = false;
    Object target = null;
    TargetSource targetSource = this.advised.getTargetSource();
    try {
        //是否暴露代理对象
        if (this.advised.exposeProxy) {
            // Make invocation available if necessary.
            oldProxy = AopContext.setCurrentProxy(proxy);
            setProxyContext = true;
        }
        // Get as late as possible to minimize the time we "own" the target, in case it comes from a pool...
        target = targetSource.getTarget();
        Class < ?>targetClass = (target != null ? target.getClass() : null);
        List < Object > chain = this.advised.getInterceptorsAndDynamicInterceptionAdvice(method, targetClass);
        Object retVal;

        if (chain.isEmpty() && Modifier.isPublic(method.getModifiers())) {
            Object[] argsToUse = AopProxyUtils.adaptArgumentsIfNecessary(method, args);
            retVal = methodProxy.invoke(target, argsToUse);
        } else {
            //创建Cglib方法调用
            retVal = new CglibMethodInvocation(proxy, target, method, args, targetClass, chain, methodProxy).proceed();
        }
        //处理返回类型
        retVal = processReturnType(proxy, target, method, retVal);
        return retVal;
    } finally {
        if (target != null && !targetSource.isStatic()) {
            targetSource.releaseTarget(target);
        }
        if (setProxyContext) {
            // Restore old proxy.
            AopContext.setCurrentProxy(oldProxy);
        }
    }
}
retVal = new CglibMethodInvocation(proxy, target, method, args, targetClass, chain, methodProxy).proceed(); 这行代码首先会创建一个 CglibMethodInvocation对象,然后去调用proceed()方法。如下图所示跳转到了ReflectiveMethodInvocation的proceed()方法:
通过源码可以发现,该方法主要是获取 this.interceptorsAndDynamicMethodMatchers 中的数据,然后遍历里面的数据并调用数据的invoke()方法。那么我们就来看下 this.interceptorsAndDynamicMethodMatchers 中到底存了什么数据:
public Object proceed() throws Throwable {
    //	We start with an index of -1 and increment early.
    if (this.currentInterceptorIndex == this.interceptorsAndDynamicMethodMatchers.size() - 1) {
        return invokeJoinpoint();
    }

    Object interceptorOrInterceptionAdvice = this.interceptorsAndDynamicMethodMatchers.get(++this.currentInterceptorIndex);
    if (interceptorOrInterceptionAdvice instanceof InterceptorAndDynamicMethodMatcher) {
        // Evaluate dynamic method matcher here: static part will already have
        // been evaluated and found to match.
        InterceptorAndDynamicMethodMatcher dm = (InterceptorAndDynamicMethodMatcher) interceptorOrInterceptionAdvice;
        if (dm.methodMatcher.matches(this.method, this.targetClass, this.arguments)) {
            return dm.interceptor.invoke(this);
        } else {
            // Dynamic matching failed.
            // Skip this interceptor and invoke the next in the chain.
            return proceed();
        }
    } else {
        // It's an interceptor, so we just invoke it: The pointcut will have
        // been evaluated statically before this object was constructed.
        return ((MethodInterceptor) interceptorOrInterceptionAdvice).invoke(this);
    }
}
如下图所示是 interceptorsAndDynamicMethodMatchers 中存储的数据:
可以发现里面包含了 before、after相关的东西。也就是说 ReflectiveMethodInvocation.proceed()分别执行了 ExposeInvocationInterceptor.invoke() 、AspectJAfterAdvice.invoke()、MethodBeforeAdviceInterceptor.invoke() 方法

通过debug上述的ExposeInvocationInterceptor.invoke() 、AspectJAfterAdvice.invoke()、MethodBeforeAdviceInterceptor.invoke() 方法发现就是分别调用了AOP的before方法、targetClass方法、after方法
上述方法分别嵌套调用了ReflectiveMethodInvocation.proceed(),所以流程比较麻烦,不再一一贴代码
大致流程如下:
- CglibAopProxy.intercept()
- ReflectiveMethodInvocation.proceed() : currentInterceptorIndex = -1 进行 ++currentInterceptorIndex
- ExposeInvocationInterceptor.invoke()
- ReflectiveMethodInvocation.proceed() : currentInterceptorIndex = 0 进行++currentInterceptorIndex 取出 (AspectAfterAdvice)
- AspectAfterAdvice.invoke() -----> ReflectiveMethodInvocation.proceed() : currentInterceptorIndex = 1 进行++currentInterceptorIndex 取出AspectjMethodBeforeAdvice
- MethodBeforeAdviceInterceptor.invoke() : 执行 advice.before() 然后再返回到proceed方法
- ReflectiveMethodInvocation.proceed() : currentInterceptorIndex = 2 执行invokeJoinpoint(); 然后return返回到 MethodBeforeAdviceInterceptor.invoke()
- MethodBeforeAdviceInterceptor.invoke()再return 返回到AspectAfterAdvice.invoke方法的finally逻辑内执行after()方法,执行完after()方法再return到 ReflectiveMethodInvocation.proceed()
- ReflectiveMethodInvocation.proceed()return返回到ExposeInvocationInterceptor.invoke()
- ExposeInvocationInterceptor.invoke()return返回到ReflectiveMethodInvocation.proceed()、
- ReflectiveMethodInvocation.proceed()return返回到CglibAopProxy.intercept()
PS: spring-aop的执行流程设计相当精巧,可以学习下设计供自己设计方法所用
上述内容如有不妥之处,还请读者指出,共同探讨,共同进步!
@author : [email protected]