SpringBoot整合Swagger2
SpringBoot整合Swagger2
一、Swagger简介
Swagger是一款RESTFUL接口的文档在线自动生成+功能测试功能软件,被广泛应用于前后端分离项目中,用来降低前后端开发人员的沟通成本,因为Swagger可以根据后端接口的设计动态的生成restful风格的API文档供前端开发人员的使用。除此之外,Swagger还提供了接口测试功能,使得开发人员可以方便的测试接口的可用性。有了Swagger以后,开发人员再也不用维护接口文档了。
Swagger目前应用最多的版本就是Swagger2,下面说明SpringBoot如何整合Swagger2
二、SpringBoot整合Swagger2
1、在项目中引入下面两个jar包
        <dependency>
            <groupId>io.springfoxgroupId>
            <artifactId>springfox-swagger2artifactId>
            <version>2.7.0version>
        dependency>
        <dependency>
            <groupId>io.springfoxgroupId>
            <artifactId>springfox-swagger-uiartifactId>
            <version>2.7.0version>
        dependency>
2、创建一个Swagger的配置类
并使用@EnableSwagger2注解开启Swagger2的支持
//表明是一个配置类
@Configuration
//开启Swagger2的支持
@EnableSwagger2
public class SwaggerConfig {
}
此时就可以在项目中利用默认配置使用Swagger了,启动项目后,访问 http://localhost:8080/swagger-ui.html/ 即可得到一份在线API文档,如下:
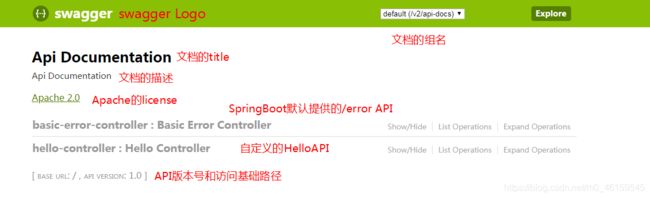
此时文档中的信息都是默认值,一般情况下我们需要修改其中的信息,如下。
3、自定义Swagger文档信息
向容器中加入一个Docket bean,替换掉默认使用的Docket,它是Swagger的核心bean,可以帮助我们自定义文档中的信息。
import org.springframework.context.annotation.Bean;
import org.springframework.context.annotation.Configuration;
import springfox.documentation.service.ApiInfo;
import springfox.documentation.service.Contact;
import springfox.documentation.spi.DocumentationType;
import springfox.documentation.spring.web.plugins.Docket;
import springfox.documentation.swagger2.annotations.EnableSwagger2;
import java.util.ArrayList;
@Configuration
@EnableSwagger2
public class SwaggerConfig {
@Bean
public Docket docket(){
//DocumentationType.SWAGGER_2是DocumentationType类提供的一个常量
//表示我们使用的Swagger文档类型为SWAGGER_2
Docket docket = new Docket(DocumentationType.SWAGGER_2);
//如果我们需要自定义文档信息,需要调用apiInfo方法,传入一个ApiInfo对象,此对象用来封装文档中显示的相关信息
//设置文档所属的组名
docket.apiInfo(apiInfo())
.groupName("groupLy");
return docket;
}
private ApiInfo apiInfo(){
//Contact用来封装联系人(作者)的相关信息,只能通过构造器为各属性赋值
//public Contact(String name, String url, String email)
//分别是作者的姓名、主页和邮箱
Contact contact = new Contact("deng","https://me.csdn.net/blog/m0_46159545","[email protected]");
//ApiInfo没有set方法,只能通过构造方法为各个属性赋值
//public ApiInfo(
// String title, 文档的标题
// String description, 文档的描述
// String version, 文档的版本
// String termsOfServiceUrl,文档的服务商网址
// Contact contact, 联系人信息
// String license, 许可证,一般使用Apache 2.0
// String licenseUrl, 许可证地址,一般使用
// http://www.apache.org/licenses/LICENSE-2.0
// Collection vendorExtensions,
// 一般使用newArrayList()
//)
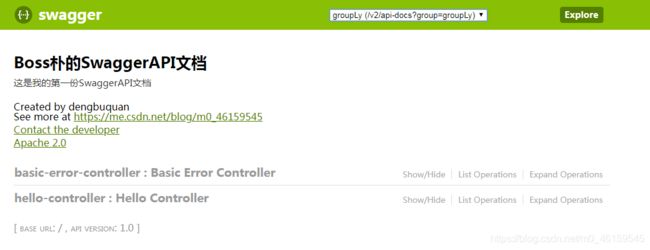
ApiInfo apiInfo = new ApiInfo(
"Boss朴的SwaggerAPI文档",
"这是我的第一份SwaggerAPI文档",
"1.0",
"https://me.csdn.net/blog/m0_46159545",
contact,
"Apache 2.0",
"http://www.apache.org/licenses/LICENSE-2.0",
new ArrayList()
);
return apiInfo;
}
}
经过上面的配置,重新启动项目,访问 http://localhost:8080/swagger-ui.html/,得到如下的页面:
这样就完成了API文档信息的自定义,但是SpringBoot默认的同德errorAPI也是默认显示出来的,我们一般情况下不希望出现这类API的信息,那么就涉及到如何设置API的显示了。
4、设置API的扫描范围
我们可以使用Docket对象来设置文档中显示那些API接口信息,将第三步中docket()修改如下:
	@Bean
    public Docket docket(){
        Docket docket = new Docket(DocumentationType.SWAGGER_2);
        docket.apiInfo(apiInfo())
              .groupName("groupLy")
              //获得ApiSelectorBuilder对象
              .select()
              //设置ApiSelector的构建规则
              //有apis和paths两个方法可以使用:
              //apis(Predicate selector),可以调用下面五个方法获得									Predicate对象
                    //RequestHandlerSelectors.any():全部构建,只要是API就构建,													     默认使用这种方式
                    //RequestHandlerSelectors.none():全部不构建
                    //RequestHandlerSelectors.basePackage():构建指定包下的所有															  API
                    //RequestHandlerSelectors.withClassAnnotation():仅构建带														 有指定(类注解)的API,
                            //相当于在@Controller等注解的基础上同时要求必须拥有指定																	  的类注解
                    //RequestHandlerSelectors.withMethodAnnotation():仅构建带														有指定(方法注解)的API,
                            //相当于在@GetMapping等注解的基础上同时要求必须拥有指定																	的方法注解
              //paths(Predicate selector),可以调用下面四个方法获得											Predicate对象
                    //PathSelectors.any():构建所有请求路径的API
                    //PathSelectors.none():所有路径的API都不构建
                    //PathSelectors.ant(String pattern):仅构建指定格式的API
                    //PathSelectors.regex():仅构建正则匹配的API
              .paths(PathSelectors.ant("/hello"))
              //构建ApiSelector
              .build();
        return docket;
    }
此时再次访问Swagger文档,可以看到仅有/hello的API被显示:

5、根据环境控制Swagger的开启
在实际开发中往往会有这样的需求,我们希望Swagger只有在dev和test环境下能使用,在prod环境下不能使用。为了解决这个问题,就需要控制Swagger的开启和关闭,在第四步的基础上继续修改:
	//获取Environment对象
    @Bean
    public Docket docket(Environment environment){
        //创建"dev","test"的Profiles对象
        Profiles profiles = Profiles.of("dev","test");
        //校验当前环境是否是"dev"或者"test"环境
        boolean flag = environment.acceptsProfiles(profiles);
        Docket docket = new Docket(DocumentationType.SWAGGER_2);
        //将flag作为是否开启Swagger的条件
        docket.enable(flag)
              .apiInfo(apiInfo())
              .groupName("groupLy")
              .select()
              .paths(PathSelectors.ant("/hello"))
              .build();
        return docket;
    }
在SpringBoot配置文件中模拟不同的环境进行测试:
    spring:
      profiles:
        active: prod

    ---
    spring:
         profiles: dev
    server:
      port: 8001

    ---
    spring:
         profiles: prod
    server:
      port: 8002
在生产环境下,Swagger页面正常显示;而在prod环境下,得到如下页面:

6、Swagger的分组设置
在实际开发中,后端API的开发往往是多人协同开发的,再使用Swagger扫描API时,每个人负责扫描每个人开发的API,这就产生了API分组的概念,一个组对应一套API。
在Swagger中,一个Docket实例bean就代表一个组,多人协同开发时,各自注入各自的Docket实例即可实现API分组,但是要注意bean的name不能相同,否则Spring会报错。另外可以使用Docket中的groupName(String)方法设置该组的组名,用来区分不同的组。
每个人都可以通过Docket自定义API页面和API扫描范围等的设置。
@Bean
public Docket docketA(Environment environment){
Profiles profiles = Profiles.of("dev","test");
boolean flag = environment.acceptsProfiles(profiles);
Docket docket = new Docket(DocumentationType.SWAGGER_2);
docket.enable(flag)
.apiInfo(apiInfo())
.groupName("A")
.select()
.paths(PathSelectors.ant("/hello"))
.build();
return docket;
}
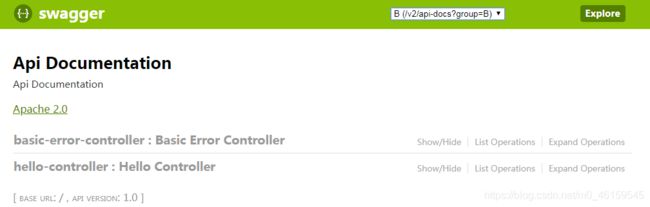
@Bean
public Docket docketB(){
return new Docket(DocumentationType.SWAGGER_2)
.groupName("B");
}
@Bean
public Docket docketC(){
return new Docket(DocumentationType.SWAGGER_2)
.groupName("C");
}
此时的Swagger页面变为了:

切换为B组,则显示B组的API,C组同理。
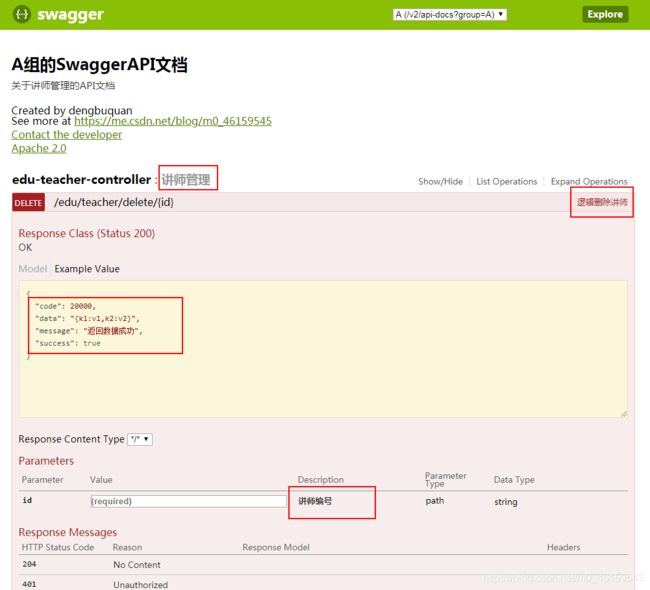
7、SwaggerAPI文档注释
在Swagger中,如果我们可以在后端接口上使用@Api、@ApiOperation和@ApiParam注解来对控制器类、接口方法以及方法参数进行注释,并且在后端model类上、属性上使用@ApiModel,@ApiModelProperty进行注释,这样得到的API文档可读性更高,如下:
@Api(description = "讲师管理")
@RestController
@RequestMapping("/edu/teacher")
public class EduTeacherController {
    @Autowired
    private EduTeacherService service;

    @ApiOperation("查询所有讲师")
    @GetMapping("/findAll")
    public Result findAll(){
        List<EduTeacher> list = service.list(null);
        return Result.ok().data("items", list);
    }
}
@ApiModel("统一的json返回格式")
public class Result {
    @ApiModelProperty(value = "是否成功返回",example = "true")
    private Boolean success;
    @ApiModelProperty(value = "返回状态码",example = "20000")
    private Integer code;
    @ApiModelProperty(value = "返回消息",example = "返回数据成功")
    private String message;
    @ApiModelProperty(value = "返回数据",example = "{k1:v1,k2:v2}")
    private Map<String,Object> data = new HashMap<>();