ENGINEER部分笔记
ENGINEER部分笔记
- 一、磁盘管理
- 1.1、fdisk 分区工具
- 1.2、格式化
- 1.3、挂载使用分区
- 1.4、parted 分区工具
- 1.5、交换空间
- 1.5.1、使用分区做交换空间
- 1.5.2、使用文件所占用的硬盘空间,充当交换空间
- 1.6、逻辑卷管理
- 1.6.1、物理卷管理
- 1.6.1.1、添加物理卷
- 1.6.1.2、查看物理卷
- 5.6.1.3、删除物理卷
- 1.6.2、卷组管理
- 1.6.2.1、添加卷组vg0
- 1.6.2.2、扩展卷组vg0的容量
- 1.6.2.3、查看卷组
- 1.6.2.4、从卷组中删除物理卷
- 1.6.2.5、删除卷组
- 1.6.3、逻辑卷管理
- 1.6.3.1、添加逻辑卷
- 1.6.3.2、查看逻辑卷
- 1.6.3.3、更改逻辑卷大小
- 1.6.3.4、删除逻辑卷
- 1.7、RAID磁盘阵列
- 二、进程管理
- 2.1、查看进程
- 2.1.1、查看进程树
- 2.1.2、查看进程快照
- 2.1.3、进程动态排名
- 2.1.4、检索进程
- 2.2、控制进程
- 2.2.1、进程的前后台调度
- 2.2.2、杀死进程
- 三、配置主机名
- 3.1、通过更改配置文件的方式更改主机名
- 3.2、通过命令行的方式修改主机名
- 3.3、文本界面工具修改主机名
- 四、Linux网络配置
- 4.1、修改网卡的命名规则
- 4.2、配置新的IP地址
- 4.3、指定DNS服务器地址
- 4.4、SSH远程管理Linux主机
- 4.5、SCP安全复制工具
- 4.6、网络管理的工具
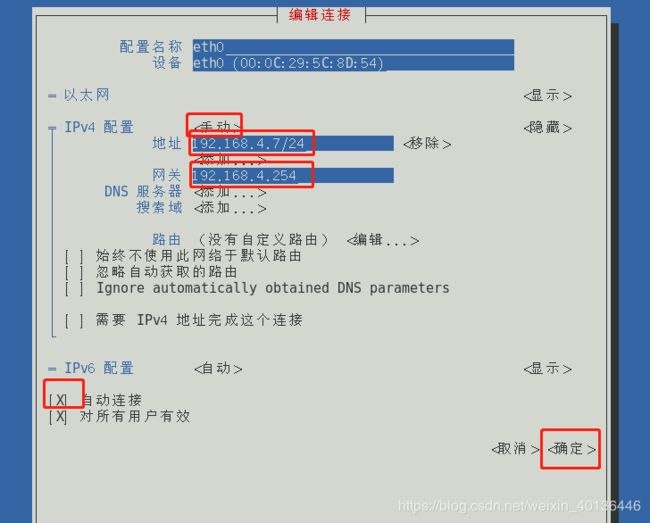
- 4.7、文本用户界面工具配置IP地址
- 五、源码编译安装
- 六、自定义yum仓库
- 七、日志管理
- 八、SELinux 系统防护
- 九、破解Linux系统root密码
- 7.1、重启系统进入恢复模式
- 7.2、以可写方式重新挂载/, 并切换到此环境
- 7.3、重新设置root 密码
- 7.4、selinux设置
- 7.5、强制重启系统完成修复
- 十、防火墙的策略管理
- 8.1、查看防火墙规则列表
- 8.2、修改防火墙的默认区域
- 8.3、添加允许的协议
- 8.4、单独拒绝一个IP地址
- 十一、服务的基础管理
一、磁盘管理
磁盘是任何系统中存储文件和数据的重要载体。是必不可缺的。无论是Windows还是Linux在安装系统时,必须先有分区来做这个载体。
在Linux系统中主要使用的磁盘工具是fdisk和parted两种。
[root@localhost ~]# lsblk 			//列出当前系统识别到的硬盘
NAME            MAJ:MIN RM  SIZE RO TYPE MOUNTPOINT
sda               8:0    0   20G  0 disk
├─sda1            8:1    0    1G  0 part /boot
└─sda2            8:2    0   19G  0 part
  ├─centos-root 253:0    0   17G  0 lvm  /
  └─centos-swap 253:1    0    2G  0 lvm  [SWAP]
sdb               8:16   0   20G  0 disk
-
分区模式:MBR和GPT
-
MBR/msdos分区模式
- 分区类型:主分区、扩展分区、逻辑分区
-
最多只能有4个主分区
-
扩展分区可以没有,至多有一个
-
1~4个主分区,或者 3个主分区+1个扩展分区(n个逻辑分区)
-
最大支持容量为 2.2TB 的磁盘
-
扩展分区不能格式化,空间不能直接存储数据
-
可以用于存储数据的分区:主分区与逻辑分区
-
-
GPT分区模式
- 全局唯一标识分区表
- 突破固定大小64字节的分区表限制
- 最多可支持128个主分区,最大支持18EB容量
- 1 EB = 1024 PB = 1024 x 1024 TB
1.1、fdisk 分区工具
- 命令格式1:fdisk [选项] <磁盘> //更改分区表
- 命令格式2:fdisk [选项] -l <磁盘> //列出分区表
[root@localhost ~]# fdisk /dev/sdb
- 进入fdisk交互模式
- 常用的交互指令
- m 列出指令帮助
- p 查看现有的分区表(存放分区信息的表格)
- n 新建分区
- d 删除分区
- q 放弃更改并退出
- w 保存更改并退出
- 常用的交互指令
命令(输入 m 获取帮助):n			//新建分区
Partition type:
   p   primary (0 primary, 0 extended, 4 free)		//主分区
   e   extended										//扩展分区
Select (default p):
Using default response p
分区号 (1-4,默认 1):
起始 扇区 (2048-41943039,默认为 2048):
将使用默认值 2048
Last 扇区, +扇区 or +size{K,M,G} (2048-41943039,默认为 41943039):+1G
分区 1 已设置为 Linux 类型,大小设为 1 GiB

命令(输入 m 获取帮助):n
Partition type:
   p   primary (1 primary, 0 extended, 3 free)
   e   extended
Select (default p):
Using default response p
分区号 (2-4,默认 2):
起始 扇区 (2099200-41943039,默认为 2099200):
将使用默认值 2099200
Last 扇区, +扇区 or +size{K,M,G} (2099200-41943039,默认为 41943039):+5G
分区 2 已设置为 Linux 类型,大小设为 5 GiB

命令(输入 m 获取帮助):p

磁盘 /dev/sdb:21.5 GB, 21474836480 字节,41943040 个扇区
Units = 扇区 of 1 * 512 = 512 bytes
扇区大小(逻辑/物理):512 字节 / 512 字节
I/O 大小(最小/最佳):512 字节 / 512 字节
磁盘标签类型:dos
磁盘标识符:0x2b679b16

   设备 Boot      Start         End      Blocks   Id  System
/dev/sdb1            2048     2099199     1048576   83  Linux
/dev/sdb2         2099200    12584959     5242880   83  Linux
1.2、格式化
-
格式化:赋予空间文件系统的过程
- 文件系统:数据在空间中存放的规则
  [root@localhost ~]# mkfs.
    mkfs.btrfs   mkfs.ext2    mkfs.ext4    mkfs.minix   mkfs.vfat
  mkfs.cramfs  mkfs.ext3    mkfs.fat     mkfs.msdos   mkfs.xfs
    [root@localhost ~]# mkfs -t
    btrfs   ext2    ext4    minix   vfat
    cramfs  ext3    fat     msdos   xfs
- 格式化分区
[root@localhost ~]# mkfs.ext4 /dev/sdb1

[root@localhost ~]# mkfs -t ext4 /dev/sdb1

[root@localhost ~]# blkid /dev/sdb1
/dev/sdb1: UUID="ae37b440-69ec-47ef-b617-02807f48496f" TYPE="ext4"
- 刷新分区表
[root@localhost ~]# partprobe
1.3、挂载使用分区
- 开机自动挂载/etc/fstab
[root@localhost ~]# mkdir /mypart1
[root@localhost ~]# vim /etc/fstab
/dev/sdb1 /mypart1  ext4  defaults 0 0
[root@localhost ~]# mount -a
[root@localhost ~]# df -h  | grep mypart1
/dev/sdb1                976M  2.6M  907M    1% /mypart1
- /etc/fstab
/dev/sdb1 /mypart1 ext4 defaults 0 0
设备名称 挂载点 文件系统 参数 备份标记 检测顺序
- 参数
| Async/sync | 设置是否为同步方式运行,默认为async |
|---|---|
| auto/noauto | 当下载mount -a 的命令时,此文件系统是否被主动挂载。默认为auto |
| rw/ro | 是否以以只读或者读写模式挂载 |
| exec/noexec | 限制此文件系统内是否能够进行"执行"的操作 |
| user/nouser | 是否允许用户使用mount命令挂载 |
| suid/nosuid | 是否允许SUID的存在 |
| Usrquota | 启动文件系统支持磁盘配额模式 |
| Grpquota | 启动文件系统对群组磁盘配额模式的支持 |
| Defaults | 同时具有rw,suid,dev,exec,auto,nouser,async等默认参数的设置 |
-
备份标记
- 能否被dump备份命令作用
- 但是现在有比dump更好的备份方式
-
是否检验扇区
- 开机的过程中,系统默认会以fsck检验我们系统是否为完整
0 不要检验 1 最早检验(一般根目录会选择) 2 1级别检验完成之后进行检验
1.4、parted 分区工具
- parted交互模式管理分区
[root@localhost ~]# parted /dev/sdb
(parted) mktable gpt			//指定分区模式
警告: The existing disk label on /dev/sdb will be destroyed and all
data on this disk will be lost. Do you want to continue?
//重新建立磁盘标签,磁盘中原来的数据会丢失,是否继续。

是/Yes/否/No? yes

(parted) mkpart 				//建立分区
分区名称?  []? sdb1				//名称随意
文件系统类型?  [ext2]? ext4		//这里不会格式化
起始点? 0
结束点? 2G
警告: The resulting partition is not properly aligned for best performance.
//得到的分区没有正确对齐以获得最佳性能。

忽略/Ignore/放弃/Cancel? Ignore

(parted) print 				//查看分区表信息
Model: VMware, VMware Virtual S (scsi)
Disk /dev/sdb: 21.5GB
Sector size (logical/physical): 512B/512B
Partition Table: gpt
Disk Flags:

Number  Start   End     Size    File system  Name  标志
 1      17.4kB  2000MB  2000MB               sdb1

(parted) resizepart
分区编号? 1
结束点?  [2000MB]? 4G
(parted) print
Number  Start   End     Size    File system  Name  标志
 1      17.4kB  4000MB  4000MB               sdb1

(parted) rm 1				//删除分区
1.5、交换空间
1.5.1、使用分区做交换空间
-
在Linux系统下除了存放文件的分区以外,还需要一个Swap(交换分区)用来充当虚拟内存。
-
SWAP分区是Linux暂时存储数据的交换分区,主要用于保存物理内存上暂时不用的数据,在需要的时候调进内存。一般情况下SWAP分区应该大于或者等于物理内存大小。
-
虚拟内存
- 当物理内存占满了,CPU可以将内存的中数据,暂时放入交换空间中,缓解真实物理内存的压力
[root@localhost ~]# ls /dev/sdb2
/dev/sdb2
[root@localhost ~]# mkswap /dev/sdb2		//格式化交换文件
正在设置交换空间版本 1,大小 = 3905532 KiB
无标签,UUID=3802ca2f-3f92-4e8f-8092-950f163de988
[root@localhost ~]# blkid /dev/sdb2			//查看文件系统类型
/dev/sdb2: UUID="3802ca2f-3f92-4e8f-8092-950f163de988" TYPE="swap" PARTLABEL="sdb2" PARTUUID="ea9e855a-0857-4c79-826d-1f351c6da31d"

[root@localhost ~]# swapon 					//查看交换空间组成
NAME      TYPE      SIZE USED PRIO
/dev/dm-1 partition   2G   0B   -1
[root@localhost ~]# swapon /dev/sdb2		//启用交换空间
[root@localhost ~]# swapon 					//查看交换空间组成
NAME      TYPE      SIZE USED PRIO
/dev/dm-1 partition   2G   0B   -1
/dev/sdb2 partition 3.7G   0B   -2


[root@localhost ~]# free -m 				//查看交换空间大小
              total        used        free      shared  buff/cache
Mem:            974         403         192           8         379
Swap:          5861           0        5861

[root@localhost ~]# swapoff /dev/sdb2		//停用交换分区
[root@localhost ~]# swapon 					//查看交换空间组成
NAME      TYPE      SIZE USED PRIO
/dev/dm-1 partition   2G   0B   -1
[root@localhost ~]# free - m
              total        used        free      shared  buff/cache   available
Mem:         997956      409692      199724        8636      388540      385896
Swap:       2097148           0     2097148
- 开机启用交换分区
[root@localhost ~]# vim /etc/fstab
[root@localhost ~]# tail -1 /etc/fstab
/dev/sdb2 swap  swap defaults 0 0
[root@localhost ~]# swapon -a
[root@localhost ~]# swapon
NAME      TYPE      SIZE USED PRIO
/dev/dm-1 partition   2G   0B   -1
/dev/sdb2 partition 3.7G   0B   -2
1.5.2、使用文件所占用的硬盘空间,充当交换空间
-
Linux中的虚拟设备
- /dev/zero 设备产生无意义数据
- “零”设备,可以无限的提供空字符(0x00,ASCII代码NUL)。
- 常用来生成一个特定大小的文件。
- /dev/null
- “空”设备,也有人称它为黑洞。任何输入到这个“设备”的数据都将被直接丢弃。
- 最常用的用法是把不需要的输出重定向到这个文件
- /dev/random和/dev/urandom
- 随机数设备,提供不间断的随机字节流。
- 二者的区别是/dev/random产生随机数据依赖系统中断,当系统中断不足时,/dev/random设备会“挂起”,因而产生数据速度较慢,但随机性好;
- /dev/zero 设备产生无意义数据
-
建立一个大文件
- dd命令
- 命令格式: if=输入文件名 of=输出文件名 bs=块大小 count=块数
- dd命令
[root@localhost ~]# dd if=/dev/zero of=/opt/swap.txt bs=1M  count=2048
记录了2048+0 的读入
记录了2048+0 的写出
2147483648字节(2.1 GB)已复制,13.3674 秒,161 MB/秒

[root@localhost ~]# du -sh /opt/swap.txt
2.0G	/opt/swap.txt
- 利用文件制作交换空间
[root@localhost ~]# mkswap /opt/swap.txt
正在设置交换空间版本 1,大小 = 2097148 KiB
无标签,UUID=ca89ca53-13c1-418a-b04d-2fbeba7ea408
[root@localhost ~]# swapon /opt/swap.txt
swapon: /opt/swap.txt:不安全的权限 0644,建议使用 0600。
[root@localhost ~]# swapon
NAME          TYPE      SIZE  USED PRIO
/dev/dm-1     partition   2G 66.3M   -1
/opt/swap.txt file        2G    0B   -2
1.6、逻辑卷管理
LVM是Linux操作系统中对磁盘分区进行管理的一种机制。
是建立在磁盘和分区之上的一个逻辑层,可以提高磁盘分区管理的灵活性。
最重要的三个概念
- 物理卷(PV,physical Volume)
- 卷组(VG,Volume group)
- 逻辑卷(LV,logical Volumes)
环境准备
- 新添加两块磁盘
- 使用fdisk分区工具创建几个分区
[root@localhost ~]# lsblk
NAME            MAJ:MIN RM  SIZE RO TYPE MOUNTPOINT
sda               8:0    0   20G  0 disk
├─sda1            8:1    0    1G  0 part /boot
└─sda2            8:2    0   19G  0 part
  ├─centos-root 253:0    0   17G  0 lvm  /
  └─centos-swap 253:1    0    2G  0 lvm  [SWAP]
sdb               8:16   0   20G  0 disk
├─sdb1            8:17   0   10G  0 part
├─sdb2            8:18   0    5G  0 part
├─sdb3            8:19   0    3G  0 part
└─sdb4            8:20   0    2G  0 part
sdc               8:32   0   20G  0 disk
├─sdc1            8:33   0   10G  0 part
└─sdc2            8:34   0   10G  0 part
1.6.1、物理卷管理
物理卷就是指磁盘,磁盘分区或从逻辑上和磁盘分区具有同样功能的设备(如RAID),是LVM的基本存储逻辑块,但和基本的物理存储介质(如分区、磁盘等)比较,却包含有和LVM相关的管理参数。
每一个物理卷被划分为若干个PE(physical Extents)。PE的大小默认是4MB。
(创建卷组的时候就会直接将对应的分区创建为物理卷)
1.6.1.1、添加物理卷
[root@localhost ~]# pvcreate /dev/sdb1  /dev/sdc1
  Physical volume "/dev/sdb1" successfully created.
  Physical volume "/dev/sdc1" successfully created.
1.6.1.2、查看物理卷
可以看到刚刚被创建完成的物理卷/dev/sdb1 和/dev/sdc1以及安装系统是自动创建的/dev/sda2
[root@localhost ~]# pvdisplay
  --- Physical volume ---
  PV Name               /dev/sda2
  VG Name               centos
  PV Size               <19.00 GiB / not usable 3.00 MiB
  Allocatable           yes (but full)
  PE Size               4.00 MiB
  Total PE              4863
  Free PE               0
  Allocated PE          4863
  PV UUID               ETpx0V-4iUA-ZzXt-BceZ-ZmSM-DQAN-5F0VAG

  "/dev/sdb1" is a new physical volume of "10.00 GiB"
  --- NEW Physical volume ---
  PV Name               /dev/sdb1
  VG Name
  PV Size               10.00 GiB
  Allocatable           NO
  PE Size               0
  Total PE              0
  Free PE               0
  Allocated PE          0
  PV UUID               fphv7f-5zXj-NYdk-0e3e-1JXP-d8jR-kwRCi0

  "/dev/sdc1" is a new physical volume of "10.00 GiB"
  --- NEW Physical volume ---
  PV Name               /dev/sdc1
  VG Name
  PV Size               10.00 GiB
  Allocatable           NO
  PE Size               0
  Total PE              0
  Free PE               0
  Allocated PE          0
  PV UUID               8ljhmv-sH3W-OZIT-G9y3-AEKf-mSkT-eOeBbI
5.6.1.3、删除物理卷
不需要的物理卷可以删除,但是已经属于某个卷组的物理卷删除会报错
[root@localhost ~]# pvremove /dev/sdc1
  Labels on physical volume "/dev/sdc1" successfully wiped.
[root@localhost ~]# pvdisplay
1.6.2、卷组管理
卷组可以由一个或者多个物理卷组成,一个卷组可以创建多个逻辑卷。当卷组空间不足时,可以往卷组中添加新的物理卷。
(创建卷组的时候就会直接将对应的分区创建为物理卷)
1.6.2.1、添加卷组vg0
创建一个名字叫做vg0的卷组
[root@localhost ~]# vgcreate vg0  /dev/sdb1
  Volume group "vg0" successfully created
1.6.2.2、扩展卷组vg0的容量
[root@localhost ~]# vgextend vg0 /dev/sdb2
  Physical volume "/dev/sdb2" successfully created.		//往卷组中添加新的物理卷时,会将它自动创建为物理卷。
  Volume group "vg0" successfully extended
1.6.2.3、查看卷组
[root@localhost ~]# vgdisplay 	//不指定卷组名字则查看全部
  --- Volume group ---
  VG Name               centos
  System ID
  Format                lvm2
  Metadata Areas        1
  Metadata Sequence No  3
  VG Access             read/write
  VG Status             resizable
  MAX LV                0
  Cur LV                2
  Open LV               2
  Max PV                0
  Cur PV                1
  Act PV                1
  VG Size               <19.00 GiB
  PE Size               4.00 MiB
  Total PE              4863
  Alloc PE / Size       4863 / <19.00 GiB
  Free  PE / Size       0 / 0
  VG UUID               DfeNcj-tPls-WVXD-UUCH-9Rej-b7ai-sAhF2a

  --- Volume group ---
  VG Name               vg0
  System ID
  Format                lvm2
  Metadata Areas        2
  Metadata Sequence No  2
  VG Access             read/write
  VG Status             resizable
  MAX LV                0
  Cur LV                0
  Open LV               0
  Max PV                0
  Cur PV                2
  Act PV                2
  VG Size               14.99 GiB
  PE Size               4.00 MiB
  Total PE              3838
  Alloc PE / Size       0 / 0
  Free  PE / Size       3838 / 14.99 GiB
  VG UUID               3ODNGU-R4Qj-4pF0-FBag-9EGc-7mgi-2g4jAr


[root@localhost ~]# vgs
1.6.2.4、从卷组中删除物理卷
[root@localhost ~]# vgreduce vg0 /dev/sdb2
  Removed "/dev/sdb2" from volume group "vg0"
[root@localhost ~]# vgdisplay vg0
  --- Volume group ---
  VG Name               vg0
  System ID
  Format                lvm2
  Metadata Areas        1
  Metadata Sequence No  3
  VG Access             read/write
  VG Status             resizable
  MAX LV                0
  Cur LV                0
  Open LV               0
  Max PV                0
  Cur PV                1
  Act PV                1
  VG Size               <10.00 GiB
  PE Size               4.00 MiB
  Total PE              2559
  Alloc PE / Size       0 / 0
  Free  PE / Size       2559 / <10.00 GiB
  VG UUID               3ODNGU-R4Qj-4pF0-FBag-9EGc-7mgi-2g4jAr
1.6.2.5、删除卷组
[root@localhost ~]# vgremove vg0
  Volume group "vg0" successfully removed
[root@localhost ~]# vgdisplay vg0
  Volume group "vg0" not found
  Cannot process volume group vg0
1.6.3、逻辑卷管理
逻辑卷基于卷组。
逻辑卷和普通的磁盘分区非常的类似,在逻辑卷上也同样可以建立文件系统。
逻辑卷被划分为LE(logical Extents)的基本单位。在同一个卷组中LE和PE的大小是相同的,并且一 一对应。
环境准备
- 新建卷组vg0
- 将磁盘分区分区/dev/sdb1、/dev/sdb2、/dev/sdb3、/dev/sdb4都加入到vg0里面。
[root@localhost ~]# vgcreate vg0 /dev/sdb1 /dev/sdb2 /dev/sdb3 /dev/sdb4
  Volume group "vg0" successfully created
[root@localhost ~]# vgdisplay vg0
  --- Volume group ---
  VG Name               vg0
  System ID
  Format                lvm2
  Metadata Areas        4
  Metadata Sequence No  1
  VG Access             read/write
  VG Status             resizable
  MAX LV                0
  Cur LV                0
  Open LV               0
  Max PV                0
  Cur PV                4
  Act PV                4
  VG Size               19.98 GiB
  PE Size               4.00 MiB
  Total PE              5116
  Alloc PE / Size       0 / 0
  Free  PE / Size       5116 / 19.98 GiB
  VG UUID               CvjdYK-0ZOB-9nQS-sWzk-5twJ-6fdi-E8Tv2G
1.6.3.1、添加逻辑卷
在卷组vg0中,创建逻辑卷lv0,大小为1111MB。
[root@localhost ~]# lvcreate -L 1111M -n lv0  vg0
  Rounding up size to full physical extent <1.09 GiB
  Logical volume "lv0" created.
在卷组vg0中,创建逻辑卷lv1,大小为1000个PE。
[root@localhost ~]# lvcreate -l 1000 -n lv1  vg0
  Logical volume "lv1" created.
在卷组和逻辑卷创建完成后,会在/dev目录下创建于其名字对应的目录。
[root@localhost ~]# ls -l /dev/vg0
total 0
lrwxrwxrwx. 1 root root 7 Apr 24 16:14 lv0 -> ../dm-2
lrwxrwxrwx. 1 root root 7 Apr 24 16:16 lv1 -> ../dm-3
1.6.3.2、查看逻辑卷
[root@localhost ~]# lvdisplay /dev/vg0/lv0		//不指定逻辑卷名称,则查看全部
  --- Logical volume ---
  LV Path                /dev/vg0/lv0
  LV Name                lv0
  VG Name                vg0
  LV UUID                vNdfVn-6ktv-dOwq-lTpq-yJUg-r8du-hMMtdO
  LV Write Access        read/write
  LV Creation host, time localhost.localdomain, 2020-04-24 16:14:04 -0400
  LV Status              available
  # open                 0
  LV Size                <1.09 GiB
  Current LE             278
  Segments               1
  Allocation             inherit
  Read ahead sectors     auto
  - currently set to     8192
  Block device           253:2

[root@localhost ~]# lvs
1.6.3.3、更改逻辑卷大小
不建议减少逻辑卷的空间,因为可能会导致逻辑卷上的文件系统中的数据丢失。
将lv0的大小增加为1500MB。
[root@localhost ~]# lvresize -L 1500M /dev/vg0/lv0
  Size of logical volume vg0/lv0 changed from <1.09 GiB (278 extents) to 1.46 GiB (375 extents).
  Logical volume vg0/lv0 successfully resized.
[root@localhost ~]# lvdisplay /dev/vg0/lv0
  --- Logical volume ---
  LV Path                /dev/vg0/lv0
  LV Name                lv0
  VG Name                vg0
  LV UUID                vNdfVn-6ktv-dOwq-lTpq-yJUg-r8du-hMMtdO
  LV Write Access        read/write
  LV Creation host, time localhost.localdomain, 2020-04-24 16:14:04 -0400
  LV Status              available
  # open                 0
  LV Size                1.46 GiB
  Current LE             375
  Segments               2
  Allocation             inherit
  Read ahead sectors     auto
  - currently set to     8192
  Block device           253:2
-
刷新文件系统
xfs_growfs:扩展xfs文件系统
resize2fs:扩展ext4文件系统
[root@localhost ~]# xfs_growfs   逻辑卷设备

[root@localhost ~]# resize2fs	逻辑卷设备
1.6.3.4、删除逻辑卷
删除逻辑卷lv1
[root@localhost ~]# lvremove /dev/vg0/lv1
Do you really want to remove active logical volume vg0/lv1? [y/n]: y
  Logical volume "lv1" successfully removed
[root@localhost ~]# lvdisplay /dev/vg0/lv1
  Failed to find logical volume "vg0/lv1"
1.7、RAID磁盘阵列
硬RAID:通过RAID卡管理
软RAID:通过软件来管理
-
Redundant Array of Independent Disks 独立磁盘冗余阵列
-
其实就是用多个独立的磁盘组成在一起形成一个大的磁盘系统,从而实现比单块磁盘更好的存储性能和更高的可靠性。
-
常见的RAID方案
-
RAID0(最少两块)
- 最早出现的RAID模式,数据分条技术(Data Striping)
- RAID 0最简单的实现方式就是将N块硬盘(最好容量相同)串联在一起形成一个大的硬盘组,在写入数据时,数据会被分为一定大小的多个区块,依次写入到磁盘中。
- 优点:
- 磁盘利用率是100%。
- 较高的读写性能。
- 缺点:
- 一块盘坏掉,数据就会丢失。没有冗余。
-
RAID1(最少两块)
-
磁盘镜像模式
-
原理在一个硬盘上写入数据时会在闲置硬盘上也同时写入,生成镜像文件,在不影响性能的情况下尽可能保证可靠性。
-
优点:
- 高度冗余
-
缺点:
- 磁盘利用率50%
- 读写性能一般
-
-
RAID10(最少四块)
- 镜像加条带(先镜像,再分条)
- 优点:
- 高度冗余
- 读写性能较高
- 缺点:
- 磁盘利用率50%
-
RAID5(最少三块)
- 分布式独立磁盘阵列。
- RAID 5将数据以块为单位分布在各个硬盘上。RAID 5不对数据进行备份,而是把数据和对应的奇偶校验信息存储在组成磁盘阵列的各个磁盘上,并且奇偶校验信息和与其相对应的信息存放在不同的硬盘上。
- 当一个硬盘损坏时,系统可以根据在另一块硬盘上存放的该损坏数据相对应的奇偶校验信息来恢复数据。
- 磁盘利用率是 n-1/n
- 优点:
- 读写性能比较高
- 缺点:
- 只允许同时损坏一块盘
-
RAID6(最少四块)
- RAID 6除了每个硬盘上都有同级数据(也就是硬盘级)的XOR校验区外,还有一个针对每个数据块的XOR校验区,而且同样是交错存储。
- 磁盘利用率是 n-2/n
- 优点:
- 冗余性能更好
- 最多可坏两块盘
- 缺点:
- 写入性能降低
- 多了一个校验区,减少了有效的存储空间
-
二、进程管理
-
每个执行的任务都被称为进程(process)。
-
Linux系统中每运行一个程序都会创建一个进程。
-
进程就是一个正在运行的程序实例。
-
进程是一个动态的概念,可以与操作系统、其他进程以及用户进行数据交互。
-
每个进程启动后,系统都会自动为它分配一个唯一的数值,用于标识该进程,这个数值就被称为进程号(Process ID,PID)。进程号是这个进程的唯一标识,系统也是通过进程号来管理的。
2.1、查看进程
2.1.1、查看进程树
- pstree 命令(Processes Tree)
- 命令格式: pstree [选项] [PID或用户名]
- 常用命令选项
- -a 显示完整的命令行
- -p 列出对应的PID编号
[root@localhost ~]# pstree
[root@localhost ~]# pstree  -p
[root@localhost ~]# pstree -a

[root@localhost ~]# pstree  lisi
bash
[root@localhost ~]# pstree  -p lisi
bash(17546)
- systemd 上帝进程(所有进程的父进程)
2.1.2、查看进程快照
-
ps 命令 (Processes Snapshot)
-
命令格式: ps [选项]
-
常用选项
- aux:
- a 显示当前终端所有进程
- x 当前用户在所有终端下的进程
- u 以用户格式输出
[root@localhost ~]# ps aux用户 进程ID 占用CPU 占用内存 虚拟内存 固定内存 终端 状态 起始状态 CPU时间 程序指令
- -elf:
- e 显示当前终端所有进程
- l 以长格式显示
- f 最完整的进程信息
[root@localhost ~]# ps -elf输出内容中会显示PPID(父进程ID)
- aux:
-
2.1.3、进程动态排名
- top交互式工具
- 命令格式: top [-d 刷新秒数] [-U 用户名]
[root@localhost ~]# top -d5
- P 按照占用CPU进行排序
- M 按照占用内存进行排序
2.1.4、检索进程
-
pgrep (Process Grep)
-
命令格式 : pgrep [选项] 查询条件
-
常用命令:
- -l 输出进程名
[root@localhost ~]# pgrep -l bash //查找进程名中带有bash的 17012 bash 17476 bash 17546 bash- -U 检索指定用户的进程
[root@localhost ~]# pgrep -lU lisi //查找用户lisi的进程 17546 bash- -x 精确匹配完整的进程名
[root@localhost ~]# pgrep -lx   crond		//查找进程名叫crond的
1145 crond
-
2.2、控制进程
2.2.1、进程的前后台调度
-
前台启动
- 输入命令后,会占用当前的终端
-
后台启动
- 在命令行后加“&”,不占用当前终端
-
Ctrl+z 挂起当前进程(暂停运行转入后台)
-
jobs 命令
- 查看后台任务列表
[root@localhost ~]# sleep 100 &
[1] 21162
[root@localhost ~]# jobs
[1]+  运行中               sleep 100 &
- fg 命令
- 将后台任务恢复到前台运行
[root@localhost ~]# fg 1
sleep 100
- bg 命令
- 激活后台被挂起任务
[root@localhost ~]# fg 1
sleep 100
^Z
[1]+  已停止               sleep 100

[root@localhost ~]# jobs
[1]+  已停止               sleep 100
[root@localhost ~]# bg 1
[1]+ sleep 100 &
[root@localhost ~]# jobs
[1]+  运行中               sleep 100 &
2.2.2、杀死进程
普通用户只能终止自己运行的进程,root用户可以终止所有。
-
Ctrl+C 结束前台进程
-
kill 命令
- 命令格式1: kill [-9] PID
- 命令格式2: kill [-9] %后台任务编号
- -9 表示强制杀死
[root@localhost ~]# sleep 100000 & [1] 23123 [root@localhost ~]# jobs [1]+ 运行中 sleep 100000 & [root@localhost ~]# kill 23123 [root@localhost ~]# jobs [1]+ 已终止 sleep 100000 [root@localhost ~]# sleep 100000 & [1] 23168 [root@localhost ~]# jobs [1]+ 运行中 sleep 100000 & [root@localhost ~]# kill %1 [root@localhost ~]# jobs [1]+ 已终止 sleep 100000 -
killall 命令
- 命令格式: killall [-9] 进程名
- 命令格式: killall [-9] -u 用户名
[root@localhost ~]# sleep 100000 & [1] 23300 [root@localhost ~]# jobs [1]+ 运行中 sleep 100000 & [root@localhost ~]# killall sleep [1]+ 已终止 sleep 100000 -
pkill 命令
- 命令格式: pkill 查找条件
[root@localhost ~]# sleep 100000 &
[1] 23363
[root@localhost ~]# jobs
[1]+  运行中               sleep 100000 &
[root@localhost ~]# pkill -9 sleep
[1]+  已杀死               sleep 100000
三、配置主机名
3.1、通过更改配置文件的方式更改主机名
[root@localhost ~]# vim /etc/hostname
[root@localhost ~]# cat /etc/hostname
svr7.tedu.com
[root@localhost ~]# reboot

[root@svr7 ~]#
3.2、通过命令行的方式修改主机名
[root@localhost ~]# hostnamectl set-hostname pc207.tedu.cn
[root@localhost ~]# exit

[root@pc207 ~]#
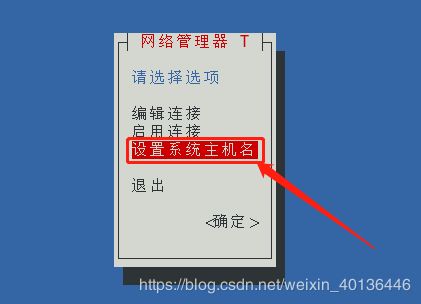
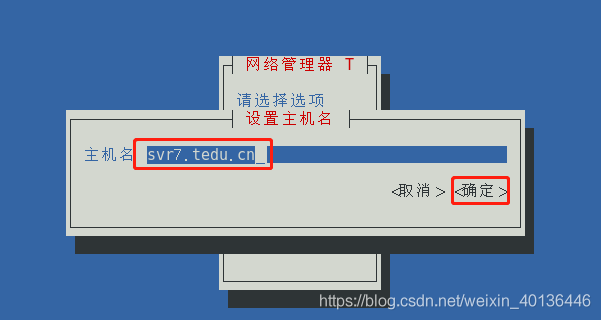
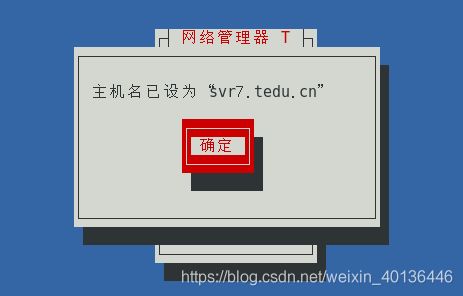
3.3、文本界面工具修改主机名
- nmtui 命令
[root@svr7 ~]# nmtui
四、Linux网络配置
4.1、修改网卡的命名规则
- 在配置文件/etc/default/grub的第六行的末尾添加net.ifnames=0 biosdevname=0
[root@svr7 ~]# vim /etc/default/grub 		#grub为引导内核的程序
[root@svr7 ~]# cat -n /etc/default/grub
     1	GRUB_TIMEOUT=5
     2	GRUB_DISTRIBUTOR="$(sed 's, release .*$,,g' /etc/system-release)"
     3	GRUB_DEFAULT=saved
     4	GRUB_DISABLE_SUBMENU=true
     5	GRUB_TERMINAL_OUTPUT="console"
     6	GRUB_CMDLINE_LINUX="crashkernel=auto rd.lvm.lv=centos/root rd.lvm.lv=centos/swap rhgb quiet net.ifnames=0 biosdevname=0"
     7	GRUB_DISABLE_RECOVERY="true"
- 重新生成grub配置文件
[root@svr7 ~]# grub2-mkconfig -o /boot/grub2/grub.cfg   #重新生成grub配置文件
Generating grub configuration file ...
Found linux image: /boot/vmlinuz-3.10.0-862.el7.x86_64
Found initrd image: /boot/initramfs-3.10.0-862.el7.x86_64.img
Found linux image: /boot/vmlinuz-0-rescue-0f6343e968a8476a8f163ca1fe496347
Found initrd image: /boot/initramfs-0-rescue-0f6343e968a8476a8f163ca1fe496347.img
done

[root@svr7 ~]# reboot
- 查看网卡信息
[root@svr7 ~]# ifconfig  | head -1
eth0: flags=4163<UP,BROADCAST,RUNNING,MULTICAST>  mtu 1500
- 删除识别错误的网络配置
[root@svr7 ~]# nmcli connection show
NAME        UUID                                  TYPE      DEVICE
virbr0      ec16c733-7362-4abd-8df3-8d4c546fc8ca  bridge    virbr0
有线连接 1  05b18026-1467-3fea-959e-4d15da5056c5  ethernet  eth0
ens33       986f20e6-0e25-4fb2-8017-078eea789342  ethernet  --

[root@svr7 ~]# nmcli connection delete ens33
成功删除连接 'ens33'(986f20e6-0e25-4fb2-8017-078eea789342)。
[root@localhost ~]# nmcli connection delete 有线连接\ 1
成功删除连接 '有线连接 1'(05b18026-1467-3fea-959e-4d15da5056c5)。

[root@svr7 ~]# nmcli connection show
NAME    UUID                                  TYPE    DEVICE
virbr0  ec16c733-7362-4abd-8df3-8d4c546fc8ca  bridge  virbr0
- 添加新的网卡名
[root@svr7 ~]# nmcli connection add ifname eth0 con-name eth0 type ethernet
连接“eth0”(fe42c860-fec1-427d-81bc-45bb16b75b15) 已成功添加。

[root@svr7 ~]# nmcli connection show
NAME    UUID                                  TYPE      DEVICE
eth0    fe42c860-fec1-427d-81bc-45bb16b75b15  ethernet  eth0
virbr0  ec16c733-7362-4abd-8df3-8d4c546fc8ca  bridge    virbr0
4.2、配置新的IP地址
- IP地址配置为192.168.4.7
- 子网掩码24位
- 网关192.168.4.254
- 开机自动连接
[root@svr7 ~]# nmcli connection modify eth0 ipv4.method manual ipv4.addresses 192.168.4.7/24 ipv4.gateway 192.168.4.254 connection.autoconnect yes
- 激活上述配置,立即生效
[root@svr7 ~]# nmcli connection up eth0
[root@svr7 ~]# ifconfig   |   head   -2
- 查看Linux系统路由表,查看网关地址
[root@svr7 ~]# route -n
Kernel IP routing table
Destination     Gateway         Genmask         Flags Metric Ref    Use Iface
0.0.0.0         192.168.4.254   0.0.0.0         UG    100    0        0 eth0
192.168.4.0     0.0.0.0         255.255.255.0   U     100    0        0 eth0
192.168.122.0   0.0.0.0         255.255.255.0   U     0      0        0 virbr0
4.3、指定DNS服务器地址
-
DNS服务器:将域名解析为对应的IP地址
-
配置完成立即生效
[root@svr7 ~]# echo nameserver 8.8.8.8  >> /etc/resolv.conf
[root@svr7 ~]# cat /etc/resolv.conf
# Generated by NetworkManager
nameserver 8.8.8.8
4.4、SSH远程管理Linux主机
-
SSH协议,Secure Shell
- 为客户机提供安全的 Shell 环境
- 默认端口:TCP 22
-
Linux远程Linux
- 常用选项 -X(大写) 开启对方的图形程序
[root@svr7 ~]# ssh [email protected]

Are you sure you want to continue connecting (yes/no)? yes
# 您确定要继续连接(是/否)吗?是的
[email protected]'s password:

Last login: Sun Jun 14 16:00:07 2020 from 192.168.4.1
[root@pc207 ~]#
- 实现ssh远程登录无密码验证
- 虚拟机A生成公钥和私钥
- 将公钥传递给虚拟机
[root@svr7 ~]# ssh-keygen    # 一路回车

[root@svr7 ~]# ssh-copy-id [email protected]
[email protected]'s password:

[root@svr7 ~]# ssh [email protected]
Last login: Sun Jun 14 16:42:19 2020 from 192.168.4.7
[root@pc207 ~]#
- xshell远程连接Linux
[c:\~]$ ssh 192.168.4.7
4.5、SCP安全复制工具
- 基于ssh
- 命令格式:
- –scp [-r] 用户名@服务器:路径 本地路径
- –scp [-r] 本地路径 用户名@服务器:路径
[root@svr7 ~]# scp /etc/passwd [email protected]:/root/
passwd                                       100% 2192     1.8MB/s   00:00

[root@svr7 ~]# scp [email protected]:/etc/hostname  /root/
hostname                                     100%   14    17.6KB/s   00:00
[root@svr7 ~]# cat hostname
pc207.tedu.cn
4.6、网络管理的工具
- 查看IP地址
[root@svr7 ~]# ip address show
[root@svr7 ~]# ip a s
- 给网卡添加临时的IP地址
[root@svr7 ~]# ip address add 192.168.100.100/24 dev eth0
[root@svr7 ~]# ip a s
- ping命令,测试网络连接的
- -c 指定包的个数
[root@svr7 ~]# ping -c 4 192.168.4.207
PING 192.168.4.207 (192.168.4.207) 56(84) bytes of data.
64 bytes from 192.168.4.207: icmp_seq=1 ttl=64 time=0.240 ms
64 bytes from 192.168.4.207: icmp_seq=2 ttl=64 time=0.249 ms
64 bytes from 192.168.4.207: icmp_seq=3 ttl=64 time=0.207 ms
64 bytes from 192.168.4.207: icmp_seq=4 ttl=64 time=0.361 ms

--- 192.168.4.207 ping statistics ---
4 packets transmitted, 4 received, 0% packet loss, time 3000ms
rtt min/avg/max/mdev = 0.207/0.264/0.361/0.059 ms
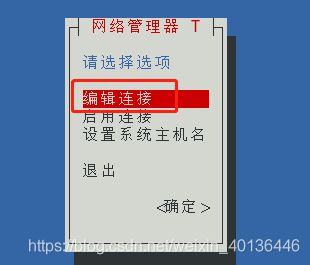
4.7、文本用户界面工具配置IP地址
[root@svr7 ~]# nmtui
五、源码编译安装
- 提前准备软件包
[root@svr7 ~]# ls /tools/inotify-tools-3.13.tar.gz
/tools/inotify-tools-3.13.tar.gz
- 解压
[root@svr7 ~]# tar -xf /tools/inotify-tools-3.13.tar.gz -C /usr/local/

[root@svr7 ~]# ls /usr/local/
inotify-tools-3.13
- 安装开发工具
- 准备编译的环境
[root@svr7 ~]# yum -y install gcc make
- 运行configure脚本程序
- 会检查系统是否安装gcc、make等工具
- 指定安装位置
- 有些软件可以通过执行这个脚本的时候选择是否安装附加的功能,或是禁用某些功能
[root@svr7 ~]# cd /usr/local/inotify-tools-3.13/
[root@svr7 inotify-tools-3.13]# ./configure --prefix=/opt/myrpm
- 编译安装
[root@svr7 inotify-tools-3.13]# make && make install
[root@svr7 inotify-tools-3.13]# ls /opt/myrpm/
bin  include  lib  share
六、自定义yum仓库
- 将自己下载的RPM包构建为仓库
[root@svr7 ~]# ls /tools/other/
boxes-1.1.1-4.el7.x86_64.rpm        oneko-1.2-19.fc24.x86_64.rpm
cmatrix-1.2a-1.i386.rpm
ntfs-3g-2014.2.15-6.el6.x86_64.rpm  sl-5.02-1.el7.x86_64.rpm
- 生成仓库数据文件
- 会产生一个repodata的目录
[root@svr7 ~]# createrepo  /tools/other/     #生成仓库数据文件
[root@svr7 ~]# ls /tools/other/repodata/
-other.sqlite.bz2
-primary.xml.gz			#软件包的主要信息
-filelists.xml.gz		#软件包的文件安装清单
-filelists.sqlite.bz2
-other.xml.gz			#软件包的其他信息
-primary.sqlite.bz2
repomd.xml				#提供.xml.gz  下载和校验信息
- 配置yum仓库
[root@svr7 ~]# cat /etc/yum.repos.d/other.repo
[other]
name = other
baseurl = file:///tools/other
enabled = 1
gpgcheck = 0

[root@svr7 ~]# yum repolist
已加载插件:fastestmirror, langpacks
Determining fastest mirrors
mydvd                                                   | 3.6 kB     00:00
other                                                   | 2.9 kB     00:00
(1/3): mydvd/group_gz                                     | 166 kB   00:00
(2/3): other/primary_db                                   | 4.8 kB   00:00
(3/3): mydvd/primary_db                                   | 5.9 MB   00:00
源标识                               源名称                               状态
mydvd                                mydvd                                9,911
other                                other                                    5
repolist: 9,916
七、日志管理
-
系统和程序的“日记本”
- 记录系统、程序运行中发生的各种事件
- 通过查看日志,了解及排除故障
- 信息安全控制的“依据”
-
由系统服务rsyslog统一记录/管理
-
日志消息采用文本格式
-
主要记录事件发生的时间、主机、进程、内容
-
-
常见的日志文件
| 日志文件 | 主要用途 |
|---|---|
| /var/log/messages | 记录内核消息、各种服务的公共消息 |
| /var/log/dmesg | 记录系统启动过程的各种消息 |
| /var/log/cron | 记录与cron计划任务相关的消息 |
| /var/log/maillog | 记录邮件收发相关的消息 |
| /var/log/secure | 记录与访问限制相关的安全消息 |
-
通用分析工具
- tail、tailf、less、grep等文本浏览/检索命令
- tailf 命令会占用终端(实时跟踪日志消息)
- awk、sed等格式化过滤工具
-
查看已登录的用户信息
- users、who、w 命令,详细度不同
[root@svr7 ~]# users
root root
[root@svr7 ~]# who			# pts:图形命令行终端
root     pts/0        2020-06-14 15:53 (192.168.4.1)
root     pts/1        2020-06-14 15:58 (192.168.4.1)
[root@svr7 ~]# w
 17:02:34 up  1:09,  2 users,  load average: 0.00, 0.01, 0.05
USER     TTY      FROM             LOGIN@   IDLE   JCPU   PCPU WHAT
root     pts/0    192.168.4.1      15:53    1:09m  0.02s  0.02s -bash
root     pts/1    192.168.4.1      15:58    2.00s  0.22s  0.00s w
- 查看最近登录成功/失败的用户信息
- last、lastb 命令
[root@svr7 ~]# last -2 		 #最近登录成功两条信息
root     pts/1        192.168.4.1      Sun Jun 14 15:58   still logged in
root     pts/0        192.168.4.1      Sun Jun 14 15:53   still logged in

wtmp begins Sun Jun 14 18:14:15 2020
[root@svr7 ~]# lastb -2 	#最近登录失败两条信息
root     ssh:notty    192.168.4.1      Sun Jun 14 10:52 - 10:52  (00:00)

btmp begins Sun Jun 14 10:52:10 2020
- Linux内核定义的事件紧急程度
- 分为 0~7 共8种优先级别
- 其数值越小,表示对应事件越紧急/重要
-
提取由 systemd-journal 服务搜集的日志
- 主要包括内核/系统日志、服务日志
-
常见用法
- journalctl | grep 关键词
- journalctl -u 服务名 [-p 优先级]
- journalctl -n 消息条数
八、SELinux 系统防护
-
SELinux的运行模式
-
enforcing(强制)、permissive(宽松)
-
disabled(彻底禁用)
-
任何默认变成disabled(彻底禁用)模式,都要经历重启系统
-
-
命令行临时切换运行模式
[root@svr7 ~]# setenforce 1
[root@svr7 ~]# getenforce
Enforcing

[root@svr7 ~]# setenforce 0
[root@svr7 ~]# getenforce
Permissive
- 固定配置:修改/etc/selinux/config第七行
[root@svr7 ~]# cat -n /etc/selinux/config
     7	SELINUX=enforcing
九、破解Linux系统root密码
7.1、重启系统进入恢复模式
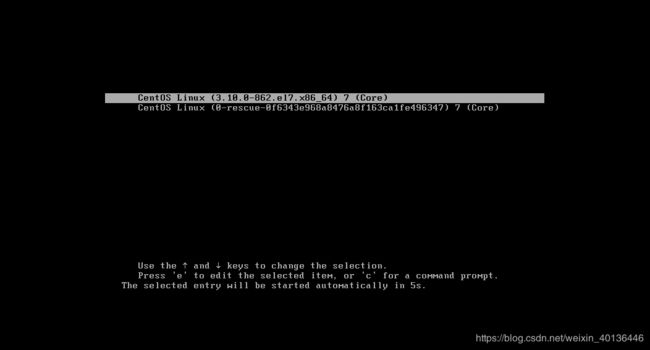
- 开机进入到这个界面是,按e键。
- press “e” to edit the selected item.
- 可以看到下方写着 “按“e”键编辑所选项目。”
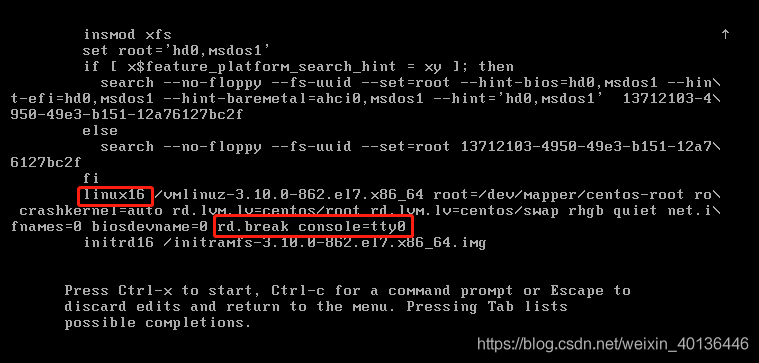
- 找到linux16 这行,在行尾输入 rd.break console=tty0
- 按Ctrl+X启动。
- Press Ctrl-x to start .
7.2、以可写方式重新挂载/, 并切换到此环境
switch_root# chroot   /sysroot               #切换环境,切换到硬盘操作系统的环境
sh-4.4# mount    -o    remount,rw      /     #让根目录下所有数据,可以读也可以写入
7.3、重新设置root 密码
sh-4.4# echo 1 | passwd --stdin root
7.4、selinux设置
sh-4.4# vim   /etc/selinux/config    #查看SELinux开机的运行模式
sh-4.4# touch     /.autorelabel      #标记下一次启动重做 SELinux 标记
#或者将selinux修改为宽松模式
7.5、强制重启系统完成修复
sh-4.4# reboot -f
十、防火墙的策略管理
-
Linux中的软件防火墙firewalld
- /etc/firewalld/
-
预设安全区域
- public:仅允许访问本机的ssh、dhcp、ping等服务,其他都拒绝
- trusted:允许任何访问
- block:拒绝任何来访请求,会回应客户端
- drop:丢弃任何来访的数据包,不会回应客户端
-
配置规则的位置
- 运行时(runtime)
- 永久(permanent)
-
防火墙判断进入区域的原则
- 查看客户端请求中源IP地址,然后查看所有区域中规则,那个区域有该源IP地址的规则,则进入该区域
- 进入默认区域(默认情况下为public)
8.1、查看防火墙规则列表
[root@svr7 ~]# firewall-cmd --list-all    [--zone=区域名]
# 加上[--zone=区域名]  表示查看指定区域的详细信息,不加表示查看当前默认区域

[root@svr7 ~]# firewall-cmd --list-all-zones #查看全部区域
[root@svr7 ~]# firewall-cmd --get-zones		#查看firewalld所有的区域
block dmz drop external home internal public trusted work

[root@svr7 ~]# firewall-cmd --get-services	#查看firewalld支持的所有服务

[root@svr7 ~]# firewall-cmd --get-default-zone #查看默认的区域
8.2、修改防火墙的默认区域
[root@svr7 ~]# firewall-cmd --get-default-zone 		#查看默认区域
public
[root@svr7 ~]# firewall-cmd --set-default-zone=trusted 	#修改默认区域为trusted
success
[root@svr7 ~]# firewall-cmd --get-default-zone
trusted
[root@svr7 ~]# firewall-cmd --set-default-zone=public
success
8.3、添加允许的协议
[root@svr7 ~]# firewall-cmd  --zone=public --add-service=http	#添加允许http协议
success
[root@svr7 ~]# firewall-cmd  --zone=public --list-all	#查看区域规则
- 防火墙区域中添加永久规则
- –permanent 永久规则选项
[root@svr7 ~]# firewall-cmd  --zone=public --remove-service=http  #删除临时设置

[root@svr7 ~]# firewall-cmd --permanent --zone=public --add-service=http
success		#添加永久规则

[root@svr7 ~]# firewall-cmd --reload  	#重新加载规则,使其生效
8.4、单独拒绝一个IP地址
[root@svr7 ~]# firewall-cmd --zone=block --add-source=192.168.4.207
success
十一、服务的基础管理
-
主要管理工具:systemctl
-
–配置目录:/etc/systemd/system/
-
服务目录:/lib/systemd/system/
-
systemctl restart 服务名 #重起服务
-
systemctl start 服务名 #开启服务
-
systemctl stop 服务名 #停止服务
-
systemctl status 服务名 #查看服务当前的状态
-
systemctl enable 服务名 #设置服务开机自启动
-
systemctl disable 服务名 #设置服务禁止开机自启动
-
systemctl is-enabled 服务名 #查看服务是否开机自启
-
systemctl -t service --all #列出所有的服务
-
-
当前直接切换到字符模式
[root@svr7 ~]# systemctl isolate multi-user.target
- 当前直接切换到图形模式
[root@svr7 ~]# systemctl isolate graphical.target
- 查看每次开机默认进入模式
[root@svr7 ~]# systemctl get-default
- 修改开机自动进入的模式
[root@svr7 ~]# systemctl   set-default    multi-user.target
[root@svr7 ~]# reboot
