caffe训练分类模型教程
caffe训练分类模型教程
1.已有图像存放在train和val下,book和not-book(两类)的图片数量相同
在caffe/data下新建一個myself文件夾,并新建两个文件夹分别命名为train和val
批量重命名图片
# -*- coding:utf8 -*-
import os
class BatchRename():
'''
批量重命名文件夹中的图片文件
'''
def __init__(self):
self.path = '/home/lab305/caffe/data/myself/train/not-book'
def rename(self):
filelist = os.listdir(self.path)
total_num = len(filelist)
i = 0
for item in filelist:
if item.endswith('.jpg'):
src = os.path.join(os.path.abspath(self.path), item)
dst = os.path.join(os.path.abspath(self.path), 'notbook_' + str(i) + '.jpg')
try:
os.rename(src, dst)
#print ('converting %s to %s ...' ,% (src, dst))
i = i + 1
except:
continue
#print ('total %d to rename & converted %d jpgs', % (total_num, i))
if __name__ == '__main__':
demo = BatchRename()
demo.rename()
执行上述文件
#python test.py
将所有图片都命名好。
2.生成txt文件,在data/myself下新建文件test.sh,并写入下面的内容,有些路径和名称需要自己更改。生成train和val的txt文件(里面包括了图片的名称和类别)
#!/usr/bin/env sh
DATA=data/myself
echo "Create train.txt..."
rm -rf $DATA/train.txt
find $DATA/train -name book*.jpg| cut -d '/' -f 5 | sed "s/$/ 0/">>$DATA/train.txt
find $DATA/train -name notbook*.jpg| cut -d '/' -f 5 | sed "s/$/ 1/">>$DATA/train.txt
echo "Create val.txt..."
rm -rf $DATA/val.txt
find $DATA/val -name book*.jpg| cut -d '/' -f 5 | sed "s/$/ 0/">>$DATA/val.txt
find $DATA/val -name notbook*.jpg| cut -d '/' -f 5 | sed "s/$/ 1/">>$DATA/val.txt
echo "All done"
执行sh文件
#sudo sh data/myself/test.sh
生成train.txt和val.txt
如下:
3.转换成lmdb格式
首先,在examples下面创建一个myself的文件夹,来存放配置文件和脚本文件。然后编写一个脚本,create_imagenet.sh,并修改高亮部分
#############################################################################
#!/usr/bin/env sh
# Create the imagenet lmdb inputs
# N.B. set the path to the imagenet train + val data dirs
set -e
EXAMPLE=examples/myself
DATA=data/myself
TOOLS=build/tools
TRAIN_DATA_ROOT=/home/lab305/caffe/data/myself/train/
VAL_DATA_ROOT=/home/lab305/caffe/data/myself/val/
# Set RESIZE=true to resize the images to 256x256. Leave as false if images have
# already been resized using another tool.
RESIZE=true
if $RESIZE; then
RESIZE_HEIGHT=256
RESIZE_WIDTH=256
else
RESIZE_HEIGHT=0
RESIZE_WIDTH=0
fi
if [ ! -d "$TRAIN_DATA_ROOT" ]; then
echo "Error: TRAIN_DATA_ROOT is not a path to a directory: $TRAIN_DATA_ROOT"
echo "Set the TRAIN_DATA_ROOT variable in create_imagenet.sh to the path" \
"where the ImageNet training data is stored."
exit 1
fi
if [ ! -d "$VAL_DATA_ROOT" ]; then
echo "Error: VAL_DATA_ROOT is not a path to a directory: $VAL_DATA_ROOT"
echo "Set the VAL_DATA_ROOT variable in create_imagenet.sh to the path" \
"where the ImageNet validation data is stored."
exit 1
fi
echo "Creating train lmdb..."
rm -rf $EXAMPLE/myself_train_lmdb
GLOG_logtostderr=1 $TOOLS/convert_imageset \
--resize_height=$RESIZE_HEIGHT \
--resize_width=$RESIZE_WIDTH \
--shuffle \
$TRAIN_DATA_ROOT \
$DATA/train.txt \
$EXAMPLE/myself_train_lmdb
echo "Creating val lmdb..."
rm -rf $EXAMPLE/myself_val_lmdb
GLOG_logtostderr=1 $TOOLS/convert_imageset \
--resize_height=$RESIZE_HEIGHT \
--resize_width=$RESIZE_WIDTH \
--shuffle \
$VAL_DATA_ROOT \
$DATA/val.txt \
$EXAMPLE/myself_val_lmdb
echo "Done."
###############################################################################
执行sh文件
sudo sh examples/myself/create_imagenet.sh
随后生成了myself_train_lmdb和myself_val_lmdb。如下图:
4.计算均值。图片减去均值再训练,会提高训练速度和精度。因此,一般都会有这个操作,as the same ,我们先创建一个脚本文件:
#sudo vi examples/myself/make_myself_mean.sh
将下面的内容写入sh文件中(同样,要修改高亮部分)
#!/usr/bin/env sh
EXAMPLE=examples/myself
DATA=data/myself
TOOLS=build/tools
rm -rf $DATA/myself_mean.binaryproto
$TOOLS/compute_image_mean $EXAMPLE/myself_train_lmdb \
$DATA/myself_mean.binaryproto
echo "Done."
执行sh文件
#sudo sh examples/myself/make_myself_mean.sh
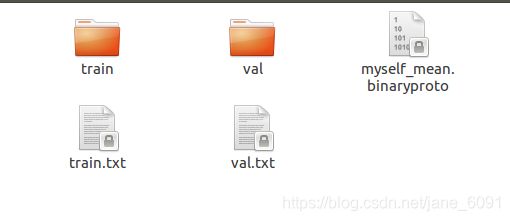
生成了myself_mean_binaryproto文件
如下:
5.创建模型并编写配置文件
我们用caffe自带的caffenet模型进行实验,位置在models/bvlc_reference_caffenet/文件夹下,将需要的两个配置文件,复制到myself文件夹中。
#sudo cp models/bvlc_reference_caffenet/solver.prototxt examples/myself/
#sudo cp models/bvlc_reference_caffenet/train_val.prototxt examples/myself/
打开solver.prototxt进行修改
#sudo vi examples/myself/solver.prototxt
我的修改如下,大家可根据需要自己设置参数:(高亮处为修改部分,我用的GPU,500个iter还是很快的)
net: "examples/myself/train_val.prototxt"
test_iter: 10
test_interval: 100
base_lr: 0.001
lr_policy: "step"
gamma: 0.1
stepsize: 100
display: 20
max_iter: 500
momentum: 0.9
weight_decay: 0.0005
snapshot: 50
snapshot_prefix: "examples/myself/caffenet_train"
solver_mode: GPU
同样,train_val.prototxt也要修改一些路径,因为这里我训练的是两类,所以要把最后一层的num_output改为2,同时把deploy.prototxt做同样的修改,否则测试会出错
name: "CaffeNet"
layer {
name: "data"
type: "Data"
top: "data"
top: "label"
include {
phase: TRAIN
}
transform_param {
mirror: true
crop_size: 227
mean_file: "data/myself/myself_mean.binaryproto"
}
# mean pixel / channel-wise mean instead of mean image
# transform_param {
# crop_size: 227
# mean_value: 104
# mean_value: 117
# mean_value: 123
# mirror: true
# }
data_param {
source: "examples/myself/myself_train_lmdb"
batch_size: 256
backend: LMDB
}
}
layer {
name: "data"
type: "Data"
top: "data"
top: "label"
include {
phase: TEST
}
transform_param {
mirror: false
crop_size: 227
mean_file: "data/myself/myself_mean.binaryproto"
}
# mean pixel / channel-wise mean instead of mean image
# transform_param {
# crop_size: 227
# mean_value: 104
# mean_value: 117
# mean_value: 123
# mirror: false
# }
data_param {
source: "examples/myself/myself_val_lmdb"
batch_size: 50
backend: LMDB
}
}
layer {
name: "fc8"
type: "InnerProduct"
bottom: "fc7"
top: "fc8"
param {
lr_mult: 1
decay_mult: 1
}
param {
lr_mult: 2
decay_mult: 0
}
inner_product_param {
num_output: 2
weight_filler {
type: "gaussian"
std: 0.01
}
bias_filler {
type: "constant"
value: 0
}
}
}
。。。。。。。。//中间还有很多层layer我并没有修改。
6.训练和测试
#sudo build/tools/caffe train -solver examples/myself/solver.prototxt
训练的时间和精度与设备和参数都相关,可以通过调整提高。我的是GPU模式,所以运行时间很短,训练结果如下:
solver里面有一个参数是snapshot,这个参数表示的意思是在训练过程中,多少个iter会生成一个model,产生的模型如下
训练的精度有0.996 loss也比较小,基本上可以满足我自己的训练要求了。。
测试,这里需要准备四个文件,第一个是deploy.prototxt(记得修改最后一个fc为自己的分类类别数),训练好的caffemodel如上,生成的mean均值文件,以及labelmap文件,我这里命名为mobilenet.txt了,里面的内容如下(可以根据自己的需求进行更改):
0 ‘not-book’
1 ‘book’
测试的代码:
#coding=utf-8
import os
import caffe
import numpy as np
root='/home/lab305/TextBoxes_plusplus-master/' #根目录
deploy=root + 'data/book/deploy.prototxt' #deploy文件
caffe_model=root + 'data/book/caffenet_train_iter_4000.caffemodel' #训练好的 caffemodel
import os
dir = root+'demo_images/book/'
filelist=[]
filenames = os.listdir(dir)
for fn in filenames:
fullfilename = os.path.join(dir,fn)
filelist.append(fullfilename)
mean_file=root+'data/book/mean.binaryproto'
def Test(img):
net = caffe.Net(deploy,caffe_model,caffe.TEST) #加载model和network
#图片预处理设置
transformer = caffe.io.Transformer({'data': net.blobs['data'].data.shape}) #设定图片的shape格式(1,3,28,28)
transformer.set_transpose('data', (2,0,1)) #改变维度的顺序,由原始图片(28,28,3)变为(3,28,28)
transformer.set_mean('data', np.array([104,117,123])) #减去均值,前面训练模型时没有减均值,这儿就不用
transformer.set_raw_scale('data', 255) # 缩放到【0,255】之间
transformer.set_channel_swap('data', (2,1,0)) #交换通道,将图片由RGB变为BGR
im=caffe.io.load_image(img) #加载图片
net.blobs['data'].data[...] = transformer.preprocess('data',im) #执行上面设置的图片预处理操作,并将图片载入到blob中
print(img) #打印图片名字
#执行测试
out = net.forward()
labels = np.loadtxt(labels_filename, str, delimiter='\t') #读取类别名称文件
prob= net.blobs['prob'].data[0].flatten() #取出最后一层(prob)属于某个类别的概率值,并打印,'prob'为最后一层的名称
print (prob) #打印测试的置信度
print(prob.shape) #打印prob的规模
order=prob.argsort()[1] #将概率值排序,取出最大值所在的序号 ,9指的是分为0-9十类
#argsort()函数是从小到大排列
print(order) #打印最大的置信度的编号
print ('the class is:',labels[order]) #将该序号转换成对应的类别名称,并打印
f=file(root + "data/book/output.txt","a+")
f.writelines(img+' '+labels[order]+'\n')
labels_filename = root +'data/text/mobilenet.txt' #类别名称文件,将数字标签转换回类别名称
for i in range(0, len(filelist)):
print("len:" + str(len(filelist)))
img= filelist[i]
Test(img)
参考博客:
https://blog.csdn.net/m984789463/article/details/74637172


