五个很厉害的 CNN 架构
本文为 AI 研习社编译的技术博客,原标题 :
Five Powerful CNN Architectures
作者 | Faisal Shahbaz
翻译 | 小哥哥、Jaruce、zackary、Disillusion
校对 | 酱番梨 整理 | 菠萝妹
原文链接:
https://medium.com/@faisalshahbaz/five-powerful-cnn-architectures-b939c9ddd57b
注:本文的相关链接请点击文末【阅读原文】进行访问
让我们来看看一些强大的卷积神经网络,这些网络实现的深度学习为今天的计算机视觉的成就奠定了基础。
LeNet-5 — LeCun et al
LeNet-5,一个7层的卷积神经网络,被很多银行用于识别支票上的手写数字。
基于梯度的学习应用于文档识别
LeNet-5 — Architecture
手写数字被数字化成尺寸为32*32的图片。在这种情况下,由于计算能力的限制,这种技术无法应用于大规模的图片。
我们来理解一下这种模型的结构。除了输入层,这个模型有七层。由于结构十分的迷你,我们逐层来研究这个模型:
第一层:卷积层,总共6个卷积核,核尺寸5*5,步长1*1。所以,当输入图像尺寸为32*32*1时,输出尺寸为28*28*6。这层的参数个数为5*5*6+6(偏置项的个数)
第二层:池化层,总共6个池化核,核尺寸为2*2,步长为2*2。但是这里的池化层与先前见到的有些许不同。这里的池化层,将接收到的输入值求和后,乘一个训练得到的参数(每个核一个),得到的结果再加一个训练得到的偏置项(同样每个核一个)。最后,将得到的结果通过Sigmod激活函数的映射,得到输出。因此,从前级继承的输入尺寸28*28*6经过了这层,会得到14*14*6的子采样。这层的参数个数为[1(训练得到的参数)+1(训练得到的偏置项)]×6=12
第三层:类似的,本层是和第一层有相同组态的卷积层,唯一不同的是,本层有16个卷积核而不是6个,所以,从前级继承的输入尺寸14*14*6经过了这层,输出层为10*10*16。参数个数为5*5*16+16=416
第四层:同样地,与第二层类似,这次的池化层中有16个核。请牢记,输出同样经过sigmod激活函数。从前级继承的输入尺寸10*10*16经过了这层池化层,会得到5*5*16的子采样.参数个数为(1+1)*16=32
第五层:这次的卷积层使用的是120个5*5的卷积核。由于输入尺寸恰好是5*5*16,所以我们甚至都不用考虑步长就可以得到输出尺寸为1*1*120.本层共有5*5*120=3000个参数
第六层:这是一个有84个参数的全连接层。所以,输入的120个单元会转化成84个单元。因此,共有84*120+84=10164个参数。这里使用了不止一个激活函数。可以确定的是,只要能让问题变得简单,你可以使用你想用的任意的备选激活函数
输出层:最终的一层是一个10单元的全连接层,共有84*10+10=924个参数
我建议,在最后一层使用交叉熵损失函数和softmax激活函数,在这里不再赘述损失函数的细节以及使用其的原因。请采用不同的训练计划和学习率进行训练。
LeNet-5 — 代码
from keras import layers
from keras.models import Model

def lenet_5(in_shape=(32,32,1), n_classes=10, opt='sgd'):
    in_layer = layers.Input(in_shape)
    conv1 = layers.Conv2D(filters=20, kernel_size=5,
                          padding='same', activation='relu')(in_layer)
    pool1 = layers.MaxPool2D()(conv1)
    conv2 = layers.Conv2D(filters=50, kernel_size=5,
                          padding='same', activation='relu')(pool1)
    pool2 = layers.MaxPool2D()(conv2)
    flatten = layers.Flatten()(pool2)
    dense1 = layers.Dense(500, activation='relu')(flatten)
    preds = layers.Dense(n_classes, activation='softmax')(dense1)

    model = Model(in_layer, preds)
    model.compile(loss="categorical_crossentropy", optimizer=opt,
                metrics=["accuracy"])
    return model

if __name__ == '__main__':
    model = lenet_5()
    print(model.summary())
AlexNet — Krizhevsky et al
在2012年,Hinton的深度神经网络参加了世界上最重要的计算机视觉挑战赛imagenet,并将top-5损失从26%减少到15.3%,这一结果让世人惊艳。
这个神经网络跟LeNetg很像,但是比它更深,有大概六千万的参数。
使用深度卷积神经网络参加ImageNet
AlexNet — Architecture
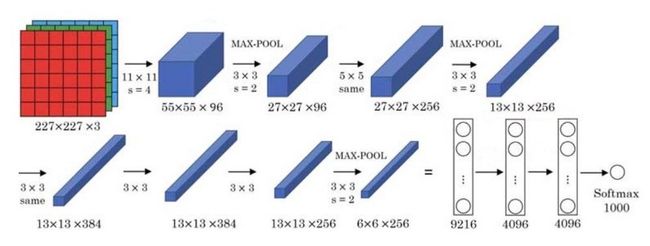
这个计算过程看起来确实有点吓人。这是因为网络由两半组成,每一部分都在两块不同的GPU上进行训练。我们把这个过程说的容易点,用一个精简版的图来说明这个问题:
这个结构包括5个卷积层和3个全连接层。这八层也都采用了当时的两个新概念——最大池化和Relu激活来为模型提供优势。
你可以在上图中找到不同层及其相应的配置。每一层的描述如下表:
注:Relu激活函数被用在除了最后的softmax层的所有卷积层和全连接层的输出部分。
作者也使用了其他很多技术(本帖不予以一一讨论)——比如dropout,augmentatio和动量随机梯度下降。
AlexNet — 代码
from keras import layers
from keras.models import Model

def alexnet(in_shape=(227,227,3), n_classes=1000, opt='sgd'):
    in_layer = layers.Input(in_shape)
    conv1 = layers.Conv2D(96, 11, strides=4, activation='relu')(in_layer)
    pool1 = layers.MaxPool2D(3, 2)(conv1)
    conv2 = layers.Conv2D(256, 5, strides=1, padding='same', activation='relu')(pool1)
    pool2 = layers.MaxPool2D(3, 2)(conv2)
    conv3 = layers.Conv2D(384, 3, strides=1, padding='same', activation='relu')(pool2)
    conv4 = layers.Conv2D(256, 3, strides=1, padding='same', activation='relu')(conv3)
    pool3 = layers.MaxPool2D(3, 2)(conv4)
    flattened = layers.Flatten()(pool3)
    dense1 = layers.Dense(4096, activation='relu')(flattened)
    drop1 = layers.Dropout(0.5)(dense1)
    dense2 = layers.Dense(4096, activation='relu')(drop1)
    drop2 = layers.Dropout(0.5)(dense2)
    preds = layers.Dense(n_classes, activation='softmax')(drop2)

    model = Model(in_layer, preds)
    model.compile(loss="categorical_crossentropy", optimizer=opt,
                metrics=["accuracy"])
    return model

if __name__ == '__main__':
    model = alexnet()
    print(model.summary())
VGGNet — Simonyan et al
2014年IMAGENET挑战赛的亚军。因为这种统一架构十分轻巧,不少新人将之作为深度卷积神经网络的简单形式。
在下面的文章中,我们将会学习这种最常用的网络架构之一是如何从图片中提取特征的(提取图像信息将之转化为包含图片重要信息的低维数组)
VGGNet — Architecture
VGGNet有两条需要遵守的简单经验法则:
每个卷积层的配置为:kernel size = 3×3, stride = 1×1, padding = same.唯一不同的是核数量。
每个最大池化层的配置为:windows size = 2×2 and stride = 2×2.因此,我们在每个池化层将图片尺寸降为一半。
输入是224*224的RGB图像,所以输入尺寸为224x224x3
总参数为138,000,000.这些参数的大部分都来自于全连接层:
第一层全连接层包含了4096 * (7 * 7 * 512) + 4096 = 102,764,544个参数
第二层全连接层包含了4096 * 4096 + 4096 = 16,781,312个参数
第三层全连接层包含了4096 * 1000 + 4096 = 4,100,096个参数
全连接层共包含了123,645,952个参数。
VGGNet — 代码
from keras import layers
from keras.models import Model, Sequential

from functools import partial

conv3 = partial(layers.Conv2D,
                kernel_size=3,
                strides=1,
                padding='same',
                activation='relu')

def block(in_tensor, filters, n_convs):
    conv_block = in_tensor
    for _ in range(n_convs):
        conv_block = conv3(filters=filters)(conv_block)
    return conv_block

def _vgg(in_shape=(227,227,3),
         n_classes=1000,
         opt='sgd',
         n_stages_per_blocks=[2, 2, 3, 3, 3]):
    in_layer = layers.Input(in_shape)

    block1 = block(in_layer, 64, n_stages_per_blocks[0])
    pool1 = layers.MaxPool2D()(block1)
    block2 = block(pool1, 128, n_stages_per_blocks[1])
    pool2 = layers.MaxPool2D()(block2)
    block3 = block(pool2, 256, n_stages_per_blocks[2])
    pool3 = layers.MaxPool2D()(block3)
    block4 = block(pool3, 512, n_stages_per_blocks[3])
    pool4 = layers.MaxPool2D()(block4)
    block5 = block(pool4, 512, n_stages_per_blocks[4])
    pool5 = layers.MaxPool2D()(block5)
    flattened = layers.GlobalAvgPool2D()(pool5)

    dense1 = layers.Dense(4096, activation='relu')(flattened)
    dense2 = layers.Dense(4096, activation='relu')(dense1)
    preds = layers.Dense(1000, activation='softmax')(dense2)

    model = Model(in_layer, preds)
    model.compile(loss="categorical_crossentropy", optimizer=opt,
                metrics=["accuracy"])
    return model

def vgg16(in_shape=(227,227,3), n_classes=1000, opt='sgd'):
    return _vgg(in_shape, n_classes, opt)

def vgg19(in_shape=(227,227,3), n_classes=1000, opt='sgd'):
    return _vgg(in_shape, n_classes, opt, [2, 2, 4, 4, 4])

if __name__ == '__main__':
    model = vgg19()
    print(model.summary())
GoogLeNet/Inception — Szegedy et al
它使用了一个inception模块,一个新颖的概念,具有较小的卷积,可以将参数的数量减少到仅仅400万个。
Inception模块
使用这些Inception模块的原因:
每一层类从输入中提取不同的信息。一个3×3层收集的信息将不同于一个5×5层收集的。我们如何知道在某一给定层中哪个变换是最好的?所以我们使用它们全部!
使用1×1卷积进行降维!考虑一个128x128x256的输入。如果我们把输入通过20个1×1大小的过滤器,我们将得到一个128 x128x20的输出。我们将它们应用在3×3或5×5的卷积前以减少在用于降维的Inception块层上输入过滤器的数量。
GoogLeNet/Inception — 架构
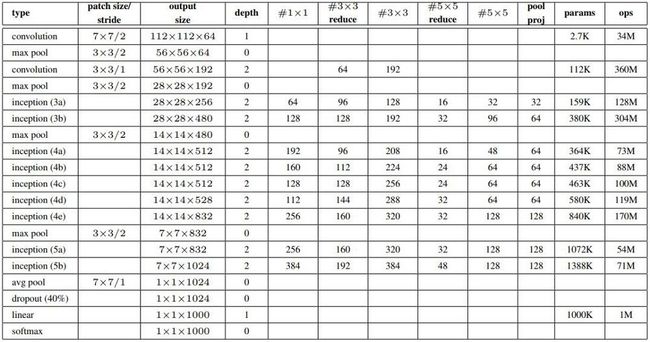
完整的inception架构:
深入了解卷积
你可能会在这个结构中看到一些带有softmax的“辅助分类器”。引用这篇论文——“通过添加连接到这些中间层的辅助分类器,我们期望在分类器的较低阶段加强辨别,增加被传播回来的梯度信号,并提供额外的正则化。”
但这意味着什么呢?他们的意思是:
低阶段识别:我们将训练网络的低层,其梯度来自较早阶段的输出概率。这保证了网络在开始阶段对不同的对象都具有一定的识别能力。
增加反向传播的梯度信号:在深层神经网络中,通常反向传播的梯度变得非常小,以至于网络的前几层很难进行学习。因此,早期的分类层通过传播强梯度信号来训练网络是有帮助的。
提供额外的正则化:深度神经网络倾向于对数据过拟合(或导致高方差),而小型神经网络倾向于对数据欠拟合 (或导致高偏差)。早期的分类器规范了深层的过拟合效果!
辅助分类器结构:
注意:这里 #1×1代表Inception模块中1×1卷积里的过滤器。
#3×3简化(reduce)代表Inception模块中3×3卷积前的1×1卷积里的过滤器。
#5×5简化(reduce)代表Inception模块中5×5卷积前的1×1卷积里的过滤器。
#3×3代表Inception模块中3×3卷积里的过滤器。
#5×5代表Inception模块中5×5卷积里的过滤器。
池项目(pool proj)代表了inception模块中最大池前的1×1卷积里的过滤器。
GoogLeNet是典型的Inception架构
它使用了批处理标准化、图像失真和RMSprop,这些我们将在以后的文章中讨论。
GoogLeNet/Inception —代码
from keras import layers
from keras.models import Model

from functools import partial

conv1x1 = partial(layers.Conv2D, kernel_size=1, activation='relu')
conv3x3 = partial(layers.Conv2D, kernel_size=3, padding='same', activation='relu')
conv5x5 = partial(layers.Conv2D, kernel_size=5, padding='same', activation='relu')

def inception_module(in_tensor, c1, c3_1, c3, c5_1, c5, pp):
    conv1 = conv1x1(c1)(in_tensor)

    conv3_1 = conv1x1(c3_1)(in_tensor)
    conv3 = conv3x3(c3)(conv3_1)

    conv5_1 = conv1x1(c5_1)(in_tensor)
    conv5 = conv5x5(c5)(conv5_1)

    pool_conv = conv1x1(pp)(in_tensor)
    pool = layers.MaxPool2D(3, strides=1, padding='same')(pool_conv)

    merged = layers.Concatenate(axis=-1)([conv1, conv3, conv5, pool])
    return merged

def aux_clf(in_tensor):
    avg_pool = layers.AvgPool2D(5, 3)(in_tensor)
    conv = conv1x1(128)(avg_pool)
    flattened = layers.Flatten()(conv)
    dense = layers.Dense(1024, activation='relu')(flattened)
    dropout = layers.Dropout(0.7)(dense)
    out = layers.Dense(1000, activation='softmax')(dropout)
    return out

def inception_net(in_shape=(224,224,3), n_classes=1000, opt='sgd'):
    in_layer = layers.Input(in_shape)

    conv1 = layers.Conv2D(64, 7, strides=2, activation='relu', padding='same')(in_layer)
    pad1 = layers.ZeroPadding2D()(conv1)
    pool1 = layers.MaxPool2D(3, 2)(pad1)
    conv2_1 = conv1x1(64)(pool1)
    conv2_2 = conv3x3(192)(conv2_1)
    pad2 = layers.ZeroPadding2D()(conv2_2)
    pool2 = layers.MaxPool2D(3, 2)(pad2)

    inception3a = inception_module(pool2, 64, 96, 128, 16, 32, 32)
    inception3b = inception_module(inception3a, 128, 128, 192, 32, 96, 64)
    pad3 = layers.ZeroPadding2D()(inception3b)
    pool3 = layers.MaxPool2D(3, 2)(pad3)

    inception4a = inception_module(pool3, 192, 96, 208, 16, 48, 64)
    inception4b = inception_module(inception4a, 160, 112, 224, 24, 64, 64)
    inception4c = inception_module(inception4b, 128, 128, 256, 24, 64, 64)
    inception4d = inception_module(inception4c, 112, 144, 288, 32, 48, 64)
    inception4e = inception_module(inception4d, 256, 160, 320, 32, 128, 128)
    pad4 = layers.ZeroPadding2D()(inception4e)
    pool4 = layers.MaxPool2D(3, 2)(pad4)

    aux_clf1 = aux_clf(inception4a)
    aux_clf2 = aux_clf(inception4d)

    inception5a = inception_module(pool4, 256, 160, 320, 32, 128, 128)
    inception5b = inception_module(inception5a, 384, 192, 384, 48, 128, 128)
    pad5 = layers.ZeroPadding2D()(inception5b)
    pool5 = layers.MaxPool2D(3, 2)(pad5)

    avg_pool = layers.GlobalAvgPool2D()(pool5)
    dropout = layers.Dropout(0.4)(avg_pool)
    preds = layers.Dense(1000, activation='softmax')(dropout)

    model = Model(in_layer, [preds, aux_clf1, aux_clf2])
    model.compile(loss="categorical_crossentropy", optimizer=opt,
                metrics=["accuracy"])
    return model

if __name__ == '__main__':
    model = inception_net()
    print(model.summary())
from keras import layers
from keras.models import Model
from functools import partial
conv1x1 = partial(layers.Conv2D, kernel_size=1, activation='relu')
conv3x3 = partial(layers.Conv2D, kernel_size=3, padding='same', activation='relu')
conv5x5 = partial(layers.Conv2D, kernel_size=5, padding='same', activation='relu')
def inception_module(in_tensor, c1, c3_1, c3, c5_1, c5, pp):
conv1 = conv1x1(c1)(in_tensor)
conv3_1 = conv1x1(c3_1)(in_tensor)
conv3 = conv3x3(c3)(conv3_1)
conv5_1 = conv1x1(c5_1)(in_tensor)
conv5 = conv5x5(c5)(conv5_1)
pool_conv = conv1x1(pp)(in_tensor)
pool = layers.MaxPool2D(3, strides=1, padding='same')(pool_conv)
merged = layers.Concatenate(axis=-1)([conv1, conv3, conv5, pool])
return merged
def aux_clf(in_tensor):
avg_pool = layers.AvgPool2D(5, 3)(in_tensor)
conv = conv1x1(128)(avg_pool)
flattened = layers.Flatten()(conv)
dense = layers.Dense(1024, activation='relu')(flattened)
dropout = layers.Dropout(0.7)(dense)
out = layers.Dense(1000, activation='softmax')(dropout)
return out
def inception_net(in_shape=(224,224,3), n_classes=1000, opt='sgd'):
in_layer = layers.Input(in_shape)
conv1 = layers.Conv2D(64, 7, strides=2, activation='relu', padding='same')(in_layer)
pad1 = layers.ZeroPadding2D()(conv1)
pool1 = layers.MaxPool2D(3, 2)(pad1)
conv2_1 = conv1x1(64)(pool1)
conv2_2 = conv3x3(192)(conv2_1)
pad2 = layers.ZeroPadding2D()(conv2_2)
pool2 = layers.MaxPool2D(3, 2)(pad2)
inception3a = inception_module(pool2, 64, 96, 128, 16, 32, 32)
inception3b = inception_module(inception3a, 128, 128, 192, 32, 96, 64)
pad3 = layers.ZeroPadding2D()(inception3b)
pool3 = layers.MaxPool2D(3, 2)(pad3)
inception4a = inception_module(pool3, 192, 96, 208, 16, 48, 64)
inception4b = inception_module(inception4a, 160, 112, 224, 24, 64, 64)
inception4c = inception_module(inception4b, 128, 128, 256, 24, 64, 64)
inception4d = inception_module(inception4c, 112, 144, 288, 32, 48, 64)
inception4e = inception_module(inception4d, 256, 160, 320, 32, 128, 128)
pad4 = layers.ZeroPadding2D()(inception4e)
pool4 = layers.MaxPool2D(3, 2)(pad4)
aux_clf1 = aux_clf(inception4a)
aux_clf2 = aux_clf(inception4d)
inception5a = inception_module(pool4, 256, 160, 320, 32, 128, 128)
inception5b = inception_module(inception5a, 384, 192, 384, 48, 128, 128)
pad5 = layers.ZeroPadding2D()(inception5b)
pool5 = layers.MaxPool2D(3, 2)(pad5)
avg_pool = layers.GlobalAvgPool2D()(pool5)
dropout = layers.Dropout(0.4)(avg_pool)
preds = layers.Dense(1000, activation='softmax')(dropout)
model = Model(in_layer, [preds, aux_clf1, aux_clf2])
model.compile(loss="categorical_crossentropy", optimizer=opt,
metrics=["accuracy"])
return model
if __name__ == '__main__':
model = inception_net()
print(model.summary())Resnet -- Kaiming He et al
2015年imagenet挑战赛中,top-5错误率在3.57%左右,低于人类top-5错误率。这都要归功于微软在竞赛中使用的ResNet( Residual Network 残差网络)。这个网络提出了一种全新的方法:“跳跃连接”
残差学习:一个模块
残差网络为这样一个现象提供了解决方案——当我们不停地加深神经网络时,深度神经网络的表现会变差。但从直觉上看来,这种事情不应该发生。如果一个深度为K的网络的表现用y来衡量,那么深度为K+1的网络至少也要有y的表现才对。
这个现象带来了一个假说:直接映射是很难学习的。所以,不去学习网络输出层与输入层间的映射,而是学习它们之间的差异——残差。
例如,设x为输入,H(x)是学习到的输出。我们得学习F(x) = H(x) -x。我们可以首先用一层来学习F(x)然后将x 与F(x)相加便得到了H(x)。作为结果,我们将H(x) 送至下一层,正如我们之前做的那样。这便是我们之前看到的残差块。
结果非常惊艳,这是因为导致神经网络无法学习的梯度消失问题被消除了。跳跃连接,或者说“捷径”,给出了一条捷径,以取得之前数层网络的梯度,跳过了之间的数层。
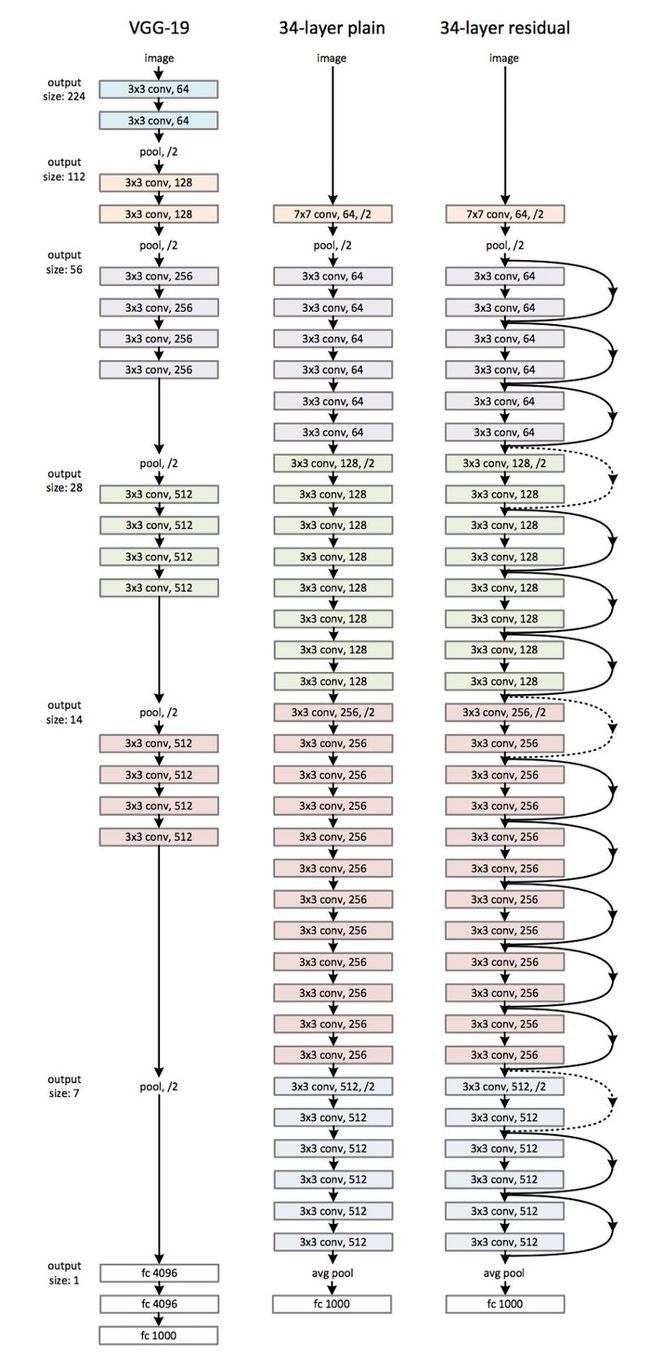
ResNet — 架构
让我们用到这里:
本文提出了利用瓶颈进行更深的 ResNets- 50/101/152。神经网络使用1×1的卷积来增加和减少通道数量的维数,而不是使用上面提到的残块。
ResNet — 代码
from keras import layers
from keras.models import Model

def _after_conv(in_tensor):
    norm = layers.BatchNormalization()(in_tensor)
    return layers.Activation('relu')(norm)

def conv1(in_tensor, filters):
    conv = layers.Conv2D(filters, kernel_size=1, strides=1)(in_tensor)
    return _after_conv(conv)

def conv1_downsample(in_tensor, filters):
    conv = layers.Conv2D(filters, kernel_size=1, strides=2)(in_tensor)
    return _after_conv(conv)

def conv3(in_tensor, filters):
    conv = layers.Conv2D(filters, kernel_size=3, strides=1, padding='same')(in_tensor)
    return _after_conv(conv)

def conv3_downsample(in_tensor, filters):
    conv = layers.Conv2D(filters, kernel_size=3, strides=2, padding='same')(in_tensor)
    return _after_conv(conv)

def resnet_block_wo_bottlneck(in_tensor, filters, downsample=False):
    if downsample:
        conv1_rb = conv3_downsample(in_tensor, filters)
    else:
        conv1_rb = conv3(in_tensor, filters)
    conv2_rb = conv3(conv1_rb, filters)

    if downsample:
        in_tensor = conv1_downsample(in_tensor, filters)
    result = layers.Add()([conv2_rb, in_tensor])

    return layers.Activation('relu')(result)

def resnet_block_w_bottlneck(in_tensor,
                             filters,
                             downsample=False,
                             change_channels=False):
    if downsample:
        conv1_rb = conv1_downsample(in_tensor, int(filters/4))
    else:
        conv1_rb = conv1(in_tensor, int(filters/4))
    conv2_rb = conv3(conv1_rb, int(filters/4))
    conv3_rb = conv1(conv2_rb, filters)

    if downsample:
        in_tensor = conv1_downsample(in_tensor, filters)
    elif change_channels:
        in_tensor = conv1(in_tensor, filters)
    result = layers.Add()([conv3_rb, in_tensor])

    return result

def _pre_res_blocks(in_tensor):
    conv = layers.Conv2D(64, 7, strides=2, padding='same')(in_tensor)
    conv = _after_conv(conv)
    pool = layers.MaxPool2D(3, 2, padding='same')(conv)
    return pool

def _post_res_blocks(in_tensor, n_classes):
    pool = layers.GlobalAvgPool2D()(in_tensor)
    preds = layers.Dense(n_classes, activation='softmax')(pool)
    return preds

def convx_wo_bottleneck(in_tensor, filters, n_times, downsample_1=False):
    res = in_tensor
    for i in range(n_times):
        if i == 0:
            res = resnet_block_wo_bottlneck(res, filters, downsample_1)
        else:
            res = resnet_block_wo_bottlneck(res, filters)
    return res

def convx_w_bottleneck(in_tensor, filters, n_times, downsample_1=False):
    res = in_tensor
    for i in range(n_times):
        if i == 0:
            res = resnet_block_w_bottlneck(res, filters, downsample_1, not downsample_1)
        else:
            res = resnet_block_w_bottlneck(res, filters)
    return res

def _resnet(in_shape=(224,224,3),
            n_classes=1000,
            opt='sgd',
            convx=[64, 128, 256, 512],
            n_convx=[2, 2, 2, 2],
            convx_fn=convx_wo_bottleneck):
    in_layer = layers.Input(in_shape)

    downsampled = _pre_res_blocks(in_layer)

    conv2x = convx_fn(downsampled, convx[0], n_convx[0])
    conv3x = convx_fn(conv2x, convx[1], n_convx[1], True)
    conv4x = convx_fn(conv3x, convx[2], n_convx[2], True)
    conv5x = convx_fn(conv4x, convx[3], n_convx[3], True)

    preds = _post_res_blocks(conv5x, n_classes)

    model = Model(in_layer, preds)
    model.compile(loss="categorical_crossentropy", optimizer=opt,
                metrics=["accuracy"])
    return model

def resnet18(in_shape=(224,224,3), n_classes=1000, opt='sgd'):
    return _resnet(in_shape, n_classes, opt)

def resnet34(in_shape=(224,224,3), n_classes=1000, opt='sgd'):
    return _resnet(in_shape,
                  n_classes,
                  opt,
                  n_convx=[3, 4, 6, 3])

def resnet50(in_shape=(224,224,3), n_classes=1000, opt='sgd'):
    return _resnet(in_shape,
                  n_classes,
                  opt,
                  [256, 512, 1024, 2048],
                  [3, 4, 6, 3],
                  convx_w_bottleneck)

def resnet101(in_shape=(224,224,3), n_classes=1000, opt='sgd'):
    return _resnet(in_shape,
                  n_classes,
                  opt,
                  [256, 512, 1024, 2048],
                  [3, 4, 23, 3],
                  convx_w_bottleneck)

def resnet152(in_shape=(224,224,3), n_classes=1000, opt='sgd'):
    return _resnet(in_shape,
                  n_classes,
                  opt,
                  [256, 512, 1024, 2048],
                  [3, 8, 36, 3],
                  convx_w_bottleneck)

if __name__ == '__main__':
    model = resnet50()
    print(model.summary())
引用:
基于梯度学习应用于文档识别
基于梯度学习的目标识别
使用深度卷积神经网络进行ImageNet分类
用于大规模图像识别的超深度卷积网络
进一步深入卷积
用于图像识别的深度残差学习
加群交流
关注计算机视觉与机器学习技术,欢迎加入52CV群,扫码添加52CV君拉你入群(请务必注明:加群):
![]()
喜欢在QQ交流的童鞋,可以加52CV官方QQ群:928997753。
(不会时时在线,如果没能及时通过验证还请见谅)
更多前沿CVML技术请浏览:
52CV精华文章分类汇总(2018年12月1日)


