使用Keras创建神经网络对数据集MNIST分类
0. 环境
Ubuntu 18.04,64bit,i3-6100,8G
Python 2.7 + tensorflow + keras
在Ubuntu 18上面,搭建keras环境只需要pip install keras即可。就是这段时间刚好是 抢 票的日子,网速特慢。
1. 例程所需文件
主文件夹内有程序文件keras_mnist.py和两个文件夹,分别是mldata和output。mldata存放mnist-original.mat,文件需要自行下载。下载路径有2个,第1个是https://github.com/amplab/datascience-sp14/blob/master/lab7/mldata/mnist-original.mat;第2个是网友的共享。
│ keras_mnist.py
│
├─mldata
│ mnist-original.mat
│
└─output
备注:这个树形图在win7下可以在cmd中输入tree /F >D:\tree.txt
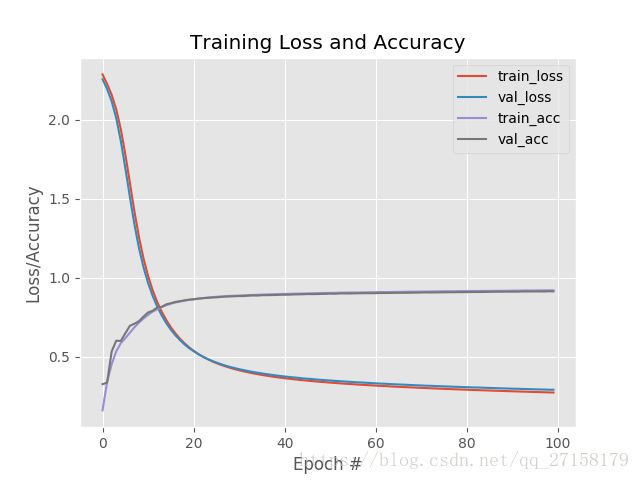
这个output是需要自行创建的,需要把损失函数和迭代次数的曲线图输出到图像文件。而代码中matplotlib的保存图形函数似乎不会自动创建文件夹。
1.1 keras_mnist.py
# import the necessary packages
from sklearn.preprocessing import LabelBinarizer
from sklearn.model_selection import train_test_split
from sklearn.metrics import classification_report
from keras.models import Sequential
from keras.layers.core import Dense
from keras.optimizers import SGD
from sklearn import datasets
import matplotlib.pyplot as plt
import numpy as np
import argparse
import os

# construct the argument parse and parse the arguments
ap = argparse.ArgumentParser()
ap.add_argument("-o", "--output", default = "output/keras_mnist.png", #required=True,
	help="path to the output loss/accuracy plot")
args = vars(ap.parse_args())

# grab the MNIST dataset (if this is your first time running this
# script, the download may take a minute -- the 55MB MNIST dataset
# will be downloaded)
print("[INFO] loading MNIST (full) dataset...")

path1 = os.path.dirname(os.path.abspath(__file__))
dataset = datasets.fetch_mldata("MNIST Original", data_home=path1)

# scale the raw pixel intensities to the range [0, 1.0], then
# construct the training and testing splits
data = dataset.data.astype("float") / 255.0
(trainX, testX, trainY, testY) = train_test_split(data,
	dataset.target, test_size=0.25)

# convert the labels from integers to vectors
lb = LabelBinarizer()
trainY = lb.fit_transform(trainY)
testY = lb.transform(testY)

# define the 784-256-128-10 architecture using Keras
model = Sequential()
model.add(Dense(256, input_shape=(784,), activation="sigmoid"))
model.add(Dense(128, activation="sigmoid"))
model.add(Dense(10, activation="softmax"))

# train the model using SGD
print("[INFO] training network...")
sgd = SGD(0.01)
model.compile(loss="categorical_crossentropy", optimizer=sgd,
	metrics=["accuracy"])
H = model.fit(trainX, trainY, validation_data=(testX, testY),
	epochs=100, batch_size=128)

# evaluate the network
print("[INFO] evaluating network...")
predictions = model.predict(testX, batch_size=128)
print(classification_report(testY.argmax(axis=1),
	predictions.argmax(axis=1),
	target_names=[str(x) for x in lb.classes_]))

# plot the training loss and accuracy
plt.style.use("ggplot")
plt.figure()
plt.plot(np.arange(0, 100), H.history["loss"], label="train_loss")
plt.plot(np.arange(0, 100), H.history["val_loss"], label="val_loss")
plt.plot(np.arange(0, 100), H.history["acc"], label="train_acc")
plt.plot(np.arange(0, 100), H.history["val_acc"], label="val_acc")
plt.title("Training Loss and Accuracy")
plt.xlabel("Epoch #")
plt.ylabel("Loss/Accuracy")
plt.legend()
plt.savefig(args["output"])
2. 运行结果
[INFO] evaluating network...
             precision    recall  f1-score   support

        0.0       0.95      0.96      0.95      1725
        1.0       0.95      0.97      0.96      1988
        2.0       0.91      0.89      0.90      1741
        3.0       0.89      0.91      0.90      1752
        4.0       0.91      0.92      0.91      1685
        5.0       0.88      0.85      0.87      1606
        6.0       0.94      0.94      0.94      1694
        7.0       0.93      0.93      0.93      1874
        8.0       0.89      0.87      0.88      1693
        9.0       0.89      0.89      0.89      1742

avg / total       0.91      0.91      0.91     17500
可以见到精度是较高的,最低也达到了88%。
小结:例程用keras新建了full connnected的(784-256-128-10)网络。精度可达到80%。据说这已经是几年前的水平了。如果使用CNN网络,结果可达98%。
本身本次例程是想在笔记本上跑的,跑得太吃力了。一次迭代需要1分钟有多,而台式机只要2、3秒……电脑是要吃鸡配置才行呐。
另外因为主要代码都不是我写的,只要标转载了。代码除了数据集的读取路径部分,其他都没改,主要代码来源于Deep.Learning.for.Computer.Vision.with.Python.Starter.Bundle
