TextKit及应用
在iOS开发中我们常常使用UIKit的UITextView、UITextField、UILabel来显示文字。它们底层都是基于一个叫做TextKit的强大引擎。通过TextKit,我们可以方便地修改文字的样式和排版,而不需要直接操作复杂的Core Text。

1.什么是TextKit
在iOS7中,苹果引入了Text Kit——一个快速而又现代化的文字排版和渲染引擎。Text Kit在UIKit framework中的定义了一些类和相关协议,它最主要的作用就是为程序提供文字排版和渲染的功能。通过Text Kit可以对文字进行存储(store)、布局(lay out),以及用最精细的排版方式(例如文字间距、换行和对齐等)来显示文本内容。
苹果引入Text Kit的目的并非要取代已有的Core Text,Core Text的主要作用也是用于文字的排版和渲染中,它是一种先进而又处于底层技术,如果我们需要将文本内容直接渲染到图形上下文(Graphics context)时,从性能和易用性来考虑,最佳方案就是使用Core Text。而如果我们直接利用苹果提供的一些控件(例如UITextView、UILabel和UITextField等)对文字进行排版,无疑就是借助于UIkit framework中Text Kit提供的API。
2.TextKit的作用
两个最重要的功能:
- 文字排版
- 文字渲染
3.TextKit中的类
要了解TextKit需要先了解其包含的几个类:

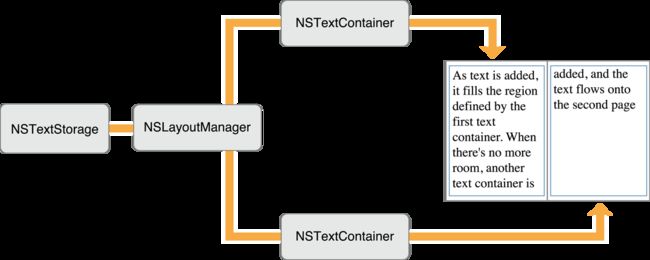
1.Text Storage(NSTextStorage):NSMutableAttributedString的子类,保存需要显示的文字和属性。
2.TextContainer(NSTextContainer):确定文字的布局区域。一般为矩形,但是可以创建NSTextContainer的子类来创建其它如圆形、五边形或不规则图形等。
3.Layout Manager(NSLayoutManager):负责根据NSTextContainer的布局信息渲染NSStorage中的文字。
4.TextView一般为UITextView等
TextKit是典型的MVC(model-view-controller )范例:
- Controller: NSLayoutManager。负责将NSTextStorage中的字符转换为文字符号,根据NSTextContainer对文字符号进行布局并显示到View中
- Model: NSTextStorage和NSTextContainer。前者保存有文字和对应的字体、颜色、大小等属性。后者保存了文字的绘制区域。
- View :UITextView或其它UIView的子类
一般情况下,一个NSTextStorage、NSLayoutManager、NSTextContainer为一一对应关系:

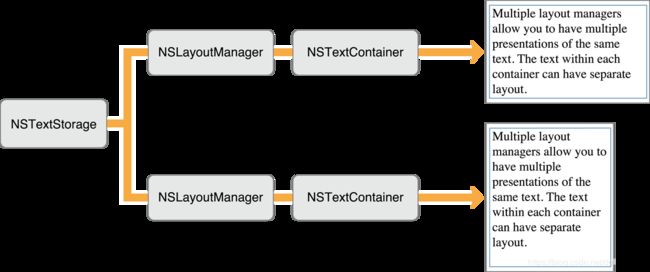
也可能有多个NSTextContainer:
或者是多个NSLayoutManager:
实际运用Demo1:高亮显示
效果:

- 新建HYHighlightTextStorage类,继承自NSTextStorage
- NSTextStorage的子类需要我们自己存储attributed string,在HYHighlightTextStorage中声明变量
NSMutableAttributedString *_mutableAttributedString;
并且重写以下4个抽象方法:
 - (NSString *)string;
 - (NSDictionary *)attributesAtIndex:(NSUInteger)location effectiveRange:(NSRangePointer)range;

 - (void)replaceCharactersInRange:(NSRange)range withString:(NSString *)str;
 - (void)setAttributes:(NSDictionary *)attrs range:(NSRange)range;
- 修改text storage的内容时,需要3个步骤:
(1) 首先调用beginEditing方法。
(2) 通过调用 replaceCharactersInRange:withString: 或 setAttributes:range: 改变字符或属性
(3)修改完成后调用endEditing,此时会调用代理方法 textStorage:willProcessEditing:range:changeInLength: 以及processEditing方法。
完整代码:
HYHighlightTextStorage.h
@interface HYHighlightTextStorage : NSTextStorage

@end
HYHighlightTextStorage.m
#import "HYHighlightTextStorage.h"

@implementation HYHighlightTextStorage{
    NSMutableAttributedString *_mutableAttributedString;
    NSRegularExpression *_expression;
}

-(instancetype)init{
    if (self = [super init]) {
        _mutableAttributedString = [[NSMutableAttributedString alloc] init];
        _expression = [NSRegularExpression regularExpressionWithPattern:@"(\\*\\w+(\\s*\\w+)*\\s*\\*)" options:0 error:NULL];
    }
    return self;
}

- (NSString *)string{
    return _mutableAttributedString.string;
}

- (NSDictionary *)attributesAtIndex:(NSUInteger)location effectiveRange:(NSRangePointer)range {
    return [_mutableAttributedString attributesAtIndex:location effectiveRange:range];
}

- (void)replaceCharactersInRange:(NSRange)range withString:(NSString *)str {
    [self beginEditing];
    [_mutableAttributedString replaceCharactersInRange:range withString:str];
    [self edited:NSTextStorageEditedCharacters range:range changeInLength:(NSInteger)str.length - (NSInteger)range.length];
    [self endEditing];
}

- (void)setAttributes:(NSDictionary *)attrs range:(NSRange)range {
    [self beginEditing];
    [_mutableAttributedString setAttributes:attrs range:range];
    [self edited:NSTextStorageEditedAttributes range:range changeInLength:0];
    [self endEditing];
}

- (void)processEditing {
    [super processEditing];
    //去除当前段落的颜色属性
    NSRange paragaphRange = [self.string paragraphRangeForRange: self.editedRange];
    [self removeAttribute:NSForegroundColorAttributeName range:paragaphRange];
    //根据正则匹配,添加新属性
    [_expression enumerateMatchesInString:self.string options:NSMatchingReportProgress range:paragaphRange usingBlock:^(NSTextCheckingResult *result, NSMatchingFlags flags, BOOL *stop) {
        [self addAttribute:NSForegroundColorAttributeName value:[UIColor redColor] range:result.range];
    }];
}
HYHighlightViewController.m
#import "HYHighlightViewController.h"
#import "HYHighlightTextStorage.h"

@interface HYHighlightViewController ()

@property (nonatomic, strong) UITextView *textView;
@property (nonatomic, strong) HYHighlightTextStorage *textStorage;
@property (nonatomic, strong) NSTextContainer *textContainer;
@property (nonatomic, strong) NSLayoutManager *layoutManager;

@end

@implementation HYHighlightViewController

- (void)viewDidLoad {
    [super viewDidLoad];

    _textContainer = [[NSTextContainer alloc] init];
    _layoutManager = [[NSLayoutManager alloc] init];
    _textStorage = [[HYHighlightTextStorage alloc] init];

    [_textStorage addLayoutManager:_layoutManager];
    [_layoutManager addTextContainer:_textContainer];
    _textView = [[UITextView alloc] initWithFrame:CGRectMake(10, 100, self.view.bounds.size.width-20, 300) textContainer:_textContainer];
    _textView.backgroundColor = [UIColor lightGrayColor];

    [self.view addSubview:_textView];
    [_textStorage replaceCharactersInRange:NSMakeRange(0, 0) withString:@"星号引起来的字符都会被*高亮*,*hello world* 星号引起来的字符都会"];
}
实际运用Demo2:文本元素与非文本元素混排
效果:
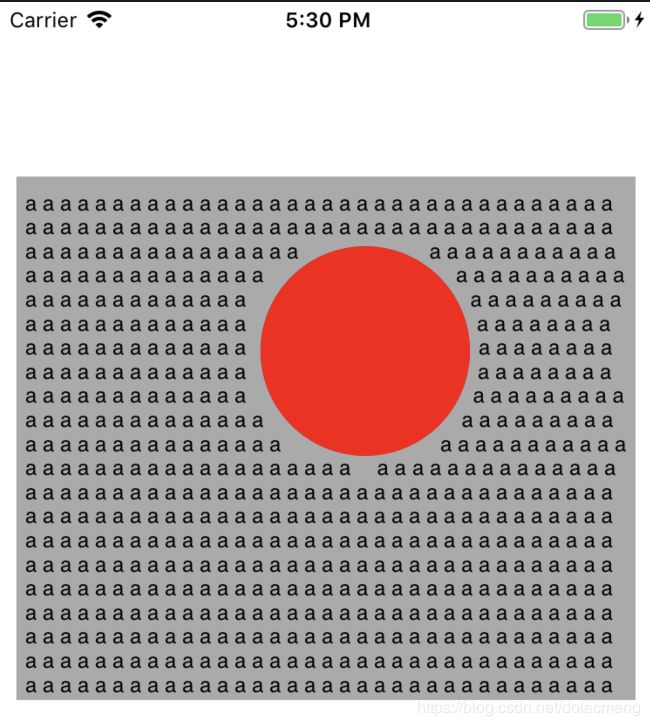
通过设置NSTextContainer的exclusionPaths属性,可以设置禁止填充文字的区域。此属性为NSArray数组,包含的是一组UIBezierPath数据,表示所有排除路径。如图:

完整代码:
#import "HYExclusionViewController.h"

@interface HYExclusionViewController ()

@property (nonatomic, strong) UITextView *textView;
@property (nonatomic, strong) NSTextStorage *textStorage;
@property (nonatomic, strong) NSTextContainer *textContainer;
@property (nonatomic, strong) NSLayoutManager *layoutManager;
@property (nonatomic, strong) UIView *exclusionView;

@end

@implementation HYExclusionViewController

- (void)viewDidLoad {
    [super viewDidLoad];

    _textContainer = [[NSTextContainer alloc] init];
    _layoutManager = [[NSLayoutManager alloc] init];
    _textStorage   = [[NSTextStorage alloc] init];

    [_textStorage addLayoutManager:_layoutManager];
    [_layoutManager addTextContainer:_textContainer];
    _textView = [[UITextView alloc] initWithFrame:CGRectZero textContainer:_textContainer];
    _textView.frame = CGRectMake(10, 100, self.view.bounds.size.width-20, 300);
    _textView.backgroundColor = [UIColor lightGrayColor];

    [self.view addSubview:_textView];
    NSString *testString = @"a a a a a a a a a a a a a a a a a a a a a a a a a a a a a a a a a a a a a a a a a a a a a a a a a a a a a a a a a a a a a a a a a a a a a a a a a a a a a a a a a a a a a a a a a a a a a a a a a a a a a a a a a a a a a a a a a a a a a a a a a a a a a a a a a a a a a a a a a a a a a a a a a a a a a a a a a a a a a a a a a a a a a a a a a a a a a a a a a a a a a a a a a a a a a a a a a a a a a a a a a a a a a a a a a a a a a a a a a a a a a a a a a a a a a a a a a a a a a a a a a a a a a a a a a a a a a a a a a a a a a a a a a a a a a a a a a a a a a a a a a a a a a a a a a a a a a a a a a a a a a a a a a a a a a a a a a a a a a a a a a a a a a a a a a a a a a a a a a a a a a a a a a a a a a a a a a a a a a a a a a a a a a a a a a a a a a a a a a a a a a a a a a a a a a a a a a a a a a a a a a a a a a a a a a a a a a a a a a a a a a a a a a a a a a a a a a a a a a a a a a a a a a a a a a a a a a a a a a a a a a a a a a a a a a a a a a a a a a a a a a a a a a a a a a a a a a a a a a a a a a a a a a a a a a a a a a a a a a a a a a a a a a a a a a a a a a a a a a a a a a a a a a a a a a a a a a a a a a a a a a a a a a a a a a a a a a a a a a a a a a a a a a a a a a a a a a a a a a a a a a a a a a a a a a a a a a a a a a a a a a a a a a a a a a a a a a a a a a a a a a a a a a a a a a a a a a a a a a a a a a a a a a a a a a a a a a a a a a a a a a a a a a a a a a a a a a a a a a a a a a a a a a a a a a a a a a a a a a a a a a a a a a a a a a a a a a a a a a a a a a a a a a a a a a a a a a a a a a a a a a a a a a a a a a a a a a a a a a a a a a a a a a a a a a a a a a a a a a a a a a a a a a a a a a a a a a a a a a a a a a a a a a a a a a a a a a a a a a a a a a a a a a a a a a a a a a a a a a a a a a a a a a a a a a a a a a a a a a a a a a";
    [_textStorage replaceCharactersInRange:NSMakeRange(0, 0) withString:testString];

    [self setupExclusion];
}


-(void)setupExclusion{
    //红圆圈
    _exclusionView = [[UIView alloc] initWithFrame:CGRectMake(140, 40, 120, 120)];
    _exclusionView.backgroundColor = [UIColor redColor];
    _exclusionView.layer.cornerRadius = 60;
    [self.textView addSubview:_exclusionView];

    CGRect originalPathRect = self.exclusionView.frame;
    CGFloat circle_X = originalPathRect.origin.x - self.textView.textContainerInset.left;
    CGFloat circle_Y = originalPathRect.origin.y - self.textView.textContainerInset.top;
    CGFloat circle_W = originalPathRect.size.width;
    CGFloat circle_H = originalPathRect.size.height;
    CGRect circleRect = CGRectMake(circle_X, circle_Y, circle_W, circle_H);

    UIBezierPath *exclusionCirclePath = [UIBezierPath bezierPathWithOvalInRect:circleRect];
    _textContainer.exclusionPaths = @[exclusionCirclePath];
}
实际运用Demo3:不规则的显示区域
效果:
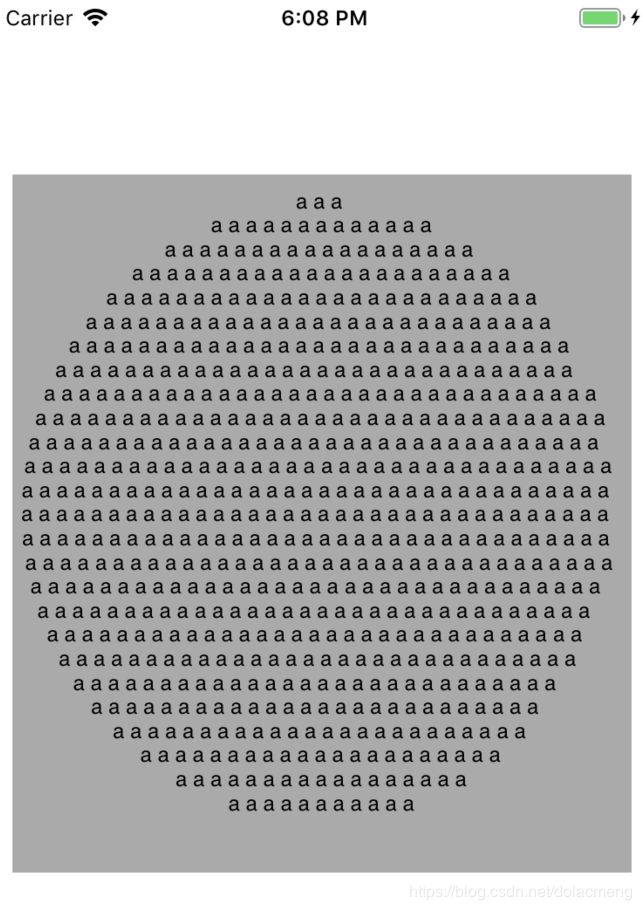
NSTextContainer确定了文字的布局区域,默认是矩形,新建HYCustomTextContainer继承自NSTextContainer,重写NSTextContainer的-(CGRect)lineFragmentRectForProposedRect: atIndex: writingDirection: remainingRect:方法,返回每一行文字的位置个大小,即可将显示区域修改成需要的形状,例如圆形。
#import "HYCustomTextContainer.h"

@implementation HYCustomTextContainer

-(CGRect)lineFragmentRectForProposedRect:(CGRect)proposedRect atIndex:(NSUInteger)characterIndex writingDirection:(NSWritingDirection)baseWritingDirection remainingRect:(CGRect *)remainingRect{
    [super lineFragmentRectForProposedRect:proposedRect
                                                 atIndex:characterIndex
                                        writingDirection:baseWritingDirection
                                           remainingRect:remainingRect];
    CGSize size = [self size];

    //圆半径
    CGFloat radius = fmin(size.width, size.height) * 0.5;
    CGFloat y = proposedRect.origin.y;
    CGFloat height = proposedRect.size.height;
    CGFloat width = 0;
    if (proposedRect.origin.y == 0) {
        width = 40.0;
    }else if(proposedRect.origin.y <= 2*radius){
        width = 2 * sqrt(powf(radius,2.0) - powf(fabs(y-radius), 2.0));
    }

    CGFloat x = radius - width/2.0;

    return CGRectMake(x, y, width, height);
}

@end
实际运用Demo4:可点击字符的UILabel
效果:
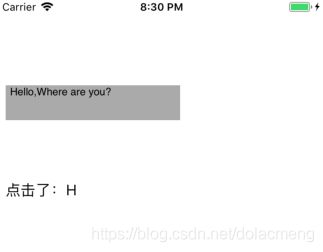
- 新建HYLabel继承自UILabel
- 在初始化方法中初始化内部的NSTextStorage、NSLayoutManager、NSTextContainer。
- 重写drawTextInRect:方法,让我们自己的NSTextContainer去替代默认的展示控件。
- 重写touchesBegan:withEvent:方法,进行点击判断。
完整代码HYLabel.m代码:
#import "HYLabel.h"

@interface HYLabel()

@property (nonatomic, strong) NSTextStorage *textStorage;
@property (nonatomic, strong) NSLayoutManager *layoutManager;
@property (nonatomic, strong) NSTextContainer *textContainer;

@end

@implementation HYLabel

-(void)setText:(NSString *)text{
    [super setText:text];
    [self setupTextSystem];
    [self.textStorage replaceCharactersInRange:NSMakeRange(0, 0) withString:text];
}

-(void)setAttributedText:(NSAttributedString *)attributedText{
    [super setAttributedText:attributedText];
    [self setupTextSystem];
    [self.textStorage replaceCharactersInRange:NSMakeRange(0, 0) withAttributedString:attributedText];
}

-(instancetype)initWithFrame:(CGRect)frame{
    if (self = [super initWithFrame:frame]) {
        self.userInteractionEnabled = YES;
        [self setupTextSystem];
    }
    return self;
}

-(void)setupTextSystem{
    _textStorage = [[NSTextStorage alloc] init];
    _layoutManager = [[NSLayoutManager alloc] init];
    _textContainer = [[NSTextContainer alloc] init];

    [_textStorage addLayoutManager:_layoutManager];
    [_layoutManager addTextContainer:_textContainer];
}

-(void)drawTextInRect:(CGRect)rect{
    NSRange range = NSMakeRange(0, self.textStorage.length);
    [self.layoutManager drawBackgroundForGlyphRange:range atPoint:CGPointMake(0, 0)];
    [self.layoutManager drawGlyphsForGlyphRange:range atPoint:CGPointMake(0, 0)];
}

-(void)layoutSubviews{
    [super layoutSubviews];
    self.textContainer.size = self.bounds.size;
}

-(void)touchesBegan:(NSSet *)touches withEvent:(UIEvent *)event{
    UITouch *touch = touches.anyObject;
    CGPoint point = [touch locationInView:self];

    //获取点击的字的index
    NSUInteger glyphIndex = [self.layoutManager glyphIndexForPoint:point inTextContainer:self.textContainer];
    //获取字的rect
    CGRect glyphRect = [self.layoutManager boundingRectForGlyphRange:NSMakeRange(glyphIndex, 1) inTextContainer:self.textContainer];
    //最后判断点击位置是否在该字的显示范围内
    if(CGRectContainsPoint(glyphRect, point)){
        NSUInteger charaterIndex = [self.layoutManager characterIndexForGlyphAtIndex:glyphIndex];
        unichar charater = [[self.textStorage string] characterAtIndex:charaterIndex];
        if ([self.delegate respondsToSelector:@selector(didClickCharater:)]) {
            [self.delegate didClickCharater:charater];
        }
    }
}

@end
实际运用Demo5:一个比较有趣的demo
网上看到的一个比较有趣的demo:https://www.jianshu.com/p/e72c441f14f3
参考:
TextKit 探究:https://www.jianshu.com/p/3f445d7f44d6
TextKit框架:https://www.jianshu.com/p/a12ecae89d6b
Using Text Kit to Draw and Manage Text:https://developer.apple.com/library/archive/documentation/StringsTextFonts/Conceptual/TextAndWebiPhoneOS/CustomTextProcessing/CustomTextProcessing.html#//apple_ref/doc/uid/TP40009542-CH4-SW1
TextKit Best Practices:https://developer.apple.com/videos/play/wwdc2018/221/