CoreText入坑一
CoreText是Mac OS和iOS系统中处理文本的low-level API, 不管是使用OC还是swift, 实际我们使用CoreText都还是间接或直接使用C语言在写代码。CoreText是iOS和Mac OS中文本处理的根基, TextKit和WebKit都是构建于其上。
一. 基础
1.在使用CoreText编写代码之前, 需要先了解一些基础知识。下图是CoreText的基础框架
- CTFrame可以想象成画布, 画布的大小范围由CGPath决定
- CTFrame由很多CTLine组成, CTLine表示为一行
- CTLine由多个CTRun组成, CTRun相当于一行中的多个块, 但是CTRun不需要你自己创建, 由NSAttributedString的属性决定, 系统自动生成。每个CTRun对应不同属性
- CTFramesetter是一个工厂, 创建CTFrame, 一个界面上可以有多个CTFrame
2.文字的样式包括很多, 而每个字符的显示要归功于字体, 而字体包括很多基础知识, 比如磅值, 样式, 基线, 连字等等, 这里就不做更多介绍, 推荐两篇文章阅读。
CoreText基础概念
CoreText入门
在这里, 贴出CoreText基础概念文中关于字体结构的图(图片版权归此文作者)
二. 使用基本步骤
新建一个UIView, 在view的drawRect函数中按步骤写入下面的代码
- 1.获取当前上下文
let context = UIGraphicsGetCurrentContext()- 2.转换坐标系
CGContextSetTextMatrix(context, CGAffineTransformIdentity)
CGContextTranslateCTM(context, 0, self.bounds.size.height)
CGContextScaleCTM(context, 1.0, -1.0)- 3.初始化路径
let path = CGPathCreateWithRect(self.bounds, nil)- 4.初始化字符串
let attrString = NSMutableAttributedString(string: "Hello CoreText")- 5.初始化framesetter
let framesetter = CTFramesetterCreateWithAttributedString(attrString)- 6.绘制frame
let frame = CTFramesetterCreateFrame(framesetter, CFRangeMake(0, attrString.length), path, nil)
CTFrameDraw(frame, context!)
绘制的步骤完成了, 然后在ViewController里面将此view加入到ViewController中, 记得将view的背景色设置为白色, 那么效果就应该如下了
文字绘制出来了, 这就是CoreText使用最基本的步骤了。
三.简单的富文本Label
上面简单的绘制步骤中, 最后一步绘制frame, 是将整个frame当做一块绘制, 至于什么换行, 行中的样式什么的都是系统自己决定了。在开始之前, 我们将这个绘制frame改成我们自己一行一行, 甚至一个run一个run的绘制
- 按行绘制
// 1.获得CTLine数组
let lines = CTFrameGetLines(frame)

// 2.获得行数
let numberOfLines = CFArrayGetCount(lines)

// 3.获得每一行的origin, CoreText的origin是在字形的baseLine处的, 请参考字形图
var lineOrigins = [CGPoint](count: numberOfLines, repeatedValue: CGPointZero)
CTFrameGetLineOrigins(frame, CFRangeMake(0, 0), &lineOrigins)

// 4.遍历每一行进行绘制
for index in 0..let origin = lineOrigins[index]

  // 参考: http://swifter.tips/unsafe/
  let line = unsafeBitCast(CFArrayGetValueAtIndex(lines, index), CTLine.self)

  // 设置每一行的位置
  CGContextSetTextPosition(context, origin.x, origin.y)

  // 开始一行的绘制
  CTLineDraw(line, context)
}
将最后一步改成按行绘制, 最终得到的效果也和按frame绘制一样的, 接下来看下按Run绘制
- 按Run绘制
// 画一行
func drawLine(line: CTLine, context: CGContext) {
   let runs = CTLineGetGlyphRuns(line) as Array

   runs.forEach { run in
       CTRunDraw(run as! CTRun, context, CFRangeMake(0, 0))
       }
   }
}
用此函数替换CTLineDraw(line, context)这一句就可以了, 效果也如上面。
那么接下来实现一个简单的富文本Label, 将上面的view改名为TULabel
- 声明一个富文本变量给此Label
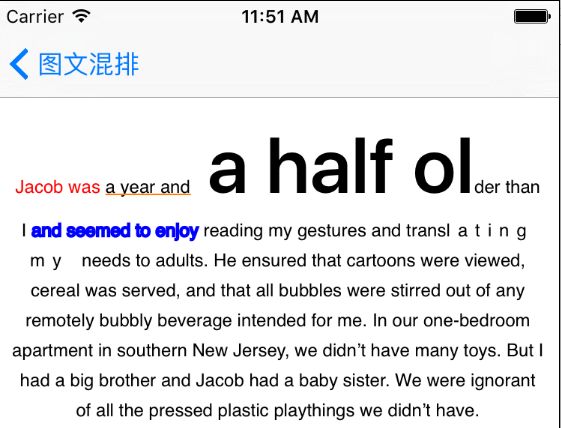
var attributedText: NSAttributedString?- 将上面的第4步注释掉, 初始化framesetter的字符串直接传入此变量, 至于后面的绘制你可以用任意一种, 这样TULabel就可以实现一部分富文本了, 在controller中创建一个TULabel, 然后来个NSMutableAttributedString实例赋值给TULabel.attributedText, 下面列出此时可用的富文本样式
let attributedText = NSMutableAttributedString(string: ...)

// CoreText支持的属性

// 字体颜色
attributedText.addAttribute(NSForegroundColorAttributeName, value: UIColor.redColor(), range: NSMakeRange(0, 10))

// 下划线
let underlineStyles = [NSUnderlineStyleAttributeName: NSUnderlineStyle.StyleSingle.rawValue,
                     NSUnderlineColorAttributeName: UIColor.orangeColor()]
attributedText.addAttributes(underlineStyles, range: NSMakeRange(10, 10))

// 字体
attributedText.addAttribute(NSFontAttributeName, value: UIFont.boldSystemFontOfSize(50), range: NSMakeRange(20, 10))

// 描边(Stroke):组成字符的线或曲线。可以加粗或改变字符形状
let strokeStyles = [NSStrokeWidthAttributeName: 10,
                  NSStrokeColorAttributeName: UIColor.blueColor()]
attributedText.addAttributes(strokeStyles, range: NSMakeRange(40, 20))

// 横竖文本
attributedText.addAttribute(NSVerticalGlyphFormAttributeName, value: 0, range: NSMakeRange(70, 10))

// 字符间隔
attributedText.addAttribute(NSKernAttributeName, value: 5, range: NSMakeRange(90, 10))

// 段落样式
let paragraphStyle = NSMutableParagraphStyle()

//对齐模式
paragraphStyle.alignment = .Center

//换行裁剪模式
paragraphStyle.lineBreakMode = .ByWordWrapping

// 行间距
paragraphStyle.lineSpacing = 5.0

// 字符间距
paragraphStyle.paragraphSpacing = 2.0

attributedText.addAttribute(NSParagraphStyleAttributeName, value: paragraphStyle, range: NSRange(location: 0, length: attributedText.length))
此时, 你就会看到如下效果
- 效果出来了, 你是否就满足了。那其他平常可以使用的样式要怎么样使用CoreText来实现了? 我们就先实现一个样式--删除线, 将上面的drawLine函数改成如下
// 画一行
func drawLine(line: CTLine, context: CGContext) {
   let runs = CTLineGetGlyphRuns(line) as Array

   runs.forEach { run in
       CTRunDraw(run as! CTRun, context, CFRangeMake(0, 0))

       // 获得run的所有样式
       let attributes = CTRunGetAttributes(run as! CTRun) as NSDictionary

       // 判断是run是否含有删除线样式
       if nil != attributes[NSStrikethroughStyleAttributeName] {
               // 开始画删除线
           drawStrikethroughStyle(run as! CTRun, attributes: attributes, context: context)
       }
   }
}- 当然, 你要将CTLineDraw(line, context)换成自定义的画行函数drawLine(line, context: context), 那么接下来就是画删除线了
// 画删除线, 这里涉及到字体相关知识, 请参考第二节, 画删除线实际画在字的中间, 而字体的高度不一样, 实际是画在x高度的一半位置
func drawStrikethroughStyle(run: CTRun, attributes: NSDictionary, context: CGContext) {
   // 1.获取删除线样式
   let styleRef = attributes[NSStrikethroughStyleAttributeName]
   var style: NSUnderlineStyle = .StyleNone
   CFNumberGetValue(styleRef as! CFNumber, CFNumberType.SInt64Type, &style)

   // 如果定义为none, 就不用画了
   guard style != .StyleNone else {
       return
   }

   // 2.获得画线的宽度
   var lineWidth: CGFloat = 1
   if (style.rawValue & NSUnderlineStyle.StyleThick.rawValue) == NSUnderlineStyle.StyleThick.rawValue {
       lineWidth *= 2
   }

   CGContextSetLineWidth(context, lineWidth)

   // 3.获取画线的起点
   var firstPosition = CGPointZero
   let firstGlyphPosition = CTRunGetPositionsPtr(run)
   if nil == firstGlyphPosition {
       let positions = UnsafeMutablePointer<CGPoint>.alloc(1)

       positions.initialize(CGPointZero)
       CTRunGetPositions(run, CFRangeMake(0, 0), positions)
       firstPosition = positions.memory

       positions.destroy()
   } else {
       firstPosition = firstGlyphPosition.memory
   }

   // 4.我们要开始画线了
   CGContextBeginPath(context)

   // 5.获取定义的线的颜色, 默认为黑色
   let lineColor = attributes[NSStrikethroughColorAttributeName]
   if nil == lineColor {
       CGContextSetStrokeColorWithColor(context, UIColor.blackColor().CGColor)
   } else {
       CGContextSetStrokeColorWithColor(context, (lineColor as! UIColor).CGColor)
   }

   // 6.字体高度, 中间位置为x高度的一半
   let font = attributes[NSFontAttributeName] ?? UIFont.systemFontOfSize(UIFont.systemFontSize())
   var strikeHeight: CGFloat = font.xHeight / 2.0 + firstPosition.y

   // 多行调整
   let pt = CGContextGetTextPosition(context)
   strikeHeight += pt.y

   // 画线的宽度
   let typographicWidth = CGFloat(CTRunGetTypographicBounds(run, CFRangeMake(0, 0), nil, nil, nil))

   // 7.开始画线
   CGContextMoveToPoint(context, pt.x + firstPosition.x, strikeHeight)
   CGContextAddLineToPoint(context, pt.x + firstPosition.x + typographicWidth, strikeHeight)

   CGContextStrokePath(context)
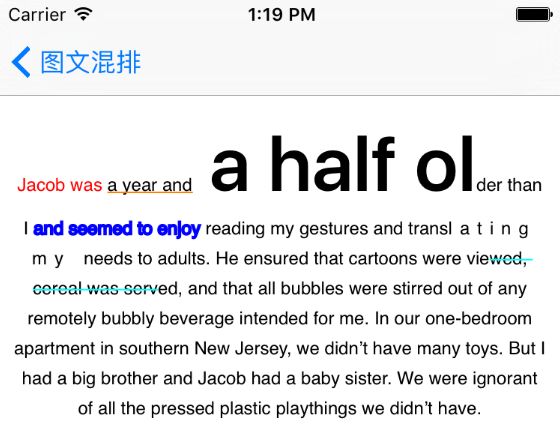
}- 然后在controller中给attributedText添加删除线样式
// 删除线
let strikethroughStyle = [NSStrikethroughStyleAttributeName: NSUnderlineStyle.StyleSingle.rawValue,
                        NSStrikethroughColorAttributeName: UIColor.cyanColor()]
attributedText.addAttributes(strikethroughStyle, range: NSMakeRange(150, 20))
这样就实现了删除线样式效果了
至此, 删除线的样式就完成了, 其他样式将可能在下一篇CoreText文章中实现。
源码在此, 请参考源码中的CoreText/1文件夹!!!
参考:
CoreText基础概念
CoreText入门
Nimbus
本文由啸寒原创, 转载请注明出处!!!


