【Kubernetes】在CentOS7上通过kubeadm工具快速安装Kubernetes集群(一)
此文作为学习《Kubernetes权威指南》的相关笔记,可以参考,不适合直接使用
参考文章:
https://www.jianshu.com/p/cd4d1fde08bc
https://blog.51cto.com/536410/2347614
https://blog.51cto.com/lullaby/2402255
https://blog.csdn.net/wchbest/article/details/88873965
0、安装准备
检查宿主机CPU核心数大于等于2
关闭防火墙服务(不安全的懒人配置
# systemctl disable firewalld
# systemctl stop firewalld
禁用SELinux
# setenforce 0
禁用swap
# swapoff -a
# echo "vm.swappiness = 0">> /etc/sysctl.conf
# sysctl -p
ps.后续发现这个方法在我的环境上并没有永久禁用swap,真正永久禁用的方法见:https://blog.csdn.net/qq_38093301/article/details/103393351
修改docker镜像站为国内站点(不知道阿里云和官方哪个好用
# echo '{"registry-mirrors": ["https://registry.docker-cn.com"]}' > /etc/docker/daemon.json
普通用户获取sudo使用权限
# visudo
添加:XXX为普通用户名
root ALL=(ALL) ALL
XXX ALL=(ALL) ALL
1、配置yum源,使用阿里云镜像仓库
# vim /etc/yum.repos.d/kubernetes.repo
[kubernetes]
name=Kubernetes Repository
baseurl=http://mirrors.aliyun.com/kubernetes/yum/repos/kubernetes-el7-x86_64/
enabled=1
qpgcheck=0
ps:Gpgcheck是GPG验证是否开启的选项,1是开启,0是不开启,一般情况可以关掉。
GPG是加密和数字签名的免费工具,大多用于加密信息的传递。除了仅用密码加密外,GPG最大的不同是提供了“公钥/私钥”对。利用一方的“公钥”别人加密信息不再需要告诉密码,随时随地都能发送加密信息。而这种加密是单向的,只有一方的“私钥”能解开加密。数字签名又是另一大使用方向。通过签名认证,别人能确保发布的消息来自一方,而且没有经过修改。
>>坑1:文件夹名kubernetes-el7-x86_64中el7打成了e17 = =
直接访问http://mirrors.aliyun.com/kubernetes/yum/repos/kubernetes-el7-x86_64/ 可以看到该镜像仓库路径
访问根目录,可以看到阿里云提供的容器镜像列表:
2、使用yum install安装kubelet、kubeadm、kubectl
#yum install -y kubelet kubeadm kubectl --disableexcludes=kubernetes
其中--disableexcudes用于关闭配置文件中的排除
--disableexcludes=[repo]
disable exclude from main, for a repo or for
everything
--disableincludes=[repo]
disable includepkgs for a repo or for everything
>>坑2 出现Public key for XXX.rpm is not installed
参考文章:https://blog.csdn.net/cy309173854/article/details/69265738 配置失败,有待研究
使用阿里云给出的安装方式:
cat <
/etc/yum.repos.d/kubernetes.repo
[kubernetes]
name=Kubernetes
baseurl=https://mirrors.aliyun.com/kubernetes/yum/repos/kubernetes-el7-x86_64/
enabled=1
gpgcheck=1
repo_gpgcheck=1
gpgkey=https://mirrors.aliyun.com/kubernetes/yum/doc/yum-key.gpg https://mirrors.aliyun.com/kubernetes/yum/doc/rpm-package-key.gpg
EOF
setenforce 0
yum install -y kubelet kubeadm kubectl
systemctl enable kubelet && systemctl start kubelet
安装成功
3、启动docker、kubelet并设置自动启动
systemctl enable kubelet && systemctl start kubelet
systemctl docker && systemctl start docker
4、查看kubeadm命令和参数列表
Available Commands:
alpha Kubeadm experimental sub-commands
completion Output shell completion code for the specified shell (bash or zsh)
config Manage configuration for a kubeadm cluster persisted in a ConfigMap in the cluster
help Help about any command
init Run this command in order to set up the Kubernetes control plane
join Run this on any machine you wish to join an existing cluster
reset Performs a best effort revert of changes made to this host by 'kubeadm init' or 'kubeadm join'
token Manage bootstrap tokens
upgrade Upgrade your cluster smoothly to a newer version with this command
version Print the version of kubeadmFlags:
--add-dir-header If true, adds the file directory to the header
-h, --help help for kubeadm
--log-file string If non-empty, use this log file
--log-file-max-size uint Defines the maximum size a log file can grow to. Unit is megabytes. If the value is 0, the maximum file size is unlimited. (default 1800)
--rootfs string [EXPERIMENTAL] The path to the 'real' host root filesystem.
--skip-headers If true, avoid header prefixes in the log messages
--skip-log-headers If true, avoid headers when opening log files
-v, --v Level number for the log level verbosity
5、导出默认配置、修改、备用
# cd /
# kubeadm config print init-defaults >init.default.yaml
# vim init.default.yaml
修改如下:
apiVersion: kubeadm.k8s.io/v1beta1
kind: ClusterConfiguration
imageRepository: docker.io/dustise
kubernetesVersion: v1.14.0
networking:
podSubnet: "192.168.0.0/16"
存储为init-config.yaml
6、下载Kubernetes相关镜像
# kubeadm config images pull --config=init-config.yaml
>>坑3
this version of kubeadm only supports deploying clusters with the control plane version >= 1.15.0. Current version: v1.14.0
通过报错内容可以看出书中提供的版本太老,不被当前kubeadm支持
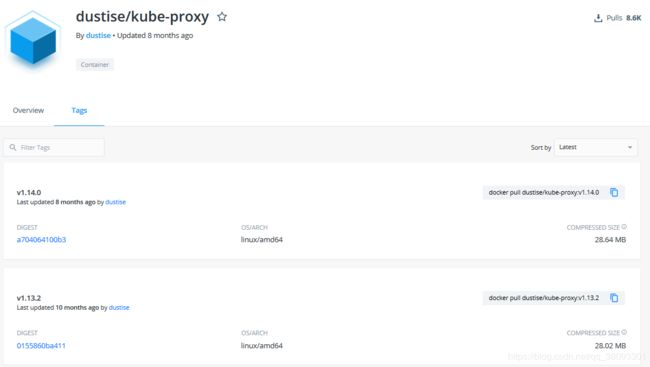
单纯更改版本号kubernetesVersion: v1.15.0也会报错,由于本书提供的imageRepository:docker.io/dustise没有提供更新的版本
进去dockerHub查看:
可以看出没有更新的版本,关于Kubernetes镜像拉取问题,解决方式如下:
(1)查看当前配置中需求的镜像
[root@localhost /]# kubeadm config images list
k8s.gcr.io/kube-apiserver:v1.16.3
k8s.gcr.io/kube-controller-manager:v1.16.3
k8s.gcr.io/kube-scheduler:v1.16.3
k8s.gcr.io/kube-proxy:v1.16.3
k8s.gcr.io/pause:3.1
k8s.gcr.io/etcd:3.3.15-0
k8s.gcr.io/coredns:1.6.2
(2)在dockerHub中寻找含有以上镜像的Repository,修改yaml文件
(3)或者参考https://blog.csdn.net/wchbest/article/details/88873965 拉取镜像后修改Tag
(4)https://blog.51cto.com/536410/2347614 中提供了一种在拉去镜像时指定镜像仓库的方法
kubeadm init \
--apiserver-advertise-address=192.168.92.56 \
--image-repository registry.aliyuncs.com/google_containers \
--kubernetes-version v1.13.1 \
--pod-network-cidr=10.244.0.0/16
7、运行kubeadm init命令安装Master
# kubeadm init --config=init-config.yaml
运行后,显示如下信息:
Your Kubernetes control-plane has initialized successfully!
To start using your cluster, you need to run the following as a regular user:
mkdir -p $HOME/.kube
sudo cp -i /etc/kubernetes/admin.conf $HOME/.kube/config
sudo chown $(id -u):$(id -g) $HOME/.kube/configYou should now deploy a pod network to the cluster.
Run "kubectl apply -f [podnetwork].yaml" with one of the options listed at:
https://kubernetes.io/docs/concepts/cluster-administration/addons/Then you can join any number of worker nodes by running the following on each as root:
kubeadm join 192.168.79.132:6443 --token mc8ng5.pi0094m1p8c90r9z \
--discovery-token-ca-cert-hash sha256:2476c042ff1997f8ae17098d5f581474102788756dd37f7859b496ad52eec052
按要求依次运行:
# mkdir -p $HOME/.kube
# sudo cp -i /etc/kubernetes/admin.conf $HOME/.kube/config
# sudo chown $(id -u):$(id -g) $HOME/.kube/config
Master节点安装成功!


