Text Kit进阶——Intermediate Text Kit
本文为raywenderlich的iOS 7 By Tutorials中的Intermediate Text Kit章节。
Text Kit进阶
在上一章中,你已了解了Text Kit最重要的一些功能。特别是,学习了动态类型、凸版印刷效果,使用排除路径,和创建自己的动态文本格式和存储系统(dynamic text formatting and storage system)。
而这章的内容主要集中在app需要大量的、复杂的文本布局方面。你将深入Text Kit渲染引擎,并学到如何创建自己自定义的文本布局。
在这个过程中,你将会使用多个文本容器(multiple text containers),创建一个简单的iPad书本app。
开始
打开已创建好的工程项目,编译运行。屏幕内容如下:

此时并没有多少内容。
初始工程项目,是Xcode的master-detail模板的修改版。详情控制器被命名为BookViewController,主控制器为ChaptersViewController。
工程中有一个Assets分组,包含了书的文本和一些的图片。
书的文本内容是Markdown格式的。
Text Kit架构
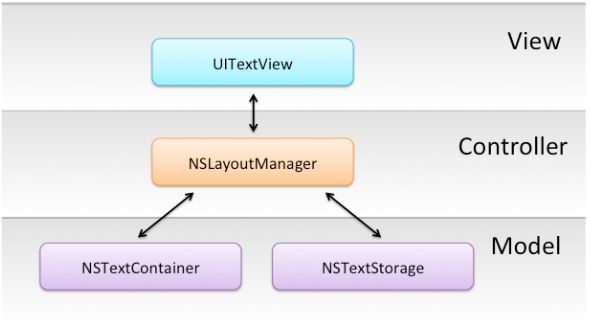
回顾上一张的内容,当你创建一个UITextView时,如下的对象将会被创建:

这些类的功能如下:
NSTextStorage:文本系统的字符数据仓库。这个数据的格式是一个属性字符串。NSLayoutManager:协调布局和渲染字符,持有一个NSTextStorage。NSLayoutManager也负责把Unicode字符映射到相应的字形。NSTextContainer:定义了text布局的区域。NSLayoutManager依据NSTextContainer来决定在哪儿换行、文本的位置等等。
以MVC模式显示如下:
布局配置(Layout configurations)
再上一章,创建了一个带有自定义Text Kit stack的UITextView,如下:

这是为了使用你自定义的子类来替换框架的NSTextStorage。
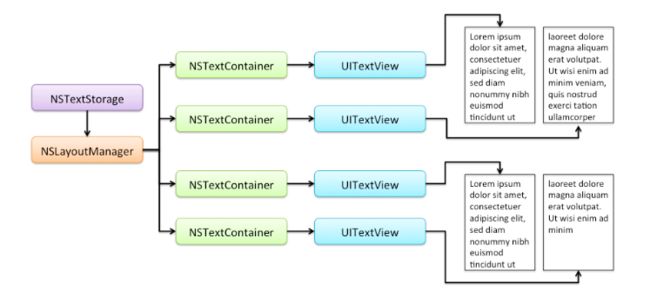
然而,layout manager可以和多个text containers关联在一起。例如,你可以使用多个text containers来渲染text,在多列或者多个页面,如下:
渲染文本
第一步是创建一个book reader来在屏幕上来渲染text。
打开AppDelegate.h,加入如下的属性:
@property (nonatomic, copy) NSAttributedString *bookMarkup;这个属性使用属性字符串来存储book。
在AppDelegate.m中的application:didFinishLaunchingWithOptions:方法中,在创建控制器之前,加入如下的代码:
NSString *path = [[NSBundle mainBundle] pathForResource:@"alices_adventures" ofType:@"md"];
NSString *text = [NSString stringWithContentsOfFile:path
encoding:NSUTF8StringEncoding error:NULL];
self.bookMarkup = [[NSAttributedString alloc] initWithString:text];上面的代码加载alices_adventures.md的内容,设置bookMarkup。
创建一个BookView类,继承自UIView。在BookView.h中,添加如下的方法和属性到接口中:
@interface BookView : UIView
@property (nonatomic, copy) NSAttributedString *bookMarkup;
- (void)buildFrames;
@end
bookMarkup属性用来存储要渲染的文本,buildFrames创建需要渲染的Text Kit的组件。
打开BookView.m,添加一个私有的变量:
@implementation BookView
{
NSLayoutManager *_layoutManager;
}在BookView.m中,实现buildFrames
- (void)buildFrames
{
//创建text storage
NSTextStorage *textStorage = [[NSTextStorage alloc] initWithAttributedString:self.bookMarkup];
//创建layout manager
_layoutManager = [[NSLayoutManager alloc] init];
[textStorage addLayoutManager:_layoutManager];
//创建container
NSTextContainer *textContainer = [[NSTextContainer alloc] initWithSize:CGSizeMake(self.bounds.size.width, FLT_MAX)];
[_layoutManager addTextContainer:textContainer];
//创建view
UITextView *textView = [[UITextView alloc] initWithFrame:self.bounds
textView.scrollEnabled = YES;
[self addSubview:textView];
}打开BookViewController.m,导入如下文件:
#import "BookView.h"
#import "AppDelegate.h"
接下来,添加一个新的实例变量:
@implementation BookViewController
{
    BookView *_bookView;
}最后,使用如下代码替换viewDidLoad的实现:
- (void)viewDidLoad
{
    [super viewDidLoad];
    // Do any additional setup after loading the view, typically from a nib.

    self.view.backgroundColor = [UIColor colorWithWhite:0.87f alpha:1.0f];

    [self setEdgesForExtendedLayout:UIRectEdgeNone];
    AppDelegate *appDelegate = (AppDelegate *) [[UIApplication sharedApplication] delegate];
    _bookView = [[BookView alloc] initWithFrame:self.view.bounds];
    _bookView.autoresizingMask = UIViewAutoresizingFlexibleWidth | UIViewAutoresizingFlexibleHeight;
    _bookView.bookMarkup = appDelegate.bookMarkup;
    [self.view addSubview:_bookView];

}
当view controller布局它的子view时,book view的大小会被计算。恰好,viewDidLayoutSubviews是book view构建自己的好地方。
- (void)viewDidLayoutSubviews
{
    [_bookView buildFrames];
}
运行app,屏幕上书的text的文本如下:

添加多列布局(Adding a multi-column layout)
你将会为book的每一列创建一个text view,然后从左到右布局它们。注意,你将一次创建所有的text view-虽然只有两个在屏幕上可见。然后,设置book view水平滚动,这样用户就可以翻页。

“等等”,你可能会说,“一次性创建如此多的view,听起来有很大的问题,特别是book很长的时候”。不错,我们将在下一节来讨论这个问题。
打开BookView.h,把超类UIView换成UIScrollView:
@interface BookView : UIScrollView打开BookView.m,替换buildFrames实现为:
- (void)buildFrames {
    //创建text storage
    NSTextStorage *textStorage = [[NSTextStorage alloc] initWithAttributedString:self.bookMarkup];
    //创建layout manager
    _layoutManager = [[NSLayoutManager alloc] init];
    [textStorage addLayoutManager:_layoutManager];

    //build the frames
    NSRange range = NSMakeRange(0, 0);
    NSUInteger containerIndex = 0;
    while (NSMaxRange(range) < _layoutManager.numberOfGlyphs) {
        //1
        CGRect textViewRect = [self frameForViewAtIndex:containerIndex];
        //2
        CGSize containerSize = CGSizeMake(textViewRect.size.width, textViewRect.size.height - 16.0f);
        NSTextContainer* textContainer = [[NSTextContainer alloc] initWithSize:containerSize];
        [_layoutManager addTextContainer:textContainer];

        // 3
        UITextView *textView = [[UITextView alloc] initWithFrame:textViewRect textContainer:textContainer];
        [self addSubview:textView];

        containerIndex++;

        //4
        range = [_layoutManager glyphRangeForTextContainer:textContainer];
    }

    //5
    self.contentSize = CGSizeMake((self.bounds.size.width / 2) * (CGFloat)containerIndex, self.bounds.size.height);
    self.pagingEnabled = YES;

}同样还是创建了一个NSTextStorage和NSLayoutManager,但是现在,你也创建了几个NSTextContainer和UITextView,基于layout manager中字形的数量。
方法的作用如下:
- 为索引的view创建一个frame。暂时先这样实现这个方法。要记住的是,一次创建所有的text view,然后从左到右布局text view。
- 基于frame创建一个
NSTextContainer。注意16.0f这个数字,减少UITextView的高度,这样container上下就有8.0f的间距。 - 使用这个container创建UITextView。
- 获取新text container的字形range。
- 更新scroll view的content size。
Note:为什么不使用
NSTextContainer的heightTracksTextView属性,而是手动调整text view的高度?在每一次container被添加时,它会重新调整大小来track关联的view,导致layout manager重复的布局相同的text。
在BookView.m中添加如下的方法:
- (CGRect)frameForViewAtIndex:(NSUInteger)index {
CGRect textViewRect = CGRectMake(0, 0, self.bounds.size.width / 2, self.bounds.size.height);
textViewRect = CGRectInset(textViewRect, 10.0, 20.0);
textViewRect = CGRectOffset(textViewRect, (self.bounds.size.width / 2) * (CGFloat)index, 0.0);
return textViewRect;
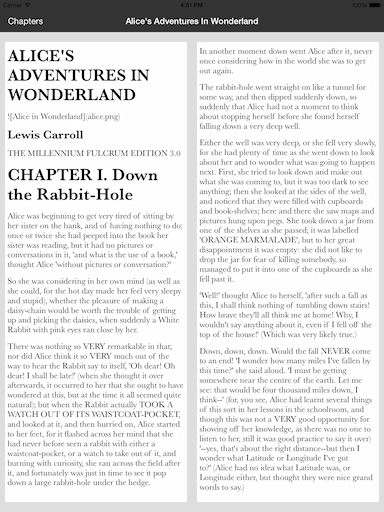
}运行app,效果如下:

这样看起来,可读性就更好。
添加文本格式(Adding text styling)
来看下app中文本,是爱丽丝梦游仙境(可以在http://www.gutenberg.org/ebooks/11获取)。
接下来的任务是给文档中的MarKdown格式化。
创建一个MarkdownParser,继承自NSObject。
打开MarkdownParser.h,添加如下的方法到接口文件中:
@interface MarkdownParser : NSObject

- (NSAttributedString *)parseMarkdownFile:(NSString*)path;

@end打开MarkdownParser.m,添加如下的实例变量:
@implementation MarkdownParser
{
    NSDictionary *_bodyTextAttributes;
    NSDictionary *_headingOneAttributes;
    NSDictionary *_headingTwoAttributes;
    NSDictionary *_headingThreeAttributes;
}
这些将被用来存储各种文本属性,来应用到文本中,并格式化它。
接下来,在同样的文件中,添加如下的方法:
- (id) init {
    if (self = [super init]) {
        [self createTextAttributes];
    }
    return self;
}调用的createTextAttributes方法如下:
- (void)createTextAttributes {
    // 1. 创建font descriptors
    UIFontDescriptor *baskerville = [UIFontDescriptor fontDescriptorWithFontAttributes: @{UIFontDescriptorFamilyAttribute: @"Baskerville"}];
    UIFontDescriptor *baskervilleBold = [baskerville fontDescriptorWithSymbolicTraits:UIFontDescriptorTraitBold];
    // 2. 获取当前的文字大小设置
    UIFontDescriptor *bodyFont = [UIFontDescriptor preferredFontDescriptorWithTextStyle:UIFontTextStyleBody];
    NSNumber *bodyFontSize = bodyFont.fontAttributes[UIFontDescriptorSizeAttribute];
    CGFloat bodyFontSizeValue = [bodyFontSize floatValue];
    // 3. 为不同的样式创建不同的属性
    _bodyTextAttributes = [self attributesWithDescriptor:baskerville size:bodyFontSizeValue];
    _headingOneAttributes = [self attributesWithDescriptor:baskervilleBold size:bodyFontSizeValue * 2.0f];
    _headingTwoAttributes = [self attributesWithDescriptor:baskervilleBold size:bodyFontSizeValue * 1.8f];
    _headingThreeAttributes = [self attributesWithDescriptor:baskervilleBold size:bodyFontSizeValue * 1.4f];
}
上述代码的解释如下:
- 创建了Baskerville family的两个font descriptors。一个正常字体,一个加粗字体。
- 获取text的大小
- 创建要用到的属性。
第三步用到了attributesWithDescriptor: size:方法 如下:
- (NSDictionary *)attributesWithDescriptor: (UIFontDescriptor*)descriptor size:(CGFloat)size
{
    UIFont *font = [UIFont fontWithDescriptor:descriptor size:size];
    return @{NSFontAttributeName: font};
}
这个方法创建了一个字体属性字典。
接下来,就该添加解析逻辑了。在文件中添加如下的方法:
- (NSAttributedString *)parseMarkdownFile:(NSString *)path {
    NSMutableAttributedString* parsedOutput = [[NSMutableAttributedString alloc] init];
    // 1. 把文件分行,遍历每一行
    NSString *text = [NSString stringWithContentsOfFile:path encoding:NSUTF8StringEncoding error:nil];
    NSArray *lines = [text componentsSeparatedByCharactersInSet:[NSCharacterSet newlineCharacterSet]];
    for(NSUInteger lineIndex=0; lineIndex.count;lineIndex++){
        NSString *line = lines[lineIndex];
        if ([line isEqualToString:@""])
            continue;
        // 2. 匹配各种'heading'格式
        NSDictionary *textAttributes = _bodyTextAttributes;
        if (line.length > 3){
                if ([[line substringToIndex:3] isEqualToString:@"###"]) {
                    textAttributes = _headingThreeAttributes;
                    line = [line substringFromIndex:3];
                }else if ([[line substringToIndex:2] isEqualToString:@"##"]) {
                    textAttributes = _headingTwoAttributes;
                    line = [line substringFromIndex:2];
                }else if ([[line substringToIndex:1] isEqualToString:@"#"]) {
                    textAttributes = _headingOneAttributes;
                    line = [line substringFromIndex:1];
                }
            }
        // 3.给当前行text应用属性
        NSAttributedString *attributedText = [[NSAttributedString alloc] initWithString:line attributes:textAttributes];
        // 4. 拼接要输出的字符串
        [parsedOutput appendAttributedString:attributedText];
        [parsedOutput appendAttributedString: [[NSAttributedString alloc] initWithString:@"\n\n"]];
    }
     return parsedOutput;
}
上述的方法执行了最简单的一个处理过程。依次来说明:
componentsSeparatedByCharactersInSet:方法把text分割成单独每一行。- 如果当前行过一个或者多个”#”字符,获取到当前级别的heading的文本属性。
- 构建属性字符串
- 拼接用来返回的字符串
现在,就开始使用解析器。打开AppDelegate.m,导入:
#import "MarkdownParser.h"把加载markdown文件的代码替换如下:
    NSString* path = [[NSBundle mainBundle] pathForResource:@"alices_adventures" ofType:@"md"];
    MarkdownParser* parser = [[MarkdownParser alloc] init];
    self.bookMarkup = [parser parseMarkdownFile:path];
编译并运行app,结果如下:
提高性能(Performance)
基于当前的字体大小,当前的app大约渲染了100个view。由于当放置在同一个UIScrollView中,这意味着大约有98个离屏的view也在渲染text。
这样不仅浪费了CPU和内存,也增加了app加载的时间。
打开BookViewController.m,在viewDidLoad的[super viewDidLoad]的方法后,调用如下的方法:
NSLog(@"viewDidLoad");在viewDidLoad: 方法中加入如下的代码:
- (void)viewDidAppear:(BOOL)animated
{
[super viewDidAppear:animated];
NSLog(@"viewDidAppear");
}
在设备上运行,你会发现,将近话费了2.2秒来启动这个app。切换到Debug Navigator栏,你会发现,它将近占据了125MBs的内存。
打开BookView.m,从buildFrames中移除掉如下的代码:
        // 3
        UITextView *textView = [[UITextView alloc] initWithFrame:textViewRect textContainer:textContainer];
[self addSubview:textView];其结果是,所有的NSTextContainer都会被创建,但是响应的UITextView却没有。在buildFrames方法结尾 ,添加如下的方法。
[self buildViewsForCurrentOffset];我们随后来添加这个方法。在这之前,要添加一些工具方法。如下:
- (NSArray *)textSubViews {
    NSMutableArray *views = [NSMutableArray new];
    for (UIView *subview in self.subviews) {
        if ([subview class] == [UITextView class]) {
            [views addObject:subview];
        }
    }
    return views;
}
这个方法会返回BookView上所有的UITextView。
接下来,添加另一个帮助方法:
- (UITextView *)textViewForContainer:(NSTextContainer *)textContainer {
    for (UITextView *textView in [self textSubViews]) {
        if (textView.textContainer == textContainer) {
            return textView;
        }
    }
    return nil;
}
这个方法会返回持有NSTextContainer的UITextView。
最后,添加最后一个帮助方法:
- (BOOL)shouldRenderView:(CGRect)viewFrame {
    if (viewFrame.origin.x + viewFrame.size.width < (self.contentOffset.x - self.bounds.size.width))
        return NO;
    if (viewFrame.origin.x >(self.contentOffset.x + self.bounds.size.width * 2.0))
        return NO;
    return YES;
}
这个方法用来决定一个view是否应该被渲染。
值得注意的是,任何frame只要scroll view的可见位置,shouldRenderView都返回YES。在用户实际滑动前,也预先加载了左右的滚动位置。
有了这些帮助方法之后,就可以实现buildViewsForCurrentOffset方法了:
- (void) buildViewsForCurrentOffset {
    // 1. 遍历containers
    for(NSUInteger index = 0; index < _layoutManager.textContainers.count; index++) {

        // 2. 获取container and view
        NSTextContainer* textContainer = _layoutManager.textContainers[index];
        UITextView* textView = [self textViewForContainer:textContainer];

        // 3. 获取需要的frame
        CGRect textViewRect = [self frameForViewAtIndex:index];

        if ([self shouldRenderView:textViewRect]) {
            // 4. 当前container需要被渲染
            if (!textView) {
                NSLog(@"Adding view at index %u", index);
                UITextView* textView = [[UITextView alloc] initWithFrame:textViewRect textContainer:textContainer];
                [self addSubview:textView];
            }
        } else {
            // 5. 当前container不需要被渲染
            if (textView) {
                NSLog(@"Deleting view at index %u", index);
                [textView removeFromSuperview];
            }
        }
    }
}
逻辑很简单:
- 遍历所有添加到layout manager的NSTextContainer。
- 获取渲染container的view,如果view没有被展示,
textViewForContainer:会返回nil - 根据frame来决定是否要渲染
- 如果要渲染,检查textView是否存在。如果存在,不处理,不存在就创建
- 如果不需要渲染,检查textView是否存在。如果存在,就移除它。
最后一步是在用户滑动的时候调用buildViewsForCurrentOffset方法。打开BookView.h,采用
@interface BookView : UIScrollView<UIScrollViewDelegate>在initWithFrame方法中设置代理对象:
- (id)initWithFrame:(CGRect)frame {
    self = [super initWithFrame:frame];
    if (self) {
        self.delegate = self;
    }
    return self;
}在BookView.m中实现代理方法:
- (void)scrollViewDidEndDecelerating:(UIScrollView *)scrollView {
    [self buildViewsForCurrentOffset];
}
运行app,会发现如下的输出:

添加列表内容
添加一个内容列表,在不同的章节切换。
新增一个新的类,为Chapter继承自NSObject。
@interface Chapter : NSObject

@property (nonatomic, copy) NSString *title;
@property (nonatomic, assign) NSUInteger location;

@end在AppDelegate.h中添加一个属性
@property (nonatomic, strong) NSArray *chapters;接下来,打开AppDelegate.m,导入Chapter类:
#import "Chapter.h"在@end前面,添加一个新的方法:
- (NSMutableArray *)locateChapters:(NSString *)markdown {
    NSMutableArray *chapters = [NSMutableArray new];
    [markdown enumerateSubstringsInRange:NSMakeRange(0, markdown.length) options:NSStringEnumerationByLines usingBlock:^(NSString *substring, NSRange substringRange, NSRange enclosingRange, BOOL *stop) {
        if (substring.length > 7 && [[substring substringToIndex:7] isEqualToString:@"CHAPTER"]) {
            Chapter *chapter = [Chapter new];
            chapter.title = substring;
            chapter.location = substringRange.location;
            [chapters addObject:chapter];
        }
    }];
    return chapters;
}使用NSString的enumerateSubstringsInRange:options:usingBlock:方法,使用block来遍历每一行。对每一行,查找关键字”CHAPTER”。
继续在AppDelegate.m中,在application:didFinishLaunchingWithOptions:方法中,在解析markdown文件的后面,添加如下的代码:
self.chapters = [self locateChapters:self.bookMarkup.string];现在,已经有了一组章节,下一步就是现实列表。
打开ChaptersViewController.m,导入如下文件:
#import "AppDelegate.h"
#import "Chapter.h"
添加已一个从app delegate中获取chapter数组的方法:
- (NSArray *)chapters {
    AppDelegate *appDelegate = (AppDelegate *)[[UIApplication sharedApplication] delegate];
    return appDelegate.chapters;
}
下一步就是更新tableView的数据源来显示章节。
在ChaptersViewController.m中,更新tableView的行数的方法:
- (NSInteger)tableView:(UITableView *)tableView numberOfRowsInSection:(NSInteger)section
{
    return [self chapters].count;
}
接下来,更新创建tableView cell的方法:
- (UITableViewCell *)tableView:(UITableView *)tableView cellForRowAtIndexPath:(NSIndexPath *)indexPath
{
    UITableViewCell *cell = [tableView dequeueReusableCellWithIdentifier:@"Cell" forIndexPath:indexPath];
    Chapter *chapter = [self chapters][indexPath.row];
    cell.textLabel.text = chapter.title;
    return cell;
}
编译运行app,点击Chapters按钮,会显示章节:

添加章节导航(Adding chapter navigation)
打开ChaptersViewController.m,把tableView:didSelectRowAtIndexPath:方法,替换如下:
- (void)tableView:(UITableView *)tableView didSelectRowAtIndexPath:(NSIndexPath *)indexPath
{
    Chapter *chapter = [self chapters][indexPath.row];
    [self.bookViewController navigateToCharacterLocation:chapter.location];
}上述代码是定位到选中的章节,要求bookViewController切换到对应的章节。
打开BookViewController.h,在接口中添加如下的声明:
- (void)navigateToCharacterLocation:(NSUInteger)location;打开BookViewController.m,实现方法:
- (void)navigateToCharacterLocation:(NSUInteger)location
{
    [self.masterPopoverController dismissPopoverAnimated:YES];
    [_bookView navigateToCharacterLocation:location];
}打开BookView.h,声明如下的方法:
- (void)navigateToCharacterLocation:(NSUInteger)location;在BookView.m中,添加如下的方法:
- (void)navigateToCharacterLocation:(NSUInteger)location {
    CGFloat offset = 0.0f;
    for (NSTextContainer *container in _layoutManager.textContainers) {
        NSRange glyphRange = [_layoutManager glyphRangeForTextContainer:container];
        NSRange charRange = [_layoutManager characterRangeForGlyphRange:glyphRange actualGlyphRange:nil];
        if (location >= charRange.location && location < NSMaxRange(charRange)) {
            self.contentOffset = CGPointMake(offset, 0);
            [self buildViewsForCurrentOffset];
            return;
        }
        offset += self.bounds.size.width / 2.0f; }
}在ChaptersViewController.m中,设置clearsSelectionOnViewWillAppear属性:
self.clearsSelectionOnViewWillAppear = YES;添加图片
在Text Kit中,image是使用NSTextAttachment添加到text storage中。markdow text中的图片占位符为:
这本书中的image为:
需要匹配这个模式,使用NSTextAttachment来替换Markdown图片。
打开MarkdownParser.m,在parseMarkdownFile方法return parsedOutput语句之前,添加如下的代码:
    // 1. Locate images
    NSRegularExpression *regex = [NSRegularExpression regularExpressionWithPattern:@"\\!\\[.*\\]\\((.*)\\)" options:0 error:nil];
    NSArray *matches = [regex matchesInString:[parsedOutput string] options:0 range:NSMakeRange(0, parsedOutput.length)];
    // 2. Iterate over matches in reverse
    for (NSTextCheckingResult *result in [matches reverseObjectEnumerator]) {
        NSRange matchRange = [result range];
        NSRange captureRange = [result rangeAtIndex:1];
        // 3. Create an attachment for each image
        NSTextAttachment *textAttachment = [NSTextAttachment new];
        textAttachment.image = [UIImage imageNamed:[parsedOutput.string substringWithRange:captureRange]];

        // 4. Replace the image markup with the attachment
        NSAttributedString *replacementString = [NSAttributedString attributedStringWithAttachment: textAttachment];
        [parsedOutput replaceCharactersInRange:matchRange withAttributedString:replacementString];
    }
运行结果如下:

添加查看字典(Adding dictionary lookups)
找到和高亮点击的文字
打开BookView.m,在initWithFrame方法中,在self.delegate = self语句的后面,添加如下的代码:
        UITapGestureRecognizer *recognizer = [[UITapGestureRecognizer alloc] initWithTarget:self action:@selector(handleTap:)];
[self addGestureRecognizer:recognizer];在BookView.m中,_layoutManager实例变量的后面,添加一个新的变量:
NSRange _wordCharacterRange;这个变量存储了,选中文字的range。
实现handleTap:方法:
-(void)handleTap:(UITapGestureRecognizer*)tapRecognizer {
    NSTextStorage *textStorage = _layoutManager.textStorage;
    // 1
    CGPoint tappedLocation = [tapRecognizer locationInView:self];
    UITextView *tappedTextView = nil;
    for (UITextView *textView in [self textSubViews]) {
        if (CGRectContainsPoint(textView.frame, tappedLocation)) {
            tappedTextView = textView;
            break; }
    }
    if (!tappedTextView)
        return;
    // 2
    CGPoint subViewLocation = [tapRecognizer locationInView:tappedTextView];
    subViewLocation.y -= 8.0;
    // 3
    NSUInteger glyphIndex = [_layoutManager glyphIndexForPoint:subViewLocation inTextContainer:tappedTextView.textContainer];
    NSUInteger charIndex = [_layoutManager characterIndexForGlyphAtIndex:glyphIndex];
    // 4
    if (![[NSCharacterSet letterCharacterSet] characterIsMember:[textStorage.string characterAtIndex:charIndex]])
        return;
    // 5
    _wordCharacterRange = [self wordThatContainsCharacter:charIndex string:textStorage.string];
    // 6
    [textStorage addAttribute:NSForegroundColorAttributeName value:[UIColor redColor] range:_wordCharacterRange];
}
上面代码的解释如下:
- 找到点击的UITextView
- 转换坐标,并减去text container的边距
- 获取点击的字形索引,把字形索引转为字符索引。
- 检查选中的字符是否是一个letter。
- 把字符的索引扩展到一个word的范围
- 应用color数学
在BookView.m中,添加如下的方法:
- (NSRange)wordThatContainsCharacter:(NSUInteger)charIndex string:(NSString *)string
{
    NSUInteger startLocation = charIndex;
    while(startLocation > 0 &&[[NSCharacterSet letterCharacterSet] characterIsMember: [string characterAtIndex:startLocation-1]]) {
        startLocation--;
    }
    NSUInteger endLocation = charIndex;
    while(endLocation < string.length &&[[NSCharacterSet letterCharacterSet] characterIsMember: [string characterAtIndex:endLocation+1]]) {
        endLocation++;
    }
    return NSMakeRange(startLocation, endLocation-startLocation+1);
}
编译并运行app,点击book的word,效果如下:

显示字典结果
新增一个协议,BookViewDelegate。
@class BookView;

@protocol BookViewDelegate <NSObject>

- (void)bookView:(BookView *)bookView didHighlightWord:(NSString *)word inRect:(CGRect)rect;

@end
打开BookView.h,导入协议:
#import "BookViewDelegate.h"在接口中声明一个代理:
@property (nonatomic, weak) id bookViewDelegate; 打开BookView.m,定位到handleTap: ,在底部添加如下的方法:
    // 1
    CGRect rect = [_layoutManager lineFragmentRectForGlyphAtIndex:glyphIndex effectiveRange:nil];
    // 2
    NSRange wordGlyphRange = [_layoutManager glyphRangeForCharacterRange:_wordCharacterRange actualCharacterRange:nil];
    CGPoint startLocation = [_layoutManager locationForGlyphAtIndex:wordGlyphRange.location];
    CGPoint endLocation = [_layoutManager locationForGlyphAtIndex:NSMaxRange(wordGlyphRange)];
    // 3
    CGRect wordRect = CGRectMake(startLocation.x, rect.origin.y, endLocation.x - startLocation.x, rect.size.height);
    // 4
    wordRect = CGRectOffset(wordRect, tappedTextView.frame.origin.x, tappedTextView.frame.origin.y);
    // 5
    wordRect = CGRectOffset(wordRect, 0.0, 8.0);
    NSString* word = [textStorage.string substringWithRange:_wordCharacterRange];
[self.bookViewDelegate bookView:self didHighlightWord:word inRect:wordRect];打开BookViewController.m,导入
#import "BookViewDelegate.h"采用协议:
@interface BookViewController ()<BookViewDelegate, UIPopoverControllerDelegate>在viewDidLoad中设置bookView的代理:
_bookView.bookViewDelegate = self;再声明一个变量:
UIPopoverController* _popover;实现代理方法:
- (void)bookView:(BookView *)bookView didHighlightWord:(NSString *)word inRect:(CGRect)rect {
    UIReferenceLibraryViewController *dictionaryVC = [[UIReferenceLibraryViewController alloc] initWithTerm: word]; _popover.contentViewController = dictionaryVC;
    _popover = [[UIPopoverController alloc] initWithContentViewController:dictionaryVC];
    _popover.delegate = self;
    [_popover presentPopoverFromRect:rect inView:_bookView permittedArrowDirections:UIPopoverArrowDirectionAny animated:YES];
}
- (void)popoverControllerDidDismissPopover: (UIPopoverController *)popoverController
{
[_bookView removeWordHighlight];
}在BookView.h中,添加一个新方法:
- (void)removeWordHighlight;
实现如下:
- (void)removeWordHighlight {
    [_layoutManager.textStorage removeAttribute:NSForegroundColorAttributeName range:_wordCharacterRange];
}
结果如下:
