ubuntu16.04下px4环境搭建与固件编译
px4官网提供了一个批处理方式搭建px4开发环境,十分好用,按照官网步骤
1 sudo usermod -a -G dialout $USER2 登出再登入使命令生效
3下载几个脚本,不需要每个都下,几个脚本是包含关系下面会细说:
ubuntu_sim_common_deps.sh: Common Dependencies, jMAVSim simulator 这个脚本可以生成需要的依赖关系以及耳熟能详的qt、git、cmake、pyulog、pip、python等以及安装JMAVSim软件,
ubuntu_sim.sh: ubuntu_sim_common_deps.sh + Gazebo8 simulator. 这个脚本包含了上个脚本,再次基础上安装了Gazebo8。意思就是如果运行了这个脚本,那么就不用运行第一个脚本了,如果运行了第一个脚本,在运行这个脚本时不会重复安装,比较好用。以下依次类推
: ubuntu_sim.sh + NuttX tools. 包含了上个脚本,gcc就是在这个脚本中安装的,这个脚本用的时间比较长,主要是gcc安装地址连不上,后来解决的。
: ubuntu_sim_common_deps.sh + ROS/Gazebo and MAVROS.主要是安装了ROS和Gazebo
4到下载的文件夹下运行下面的命令:
source ubuntu_sim_nuttx.sh5重启电脑
6下载QGC,在下面的链接中下载老的版本,之所以下载老的版本新的版本连不上pixhawk(极大可能是串口没设对,小部分可能就是版本问题,回头解决这个问题),下了个3.0.1版本可以直接连,但是该版本需要先插入pixhawk才能工作:
https://docs.qgroundcontrol.com/en/releases/release_notes.html
我下的是.AppImage,下载后对QGC添加执行操作授权即下面第一句,下面第二句是打开QGC,以后都可以直接输入第二句打开
chmod +x ./QGroundControl.AppImage
./QGroundControl.AppImage  (or double click)
7编译和上传
使用命令行编译和上传,这里要注意pixhawk的版本之前按照官网直接输入了v4结果出现了board ID和firmware ID不匹配的问题:
cd Firmware
make px4fmu-v2_default
make px4fmu-v4_default upload用qt编译并上传:
(1)首先得进行如下操作,这是官网给的,但是不对,可以编译但不能上传给,参考
https://blog.csdn.net/oqqenvy12/article/details/52035127?_t=t进行修改
cd ~/src/Firmware
mkdir ../Firmware-build
cd ../Firmware-build
cmake ../Firmware -G "CodeBlocks - Unix Makefiles"
摘录该网页的原话:
提个醒: 按照官网上面最后一行的命令,当前使用Qt编译得到的将是build px4 ,因为默认的编译指令是
make posix_sitl_default,这不是大家所期待的结果。解决方案:对于,Pixhawk硬件,将最后一行改成
cmake ../Firmware -G "CodeBlocks - Unix Makefiles" -DCONFIG=nuttx_px4fmu-v2_default其他例如使用FMUv4的用户请根据需求进行替换。
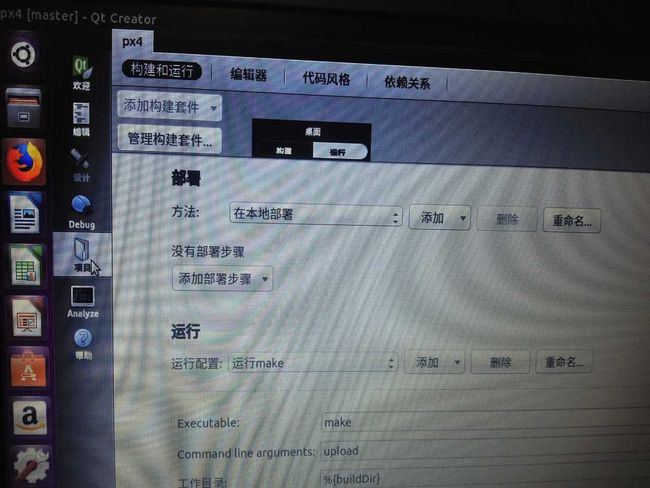
修改后,打开qt,通过 File -> Open File or Project -> Select the CMakeLists.txt file加载工程,其中Cmakelists是firmware下的那个。在项目的运行标签菜单中添加upload,添加后直接点绿色的按钮即运行键
下面是ubuntu_sim_common_deps.sh脚本:
#!/bin/bash

## Bash script for setting up a PX4 development environment on Ubuntu LTS (16.04).
## It can be used for installing simulators (only) or for installing the preconditions for Snapdragon Flight or Raspberry Pi.
##
## Installs:
## - Common dependencies and tools for all targets (including: Ninja build system, Qt Creator, pyulog)
## - FastRTPS and FastCDR
## - jMAVSim simulator dependencies
## - PX4/Firmware source (to ~/src/Firmware/)

# Preventing sudo timeout https://serverfault.com/a/833888
trap "exit" INT TERM; trap "kill 0" EXIT; sudo -v || exit $?; sleep 1; while true; do sleep 60; sudo -nv; done 2>/dev/null &

# Ubuntu Config
echo "We must first remove modemmanager"
sudo apt-get remove modemmanager -y


# Common dependencies
echo "Installing common dependencies"
sudo apt-get update -y
sudo apt-get install git zip qtcreator cmake build-essential genromfs ninja-build -y
# Required python packages
sudo apt-get install python-argparse python-empy python-toml python-numpy python-dev python-pip -y
sudo -H pip install --upgrade pip
sudo -H pip install pandas jinja2 pyserial
# optional python tools
sudo -H pip install pyulog

# Install FastRTPS 1.5.0 and FastCDR-1.0.7
fastrtps_dir=$HOME/eProsima_FastRTPS-1.5.0-Linux
echo "Installing FastRTPS to: $fastrtps_dir"
if [ -d "$fastrtps_dir" ]
then
    echo " FastRTPS already installed."
else
    pushd .
    cd ~
    wget http://www.eprosima.com/index.php/component/ars/repository/eprosima-fast-rtps/eprosima-fast-rtps-1-5-0/eprosima_fastrtps-1-5-0-linux-tar-gz -O eprosima_fastrtps-1-5-0-linux.tar.gz
    tar -xzf eprosima_fastrtps-1-5-0-linux.tar.gz eProsima_FastRTPS-1.5.0-Linux/
    tar -xzf eprosima_fastrtps-1-5-0-linux.tar.gz requiredcomponents
    tar -xzf requiredcomponents/eProsima_FastCDR-1.0.7-Linux.tar.gz
    cpucores=$(( $(lscpu | grep Core.*per.*socket | awk -F: '{print $2}') * $(lscpu | grep Socket\(s\) | awk -F: '{print $2}') ))
    cd eProsima_FastCDR-1.0.7-Linux; ./configure --libdir=/usr/lib; make -j$cpucores; sudo make install
    cd ..
    cd eProsima_FastRTPS-1.5.0-Linux; ./configure --libdir=/usr/lib; make -j$cpucores; sudo make install
    cd ..
    rm -rf requiredcomponents eprosima_fastrtps-1-5-0-linux.tar.gz
    popd
fi

# jMAVSim simulator dependencies
echo "Installing jMAVSim simulator dependencies"
sudo apt-get install ant openjdk-8-jdk openjdk-8-jre -y

# Clone PX4/Firmware
clone_dir=~/src
echo "Cloning PX4 to: $clone_dir."
if [ -d "$clone_dir" ]
then
    echo " Firmware already cloned."
else
    mkdir -p $clone_dir
    cd $clone_dir
    git clone https://github.com/PX4/Firmware.git
fi
