CT图像预处理之重采样
CT图像的预处理操作一般包括以下几步:
step1: spacing interpolation
step2: window transform
step3: get mask effective range
step4: generate subimage
配套代码
各步骤意义:
step1: spacing interpolation。
用插值(interpolation)一词可能不太准确,较准确的叫法是重采样(resampling),另外取决于不同的工具包(下文会展开)还有zoom, resize两个称呼。
因为CT图像中,不同扫描面的像素尺寸、粗细粒度是不同的。这不利于进行CNN任务,所以需要使用同构采样。
step2: window transform
窗宽窗位的变换,主要是为了视觉上的清晰,具体可参见此篇博文。有人会用cut off,即HU值截断来代替此步,我一直用的window transform,因为无需分析整个数据集或许cut off所必须的截断值。
PS.我在此步顺便做了归一化操作,这一步也是必不可少的。归一化和零值中心化的操作主要是为了后续训练网络,零值中心化是网络收敛的关键。至于具体的归一化操作,也有很多变种,可自行Google.
step3: get mask effective range
获取Slices的有效范围,即去除整个序列中前后几张没有任何器官的Slices。
step4: generate subimage
获取小patch,即根据手头的GPU可以接受的大小,用滑窗法从原始图像中获得小patch。
本文主要讲述重采样操作。
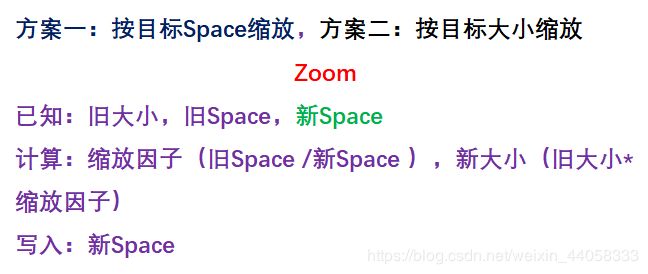
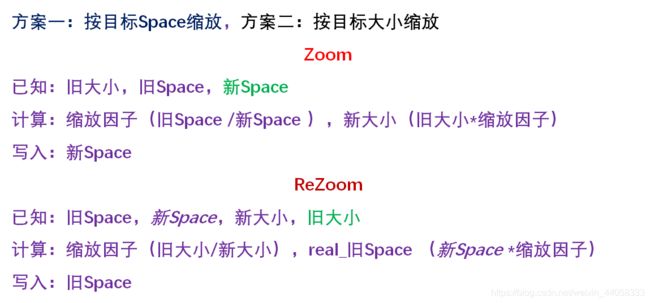
重采样可分为两种方案,具体操作步骤并无太大差异:
可用的工具包:
PIL-按目标大小缩放
from PIL import Image
img=Image.open(jpgfile)
new_img=img.resize((width,height),Image.BILINEAR)
new_img.save(os.path.join(outdir,os.path.basename(jpgfile)))
CV2-按目标大小缩放
import cv2
pic = cv2.imread(jpgfile)
pic = cv2.resize(pic, (width,height), interpolation=cv2.INTER_CUBIC)
#cv.INTER_NEAREST;cv.INTER_LINEAR;cv.INTER_CUBIC;cv.INTER_AREA
# 通常,缩小使用cv.INTER_AREA,放缩使用cv.INTER_CUBIC(较慢)和cv.INTER_LINEAR(较快效果也不错)。
# 默认情况下,所有的放缩都使用cv.INTER_LINEAR。
缺点:PIL,CV2一般针对2D图像做处理,比如普通的自然图像,或者ct三维图像中的某一层。所以,并不适用于3D的医学图像处理。
scipy.ndimage-按缩放因子缩放
scipy.ndimage中有两个zoom函数,但本人感觉并无明显差别,应该是版本不同。
import scipy.ndimage as ndimage # SciPy v1.3.1 Reference Guide
ndimage_zoom = ndimage.zoom(magic_or, (z_zoomRatio, x_zoomRatio, y_zoomRatio), order=0)

from scipy.ndimage.interpolation import zoom # SciPy v0.14.0 Reference Guide
interpolation_zoom = ndimage.zoom(magic_or, (z_zoomRatio, x_zoomRatio, y_zoomRatio), order=3)

# order=0:nearest interpolation;order=1:bilinear interpolation;order=3:cubic interpolation
# zoom_ratio = old/new
缺点与解决方案:
缺点:
在医学图像具体的应用中,所有zoom后的图像,都要rezoom回去,如果zoom和rezoom都按缩放因子缩放,rezoom的时候可能会无法完全恢复原样。如下所示,这是我遇到的问题,rezoom后的shape和origin的shape有一张slice之差。

解决方案一:
重新调整缩放因子,可以按目标大小进行调整,也可以按缩放因子本身进行调整,以下代码采用前者(对目标大小进行取整)。
def resample(ct_array, spacing, new_spacing=[0,0,1], order = 3):
    # 0 denotes remains the same
    # order=0:nearest interpolation
    # order=1:bilinear interpolation
    # order=3:cubic interpolation
    # http://shartoo.github.io/medical_image_process/
    resize_factor = spacing / new_spacing
    new_shape = ct_array.shape * resize_factor

    real_new_shape = np.round(new_shape)
    real_resize_factor = real_new_shape / ct_array.shape
    real_new_spacing = spacing / real_resize_factor

    ct_array = ndimage.zoom(ct_array, real_resize_factor, order, mode='nearest')
    # mode : Points outside the boundaries of the input are filled according to the given mode
    # (‘constant’, ‘nearest’, ‘reflect’ or ‘wrap’). Default is ‘constant’.
    return ct_array, real_new_spacing
解决方案二:(推荐)
今天实验室停电,配套代码后续补充。
SimpleITK
def Resampling(img,lable = False):
    original_size = img.GetSize() #获取图像原始尺寸
    original_spacing = img.GetSpacing() #获取图像原始分辨率
    new_spacing = [1, 1, 1] #设置图像新的分辨率为1*1*1

    new_size = [int(round(original_size[0] * (original_spacing[0] /1))),
                int(round(original_size[1] * (original_spacing[1] / 1))),
                int(round(original_size[2] * (original_spacing[2] / 1)))] #计算图像在新的分辨率下尺寸大小
    resampleSliceFilter = sitk.ResampleImageFilter() #初始化
    if lable == False:
        Resampleimage = resampleSliceFilter.Execute(img, new_size, sitk.Transform(), sitk.sitkBSpline,
                                                img.GetOrigin(), new_spacing, img.GetDirection(), 0,
                                                img.GetPixelIDValue())
        ResampleimageArray = sitk.GetArrayFromImage(Resampleimage)
        ResampleimageArray[ResampleimageArray < 0] = 0 #将图中小于0的元素置为0
    else:# for label, should use sitk.sitkLinear to make sure the original and resampled label are the same!!!
        Resampleimage = resampleSliceFilter.Execute(img, new_size, sitk.Transform(), sitk.sitkLinear,
                                                    img.GetOrigin(), new_spacing, img.GetDirection(), 0,
                                                    img.GetPixelIDValue())
        ResampleimageArray = sitk.GetArrayFromImage(Resampleimage)
skimage.transform-两种缩放皆可
# 1、按目标大小缩放resize
skimage.transform.resize(image, output_shape, order=1, mode='reflect', cval=0, clip=True, preserve_range=False, anti_aliasing=True, anti_aliasing_sigma=None)
# 2、按缩放因子缩放rescale
skimage.transform.rescale(image, scale, order=1, mode='reflect', cval=0, clip=True, preserve_range=False, multichannel=False, anti_aliasing=True, anti_aliasing_sigma=None)

# The order of interpolation. The order has to be in the range 0-5:
# 0: Nearest-neighbor
# 1: Bi-linear (default)
# 2: Bi-quadratic
# 3: Bi-cubic
# 4: Bi-quartic
# 5: Bi-quintic
参考:
常见医疗扫描图像处理步骤(含有3D打印)
医学图像处理及配准代码整理
医学图像插值方法对比