android Window和ViewRootImpl
1.android的窗口结构(Window,PhoneWindow,DecorView)
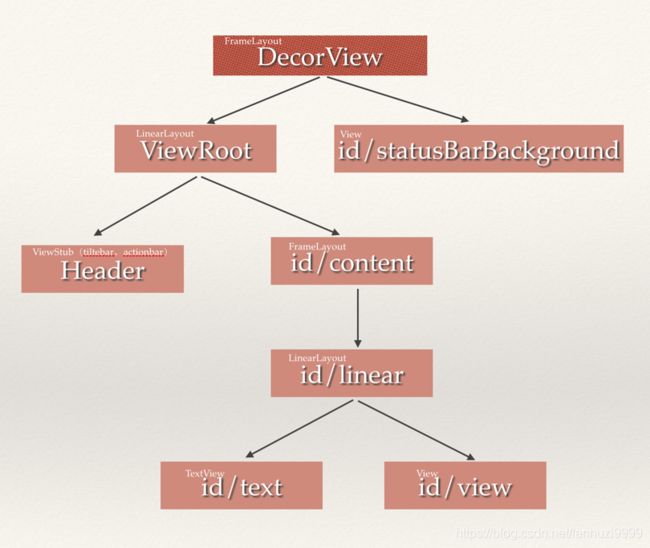
每一个Activity都包含一个Window对象,Window对象通常由PhoneWindow实现。activity--phonewindow--decorview这里没啥问题,但是decorview的内部描述可以参照下面两张图来理解。decorview是一个framelayout下面包含statusBarbackground(状态栏)+viewroot(Linearlayout来着),viewroot下面包含header(viewstub,有titlebar和actionbar)+content(framelayout),这个content就是我们setcontent的布局。

1.1看看源码来验证下面两张图是否正确,首先window的源码
/**
 * Abstract base class for a top-level window look and behavior policy.  An
 * instance of this class should be used as the top-level view added to the
 * window manager. It provides standard UI policies such as a background, title
 * area, default key processing, etc.
 *
 * The only existing implementation of this abstract class is
 * android.view.PhoneWindow, which you should instantiate when needing a
 * Window.
 * 这里说window作为一个顶级view被添加到windowmanager中,它提供了一套标准的ui规则例如背景、标题栏区域等
 * 如果你要使用它,就需要实现它的唯一实现类PhoneWindow
 */
public abstract class Window {
    ...
    @Nullable
    public View findViewById(@IdRes int id) {
        return getDecorView().findViewById(id);
    }

/**
 * Convenience for * {@link #setContentView(View, android.view.ViewGroup.LayoutParams)}
 * to set the screen content from a layout resource.  The resource will be * inflated, adding all top-level views to the screen. * * @param layoutResID Resource ID to be inflated.
 * @see #setContentView(View, android.view.ViewGroup.LayoutParams)
 * 这里就是setcontentView的入口,我们在activity中调用setcontentView其实会直接走到这里
 */
     public abstract void setContentView(@LayoutRes int layoutResID);
     ...
}
1.2PhoneWindow的源码,window的唯一实现
public class PhoneWindow extends Window implements MenuBuilder.Callback {

    private final static String TAG = "PhoneWindow";

    ...

    // This is the top-level view of the window, containing the window decor.
    // window的唯一实现类PhoneWindow的成员里面出现了DecorView
    private DecorView mDecor;

    // This is the view in which the window contents are placed. It is either
    // mDecor itself, or a child of mDecor where the contents go.
    private ViewGroup mContentParent;

    private ViewGroup mContentRoot;
    ...
}
1.3DecorView的源码(最顶层view)
/**
* DecorView继承自FrameLayout
*/
private final class DecorView extends FrameLayout implements RootViewSurfaceTaker {

        // (状态栏)View added at runtime to draw under the status bar area
        private View mStatusGuard;
        // (导航栏)View added at runtime to draw under the navigation bar area
        private View mNavigationGuard;
        //viewRoot
        ViewGroup mContentRoot;
        /* package */int mDefaultOpacity = PixelFormat.OPAQUE;

        /** The feature ID of the panel, or -1 if this is the application's DecorView */
        private final int mFeatureId;

        private final Rect mDrawingBounds = new Rect();

        private final Rect mBackgroundPadding = new Rect();

        private final Rect mFramePadding = new Rect();

        private final Rect mFrameOffsets = new Rect();
        ....
 }
2.Window和WindowManager
这里主要涉及到几个接口和类:ViewManager,ViewGroup,WindowManager,WindowManagerImpl,Window
2.1ViewManager接口
/** Interface to let you add and remove child views to an Activity. To get an instance
  * of this class, call {@link android.content.Context#getSystemService(java.lang.String) Context.getSystemService()}.
  * ViewManager接口定义了一组规则,也就是add、update、remove的操作View接口
  */
public interface ViewManager
{
    public void addView(View view, ViewGroup.LayoutParams params);
    public void updateViewLayout(View view, ViewGroup.LayoutParams params);
    public void removeView(View view);
}
2.2ViewManager的实现ViewGroup
这个就比较熟悉了,我们在日常开发中常使用这几个方法。
public abstract class ViewGroup extends View implements ViewParent, ViewManager {
    private static final String TAG = "ViewGroup";
    ...
    public void addView(View child, LayoutParams params) {
        addView(child, -1, params);
    }

     /*
     * @param child the child view to add
     * @param index the position at which to add the child or -1 to add last
     * @param params the layout parameters to set on the child
     */
    public void addView(View child, int index, LayoutParams params) {
        // addViewInner() will call child.requestLayout() when setting the new LayoutParams
        // therefore, we call requestLayout() on ourselves before, so that the child's request
        // will be blocked at our level
        requestLayout();
        invalidate(true);
        addViewInner(child, index, params, false);
    }
}
2.3Windowmanager源码
窗口管理器,这也是一个继承于ViewManager的接口,具体的实现是在实现类WindowManagerImpl里面
/*   The interface that apps use to talk to the window manager.
Use Context.getSystemService(Context.WINDOW_SERVICE) to get one of these.
*/
public interface WindowManager extends ViewManager {
    public static class BadTokenException extends RuntimeException{...}
    public static class InvalidDisplayException extends RuntimeException{...}
    public Display getDefaultDisplay();
    public void removeViewImmediate(View view);
    public static class LayoutParams extends ViewGroup.LayoutParams
        implements Parcelable
}
2.4WindowManagerImpl的实现(window的添加移除更新)
windowmanagerimpl并没有自己来实现window的添加移除更新操作,直接交给WindowManagerGlobal(艺术探索说是工厂模式可我看源码怎么是标准的单例啊)来处理。
public final class WindowManagerImpl implements WindowManager {
    //真正的实现是在WindowManagerGlobal里面做的
    private final WindowManagerGlobal mGlobal = WindowManagerGlobal.getInstance();
    private final Display mDisplay;
    private final Window mParentWindow;

    //#分析1:添加window
     @Override
    public void addView(@NonNull View view, @NonNull ViewGroup.LayoutParams params) {
        applyDefaultToken(params);
        mGlobal.addView(view, params, mDisplay, mParentWindow);
    }

    //#分析2:移除window
     @Override
    public void removeView(View view) {
        applyDefaultToken(params);
        mGlobal.removeView(view, false);
    }

    //#分析3:更新window
    @Override
    public void updateViewLayout(@NonNull View view, @NonNull ViewGroup.LayoutParams params) {
        applyDefaultToken(params);
        mGlobal.updateViewLayout(view, params);
    }
}
3.window的创建过程

Window如何创建,如何跟WindowManager绑定,如何跟activity绑定的,这里涉及到activity的启动过程。activity启动有两种,一种是launch进入启动的Activity,另一种而是在已有的Activity中调用startActivity,启动期间通过Binder驱动ActivityWindowService,ActivityThread,ApplicationThread,ActivityStack ,Activity之间进行通信。现先看ActivityThread的andleLaunchActivity方法,创建activity:
3.1window的创建,在activity.attach时创建Window,为Window设置WindowManager
private void handleLaunchActivity(ActivityClientRecord r, Intent customIntent) {
   ...

    // Initialize before creating the activity,在WindowManagerImpl里有这个成员,创建了WindowManagerServer(WMS)
    WindowManagerGlobal.initialize();
    //创建activity#分析1
    Activity a = performLaunchActivity(r, customIntent);

    if (a != null) {
        r.createdConfig = new Configuration(mConfiguration);
        Bundle oldState = r.state;
        //调用activity的onresume#分析5
        handleResumeActivity(r.token, false, r.isForward,
        ...
}

/**
** #分析1
**/
private Activity performLaunchActivity(ActivityClientRecord r, Intent customIntent) {
    ...
    Activity activity = null;
    try {
        //Activity通过ClassLoader创建出来
        java.lang.ClassLoader cl = r.packageInfo.getClassLoader();
        //创建activity#分析2
        activity = mInstrumentation.newActivity(cl, component.getClassName(), r.intent);
    } ...
    try {
        //创建Application
        Application app = r.packageInfo.makeApplication(false, mInstrumentation);
        ...
        if (activity != null) {
            //创建Activity所需的Context
            Context appContext = createBaseContextForActivity(r, activity);
            ...
            //将Context与Activity进行绑定#分析3
            activity.attach(appContext, this, getInstrumentation(), r.token,
                    r.ident, app, r.intent, r.activityInfo, title, r.parent,
                    r.embeddedID, r.lastNonConfigurationInstances, config,
                    r.referrer, r.voiceInteractor);
            ...
            //调用activity.oncreate#分析4
            mInstrumentation.callActivityOnCreate(activity, r.state, r.persistentState);
            ...
            //调用Activity的onstart方法(是不是很熟悉)
            activity.performStart();
            //调用activitu的OnRestoreInstanceState方法进行Window数据恢复(是不是很熟悉)
         mInstrumentation.callActivityOnRestoreInstanceState(activity, r.state,
                                r.persistentState);
            ...
        }
    return activity;
}

/**
** #分析2:创建activity
**/
public Activity newActivity(ClassLoader cl, String className,
        Intent intent)
        throws InstantiationException, IllegalAccessException,
        ClassNotFoundException {
    return (Activity)cl.loadClass(className).newInstance();
}

/**
** #分析3:activity创建完attach,这时候创建Window,为Window设置WindowManager
**/
final void attach(Context context, ActivityThread aThread,
            Instrumentation instr, IBinder token, int ident,
            Application application, Intent intent, ActivityInfo info,
            CharSequence title, Activity parent, String id,
            NonConfigurationInstances lastNonConfigurationInstances,
            Configuration config, String referrer, IVoiceInteractor voiceInteractor) {
    //ContextImpl的绑定
    attachBaseContext(context);
    //在当前Activity创建Window
    mWindow = new PhoneWindow(this);
    mWindow.setCallback(this);
    mWindow.setOnWindowDismissedCallback(this);
    mWindow.getLayoutInflater().setPrivateFactory(this);
    ...
    //为Window设置WindowManager
    mWindow.setWindowManager(
            (WindowManager)context.getSystemService(Context.WINDOW_SERVICE),
            mToken, mComponent.flattenToString(),
            (info.flags & ActivityInfo.FLAG_HARDWARE_ACCELERATED) != 0);
    if (mParent != null) {
        mWindow.setContainer(mParent.getWindow());
    }
    //创建完后通过getWindowManager就可以得到WindowManager实例
    mWindowManager = mWindow.getWindowManager();
    mCurrentConfig = config;
}

/**
** #分析4:调用activity.oncreate方法
**/
public void callActivityOnCreate(Activity activity, Bundle icicle) {
    prePerformCreate(activity);
    activity.performCreate(icicle);
    postPerformCreate(activity);
}
3.2在onResume里面,将当前的DecorView与WindowManager绑定一起(wm.addView(decor),也就是咋这时候viewrootimpl才真正的被创建起来
**
** #分析5:调用activity.onresume获取到在前面activity.attach创建的window,
** 进而获取到DecorView与WindowManager
** 就是在这里将DecorView与WindowManager绑定在一起的。
**/
final void handleResumeActivity(IBinder token,
            boolean clearHide, boolean isForward, boolean reallyResume) {

    //调用activity.onResume,把activity数据记录更新到ActivityClientRecord#分析6
    ActivityClientRecord r = performResumeActivity(token, clearHide);

    if (r != null) {
        final Activity a = r.activity;
        //activity.mStartedActivity是用来标记启动Activity,有没有带返回值,
        //一般我们startActivity(intent)是否默认是startActivityForResult(intent,-1),默认值是-1,所以这里mStartedActivity = false
        boolean willBeVisible = !a.mStartedActivity;
        ...
        //mFinished标记Activity有没有结束,而r.window一开始activity并未赋值给ActivityClientRecord,所以这里为null
        if (r.window == null && !a.mFinished && willBeVisible) {
            r.window = r.activity.getWindow(); //赋值
            View decor = r.window.getDecorView();
            decor.setVisibility(View.INVISIBLE);
            ViewManager wm = a.getWindowManager();
            WindowManager.LayoutParams l = r.window.getAttributes();
            a.mDecor = decor;
            l.type = WindowManager.LayoutParams.TYPE_BASE_APPLICATION;
            l.softInputMode |= forwardBit;
            if (a.mVisibleFromClient) {
                a.mWindowAdded = true;
                //把当前的DecorView与WindowManager绑定一起
                wm.addView(decor, l);
            }

        //横竖屏切换会走到这里
        if (!r.activity.mFinished && willBeVisible
                && r.activity.mDecor != null && !r.hideForNow) {
         //标记当前的Activity有没有设置新的配置参数,比如现在手机是横屏的,而之后你转成竖屏,那么这里的newCofig就会被赋值,表示参数改变
            if (r.newConfig != null) {
                r.tmpConfig.setTo(r.newConfig);
                if (r.overrideConfig != null) {
                    r.tmpConfig.updateFrom(r.overrideConfig);
                }
                //然后调用这个方法回调,表示屏幕参数发生了改变
                performConfigurationChanged(r.activity, r.tmpConfig);
            ...
            WindowManager.LayoutParams l = r.window.getAttributes();
            ...//改变之后update更新当前窗口的DecorView
                if (r.activity.mVisibleFromClient) {
                    ViewManager wm = a.getWindowManager();
                    View decor = r.window.getDecorView();
                    wm.updateViewLayout(decor, l);
                }
            }
            //参数没改变
            r.activity.mVisibleFromServer = true;
            mNumVisibleActivities++;
            if (r.activity.mVisibleFromClient) {
            //由于前面设置了INVISIBLE,所以现在要把DecorView显示出来了
            //这里也证实了view是在onResume的时候才真正被看到的。
                r.activity.makeVisible();
            }
        }

       //通知ActivityManagerService,Activity完成Resumed
         ActivityManagerNative.getDefault().activityResumed(token);

}

**
** #分析6:调用activity.onResume方法
**/
public final ActivityClientRecord performResumeActivity(IBinder token,
            boolean clearHide) {
    ActivityClientRecord r = mActivities.get(token);
...
    r.activity.mStartedActivity = false;
    r.activity.onStateNotSaved();
    r.activity.mFragments.noteStateNotSaved();
   .//执行了activity.onResume
    r.activity.performResume();
...
    r.paused = false;
    r.stopped = false;
    r.state = null;
    r.persistentState = null;

    return r;
}
3.3将decorview附属到window上,从setContentView添加布局入口查起,主要包含两部分:创建decorview和将decorview添加到contentParent
- 3.3.1创建decorview
/**
** activity
**/
public void setContentView(@LayoutRes int layoutResID) {
    getWindow().setContentView(layoutResID);
    initWindowDecorActionBar();
}

/**
** getWindow()得到的其实就是activity里面的PhoneWindow
**/
@Override
public void setContentView(int layoutResID) {
    // Note: FEATURE_CONTENT_TRANSITIONS may be set in the process of installing the window
    // decor, when theme attributes and the like are crystalized. Do not check the feature
    // before this happens.
    if (mContentParent == null) {
        //创建DecorView,并添加到mContentParent上--#分析1
        installDecor();
    } else if (!hasFeature(FEATURE_CONTENT_TRANSITIONS)) {
        mContentParent.removeAllViews();
    }

    if (hasFeature(FEATURE_CONTENT_TRANSITIONS)) {
        //转场动画
        final Scene newScene = Scene.getSceneForLayout(mContentParent, layoutResID,
                getContext());
        transitionTo(newScene);
    } else {
        //将要加载的资源inflate转化为view树,并添加到mContentParent上
        //为什么叫setContentView,将view设到contentParent里面
        mLayoutInflater.inflate(layoutResID, mContentParent);
    }
    mContentParent.requestApplyInsets();
    final Callback cb = getCallback();
    if (cb != null && !isDestroyed()) {
        //最后调用Callback来通知界面发生改变。Callback是Window里面的一个接口,
        //里面声明了当界面更改触摸时调用的各种方法
        cb.onContentChanged();
    }
}

/**
** #分析1创建并添加DecorView
**/
private void installDecor() {
    //首次调用会走这里
    if (mDecor == null) {
        //调用该方法创建new一个DecorView
        mDecor = generateDecor();//return new DecorView(getContext(), -1);
        mDecor.setDescendantFocusability(ViewGroup.FOCUS_AFTER_DESCENDANTS);
        mDecor.setIsRootNamespace(true);
        if (!mInvalidatePanelMenuPosted && mInvalidatePanelMenuFeatures != 0) {
            mDecor.postOnAnimation(mInvalidatePanelMenuRunnable);
        }
    }
    //#分析2一开始DecorView未加载到mContentParent,所以此时mContentParent=null
    if (mContentParent == null) {
    //该方法将mDecorView添加到Window上绑定布局
    mContentParent = generateLayout(mDecor);

    // Set up decor part of UI to ignore fitsSystemWindows if appropriate.
    mDecor.makeOptionalFitsSystemWindows();

    final DecorContentParent decorContentParent = (DecorContentParent) mDecor.findViewById(
            R.id.decor_content_parent);

    ...//添加其他资源
    ...//设置转场动画
    }
}

/**
** #分析2将decorview添加到contentParent
**/
protected ViewGroup generateLayout(DecorView decor) {
    // Apply data from current theme.
    //根据当前设置的主题来加载默认布局
    TypedArray a = getWindowStyle();
    //如果你在theme中设置了window_windowNoTitle,则这里会调用到,其他方法同理,
    //我们在activity里面设置的requestFeature,Flags全屏等等就在这里起作用。
    //这里也说明了我们要在setContentView之前调用requesetFeature的原因,为什么在之后设置无效。
    //这里是根据你在theme中的设置去设置的
    if (a.getBoolean(R.styleable.Window_windowNoTitle, false)) {
        requestFeature(FEATURE_NO_TITLE);
    } else if (a.getBoolean(R.styleable.Window_windowActionBar, false)) {
        // Don't allow an action bar if there is no title.
        requestFeature(FEATURE_ACTION_BAR);
    }
    //是否有设置全屏
    if (a.getBoolean(R.styleable.Window_windowFullscreen, false)) {
        setFlags(FLAG_FULLSCREEN, FLAG_FULLSCREEN & (~getForcedWindowFlags()));
    }

    ...//省略其他加载资源

    // 添加布局到DecorView,前面说到,DecorView是继承与FrameLayout,
    //它本身也是一个ViewGroup,而我们前面创建它的时候,只是调用了new DecorView,
    //此时里面并无什么东西。而下面的步奏则是根据用户设置的Feature来创建相应的默认
   //布局主题。举个例子,如果我在setContentView之前调用了requestWindowFeature(Window.FEATURE_NO_TITLE),
   //这里则会通过getLocalFeatures来获取你设置的feature,进而选择加载对应的布局,
   //此时则是加载没有标题栏的主题,对应的就是R.layout.screen_simple

    int layoutResource;
    int features = getLocalFeatures();
    // System.out.println("Features: 0x" + Integer.toHexString(features));
    if ((features & (1 << FEATURE_SWIPE_TO_DISMISS)) != 0) {
        layoutResource = R.layout.screen_swipe_dismiss;
    } ... //省略其他判断方法
    } else {
        // Embedded, so no decoration is needed.
        layoutResource = R.layout.screen_simple;
        // System.out.println("Simple!");
    }

    mDecor.startChanging();
    //选择对应布局创建添加到DecorView中,之前的decorview是空的只是加载了主题等,这里才是真正的添加内容
    View in = mLayoutInflater.inflate(layoutResource, null);
    decor.addView(in, new ViewGroup.LayoutParams(MATCH_PARENT, MATCH_PARENT));
    mContentRoot = (ViewGroup) in;
    //ID_ANDROID_CONTENT = com.android.internal.R.id.content
    ViewGroup contentParent = (ViewGroup)findViewById(ID_ANDROID_CONTENT);
    ...
    return contentParent;
}- 3.3.2将decorview添加到contentParent
public void setContentView(int layoutResID) {
        installDecor();
        *********略***************
        //将要加载的资源inflate转化为view树,并添加到mContentParent上
        //为什么叫setContentView,将view设到contentParent里面
        mLayoutInflater.inflate(layoutResID, mContentParent);
}
4.window的内部机制(添加、删除、更新)
首先声明几个成员:
mViews:所有window对应的views
mRoots:所有window对应的ViewRootImpl
mParams:所有window对应的布局参数
mDyingViews:待删除(或者可以说正在被删除)的view对象
4.1window的添加
private final ArrayList mViews = new ArrayList();
private final ArrayList mRoots = new ArrayList();
private final ArrayList mParams =
        new ArrayList();
private final ArraySet mDyingViews = new ArraySet();

/**
**具体实现的地方
**/
public final class WindowManagerGlobal {
    private static final String TAG = "WindowManager";
     //#分析1
     public void addView(View view, ViewGroup.LayoutParams params,
            Display display, Window parentWindow) {
        ...
        root = new ViewRootImpl(view.getContext(), display);
        //设置LayoutParams
        view.setLayoutParams(wparams);

        mViews.add(view);
        mRoots.add(root);
        mParams.add(wparams);

        // do this last because it fires off messages to start doing things
        try {
            //ViewRootImpl开始绘制view#添加window分析1
            root.setView(view, wparams, panelParentView);
        } catch (RuntimeException e) {
            // BadTokenException or InvalidDisplayException, clean up.
            if (index >= 0) {
                removeViewLocked(index, true);
            }
            throw e;
        }
     }
}

/**
 ** We have one child
 **#添加window分析1
 **/
public void setView(View view, WindowManager.LayoutParams attrs, View panelParentView) {
    synchronized (this) {
        if (mView == null) {
            mView = view;
            *********略********
            mAdded = true;
            int res; /* = WindowManagerImpl.ADD_OKAY; */
            // Schedule the first layout -before- adding to the window
            // manager, to make sure we do the relayout before receiving
            // any other events from the system.
            #添加window分析2
            requestLayout();
            try {
                **************略****************
                //#添加window分析3:WindowSession最终来完成Window的添加过程,WindowSession是一个binder对象,
                //也就是说addToDisplay是IPC过程,远程调用了Session中的addToDisPlay方法
                res = mWindowSession.addToDisplay(mWindow, mSeq, mWindowAttributes,
                        getHostVisibility(), mDisplay.getDisplayId(),
                        mAttachInfo.mContentInsets, mAttachInfo.mStableInsets,
                        mAttachInfo.mOutsets, mInputChannel);
            } catch (RemoteException e) {
            }
            ******************略*****************
    }
}

/**
 **#添加window分析2
 **/
public void requestLayout() {
    if (!mHandlingLayoutInLayoutRequest) {
        checkThread();
        mLayoutRequested = true;
        //添加window分析4
        //这里view的绘制的入口了,最终会调用performTraversals方法来完成View的绘制。
        scheduleTraversals();
    }
}

/**
 **#添加window分析3
 **这里的mservice就是windowmanagerservice,添加window的过程最终是由它来完成的
 **/
public int addToDisplay(IWindow window, int seq, WindowManager.LayoutParams attrs,
        int viewVisibility, int displayId, Rect outContentInsets, Rect outStableInsets,
        Rect outOutsets, InputChannel outInputChannel) {
    return mService.addWindow(this, window, seq, attrs, viewVisibility, displayId,
            outContentInsets, outStableInsets, outOutsets, outInputChannel);
}

/**
 **#添加window分析4
 **/
void scheduleTraversals() {
    if (!mTraversalScheduled) {
        ...
        mChoreographer.postCallback(
                Choreographer.CALLBACK_TRAVERSAL, mTraversalRunnable, null);
      ...
    }
}

final class TraversalRunnable implements Runnable {
    @Override
    public void run() {
        doTraversal();
    }
}

void doTraversal() {
    ...
    performTraversals();
    ...
}

//有没有很熟悉,view的绘制三部曲
private void performTraversals() {
    ......
    performMeasure(childWidthMeasureSpec, childHeightMeasureSpec);
    ...
    performLayout(lp, desiredWindowWidth, desiredWindowHeight);
    ......
    performDraw();
    }
    ......
}
4.2window的删除
/**
**#删除window分析1
**/
public void removeView(View view, boolean immediate) {
    if (view == null) {
        throw new IllegalArgumentException("view must not be null");
    }

    synchronized (mLock) {
        //先遍历知道index下标
        int index = findViewLocked(view, true);
        //找到当前view
        View curView = mRoots.get(index).getView();
        //移除#删除window分析1
        removeViewLocked(index, immediate);
        if (curView == view) {
            return;
        }

        throw new IllegalStateException("Calling with view " + view
                + " but the ViewAncestor is attached to " + curView);
    }
}

/**
**#删除window分析2
**/
private void removeViewLocked(int index, boolean immediate) {
    //根据下标得到viewroot
    ViewRootImpl root = mRoots.get(index);
    View view = root.getView();

    if (view != null) {
        InputMethodManager imm = InputMethodManager.getInstance();
        if (imm != null) {
            imm.windowDismissed(mViews.get(index).getWindowToken());
        }
    }
    //执行die删除#删除window分析3
    boolean deferred = root.die(immediate);
    if (view != null) {
        view.assignParent(null);
        if (deferred) {
            mDyingViews.add(view);
        }
    }
}

/**
**#删除window分析3,immediate表示是否立即删除:true同步操作, false异步操作,大多数情况使用false
**/
boolean die(boolean immediate) {
    // Make sure we do execute immediately if we are in the middle of a traversal or the damage
    // done by dispatchDetachedFromWindow will cause havoc on return.
    if (immediate && !mIsInTraversal) {
        //#删除window分析4
        doDie();
        return false;
    }

    if (!mIsDrawing) {
        destroyHardwareRenderer();
    } else {
        Log.e(mTag, "Attempting to destroy the window while drawing!\n" +
                "  window=" + this + ", title=" + mWindowAttributes.getTitle());
    }
    //一般情况我们会通过handler发个消息通知移除window
    mHandler.sendEmptyMessage(MSG_DIE);
    return true;
}

/**
**#删除window分析4
**/
void doDie() {
    checkThread();
    if (LOCAL_LOGV) Log.v(mTag, "DIE in " + this + " of " + mSurface);
    synchronized (this) {
        if (mRemoved) {
            return;
        }
        mRemoved = true;
        if (mAdded) {
            //这里胡调用mWindowSession.remove(mWindow);,它同样是一个IPC过程,最终会调用WMS的removeWindow
            dispatchDetachedFromWindow();
        }
        *************略**************
    }
    //刷新数据
    WindowManagerGlobal.getInstance().doRemoveView(this);
}
4.3window的更新
/**
**#更新window
**/
public void updateViewLayout(View view, ViewGroup.LayoutParams params) {
    if (view == null) {
        throw new IllegalArgumentException("view must not be null");
    }
    if (!(params instanceof WindowManager.LayoutParams)) {
        throw new IllegalArgumentException("Params must be WindowManager.LayoutParams");
    }

    final WindowManager.LayoutParams wparams = (WindowManager.LayoutParams)params;
    //更新view的LayoutParams
    view.setLayoutParams(wparams);

    synchronized (mLock) {
        int index = findViewLocked(view, true);
        ViewRootImpl root = mRoots.get(index);
        mParams.remove(index);
        mParams.add(index, wparams);
        //更新viewroot的LayoutParams,并且重新绘制view(调用了requestLayout)
        root.setLayoutParams(wparams, false);
    }
}
5.ViewRootImpl与View和WindowManager之间关系
在前面的图二中decorView下面除了statusbarbackground还有个ViewRootImpl(2.2就替换ViewRoot为ViewRootImpl了),它是一个view视图顶层结构,WindowManagerGlobal的大部分实现都是和ViewRootImpl相关的,它类似于view和WindowManager之间的桥梁,真正操纵绘制view的是viewrootimpl,view通过windowmanager调用viewrootimpl。调用顺序如图:view -> WindowManager -> WindowManagerImpl -> WindowManagerGlobal -> ViewRootImpl.