Android加载高清大图
一、概述
我们在开发中会遇到需要显示高清大图的时候,如果直接将图片显示,会出现OOM的情况,接下来介绍两种加载大图的方式。
二、有损压缩
有损压缩的原理是在使用BitmapFactory.decodeResource获取Bitmap对象时,设置inSampleSize,默认不压缩这个值就是1,大于1表示压缩。那么在使用过程中具体设置多大呢?这里就需要有两个值来确定,第一个是图片的实际宽高,第二个是期望压缩后图片的宽高,通过这两个值就能计算出inSampleSize。下面我们来看下具体的步骤:
1、计算图片的实际宽高
BitmapFactory.Options options = new BitmapFactory.Options();
options.inJustDecodeBounds = true;
int width = options.outWidth;
int height = options.outHeight;
将inJustDecodeBounds设置为true表示不要把图片加载到内存中,只需要获取图片的宽高,这样不会占用内存,同样此时得到的Bitmap也是为null。
2、计算inSampleSize
int inSampleSize = 1;
if (height > reqHeight || width > reqWidth) {
//计算出实际宽高和目标宽高的比率
final int widthRatio = Math.round((float) width / (float) reqWidth);
final int heightRatio = Math.round((float) height / (float) reqHeight);
//选择宽和高中最小的比率作为inSampleSize的值,这样可以保证最终图片的宽和高一定都会大于等于目标的宽和高
inSampleSize = heightRatio < widthRatio ? heightRatio : widthRatio;
}
reqWidth和reqHeight是我们期望的大小,通过两者计算出inSampleSize。
3、具体使用
    public static int calculateInSampleSize(BitmapFactory.Options options,
                                            int reqWidth, int reqHeight) {
        //原图片的宽高
        final int width = options.outWidth;
        final int height = options.outHeight;
        int inSampleSize = 1;
        if (height > reqHeight || width > reqWidth) {
            //计算出实际宽高和目标宽高的比率
            final int widthRatio = Math.round((float) width / (float) reqWidth);
            final int heightRatio = Math.round((float) height / (float) reqHeight);
            //选择宽和高中最小的比率作为inSampleSize的值,这样可以保证最终图片的宽和高一定都会        大于等于目标的宽和高
            inSampleSize = heightRatio < widthRatio ? heightRatio : widthRatio;
            Log.i(TAG, "widthRatio = " + widthRatio + ", heightRatio = " + heightRatio + ", inSampleSize = " + inSampleSize);
        }
        return inSampleSize;
    }
public static Bitmap decodeSampledBitmapFromResource(Resources res, int resId,
int reqWidth, int reqHeight) {
//inJustDecodeBounds设置为true,来获取图片大小,不会将图片加载到内存中
final BitmapFactory.Options options = new BitmapFactory.Options();
options.inJustDecodeBounds = true;
BitmapFactory.decodeResource(res, resId, options);
//计算inSampleSize值
options.inSampleSize = calculateInSampleSize(options, reqWidth, reqHeight);
//inJustDecodeBounds设置为false,需要将图片加载到内存中
options.inJustDecodeBounds = false;
return BitmapFactory.decodeResource(res, resId, options);
}调用:
Bitmap bitmap = decodeSampledBitmapFromResource(getResources(), R.mipmap.flower,
        1080, 1920);

image_compress.setImageBitmap(bitmap);
注意:如果压缩后的图片显示有变形,可以试着设置下面两个属性:
android:adjustViewBounds="true"
android:scaleType="fitXY"
三、无损压缩
无损压缩是通过BitmapRegionDecoder这个类来实现的,原理是只加载当前需要显示的区域到内存中来达到减小内存的目的。下面我们来看下具体的步骤:
1、得到BitmapRegionDecoder对象
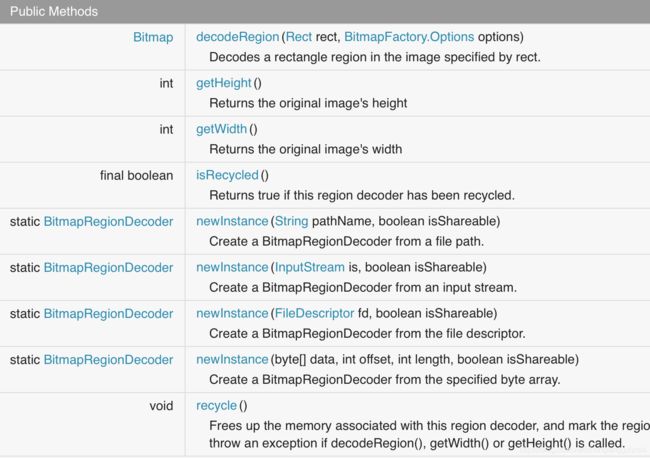
以上是它的API,我们通过newInstance方法传入InputStream来得到BitmapRegionDecoder对象。
2、获取需要显示的Bitmap
通过调用BitmapRegionDecoder的decodeRegion方法来获取Bitmap,其中一个参数是Rect,这个表示我们希望显示图片的区域。
3、具体实现
try {
            InputStream inputStream = getAssets().open("flower.jpg");

            //获取图片的宽高,但不加载到内存中
            BitmapFactory.Options tmpOptions = new BitmapFactory.Options();
            tmpOptions.inJustDecodeBounds = true;
            BitmapFactory.decodeStream(inputStream, null, tmpOptions);
            int mImageWidth = tmpOptions.outWidth;
            int mImageHeight = tmpOptions.outHeight;

            //获取BitmapRegionDecoder,并设置相关参数
            BitmapRegionDecoder mDecoder =      BitmapRegionDecoder.newInstance(inputStream, false);
            BitmapFactory.Options mOptions = new BitmapFactory.Options();
            mOptions.inPreferredConfig = Bitmap.Config.RGB_565;

            //显示图片
            Rect rect = new Rect(mImageWidth / 2 - 400, mImageHeight / 2 - 400,
                    mImageWidth / 2 + 400, mImageHeight / 2 + 400);
            Bitmap newBitmap = mDecoder.decodeRegion(rect, mOptions);
            image_view.setImageBitmap(newBitmap);

        } catch (IOException e) {
            e.printStackTrace();
    }
这里首先还是获取了图片的实际宽高,然后再根据读取图片的数据流得到BitmapRegionDecoder,再设置需要显示的大小rect,最后调用decodeRegion方法得到bitmap显示出来。
上面代码展示的是显示图片固定一个区域,当我们想滑动来查看整个图片时,可以自定义一个View,监听手势滑动来改变Rect显示区域,具体代码可下载查看。
LargeImageDemo