【大数据开发】Java语言基础——异常、多重异常、自定义异常、包装类、享元day11
学习异常这一章节所有知识点都要依靠实战来学习,并且不能使用idea编辑器(看不到异常信息),因为这一章节所抛出的Exception都需要通过控制台才能够看得到,唯有亲手敲一遍代码才能更深的感受。在学习本章节时,我全程使用的都是EditPlus完成,具体的异常信息通过控制台窗口查看。下面的代码写了完整的注释,有一些代码的注释是在调试过程中产生的。好了,下面我们来学习异常吧。
一、什么是异常
程序在运行时出现的不正常情况(不是编译时的问题)
默认的处理机制:在异常时Java定义的前提下,系统自动创建异常类对象,抛给JVM,JVM调用异常类对象的printStackTrace()方法显示异常类信息,然后程序中断。
异常体系:

Exception(异常):Java把运行时出现的各种不正常情况提取属性和行为,然后封装成类,因而出现了各种异常类
异常名称、异常信息、异常发生的位置都需要使用异常类描述
二、ArrayIndexOutOfBoundsException
package com.day12;

public class Demo2 {
    public static void main(String[] args)
    {
        int[] arr = new int[5];
        System.out.println(arr[5]);  //thow new ArrayIndexOutOfBoundsException()
        //当执行zrr[5]因为下标越界异常ArrayIndexOutOfBoundsException在Java内部已经定义好了,所以会自动创建异常类对象。
        //main处理不了这种异常,就抛给了java虚拟机,jvm默认的处理异常的方式就是调用异常类对象的prinltStachTrace()方法
        //方法会打印异常名称,异常信息,异常发生的位置

        //Exception in thread "main" java.lang.ArrayIndexOutOfBoundsException: Index 5 out of bounds for length 5
        //	at com.day12.Demo2.main(Demo2.java:7)

        System.out.println("这句话不会输出");
    }
}
三、ArithmeticException
try{
	可能发生异常的代码	//thows new ArithmeticException()
	...........  		//发生异常的代码后面的代码是不执行的
}
catch(异常类 参数名){
	当发生异常时,处理异常的代码
}
我们继续看除0异常
package com.day12;
class MyMath
{
    public int div(int a, int b)
    {
        return a/b;  //1. throw new ArithmeticException
    }
}
public class Demo3 {
    public static void main(String[] args)
    {
        MyMath myMath = new MyMath();
        try
        {
            //2. throw new ArithmeticException
            //3. 异常被try检测到,被catch捕获到(即传参数给5)
            //4. 生成异常类对象
            int result = myMath.div(5,0);

            //发生异常代码下面的代码是不会执行的
            System.out.println(result);  //没有执行
        }
        catch (Exception e)  //5. Exception e = new ArithmeticException()   多态
        {
            //处理异常的代码
            //6. 执行的代码
            System.out.println("除数为0了");

            //7. 调用throwable内部方法getMessage()
            //返回此throwable的详细消息字符串。
            System.out.println(e.getMessage());
            //8. 打印异常名称:异常信息
            System.out.println(e.toString());
            //9. 打印异常名称:异常信息 异常发生的位置
            e.printStackTrace();
        }
        //10. 执行的代码
        System.out.println("哈哈");
    }
}
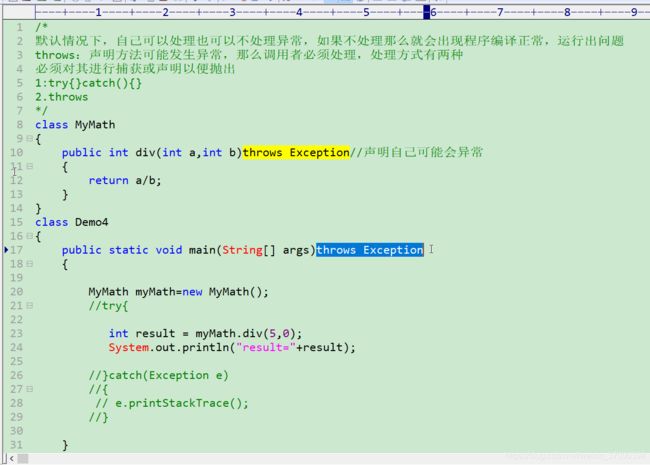
默认情况下,自己可以处理也可以不处理异常,如果不处理那么就会出现程序编译正常,运行出问题。为了解决这个问题。下面我们来看throws
四、thows
使用thows的格式
public void fun()throws 异常类名字		//声明可能发生异常
{

}
 调用fun()时必须处理,处理方式有两种
 1.负责任地使用try{}  catch(){}处理
 2.使用throws  继续声明
声明该方法可能会发生异常,那么调用者必须处理。
throws用在方法后面,thows后边跟的是异常的名字
其中,处理方式有两种,必须对其进行保护或声明以便抛出
如下,MyMath函数抛出给main函数的异常必须得到处理,编译才能通过。若不处理编译则无法通过。
package com.day12;
class MyMath1
{
    public int div(int a, int b) throws Exception    //声明自己可能会异常
    {
        return a/b;
    }
}
public class Demo4 {
    public static void main(String[] args)
    {
        MyMath myMath = new MyMath();
        try {
            int result = myMath.div(5, 0);
            System.out.println(result);
        }catch (Exception e)
        {
            e.printStackTrace();
        }
    }
}
若MyMath函数不想处理异常,main函数也不想处理,添加如下代码,将异常抛给JVM处理。
下面代码编译时期会通过:
package com.day12;
class MyMath1
{
    public int div(int a, int b) throws Exception    //声明自己可能会异常
    {
        return a/b;
    }
}
public class Demo4 {
    public static void main(String[] args)throws Exception  //抛给JVM处理
    {
        MyMath myMath = new MyMath();
//        try {
            int result = myMath.div(5, 0);
            System.out.println(result);
//        }catch (Exception e)
//        {
//            e.printStackTrace();
//        }
    }
}
五、多重异常
package com.day12;

class MyMath2
{
	//多重异常
    public int div(int a, int b) throws ArrayIndexOutOfBoundsException,ArithmeticException
    {
        int[] arr = new int[3];
        System.out.println(arr[4]);
        return a/b;
    }
}

public class Demo5 {
    public static void main(String[] args)
    {
        MyMath myMath = new MyMath();
        try {
            int result = myMath.div(5, 0);
            System.out.println(result);
        }catch (ArrayIndexOutOfBoundsException e)
        {
            //e.printStackTrace();
            System.out.println("下标越界了");
        }catch (ArithmeticException e)
        {
            System.out.println("除数为0了");
        }

        //子类异常应当写在父类异常的前面
        //实际上不应当写该异常
        catch (Exception e)
        {
            System.out.println("发生异常了");
        }
    }
}
六、自定义异常
自定义异常必须对其进行捕获或者声明以便抛出
方式1:自行处理(一般不这么干)
package com.day12;

//创建除数为负数异常
class MinusException extends Exception
{
    MinusException()
    {
        super();  //不写也行,系统自动加上
    }

    MinusException(String message)
    {
        super(message);     //给父类传递message
    }

}


class MyMath3
{
    public int div(int a, int b) {
        try {
            if (b < 0)
                //创建异常类对象
                throw new MinusException();     //自定义异常必须手动创建   必须对其进行捕获或声明以便抛出
        }catch (MinusException e)
        {
            e.printStackTrace();
        }
            return a / b;
    }
}

public class Demo6 {
    public static void main(String[] args) {
        MyMath3 myMath = new MyMath3();
        int result = myMath.div(5, -1);
        System.out.println(result);
    }
}
方式2:抛出异常
//创建除数为负数异常
class MinusException extends Exception
{
    MinusException()
    {
        super();  //不写也行,系统自动加上
    }

    MinusException(String message)
    {
        super(message);     //给父类传递message
    }

}


class MyMath3
{
    public int div(int a, int b) throws MinusException{
            if (b < 0)
                //创建异常类对象
                throw new MinusException("除数为负数了");     //自定义异常必须手动创建   必须对其进行捕获或声明以便抛出
            return a / b;
    }
}

public class Demo17 {
    public static void main(String[] args){
        MyMath3 myMath = new MyMath3();
        try {
            int result = myMath.div(5, -1);
            System.out.println(result);
        }catch (MinusException e) {
            System.out.println(e.getMessage());
        }
    }
}
或者main函数也想不处理,继续抛出即可
七、 运行时异常:RuntimeException (编译时不检测的异常)
特点:
1.使用了throws,不处理编译通过
2.使用了throws,不处理编译通过
Java认为运行时异常时不该处理的,所以编译时根本就不检测运行时异常,所以编译通过。
运行时异常都是由于传递数据错误造成的,所以Java认为程序不应该处理,就应该程序中断,修改程序错误。
八、throw和throws的区别
1.throw:后面是异常类对象,用在方法内部
2.throws:后面是异常类,用在方法名的小括号后面,用来声明方法可能发生的异常
异常分为两种
1.运行时异常
2.非运行时异常
故上面所提到的负数异常应当改为运行时异常
//创建除数为负数异常
class MinusException extends RuntimeException
{
    MinusException()
    {
        super();  //不写也行,系统自动加上
    }

    MinusException(String message)
    {
        super(message);     //给父类传递message
    }

}


class MyMath3
{
    public int div(int a, int b) {
            if (b < 0)
                //创建异常类对象
                throw new MinusException("除数为负数了");     //自定义异常必须手动创建   必须对其进行捕获或声明以便抛出
            return a / b;
    }
}

public class Demo17 {
    public static void main(String[] args){
        MyMath3 myMath = new MyMath3();
        int result = myMath.div(5, -1);
        System.out.println(result);
    }
}
九、自定义异常
自定义非运行时异常
class MyException extends Exception
{}
自定义运行时异常
class MyException extends RuntimeException		看异常是否因为数据错误造成的
{}
异常分两类
非运行时异常:编译时检测的异常,如果没有处理,编译不通过
运行时异常:编译时不检测的异常。处理不处理都可以
编程实战难点:区分究竟是运行时异常还是非运行时异常,看异常是否因为数据错误造成的,若异常是由于数据错误造成的,则自定义异常应当继承RuntimeException;否则,该异常应当是非运行时异常,应当继承Exception。
try{
}
catch{
}
finally{
	必须要执行的代码		//finally能保证里面的代码被执行
}
看下面例子,可以看出finally的强大之处。注意:finally里的代码是在return之前被执行的。

但是将return改成System.exit(1)后就不再执行后面代码,因为该语句直接退出了JVM。我们来看下面:

下面我们来总结一下,try、catch、finally组合只有下面三种,其中finally不能单独使用。

总结

十、包装类
byte ---- Byte
short ---- Short
int ---- Integer
long ---- Long
float ---- Float
double ---- Double
char ---- Character
booble ---- Boolean
基本数据类型转字符串类型,如下:
String Integer.toString(8)
String Double.toString(8.5)
String Float.toString(55f)
字符串类型的数据转基本类型,如下:
int Integer.parseInt("123")
double Double.parseDouble("45.25")
十进制数转成其他进制,如下:
Integer.toHexString()  //转十六进制
Integer.toOctalString() //转八进制
Integer.toBinaryString()  //转二进制
其他进制转十进制,如下:
Integer.parseInt("3c",16)  //十六进制的3c(字符串)转成十进制
Integer.parseInt("24",8)	 //八进制的28(字符串)转成十进制
Integer.parseInt("111",2)	 //八进制的111(字符串)转成十进制
创建对象
手动装箱 ---- 把一个加基本数据类型的数值封装成对象(有两种方式,如下两张图)
手动拆箱 ---- 从对象中获取基本数据类型数值


可以看出手动装箱和手动拆箱都太麻烦了,从jdk1.5版本开始进行了优化,增加了如下方式:

先将b1自动拆箱,在运算后再自动装箱。由此引出下面的概念:
享元 ---- 一个数字一个字节内(-128~127),那么再次定义时,使用的是之前定义的。
package com.day12;

public class Demo7 {
    public static void main(String[] args)
    {
        Integer n1 = 120;
        Integer n2 = 120;
        System.out.println(n1 == n2);   //true

        Integer m1 = 250;
        Integer m2 = 250;
        System.out.println(m1 == m2);   //false,超出了范围
    }
}
再看一个例子
package Day15;

public class Demo8 {
    public static void main(String[] args)
    {
        Integer in1 = 66;
        Integer in2 = 66;
        System.out.println(in1 == in2);  //享元

        Integer in3 = new Integer(66);
        Integer in4 = new Integer(66);
        System.out.println(in3 == in4);     //两个不同的对象

        String str1 = new String("66");
        String str2 = new String("66");
        System.out.println(str1 == str2);   //两个不同的对象,比较的是内存地址

        String str3 = new String("66");
        String str4 = new String("66");
        System.out.println(str1.equals(str2));  //比较的是值
    }
}


