React Native安装过程及使用方法
中文网站:https://reactnative.cn/docs/getting-started
安装环境
在Mac平台上开发React Native需要安装以下环境和工具:
Note.js
React Native Command Line Tools
XCode/AndroidStudio
1、安装Node.js
React Native开发需要用到Node.js环境。我们做React Native开发会经常性的和Node.js进行打交道,在Mac上安装 Node.js可以通过Homebrew,打开终端运行如下命名:
brew install node
安装完 Node 后建议设置 npm 镜像以加速后面的过程(如果能可以省略这步):
npm config set registry https://registry.npm.taobao.org --global
npm config set disturl https://npm.taobao.org/dist --global
2、安装React Native命令行工具
Note.js安装成功之后,接下来我们就可以通过npm install来安装React Native命令行工具了。
打开终端,输入并执行下面命令即可完成安装:
npm install -g react-native-cli
3、安装iOS开发工具XCode/android开发工具android studio
4、安装一些命令行工具
Watchman则是由 Facebook 提供的监视文件系统变更的工具。安装此工具可以提高开发时的性能(packager 可以快速捕捉文件的变化从而实现实时刷新)。
brew install watchman
Yarn是 Facebook 提供的替代 npm 的工具,可以加速 node 模块的下载。React Native 的命令行工具用于执行创建、初始化、更新项目、运行打包服务(packager)等任务。
npm install -g yarn
安装完 yarn 后同理也要设置镜像源:
yarn config set registry https://registry.npm.taobao.org --global
yarn config set disturl https://npm.taobao.org/dist --global
安装 CocoaPods(iOS端依赖),安装见https://blog.csdn.net/zkdemon/article/details/90241630
5、创建自己第一个react-native项目
使用 React Native 命令行工具来创建一个名为"TestReactNative"的新项目:
react-native init TestReactNative
自动调用CocoaPods安装依赖包如果失败的话,手动到ios目录下pod install一下(Podfile文件中第一行添加源地址 source 'https://github.com/CocoaPods/Specs.git')
ios和android目录提前先用xcode和android studio编译运行一下(android端需要提前在AVD Manager中创建模拟器,创建要求见https://reactnative.cn/docs/getting-started中的介绍)
android端第一次运行的时候app里面可能会报js错误

修改项目目录/android/app/build.gradle里
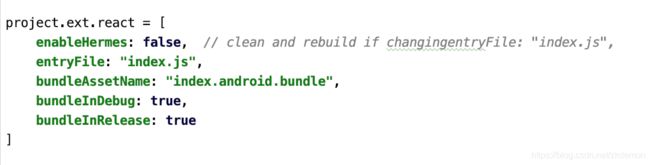
加入
entryFile: "index.js",
bundleAssetName: "index.android.bundle",
bundleInDebug: true,
bundleInRelease: true
这几句重新运行就没问题了。
后边就直接可以在项目目录中运行以下命令就可以编译运行:
cd TestReactNative
// 运行IOS
yarn ios
// 运行android(提前需要把模拟器开开,在运行命令)
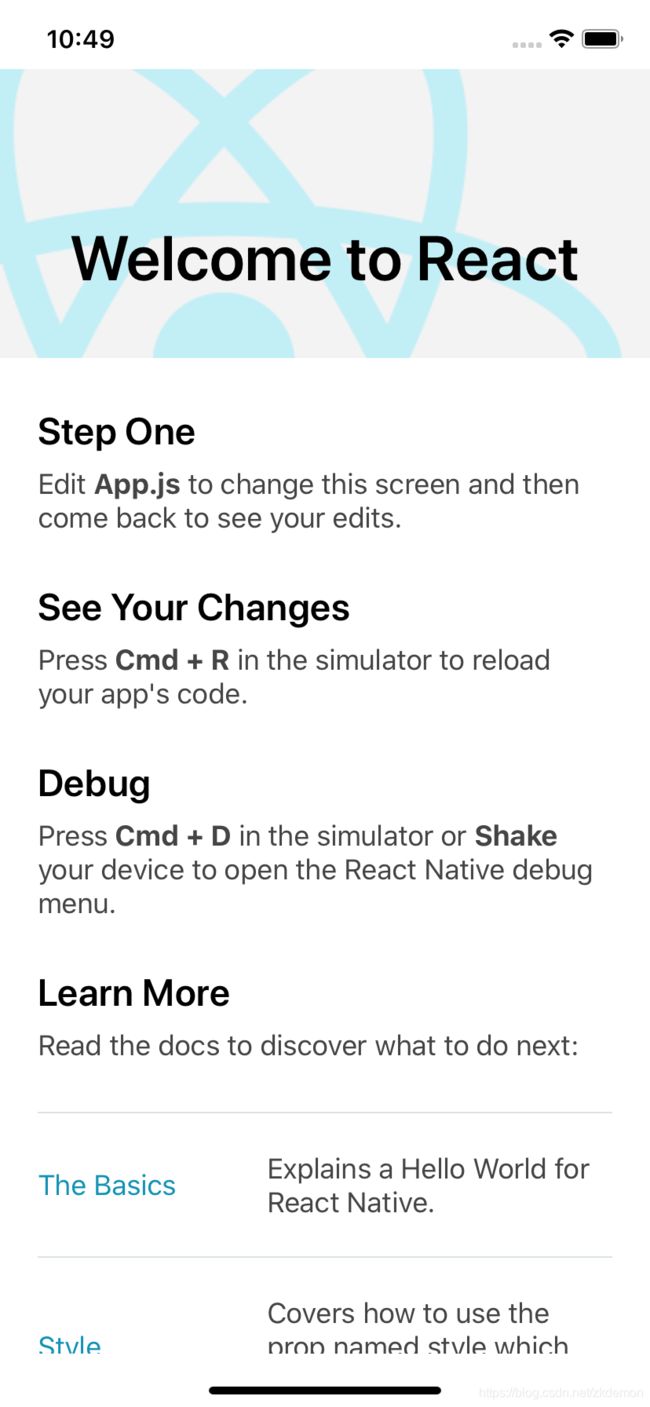
yarn android编译成功可以看到一个简单的demo:
开发工具Sublime+Babel+react-native-snippets
安装Sublime后安装package插件Babel和react-native-snippets
Babel支持 Javascript,ES6 和 JSX 语法高亮,每个需要高亮显示的文件都要在View->Syntax->Babel->JavaScript(Babel)设置一下
react-native-snippets支持 React Native 代码片段及补全
组件component
1、组件创建方式
常用的组件创建方式有两种,第一种是单纯一个JavaScript函数,第二种是创建一个JS类
    import React, {Component} from 'react';
    import { Text, View } from 'react-native';

    // 方式一:
    const MyComponent = (props) => (

            MyComponent

    );

    // 方式二:
    class MyClass extends Component {
      render() {
          return (

                  MyClass

          );
      }
    }

    export { MyClass };

    export default MyComponent;
以上两种方式创建的组件用法完全一样,区别在于方式一无法复写组件的声明周期,无法维护state,关于声明周期与state我们将在以后章节里面讲解。
2、组件和模块的导出和引入
1)export 命令
一个独立的文件就是一个模块。该文件内部的所有变量,外部无法获取。如果你希望外部能够读取模块内部的某个变量,就必须使用export关键字输出该变量。下面是一个 JS 文件,里面使用export命令输出变量。如上方的自定义组件中的
export { MyClass };

export default MyComponent;
-
export defalt命令在每个文件中只能存在一个,顾名思义是导出组件的默认输出。
-
接下来介绍export的几种写法
// 方式一:分别导出三个变量 export const firstName = 'Michael'; export const lastName = 'Jackson'; export const year = 1958; // 方式二:用大括号统一导出(和方式一效果一样) const firstName = 'Michael'; const lastName = 'Jackson'; const year = 1958; export { firstName, lastName, year }; // 除了导出变量,还可以导出方法和类 export function logExport() { console.log('export'); } class MyClass extends Component { render() { return (MyClass
2)import 命令
使用export命令定义了模块的对外接口以后,其他 JS 文件就可以通过import命令加载这个模块。
    // 非export default输出的,需要使用大括号
    // 和export相同也可以使用as 取别名
    import { firstName, MyComponent ,year as yearName } from './MyComponent';

    // 使用export default时,对应的import语句不需要使用大括号
    import MyClass from './MyComponent';

    // 本质上,export default就是输出一个叫做default的变量或方法,然后系统允许你为它取任意名字。所以,下面的写法是有效的。
    import OtherName from './MyComponent';
通过 export 和import 我们就可以在app.js中使用自己创建的组件了
    ...

    import OtherName from './MyComponent';
    ...

    export default class App extends Component {

        render() {

            return (


                Welcome to React Native!

                To get started, edit App.js

                {instructions}


           );
        }
    }
组件生命周期
生命周期
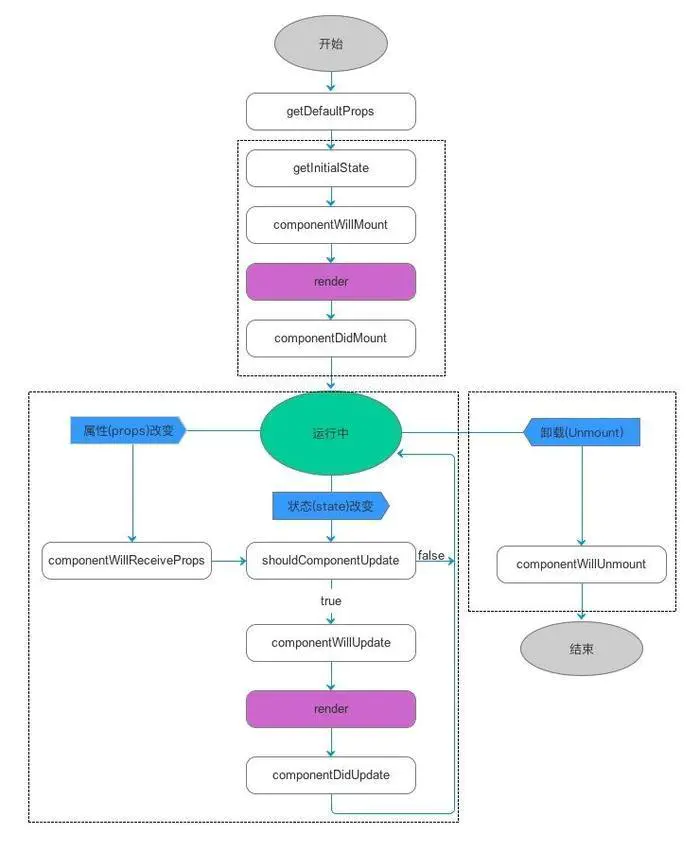
如图,可以把组件生命周期大致分为三个阶段:
-
第一阶段:是组件第一次绘制阶段,如图中的上面虚线框内,在这里完成了组件的加载和初始化,其中getDefaultProps,getInitialState 在新版的Component中ES6语法继承时,直接复写方法会报异常,RN API要求我们props,state的初始化在Component的constructor函数中完成;
-
第二阶段:是组件在运行和交互阶段,如图中左下角虚线框,这个阶段组件可以处理用户交互,或者接收事件更新界面;
-
第三阶段:是组件卸载消亡的阶段,如图中右下角的虚线框中,这里做一些组件的清理工作。
进入一个RN界面时,Component的声明周期函数大致流程如下:
-
1.constructor构造函数,从上一个界面传过来的数据props在作为constructor的参数,在constructor中做一些初始化的操作,如props,state等初始化;函数原型:void constructor(props)
-
2.componentWillMount,第一次绘制组件(render)前触发该生命周期函数;函数原型:void componentWillMount()
-
3.render绘制组件到界面上;函数原型:void render()
-
4.componentDidMount,第一次挥之组件(render)后触发该生命周期函数,触发该函数说明RN组件绘制已经完成了,虚拟DOM已经构建完成;从这个函数开始我们就可以和JS其他框架开始交互了,例如定时器,网络请求等操作。函数原型:void componentDidMount()
-
5.componentWillReceiveProps,当组件收到新的属性时,触发该函数。函数原型:void componentWillReceiveProps( object nextProps )
-
6.shouldComponentUpdate,当组件属性(props)或者状态(state)发生变化时,都会触发该函数。函数原型:boolean shouldComponentUpdate( object nextProps, object nextState ); 若函数返回true,则继续触发componentWillUpdate,render,componentDidUpdate等方法;若函数返回false,则不做任何处理;默认情况下,这个函数永远返回true用来保证数据变化的时候 UI 能够同步更新。在大型项目中,你可以自己重载这个函数,通过检查变化前后属性和状态,来决定 UI 是否需要更新,能有效提高应用性能。
-
7.componentWillUpdate,如果组件状态或者属性改变,并且上面的shouldComponentUpdate(object nextProps, object nextState)返回为true,则触发该方法,函数原型:void componentWillUpdate(object nextProps, object nextState),函数中参数实际上与shouldComponentUpdate中的参数一样,是同一个数据源;需要特别注意的是,在这个函数里面,你就不能使用this.setState来修改状态,否则会循环调用该函数导致堆栈溢出。这个函数调用之后,就会把nextProps和nextState分别设置到this.props和this.state中。紧接着这个函数,就会调用render()来更新界面了。
-
8.componentDidUpdate,更新render结束后,则调用该方法,函数原型:void componentDidUpdate(object prevProps, object prevState);因为到这里已经完成了属性和状态的更新了,此函数的输入参数变成了prevProps和prevState。
-
9.componentWillUnmount,当组件要被从界面上移除的时候,就会调用componentWillUnmount(),函数原型:void componentWillUnmount();在这个函数中,可以做一些组件相关的清理工作,例如取消计时器、网络请求等。
组件引用Ref
ref是组件的特殊属性,组件被渲染后,指向组件的一个引用。可以通过组件的ref属性,来获取真实的组件。因为,组件并不是真正的DOM节点,而是存在于内存中的一种数据结构,
称为虚拟的DOM,只有当它真正的插入文档之后,才变为真正的DOM节点。根据React的设计,所以的DOM变动都发生在虚拟DOM上,然后再将实际的部分反映到真实的DOM上--这就是 DOM DIff,它可以提高页面性能。
ref属性的定义是在使用组件的部分,而组件的方法之类的都是在定义组件的里面就有的。render方法被调用的时候,组件就会被渲染。渲染完成之后,就可以获取这个组件实例,因而就可以调用组件实例里的方法或者变量。
React的ref有3种用法:
1. 字符串(已废弃)
2. 回调函数
3. React.createRef() (React16.3提供)
1. 字符串
最早的ref用法(已废弃)
类组件上使用,通过this.refs[refName]来引用组件的实例
2. 回调函数
回调函数就是在dom节点或组件上挂载函数,函数的入参是dom节点或组件实例,达到的效果与字符串形式是一样的,
都是获取其引用。
回调函数的触发时机:。
1. 组件渲染后,即componentDidMount后
2. 组件卸载后,即componentWillMount后,此时,入参为null
3. ref改变后
类组件上使用使用回调函数
class CustomTextInput extends React.Component{
   constructor(props){
       super(props);
       this.focus = this.focus.bind(this);
   }

   focus(){
       // 获取文字焦点
       this.textInput.focus();
   }

   render(){
       // 使用ref回调函数存储text input 元素的引用
       return (


           { this.textInput = input; }} />


       );
   }
}
3.React.createRef()
在React 16.3版本后,使用此方法来创建ref。将其赋值给一个变量,通过ref挂载在dom节点或组件上,该ref的current属性
将能拿到dom节点或组件的实例
例如
class Child extends React.Component{
     constructor(props){
         super(props);
         this.myRef=React.createRef();
     }
     componentDidMount(){
         console.log(this.myRef.current);
     }
     render(){
         return
     }
 }
4.React.forwardRef
同样是React 16.3版本后提供的,可以用来创建子组件,以传递ref。
例如:
//子组件(通过forwardRef方法创建)
const Child=React.forwardRef((props,ref)=>(
}
} 子组件通过React.forwardRef来创建,可以将ref传递到内部的节点或组件,进而实现跨层级的引用。
注意:
1. ref在函数式组件上不可使用,函数式组件无实例,但是其内部的dom节点和类组件可以使用
2. React的render函数返回的是vDom(虚拟dom)
总结:
父传值给子通过子组件的ref属性获取子组件调用子组件的方法;子传值给父是通过将父组件的方法当作属性传给子组件,子组件调用属性方法
字符串,回调函数,React.createRef(),React.forwardRef方式属于父传值给子,子传值给父如下
import React, {Component} from "react";
import {View,
        StyleSheet,
        Text} from "react-native";
//子组件
class SonComponent extends Component{

    //构造函数
    constructor(props){
        super(props);
    }

    addClick(){
        this.props.receiveNumber();
    }

    render(){
        return(
            {"+"}
        );
    }
}

//父组件
class FatherComponent extends Component{

    constructor(props){
        super(props);
        //初始状态
        this.state={number:1};
    }

    receiveNumber(){
        let m = this.state.number;
        m += 1;
        this.setState({number:m});
    }

    render(){
        return (


                    {this.state.number}


        );
    }
}

//主视图
export default class RNPassValueComponent extends Component{
    render(){
        return (

        );
    }
}

const styles = StyleSheet.create({
    container: {
        flex: 1,
        backgroundColor: 'red',
    },

    sonViewStyle: {
        flex: 1,
        backgroundColor: '#F5FCFF',
        justifyContent: 'center',
        alignItems: 'center',
    },
    fatherViewStyle: {
        flex: 1,
        justifyContent: 'center',
        alignItems:'center',
    },
});
监听器
当两个组件之间互相拿不到对方的组件的时候,可以用通知传值。比如当两个组件是同一层级关系的时候。
a.在BrotherOneComponent组件中注册监听器,组件销毁时移除监听器;
b.在BrotherTwoComponent组件中发送数据给注册监听器;
import React, {Component} from "react";
import {View,
    StyleSheet,
    DeviceEventEmitter,
    Text} from "react-native";
//接收兄弟组件
class BrotherOneComponent extends Component{

    //构造函数
    constructor(props){
        super(props);
        //初始值
        this.state={"money": 0};
    }

    render(){
        //显示接收值,接收值放在state中
        return(
            {this.state.money}
        );
    }

    componentDidMount() {
        //添加监听者
        this.listener = DeviceEventEmitter.addListener("makeMoney", (money)=>{
            this.setState({
                money:money
            });
        });
    }

    componentWillUnmount() {
        //移除监听者
        this.listener.remove();
    }
}

//发送兄弟组件
class BrotherTwoComponent extends Component{
    render(){
        return (

                {
                    DeviceEventEmitter.emit('makeMoney', 100)
                }}>发送

        );
    }
}

//主组件
export default class RNPassValueComponent extends Component{
    render(){
        return (


        );
    }
}

const styles = StyleSheet.create({
    container: {
        flex: 1,
        backgroundColor: 'red',
    },

    didiStyle: {
        flex: 1,
        backgroundColor: '#F5FCFF',
        justifyContent: 'center',
        alignItems: 'center',
    },

    gegeStyle: {
        flex: 1,
        justifyContent: 'center',
        alignItems:'center',
    },
});
React Native插件
(1)React Navigation 4.x
官网文档https://reactnavigation.org/docs/getting-started/
4.x 版本从 react-navigation 中移除了各类导航器,同时还依赖了一些其他的包需要手动安装
npm install react-navigation react-native-reanimated react-native-gesture-handler react-native-screens react-native-safe-area-contextnpm install react-navigation-stack @react-native-community/masked-view react-navigation-tabsreactnative 0.60 版本之后,安装完成之后会自动 link。
Android 端需要手动进行一些修改,编辑 android/app/build.gradle,在 dependencies 中添加如下内容:
implementation 'androidx.appcompat:appcompat:1.1.0-rc01'
implementation 'androidx.swiperefreshlayout:swiperefreshlayout:1.1.0-alpha02'
编辑 Android 中的 MainActivity.java,添加如下内容:
package com.reactnavigation.example;

import com.facebook.react.ReactActivity;

import com.facebook.react.ReactActivityDelegate;
import com.facebook.react.ReactRootView;
import com.swmansion.gesturehandler.react.RNGestureHandlerEnabledRootView;

public class MainActivity extends ReactActivity {

  @Override
  protected String getMainComponentName() {
    return "Example";
  }

  @Override
  protected ReactActivityDelegate createReactActivityDelegate() {
    return new ReactActivityDelegate(this, getMainComponentName()) {
      @Override
      protected ReactRootView createRootView() {
        return new RNGestureHandlerEnabledRootView(MainActivity.this);
      }
    };
  }
}
iOS端需要进入项目的ios目录执行:
pod install使用时界面下边如果经常报js警告:
Calling getNode() on the ref of an Animated component is no longer necessary. You can now directly use the ref instead. This method will be removed in a future release.
找到项目node_modules/react-native-safe-area-view/index.js,修改192行
把this.view.getNode().measureInWindow((winX, winY, winWidth, winHeight)改为this.view.measureInWindow((winX, winY, winWidth, winHeight),警告就消失了。
创建tabbar及导航
import React from 'react';
import {View,Text,Image,Button} from 'react-native';
import {createAppContainer} from 'react-navigation';
import {createBottomTabNavigator} from 'react-navigation-tabs';
import {createStackNavigator} from 'react-navigation-stack';
import App1 from './App1';
import App2 from './App2';
import Introd from './Introd';
class nav1 extends React.Component {
render() {
return (
this is nav1
)
}
}
const chiStack = createStackNavigator({
"次页": {
screen: App2,
},
"欢迎页": {
screen: Introd,
},
},
{
initialRouteName: "次页",
});
const qStack = createStackNavigator({
"导航": {
screen: nav1,
},
"欢迎页": {
screen: Introd,
},
},
{
initialRouteName: "导航",
});
const TabNavigator = createBottomTabNavigator(
{
"App1":{
screen: App1,
navigationOptions: {
title: "首页",
tabBarIcon:({ focused, horizontal, tintColor })=>{
return React Navigation 5.x
npm install @react-navigation/native

npm install react-native-gesture-handler react-native-reanimated react-native-screens react-native-safe-area-context @react-native-community/masked-view

npm install @react-navigation/stack

npm install @react-navigation/bottom-tabs
iOS端需要进入项目的ios目录执行:
pod install创建tabbar及导航
import 'react-native-gesture-handler';
import React,{Component} from 'react';
import {View,Text,Image,Button,SafeAreaView} from 'react-native';
import { NavigationContainer } from '@react-navigation/native';
import { createStackNavigator } from '@react-navigation/stack';
import { createBottomTabNavigator } from '@react-navigation/bottom-tabs';
import App1 from './App1';
import App2 from './App2';
import Introd from './Introd';
import {
Cat,
Bananas,
} from './utils';
class nav1 extends React.Component {
render() {
return (
this is nav1
)
}
}
const navStack = createStackNavigator();
export class navStackScreen extends Component {
render() {
return (
);
}
}
const ciStack = createStackNavigator();
export class ciStackScreen extends Component {
render() {
return (
);
}
}
const Tab = createBottomTabNavigator();
export default function App() {
return (
({
tabBarIcon: ({ focused, color, size }) => {
if (route.name === '次页') {
return
);
}
在没有导航器的情况下进行导航:https://reactnavigation.org/docs/navigating-without-navigation-prop/