bandit(13-34)
bandit13——>bandit14
关卡提示:The password for the next level is stored in /etc/bandit_pass/bandit14 and can only be read by user bandit14. For this level, you don’t get the next password, but you get a private SSH key that can be used to log into the next level. Note: localhost is a hostname that refers to the machine you are working on
根据提示,需要用bandit14用户登录才能查看密码,并给我们ssh的私钥了,所以可以使用ssh -i 指定私钥进行登录。登录之后根据提示,password存在/etc/bandit_pass/bandit14,查看即可。


bandit14——>bandit15
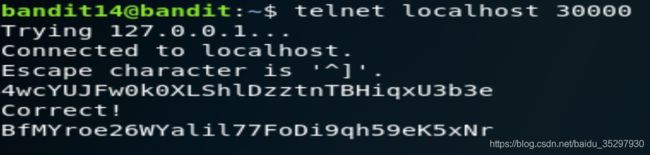
关卡提示:The password for the next level can be retrieved by submitting the password of the current level to port 30000 on localhost.
根据提示,我们需要将密码提交到localhost的30000端口上,所以使用telnet连接端口,然后将密码发送过去。
bandit15——>bandit16
关卡提示:The password for the next level can be retrieved by submitting the password of the current level to port 30001 on localhost using SSL encryption.
Helpful note: Getting “HEARTBEATING” and “Read R BLOCK”? Use -ign_eof and read the “CONNECTED COMMANDS” section in the manpage. Next to ‘R’ and ‘Q’, the ‘B’ command also works in this version of that command…
根据提示,可以使用如下命令:
openssl s_client -ign_eof -connect localhost:30001


bandit16——>bandit17
关卡提示:The credentials for the next level can be retrieved by submitting the password of the current level to a port on localhost in the range 31000 to 32000. First find out which of these ports have a server listening on them. Then find out which of those speak SSL and which don’t. There is only 1 server that will give the next credentials, the others will simply send back to you whatever you send to it.
根据提示31000-32000只有一个服务器是我们要找的,可以用nmap进行端口扫描。

可见有两个端口开放,接着尝试哪个支持SSL。
openssl s_client -connect localhost:31518
openssl s_client -connect localhost:31790
测试后发现31790可行。返回的是一个私钥,保存到一个文件中ssh.priv,由于权限管理,所以需要在/tmp目录下创建一个目录才能写入到文件中。
mkdir /tmp/b16
cd /tmp/b16
nano ssh.priv
chmod 600 ssh.priv
ssh -i ./ssh.priv bandit17@localhost

bandit17——>bandit18
关卡提示:There are 2 files in the homedirectory: passwords.old and passwords.new. The password for the next level is in passwords.new and is the only line that has been changed between passwords.old and passwords.new
NOTE: if you have solved this level and see ‘Byebye!’ when trying to log into bandit18, this is related to the next level, bandit19
根据提示,需要使用对比的命令了,diff passwords.old passwords.new

bandit18——>bandit19
关卡提示:The password for the next level is stored in a file readme in the homedirectory. Unfortunately, someone has modified .bashrc to log you out when you log in with SSH.
按照之前的方式进行登录,会出现图下情况:

于是尝试在ssh命令后面跟上命令,虽然被断开了,但是命令还是执行了的。

也可以使用ssh [email protected] "bash --norc"命令。

bandit19——>bandit20
关卡提示:To gain access to the next level, you should use the setuid binary in the homedirectory. Execute it without arguments to find out how to use it. The password for this level can be found in the usual place (/etc/bandit_pass), after you have used the setuid binary.
https://en.wikipedia.org/wiki/Setuid
根据提示,在home目录下有一个二进制文件,而这个文件运行命令就和在bandit20运行命令一样。

bandit20——>bandit21
关卡提示:There is a setuid binary in the homedirectory that does the following: it makes a connection to localhost on the port you specify as a commandline argument. It then reads a line of text from the connection and compares it to the password in the previous level (bandit20). If the password is correct, it will transmit the password for the next level (bandit21).
NOTE: Try connecting to your own network daemon to see if it works as you think
本关是需要自己设置一个监听端口来接受home目录下二进制文件的连接。这关需要两个ssh。
ssh1用来监听,设置监听端口为54321,如果有链接过来就会回复上一关的密码。
echo "GbKksEFF4yrVs6il55v6gwY5aVje5f0j" | nc -l -p 54321
![]()
ssh2 用来连接,连接之前先yongnmap确认端口是否开放。
nmap localhost -p 54321

在ssh2运行一下代码:
./suconnect 54321

查看ssh1,获得密码。

bandit21——>bandit22
关卡提示:A program is running automatically at regular intervals from cron, the time-based job scheduler. Look in /etc/cron.d/ for the configuration and see what command is being executed.
根据提示,到/etc/cron.d目录下查看cronjob_bandit22的定时任务。
具体过程是:将一个sh问输出重定向搭配空设备文件,然后将内容输出到/tmp下的一个文件里。

bandit22——>bandit23
关卡提示:A program is running automatically at regular intervals from cron, the time-based job scheduler. Look in /etc/cron.d/ for the configuration and see what command is being executed.
NOTE: Looking at shell scripts written by other people is a very useful skill. The script for this level is intentionally made easy to read. If you are having problems understanding what it does, try executing it to see the debug information it prints.
根据提示,先切到/etc/cron.d目录下,查看该目录下有什么东西,感觉和上一关差不多,按照上一关的步骤进行。本关脚本为,定义了myname用来存储用户名,然后密码保存到了/tmp/$mytarget中。而$mytarget=(echo I am user $myname | md5sum | cut -d ’ ’ -f 1),则是将前面echo的东西进行md5加密,cut -d则是分割一个字符串,指定分隔符,-f表示取分隔后的第几段内容。

bandit23——>bandit24
关卡提示:A program is running automatically at regular intervals from cron, the time-based job scheduler. Look in /etc/cron.d/ for the configuration and see what command is being executed.
NOTE: This level requires you to create your own first shell-script. This is a very big step and you should be proud of yourself when you beat this level!
NOTE 2: Keep in mind that your shell script is removed once executed, so you may want to keep a copy around…
该题需要我们自己写脚本,我们先看看文件。

会定时执行/usr/bin/cronjob_bandit24.sh,脚本的意思,执行/var/spool/bandit24中的所有文件,如果60秒内没有执行就删除。所以我们需要写一个查看密码的脚本并放到这个目录下,让它以bandit24用户来执行。
由于不执行会删除,所以我们把密码放在其他不被删除的地方
mkdir /tmp/zz
cd /tmp/zz
touch pass
nano
打开nano后,加入以下代码,并保存为getpass.sh:
#!/bin/bash

cat /etc/bandit_pass/bandit24 > /tmp/zz/pass
回到控制台,修改文件权限,等待一会,查看pass可看到密码:
chmod 777 getpass.sh
chmod 777 pass
cp getpass.sh /var/spool/bandit24
chmod 777 /var/spool/bandit24/getpass.sh
cat pass
ps:因为将getpass.sh复制过去的时候文件的权限会改变,所以需要在此修改文件权限,提起创建pass文件是因为,正常操作的它不出来啊!!!所以我只能提前创建了,然后修改权限,一定要记得修改所有文件的权限!!!!!这是个坑!!!!不然密码出不来的!!!

bandit24——>bandit25
关卡提示:A daemon is listening on port 30002 and will give you the password for bandit25 if given the password for bandit24 and a secret numeric 4-digit pincode. There is no way to retrieve the pincode except by going through all of the 10000 combinations, called brute-forcing.
根据提示,我们需要把10000个数都列出来,然后把当前密码和一个4位数字一同发送给30002端口,知道符合要求,才会得到下一关的密码。这需要写脚本了。

由于自己写shell脚本没有成功(我是个小弱鸡,现学现写,没不太熟练),所以参照了简书上一位大佬给的python爆破脚本。
from pwn import *

r = remote('localhost', 30002)
for i in range(0, 10):
    for j in range(0, 10):
        for k in range(0, 10):
            for p in range(0, 10):
                flag = str(i) + str(j) + str(k) + str(p)
                s = "UoMYTrfrBFHyQXmg6gzctqAwOmw1IohZ "+ flag
                r.sendline(s)
                response = r.recvline()
                if 'Wrong!' not in response:
                    print 'Correct! ' + response
bandit25——>bandit26
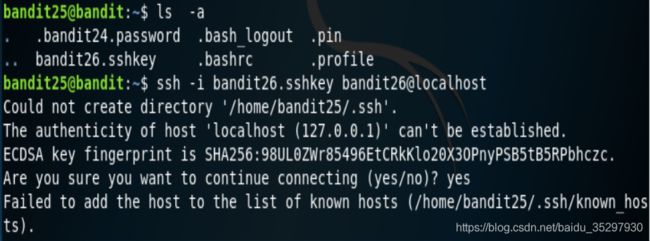
关卡提示:Logging in to bandit26 from bandit25 should be fairly easy… The shell for user bandit26 is not /bin/bash, but something else. Find out what it is, how it works and how to break out of it.
先查看有什么东西,看到bandit26.sshkey,尝试连接,发现失败。

于是查看bandit26的shell。想知道一个用户的shell可以查看用户数据文件 /etc/passwd,发现一个/usr/bin/showtext,查看该文件。
cat /etc/passwd | gred "bandit26"
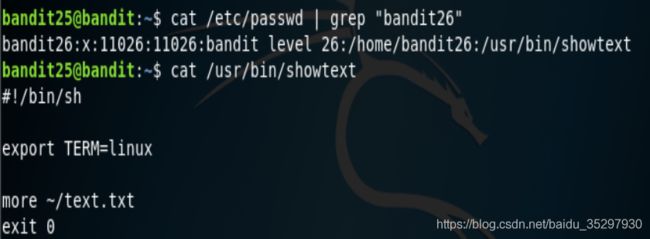
脚本中使用了more来查看文本文件,当执行完之后,进行退出操作,所以我们的连接会断开。所以我们需要让more别执行完,而more指令正好有一个特性,当输出的内容行数多于终端行数的时候会停下来,等着我们去翻页,所以我们可以缩小窗口试试看,缩短之后并没有断开,而是显示一个–More–(50%) (此处没截图)。
然后按下V键,它会将我们带到vim,然后键入:
:r /etc/bandit_pass/bandit26
按下enter键应该得到如下显示,得到密码后不要关闭终端!!!!!26关会继续用!!!。

bandit26——>bandit27
关卡提示:Good job getting a shell! Now hurry and grab the password for bandit27!
与上一关卡一样,但这次不能使用:r命令了,因为没有权限,需要设置shell目录。
#vim 模式中
:set  shell=/bin/sh
:sh
这样就运行得到了一个shell,然后进行ls,发现一个程序,接下来操作如图所示。

bandit27——>bandit28
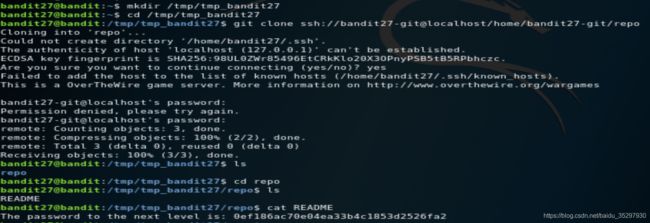
关卡提示:There is a git repository at ssh://bandit27-git@localhost/home/bandit27-git/repo. The password for the user bandit27-git is the same as for the user bandit27.
Clone the repository and find the password for the next level.
这关是使用git clone命令,然后查找到密码即可。
bandit28——>bandit29
关卡提示:There is a git repository at ssh://bandit28-git@localhost/home/bandit28-git/repo. The password for the user bandit28-git is the same as for the user bandit28.
Clone the repository and find the password for the next level.
和上关一样,clone下来,查看文件。发现一个README.md.
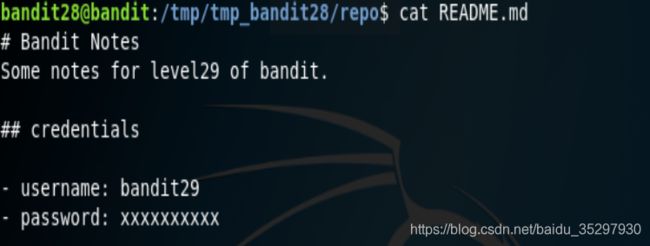
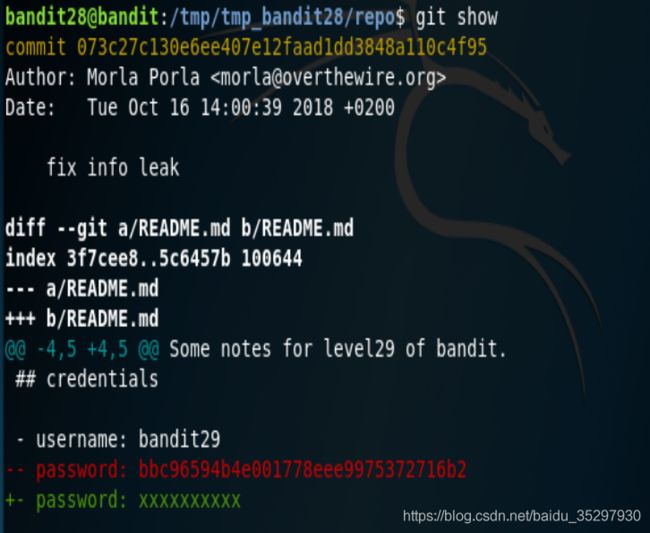
什么都没有?????好吧,那试试查看查看日志,git log

我们发现最新的是修复信息泄露,那我们可以git show,默认会有git diff -tree --cc的格式,可以查看文本的差异。然后密码就出来了。
bandit29——>bandit30
关卡提示:There is a git repository at ssh://bandit29-git@localhost/home/bandit29-git/repo. The password for the user bandit29-git is the same as for the user bandit29.
Clone the repository and find the password for the next level.
和之前一样,先clone下来。然后按照之前的git log 、git show操作一遍,什么都没有发现。猜想可能不在这个分支内,于是查看所有分支,发现分支,切换分支,一般dev是development开发者的分支,所以切换到该分支看看。
git branch -a
git checkout remotes/origin/dev
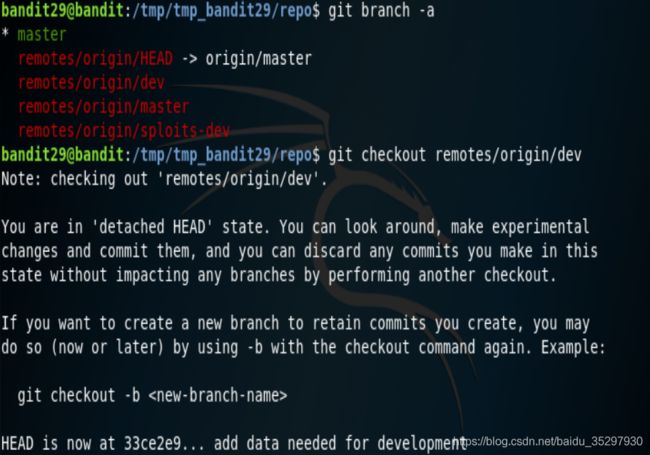
接着git log,发现了有趣的东西,接着git show发现密码。


bandit30——>bandit31
关卡提示:There is a git repository at ssh://bandit30-git@localhost/home/bandit30-git/repo. The password for the user bandit30-git is the same as for the user bandit30.
Clone the repository and find the password for the next level.
老样子,clone下来,老方法,git log、git show都没有东西,查看分支也只有一个分支,好吧,那只能使用git show-ref,它可以实现本地存储库的多有可用的引用以及关联的提交ID。
发现一个敏感词,secret,好吧,我们看看它创建时提交的元数据吧,git show xxx,获得密码。

bandit31——>bandit32
关卡提示:There is a git repository at ssh://bandit31-git@localhost/home/bandit31-git/repo. The password for the user bandit31-git is the same as for the user bandit31.
Clone the repository and find the password for the next level.
还是先clone下来。查看文件,发现需要我们吧key.txt文件push到远程服务器上。
先是创建key.txt文件,上传文件时会出错,是因为wenj.gitignore会对上传的.txt文件无视,所以使用git add -f 强制上传。

然后设置给git commit。
git commit -m 'key.txt'

然后git push,获得密码。

bandit32——>bandit33
关卡提示:After all this git stuff its time for another escape. Good luck!
进入之后直接进入了命令大写的终端,想构建一个大写文件命的shell都不行orz。

查找资料发现,使用$0进入shell,id查看当前用户为bandi33

ls -ll /etc/bandit_pass 查看权限。

查看路径下的密码。

bandit33——>bandit34

至此bandit所有内容都结束了~~