koa2+vue实现验证码登录验证的详细过程
首先我们需要在后端使用svg-captcha,和koa-session模块。
const Koa = require('koa');
const Router = require('koa-router') // koa 路由中间件
const svgCaptcha = require('svg-captcha')
const session=require('koa-session')
const app = new Koa();

const router = new Router(); // 实例化路由
//设置session
app.keys = ['some secret hurr'];
const config={
    key:'koa:sess',
    maxAge:60*1000*20,
    overwrite:true,
    httpOnly:true,
    signed:true,
    rolling:true,//每次访问将会重置过期时间
    renew:true
}
//启动session
app.use(session(config,app))

router.get('/home', async (ctx, next) => {

  const cap = svgCaptcha.create({
    size: 4, // 验证码长度
    width:160,
    height:60,
    fontSize: 50,
    ignoreChars: '0oO1ilI', // 验证码字符中排除 0o1i
    noise: 2, // 干扰线条的数量
    color: true, // 验证码的字符是否有颜色,默认没有,如果设定了背景,则默认有
    background: '#eee' // 验证码图片背景颜色
  })

  let img = cap.data // 验证码
  let text = cap.text.toLowerCase() // 验证码字符,忽略大小写

  // 设置响应头
  ctx.response.type = 'image/svg+xml';

  ctx.body = img;
});

app.use(router.routes());

app.listen(5757, () => {
  console.log('This server is running at http://localhost:' + 5757)
})
这时直接访问 http://localhost:5757/home便会有一个图片返回。
<img :src="imgsrc" @click="changeimg" alt="验证码" class="yanmaicon">
接下来讲验证登录接口操作。
const Koa = require('koa');
const Router = require('koa-router') // koa 路由中间件
const session=require('koa-session')
const svgCaptcha = require('svg-captcha')
const app = new Koa();
const router = new Router(); // 实例化路由
const {sign} =require('jsonwebtoken')
const {secret} = require('../../routes/config')
//设置session
app.keys = ['some secret hurr'];
const config={
    key:'koa:sess',
    maxAge:60*1000*20,
    overwrite:true,
    httpOnly:true,
    signed:true,
    rolling:true,//每次访问将会重置过期时间
    renew:true
}
//启动session
app.use(session(config,app))
router.get('/home', async (ctx, next) => {

  const cap = svgCaptcha.create({
    size: 4, // 验证码长度
    width:160,
    height:60,
    fontSize: 50,
    ignoreChars: '0oO1ilI', // 验证码字符中排除 0o1i
    noise: 2, // 干扰线条的数量
    color: true, // 验证码的字符是否有颜色,默认没有,如果设定了背景,则默认有
    background: '#eee' // 验证码图片背景颜色
  })

  let img = cap.data // 验证码
  let text = cap.text.toLowerCase() // 验证码字符,忽略大小写

  // 设置响应头
  ctx.response.type = 'image/svg+xml';

  ctx.body = img;
});
const newdata=[]
router.get('/login' ,async (ctx,next){
   //ctx.request.params 路径参数
    //ctx.request.query 请求参数
    //ctx.request.header 头参数
    //ctx.request.body 对象参数
    const user = ctx.request.body

    console.log(newdata);

    console.log(user);
    if(ctx.session.userinfo){
        newdata.push(ctx.session.userinfo)
        if(newdata.length==2){
            newdata.splice(0,1)
        }
     }
    if (user && user.username=='admin'&&user.password=='ws123456'&&user.yanma==newdata[0]){
        let {username,password} = user
        console.log(user)
        //签发令牌token
        const token=sign({username,password},secret,{expiresIn: '1h'})
        ctx.body={
            message:'成功得到了token',
            code:200,
            token
        }
    }else{

        ctx.body={
            message:'error',
            code:404,
            userinfo:ctx.session.userinfo+''
        }
    }
}
app.use(router.routes());

app.listen(5757, () => {
  console.log('This server is running at http://localhost:' + 5757)
})
以上为完整的合并后的代码。
…/…/routes/config文件就是一段密钥,随便设置。
exports.secret='adsdafasfdafaefae'
接下来就是前端请求了。
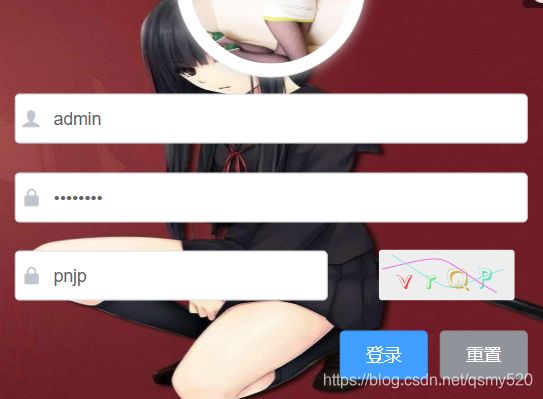
<template>

  <div class="login_container">

    <div class="login_box">
      <!-- 头像区域 -->
      <div class="avatar_box">
        <img src="https://i03piccdn.sogoucdn.com/901feb22e6b076c2" alt="">
      </div>
      <!-- 登录表单区域 -->
      <el-form ref="loginFormRef" :model="loginForm" :rules="loginFormRules" label-width="0px" class="login_form">
        <!-- 用户名 -->
        <el-form-item prop="username">
          <el-input v-model="loginForm.username" prefix-icon="iconfont icon-user" placeholder="请输入用户名"></el-input>
        </el-form-item>
        <!-- 密码 -->
        <el-form-item prop="password">
          <el-input v-model="loginForm.password" prefix-icon="iconfont icon-3702mima" type="password" placeholder="请输入密码"></el-input>
        </el-form-item>
        <!-- 验证码 -->
        <el-form-item prop="yanma">
          <el-input v-model="loginForm.yanma" prefix-icon="iconfont icon-3702mima" placeholder="请输入验证码"></el-input>
          <span>

        <img :src="imgsrc" @click="changeimg" alt="验证码" class="yanmaicon">

      </span>
        </el-form-item>
        <!-- 按钮区域 -->
        <el-form-item class="btns">
          <el-button type="primary" @click="login">登录</el-button>
          <el-button type="info" @click="resetLoginForm">重置</el-button>
        </el-form-item>
      </el-form>

    </div>
  </div>
</template>

<script lang="ts">
import { Component, Vue } from 'vue-property-decorator';


@Component({
  components: {

  },
})
export default class App extends Vue {
  // 这是登录表单的数据绑定对象
     resdata=''
      loginForm= {
        username: 'admin',
        password: 'ws123456',
        yanma:'pnjp'
      }
     imgsrc='http://127.0.0.1:5757/home'
      // 这是表单的验证规则对象
      loginFormRules= {
        // 验证用户名是否合法
        username: [
          { required: true, message: '请输入登录名称', trigger: 'blur' },
          { min: 3, max: 10, message: '长度在 3 到 10 个字符', trigger: 'blur' }
        ],
        // 验证密码是否合法
        password: [
          { required: true, message: '请输入登录密码', trigger: 'blur' },//提交为空时显示
          { min: 6, max: 15, message: '长度在 6 到 15 个字符', trigger: 'blur' }//提交少于6或者大于15时显示
        ],
         yanma: [
          { required: true, message: '请输入验证码', trigger: 'blur' },//提交为空时显示

        ]
        }

    changeimg(){

      this.imgsrc='http://127.0.0.1:5757/login?'+Math.random();


    }
        // 点击重置按钮,重置登录表单
   async resetLoginForm() {
       this.$refs.loginFormRef.resetFields();
    }
   async login() {
      this.$refs.loginFormRef.validate(async valid => {
        if (!valid) return
      const {data:data}=await this.$http.post('/login',this.loginForm)
      console.log(this.loginForm);

       this.resdata=data.token
     window.sessionStorage.setItem('token', data.token)
     if(data.token){
        this.$message({
          showClose: true,
          message: '登录成功!',
          type: 'success'
        });
          // 2. 通过编程式导航跳转到后台主页,路由地址是 /home
        this.$router.push('/home')
     }else{
        this.$message({
          showClose: true,
          message: '登录失败!',
          type: 'error'
        });
     }
     })

    }}

</script>

<style lang='less'>
.login_container {
  background-image:url('https://ss2.bdstatic.com/70cFvnSh_Q1YnxGkpoWK1HF6hhy/it/u=1467174003,3923680221&fm=26&gp=0.jpg');
  height: 100%;

}

.login_box {
  width: 450px;
  height: 340px;
  background-color: #fff;
  border-radius: 3px;
  position: absolute;
  left: 50%;
  top: 50%;
  background: url('https://timgsa.baidu.com/timg?image&quality=80&size=b9999_10000&sec=1585853885685&di=49a050de3c0868045138d5f9bf546058&imgtype=0&src=http%3A%2F%2Fc.hiphotos.baidu.com%2Fzhidao%2Fpic%2Fitem%2Fadaf2edda3cc7cd91769df6a3801213fb80e9139.jpg');
  transform: translate(-50%, -50%);
  background-size:100% 100%;
  background-repeat:no-repeat;

  .avatar_box {
    height: 130px;
    width: 130px;
    border: 1px solid #eee;
    border-radius: 50%;
    padding: 10px;
    box-shadow: 0 0 10px #ddd;
    position: absolute;
    left: 50%;
    transform: translate(-50%, -50%);
    background-color: #fff;
    img {
      width: 100%;
      height: 100%;
      border-radius: 50%;
      background-color: #eee;
    }
  }
}

.login_form {
  position: absolute;
  bottom: 0;
  width: 100%;
  padding: 0 20px;
  box-sizing: border-box;//使其符合盒子模型
}

.btns {
  display: flex;
  justify-content: flex-end;
}
img[class="yanmaicon"]{
  position: absolute;
  right: 10px;
  height: 100%;
  border-radius: 3px;

}
.login_form :nth-child(3) .el-input{
  width: 250px;
}
</style>
this.imgsrc='http://127.0.0.1:5757/login?'+Math.random()

  这段代码是为了点击图片时刷新
同时,想在访问时传递session,必须在main.ts添加上axios.defaults.withCredentials=true;
接下来就可以登录验证和验证码登录了。
大功告成!