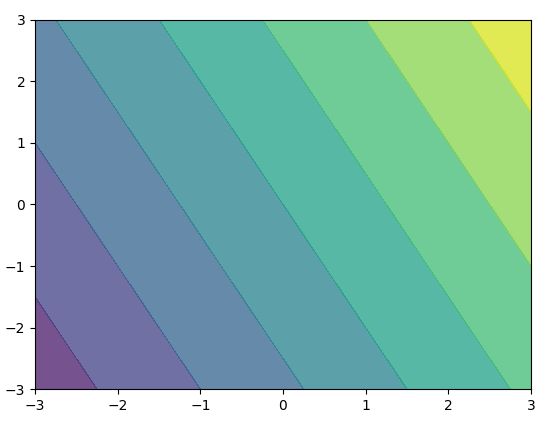
matplot 除了可以画比较简单的图之外,还可以类似于等高线这样的图。在机器学习里面可以用于可视化分类的效果,比如在可视化svm分类的时候,就可以这样的方式去画图,在可视化上往往会有很好的效果。
代码如下:
import matplotlib.pyplot as plt
import numpy as np

def f(x,y):
    # the height functions
    return 2 * x +y

n = 256
# 将(-3,+3) 的这个区间分成256
x = np.linspace(-3, 3, n)  # x shape (256,)
y = np.linspace(-3, 3, n)  # y shape (256,)

# np.meshgrid 形成一个平面网格,
# X代表这个平面点的横坐标,Y代表这个平面点的纵坐标
# X or Y shape is : (256, 256)
# 这个函数的具体功能在下面讲
X,Y = np.meshgrid(x, y)

# 接下来进行颜色填充
# 使用函数plt.contourf把颜色加进去,位置参数分别为:X, Y, f(X,Y)。
plt.contourf(X, Y, f(X, Y))
# 更多的参数,可以画出不同的风格,alpha=.75 表示透明度 , cmap=plt.cm.hot 表示f(X,Y) 的值对应到color map的暖色组中寻找对应颜色
#plt.contourf(X, Y, f(X, Y), 8, alpha=.75, cmap=plt.cm.hot)
plt.show()
结果如下图:
如果要画的点是离散的取值怎么办?
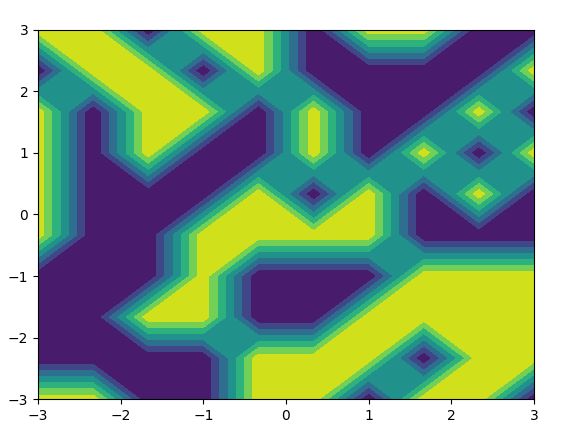
for example,画一个二维平面,上面的点的取值是离散的(比如说,0或1)。在机器学习经常需要可视化这样的东西,给一个平面,上面有很多点,有的属于正类,有的属于负类,那么如果可视化?
"""
画一个二维平面,上面的点的取值是离散的(比如说,0或1),
比如说机器学习经常需要可视化这样的东西,给一个平面,上面有很多点,有的属于正类,有的属于负类,那么如果可视化?

下面,是一个解决方案
"""

import matplotlib.pyplot as plt
import numpy as np


n = 10
x = np.linspace(-3, 3, n)
y = np.linspace(-3, 3, n)


X,Y = np.meshgrid(x, y)

# X,Y指的是一个 x 属于[-3,3],y属于[-3,3]的二维平面
# z表示的是在这个二维平面内点的取值
# np.random.randint(0,2,X.shape) 指的是生成一个shape形状的矩阵,里面的取值是0或1
z=np.random.randint(0,2,X.shape)

"""
rand = np.random.randint(0,2,(3,8))
print(rand)

[[1 1 0 0 1 0 1 0]
 [0 1 0 1 0 1 0 0]
 [0 0 1 0 0 1 0 0]]
"""

plt.contourf(X, Y, z)
plt.show()
结果如下:
使用matplot画图的时候,常用的几个numpy函数:
np.meshgrid() 函数
一个简单的示例代码如下:
x = np.arange(-2,2)
y = np.arange( 0,3)   #生成一位数组,其实也就是向量

x
Out[31]: array([-2, -1,  0,  1])

y
Out[32]: array([0, 1, 2])

#将两个一维数组变为二维矩阵
ret_x ,ret_y = np.meshgrid(x,y)

# ret_x  可以理解为 x 纵向扩展
ret_x  Out[36]:
array([[-2, -1,  0,  1],
       [-2, -1,  0,  1],
       [-2, -1,  0,  1]])

# ret_y 可以理解为 y 横向扩展
ret_y Out[37]:
array([[0, 0, 0, 0],
       [1, 1, 1, 1],
       [2, 2, 2, 2]])
如果我们想把 一个平面上面,x 属于[-2,1],y属于[0,2]的区域 里面的点画出来。np.meshgrid()就可以提供这样的功能。
它的返回值ret_x , ret_y 维度是相同的,分别表示了这个区域内点的横坐标和纵坐标。
np.c_ or np.r_ 函数
np.c_ or np.r_ 函数的作用是按行或者是按列合并向量
import numpy as np

a = np.array([1,2,3])
b = np.array([5,2,1])

# np.r_按row来组合array
# a,b 必须是向量
print (np.r_[a,b])
# 输出
# [1 2 3 5 2 1]

# np.c_按colunm来组合array
print (np.c_[a,b])
"""
# 输出
[[1 5]
 [2 2]
 [3 1]]
"""
举个例子:
svm 非线性核分类
"""
一个 非线性svm分类器 的demo
"""

import numpy as np
import matplotlib.pyplot as plt
from matplotlib import style
from sklearn import svm
#style.use("ggplot")


# 构造了一个非线性的数据
X = np.array([[1,1],[5,5],[5,1],[1,5],[2.5,2.5],[2,3],[3,2],[2,2],[3,3]])
y = [1,1,1,1,0,0,0,0,0]
plt.scatter(X[:, 0], X[:, 1], c = y)
#plt.show()

#svc = svm.SVC(kernel='linear',C=1.0) # 线性核
#svc = svm.SVC(kernel='rbf',C=1.0,gamma=1)  #如果是非线性核 可以还不同的gamma值
svc = svm.SVC(kernel='rbf',C=1.0,gamma='auto')
svc.fit(X,y)

h = 0.01
x_min, x_max = X[:, 0].min() - 1, X[:, 0].max() + 1
y_min, y_max = X[:, 1].min() - 1, X[:, 1].max() + 1
xx, yy = np.meshgrid(np.arange(x_min, x_max, h),np.arange(y_min, y_max, h))


plt.subplot(1, 1, 1)
Z = svc.predict(np.c_[xx.ravel(), yy.ravel()])
Z = Z.reshape(xx.shape)
plt.contourf(xx, yy, Z, cmap=plt.cm.Paired, alpha=0.8)

plt.scatter(X[:, 0], X[:, 1], c=y, cmap=plt.cm.Paired)
plt.xlim(xx.min(), xx.max())
plt.title("SVC with kernel "+svc.kernel)
plt.show()


