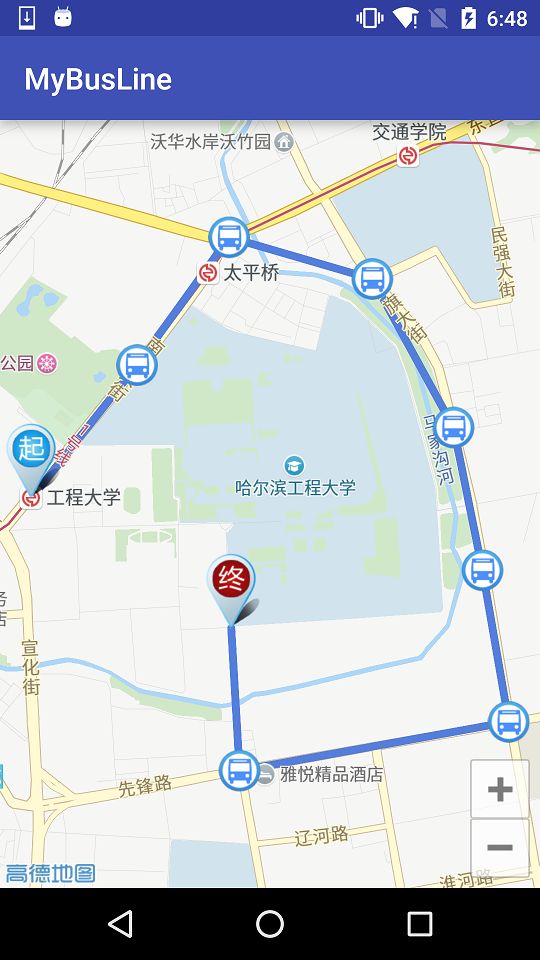
高德地图BusLineOverlay自定义公交线路
项目中用到一个功能,对车辆运行情况监控,在地图上显示。
因此需要在地图上绘制一条线路,显示每个站点的车站信息,以及当前车辆在线路上的运行情况。
类似高德地图demo中公交线路查询的样式

查了下文档,在BusLIneOverlay中看到这么一段话
公交线路图层类。在高德地图API里,如果要显示公交线路,可以用此类来创建公交线路图层。如不满足需求,也可以自己创建自定义的公交线路图层。
看来应该需要自定义实现。除了这个还有BusRouteOverlay,貌似这个是给出起始点坐标然后联网规划用的吧,没怎么看。还是用BusLineOverlay,因为看了下代码貌似需要提供线路坐标和车站坐标,和我需求比较相近。
看了下BusLineOverlay使用方法,基本上初始化之后,调用 addToMap()方法即可。BusLineOverlay所需参数如下:
public BusLineOverlay(Context context, AMap amap, BusLineItem busLineItem) context和amap目前都有了,现在主要需要创建BusLineItem ,这个类在AMap_Search_V3.2.1_20160308.jar这个包内,如果没有导入,需要导入下。
然后BusLineItem中主要内容(部分)如下。。。。
public class BusLineItem implements Parcelable {
    private float a;
    private String b;
    private String c;
    private String d;
    private List e = new ArrayList();
    private List f = new ArrayList();
    private String g;
    private String h;
    private String i;
    private Date j;
    private Date k;
    private String l;
    private float m;
    private float n;
    private List o = new ArrayList();
    public static final Creator CREATOR = new a();

    public BusLineItem() {
    }
这些abcde需要结合后边提供的Getter和Setter方法才能知道大概意思,然后我调试了官方demo抓取了一些数据研究了下,整理如下:
| 原始 | 含义 | 内容样例 |
|---|---|---|
| private float a; | 公交线路全程里程 | a = 20.00017 |
| private String b; | 线路名称 | b = “641路(金盏村–和平西桥)” |
| private String c; | 线路类型 | c = “普通公交” |
| private String d; | 城市代码 | d = “010” |
| private List e = new ArrayList(); | 公交线路的沿途坐标,包含首发站和终点站坐标。 | e = {ArrayList@4457} size = 283 |
| private List f = new ArrayList(); | 公交线路外包矩形的左下与右上顶点坐标。 | f = {ArrayList@4458} size = 2 |
| private String g; | 公交线路id | g = “110100015854” |
| private String h; | 公交线路的始发站名称。 | h = “金盏村” |
| private String i; | 公交线路的终点站名称。 | i = “和平西桥” |
| private Date j; | 首班车时间 | j = {Date@4462} “Thu Jan 01 05:30:00 GMT+08:00 1970” |
| private Date k; | 末班车时间 | k = {Date@4463} “Thu Jan 01 21:40:00 GMT+08:00 1970” |
| private String l; | 公交公司名 | l = “北京公共交通控股集团有限公司第七客运分公司” |
| private float m; | 起步价 | m = 2.0 |
| private float n; | 全程票价 | n = 5.0 |
| private List o = new ArrayList(); | 公交线路的站点列表。 | o = {ArrayList@4510} size = 23 |
在这些属性中,我认为主要有用的是那几个List,即
- 公交线路的沿途坐标
- 公交线路外包矩形的左下和右上顶点坐标
- 公交线路的站点列表
在之后的实验中我也发现,使用这几个参数即可实现我所需要的功能。
公交线路的沿途坐标:
这个主要用于存放线路上的坐标点,然后会根据这些点在地图上画出公交线路,要注意的是每个点之间使用的是直线连接,即给定两个点并不会沿公路画线,而是直接一条直线连接。所以如果想让线路准确比如在拐弯时完美描绘,我们需要提供大量点使线路与道路重合,从抓取的数据来看也能发现,使用了283个点来描绘了一条路线。
公交线路外包矩形的左下和右上顶点坐标:(不必须)
这个主要是为了确定所有点的范围,之后在地图显示时能以最好的比例把整个路线在地图上显示出来。这个如果使用过canvas中的drawRect就好理解了。
公交线路的站点列表:
这个顾名思义存储的就是线路中每个站点的信息,这个不像前两个,直接存储的经纬度坐标,这个使用了一个BusStationItem类,其内容如下:
| 原始 | 含义 | 内容样例 |
|---|---|---|
| private String a; | 车站id | a = “BV10006331” |
| private String b; | 车站名称 | b = “前苇沟” |
| private LatLonPoint c; | 车站坐标 | c = {LatLonPoint@4798} “40.021935,116.558075” |
| private String d; | 公交线路的城市编码 | d = null |
| private String e; | 车站区域编码。 | e = null |
| private List f; | 途径此公交站的公交路线。 | f = {ArrayList@4799} size = 0 |
这个直接设置车站名称和车站坐标即可。
准备开始:
首先把一个初始地图建立好。
之后,创建一个list存储LatLonPoint,主要存路线信息
        List pointList = new ArrayList<>();
        pointList.add(new LatLonPoint(45.775461,126.668084));
        pointList.add(new LatLonPoint(45.780235,126.673535));
        pointList.add(new LatLonPoint(45.784829,126.678277));
        pointList.add(new LatLonPoint(45.783332,126.685648));
        pointList.add(new LatLonPoint(45.77799,126.689832));
        pointList.add(new LatLonPoint(45.772869,126.691322));
        pointList.add(new LatLonPoint(45.76742,126.692674));
        pointList.add(new LatLonPoint(45.765669,126.678812));
        pointList.add(new LatLonPoint(45.770788,126.678383));
再创建一个list存BusStationItem车站信息,这里偷懒,线路坐标和车站坐标用的一样的,实际线路坐标要比车站坐标多很多
 List busStationItemList = new ArrayList<>();

        BusStationItem item1 = new BusStationItem();
        BusStationItem item2 = new BusStationItem();
        BusStationItem item3 = new BusStationItem();
        BusStationItem item4 = new BusStationItem();
        BusStationItem item5 = new BusStationItem();
        BusStationItem item6 = new BusStationItem();
        BusStationItem item7 = new BusStationItem();
        BusStationItem item8 = new BusStationItem();
        BusStationItem item9 = new BusStationItem();

        item1.setBusStationName("车站1");
        item2.setBusStationName("车站2");
        item3.setBusStationName("车站3");
        item4.setBusStationName("车站4");
        item5.setBusStationName("车站5");
        item6.setBusStationName("车站6");
        item7.setBusStationName("车站7");
        item8.setBusStationName("车站8");
        item9.setBusStationName("车站9");

        item1.setLatLonPoint(new LatLonPoint(45.775461,126.668084));
        item2.setLatLonPoint(new LatLonPoint(45.780235,126.673535));
        item3.setLatLonPoint(new LatLonPoint(45.784829,126.678277));
        item4.setLatLonPoint(new LatLonPoint(45.783332,126.685648));
        item5.setLatLonPoint(new LatLonPoint(45.77799,126.689832));
        item6.setLatLonPoint(new LatLonPoint(45.772869,126.691322));
        item7.setLatLonPoint(new LatLonPoint(45.767076,126.690356));
        item8.setLatLonPoint(new LatLonPoint(45.765669,126.678812));
        item9.setLatLonPoint(new LatLonPoint(45.770788,126.678383));


        busStationItemList.add(item1);
        busStationItemList.add(item2);
        busStationItemList.add(item3);
        busStationItemList.add(item4);
        busStationItemList.add(item5);
        busStationItemList.add(item6);
        busStationItemList.add(item7);
        busStationItemList.add(item8);
        busStationItemList.add(item9);
之后创建BusLineItem ,并将线路坐标和车站坐标赋值给它
        BusLineItem busLineItem = new BusLineItem();
        busLineItem.setDirectionsCoordinates(pointList);
        busLineItem.setBusStations(busStationItemList);
最后创建BusLineOverlay,再用addToMap方法绘制到地图上即可。
busLineOverlay = new BusLineOverlay(this,aMap,busLineItem);
busLineOverlay.addToMap();
到这里其实路线已经可以正常显示了,不过还有个问题,就是一开始载入时,如果没有设定,默认回以北京为坐标,就算设了本地城市坐标,但是也没法保证地图缩放比例正好合适。为了解决这个问题,可以参考官方文档中可视区域操作这一节。
我给activity注册了AMap.OnMapLoadedListener接口,当地图初始化完成后会调用onMapLoaded方法,
    @Override
    public void onMapLoaded() {
        LatLngBounds bounds = new LatLngBounds.Builder()
                .include(new LatLng(45.775461,126.668084))
                .include(new LatLng(45.780235,126.673535))
                .include(new LatLng(45.784829,126.678277))
                .include(new LatLng(45.783332,126.685648))
                .include(new LatLng(45.77799,126.689832))
                .include(new LatLng(45.772869,126.691322))
                .include(new LatLng(45.76742,126.692674))
                .include(new LatLng(45.765669,126.678812))
                .include(new LatLng(45.770788,126.678383)).build();
        //第二个参数,与地图边缘边距
        aMap.moveCamera(CameraUpdateFactory.newLatLngBounds(bounds, 30));
    }
LatLngBounds 作用是确定边界,将所有点传进去后,然后调用moveCamera方法,地图会以最好效果显示出所有点。
看文档时发现BusLineOverlay中还有个zoomToSpan()方法,移动镜头到当前的视角。查看了下源码
    public void zoomToSpan() {
        if(this.b != null) {
            try {
                List var1 = this.a.getDirectionsCoordinates();
                if(var1 != null && var1.size() > 0) {
                    LatLngBounds var2 = this.a(var1);
                    this.b.moveCamera(CameraUpdateFactory.newLatLngBounds(var2, 5));
                }
            } catch (Throwable var3) {
                var3.printStackTrace();
            }

        }
    }
其实原理一样,也是取出了线路上所有点创建了LatLngBounds 来移动。
最后,效果如下
源码
车站信息点击显示还没做,以后有空会更新。
