中标麒麟linux安装Oracle客户端
在中标麒麟桌面系统安装Oracle客户端
主要参考链接:https://www.cnblogs.com/mthoutai/p/6973131.html
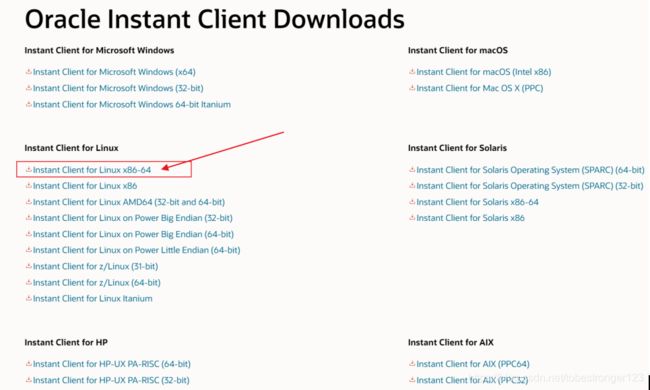
- 准备好所须要的安装包,http://www.oracle.com/technetwork/database/features/instant-client/index-097480.html这个网址有各种操作系统的客户端
虚拟机X86版本选的是
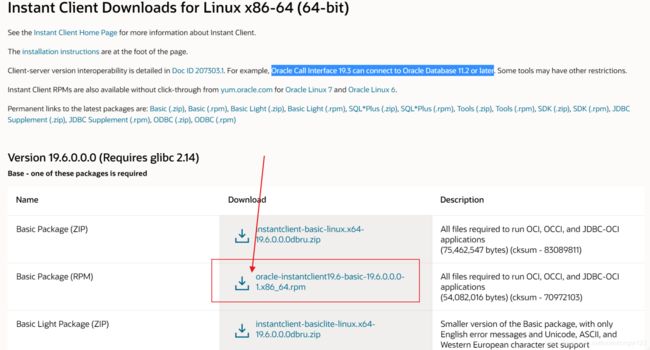
客户端支持11.2及以后版本的Oracle服务端的链接
然后下载rpm安装文件,下载存放路径位置:
需要下载文件列表
oracle-instantclient19.6-basic-19.6.0.0.0-1.x86_64.rpm
oracle-instantclient19.6-devel-19.6.0.0.0-1.x86_64.rpm
oracle-instantclient19.6-jdbc-19.6.0.0.0-1.x86_64.rpm
oracle-instantclient19.6-sqlplus-19.6.0.0.0-1.x86_64.rpm
下载完成后
先安装oracle-instantclient19.6-basic-19.6.0.0.0-1.x86_64.rpm。其它依次安装
我是直接使用root用户去安装的
执行安装命令:rpm -ivh oracle-instantclient19.6-basic-19.6.0.0.0-1.x86_64.rpm;
报错了:如下图所示
其实通过命令:ldconfig可以提前判断是不是会报“不是符合连接”的错误
[liveuser@localhost down]$ su - root
[root@localhost ~]# ldconfig
ldconfig: /opt/remote-viewer/libs/libspice-controller.so.0 不是符号连接
ldconfig: /opt/remote-viewer/libs/libspice-client-gtk-3.0.so.1 不是符号连接
ldconfig: /opt/remote-viewer/libs/libspice-client-glib-2.0.so.1 不是符号连接
这里显示存在“/opt/remote-viewer/libs/libspice-controller.so.0 不是符号连接”的问题
解决办法:
[root@localhost ~]# cd /opt/remote-viewer/libs/
执行下图方框内的3个命令
[root@localhost libs]# ln -sf libspice-client-glib-2.0.so.1.6.0 libspice-client-glib-2.0.so.1
[root@localhost libs]# ln -sf libspice-client-gtk-3.0.so.1.2.0 libspice-client-gtk-3.0.so.1
[root@localhost libs]# ln -sf libspice-controller.so.0.0.0 libspice-controller.so.0
------------------------
【ps:ln -sf 的用法 b—>a即b 指向a ln -sf a b】
执行完后,在执行ldconfig命令显示已经不在提示“不是符合连接”的错误。
然后卸载之前安装报错的包oracle-instantclient19.6-basic-19.6.0.0.0-1.x86_64.rpm:
[root@localhost down]# rpm -e oracle-instantclient19.6-basic-19.6.0.0.0-1.x86_64;
重新安装
[root@localhost down]# rpm -ivh oracle-instantclient19.6-basic-19.6.0.0.0-1.x86_64.rpm
准备中... ################################# [100%]
正在升级/安装...
1:oracle-instantclient19.6-basic-19################################# [100%]
[root@localhost down]# rpm -ivh oracle-instantclient19.6-devel-19.6.0.0.0-1.x86_64.rpm oracle-instantclient19.6-jdbc-19.6.0.0.0-1.x86_64.rpm oracle-instantclient19.6-sqlplus-19.6.0.0.0-1.x86_64.rpm
准备中... ################################# [100%]
正在升级/安装...
1:oracle-instantclient19.6-sqlplus-################################# [ 33%]
2:oracle-instantclient19.6-jdbc-19.################################# [ 67%]
3:oracle-instantclient19.6-devel-19################################# [100%]
(不是符号连接 解决方案主要是参考链接:https://blog.csdn.net/buknow/article/details/103205522)
2、创建用户、组和文件夹
[root@localhost down]# groupadd oinstall
[root@localhost down]#
[root@localhost down]#
[root@localhost down]# groupadd dba
[root@localhost down]# useradd -g oinstall -G dba oracle
[root@localhost down]# passwd oracle
更改用户 oracle 的密码 。
新的 密码:
无效的密码: 密码少于 8 个字符
重新输入新的 密码:
passwd:所有的身份验证令牌已经成功更新。
[root@localhost down]# mkdir -p /home/oracle/network/admin
[root@localhost down]# chown -R oracle:oinstall /home/oracle
[root@localhost down]# chmod -R 755 /home/oracle
[root@localhost down]# cp /home/liveuser/down/tnsnames.ora /home/oracle/network/admin
// 3、将oracleserver上面的tnsnames.ora拷贝出来。放到/home/oracle/network/admin文件夹以下。
[root@localhost down]# cp /home/liveuser/down/tnsnames.ora /home/oracle/network/admin
这一步骤可以不操作[我没有操作]
4、改动环境变量
[oracle@wxcs-2 ~]$ vi .bash_profile
export ORACLE_HOME=/home/oracle
export SQLPATH=/home/oracle/network/admin
export TNS_ADMIN=/home/oracle/network/admin
export NLS_LANG="SIMPLIFIED CHINESE_CHINA.ZHS16GBK"
export LD_LIBRARY_PATH=/usr/lib/oracle/10.2.0.5/client/lib/:/usr/lib/oracle/10.2.0.5/client/lib:$LD_LIBRARY_PA
TH
export PATH=$PATH:$ORACLE_HOME:$LD_LIBRARY_PATH
[oracle@wxcs-2 ~]$ source .bash_profile 环境变量马上生效
5、能够正常连接oracleserver了
[root@localhost down]# sqlplus test/[email protected]/orcl
SQL*Plus: Release 19.0.0.0.0 - Production on Mon Apr 20 12:40:32 2020
Version 19.6.0.0.0
Copyright (c) 1982, 2019, Oracle. All rights reserved.
Connected to:
Oracle Database 11g Enterprise Edition Release 11.2.0.1.0 - Production
With the Partitioning, OLAP, Data Mining and Real Application Testing options
SQL> select task_name from abc;
TASK_NAME
--------------------------------------------------------------------------------
1
211
??-2019-12-24
6 rows selected.


