Nacos 代替 eureka 成为注册中心
本文不适合初学者,初学者请移步百度基础知识。
nacos既可以作为注册中心,又可以作为配置中心,可以代替传统的eureka+cloud config的方式,并且nacos自带图形化管理界面,而且支持热加载,nacos可以和eureka+cloud config无缝切换,所以也支持RestTemplate和Feign等方式进行远程调用
一:环境
本文相关版本,版本一定要对应好,否则会报各种奇怪的错误
1:spring-cloud-alibaba 2.1.2.RELEASE
2:spring-cloud Greenwich.RELEASE:
3:spring-boot 2.1.4.RELEASE:
4:nacos 0.9.0.RELEAS
5:nacos服务端版本1.0.1
下面给出相应的版本对应关系
Spring Cloud Version Spring Cloud Alibaba Version Spring Boot Version
Spring Cloud Edgware 1.5.1.RELEASE 1.5.X.RELEASE
Spring Cloud Finchley 2.0.2.RELEASE 2.0.X.RELEASE
Spring Cloud Greenwich 2.1.2.RELEASE 2.1.X.RELEASE
Spring Cloud Hoxton.RELEASE 2.2.0.RELEASE 2.2.X.RELEASE
Spring Cloud Hoxton.SR3 2.2.1.RELEASE 2.2.5.RELEASE
二:下载nacos
地址:https://github.com/alibaba/nacos/releases,下载后解压即可
windows系统点击startup.cmd 启动 。linux下命令启动 : nohup sh startup.sh -m standalone & 或者 bash startup.sh -m standalone &,默认端口是8848
启动成功,在浏览器上访问:http://localhost:8848/nacos,会跳转到登陆界面,默认的登陆用户名为nacos,密码也为nacos。
在里面可以进行配置管理和服务管理
三:更换eureka为nacos
主要有4点
1: pom里添加 SpringCloud Alibaba、nacos 依赖
			com.alibaba.cloud
			spring-cloud-alibaba-dependencies
			2.1.2.RELEASE
			pom
			import


			org.springframework.cloud
			spring-cloud-starter-alibaba-nacos-discovery
			0.9.0.RELEASE


			org.springframework.cloud
			spring-cloud-alibaba-nacos-config
			0.9.0.RELEASE
2: yml排除 eurake依赖
autoconfigure:
    exclude: org.springframework.cloud.netflix.eureka.EurekaClientAutoConfiguration #排除eureka注册中心
3: yml里注释去掉config配置
完整yml代码 bootstrap.yml,注意一定是bootstrap.yml,bootstrap比application先加载
#eureka注册中心地址
#eureka:
#  instance:
#    prefer-ip-address: true
#  client:
#    service-url:
#      defaultZone: http://xxx.xxx.xxx.xxx:8060/eureka/
#    register-with-eureka: true
#    fetch-registry: true
#客户端配置中心配置
#spring:
#  application:
#    name: api-system
#  cloud:
#    config:
#      fail-fast: true #是否启动快速失败功能,功能开启则优先判断config server是否正常
#      name: api-druid-hdys  #配置中心Git仓库config文件夹里的文件名字
#      label: master         #默认分支master
#      profile: dev          #不加此属性直接获取api-druid-hdys.yml,加了后符合config的名字规则api-druid-hdys-dev.yml
#      discovery:
#        enabled: true
#        service-id: config-server  #spring cloud 配置中心服务名
#nacos注册中心配置
spring:
  application:
    name:  api-system
  cloud:
    nacos:
      discovery:
        server-addr: 127.0.0.1:8848
        namespace: 6e65de9c-9069-4d05-8c20-2f94602163aa
      config:
        server-addr: 127.0.0.1:8848
        namespace: 6e65de9c-9069-4d05-8c20-2f94602163aa
        file-extension: yaml #nacos config扩展名 目前仅支持ymal和properties
        prefix: api-hdys-durid-sys
  profiles:
    active: dev   #和Nacos中的dataId 格式对应 ${prefix}-${spring.profile.active}.${file-extension}
  autoconfigure:
    exclude: org.springframework.cloud.netflix.eureka.EurekaClientAutoConfiguration #排除eureka注册中心
nacos相关字段解释,主要是下面的配置,这里的配置是和Nacos中的dataId 的格式是对应的,我这里的是api-hdys-durid-sys-dev.yaml ,nacos的完整格式如下:
${prefix}-${spring.profile.active}.${file-extension}spring:
application:
name: api-system
cloud:
nacos:
discovery:
server-addr: 127.0.0.1:8848 #nacos服务的地址:端口号
namespace: 6e65de9c-9069-4d05-8c20-2f94602163aa #nacos命名空间的id
config:
server-addr: 127.0.0.1:8848
namespace: 6e65de9c-9069-4d05-8c20-2f94602163aa
file-extension: yaml #nacos配置中心需要的文件后缀,目前仅支持ymal和properties
prefix: api-hdys-durid-sys #nacos配置中心文件名
profiles:
active: dev #nacos配置中心文件名开发环境
心4:启动类
由原来的 @EnableEurekaClient 改为 @EnableDiscoveryClient四:配置文件内容
这里面可以配置一下数据库的基本信息等,不建议端口号在这里配置,因为可能是多个服务调用同一个配置文件
api-hdys-durid-sys-dev.yaml
经过上面的步骤后,基本上就能完成eureka向nacos的转换,推荐把gatway的路由信息放到nacos配置中心实现热加载。当然 如果想换回来就把上面的几步换回来即可
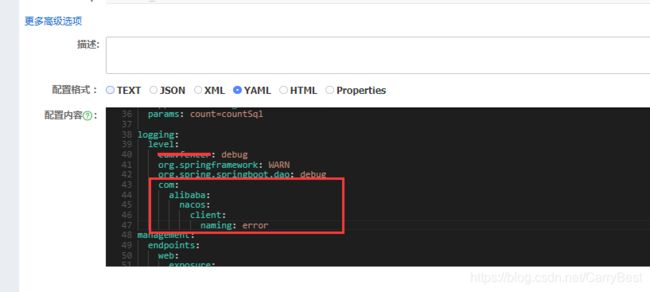
由于nacos一直在控制台输出心跳日志,可以在配置中心把日志级别改成error
logging:
  level:
    com:
      alibaba:
        nacos:
          client:
            naming: error


