JAVA之HttpClient+Jsoup实现代理IP爬虫
文章目录:
- HttpClient(请求数据):
- Jsoup解析筛选数据:
- 通过httpclient+jsoup爬取代理ip网址上面的ip和端口,并存入数据库:
- 筛选数据库中的有效代理IP,并实现代理IP访问:
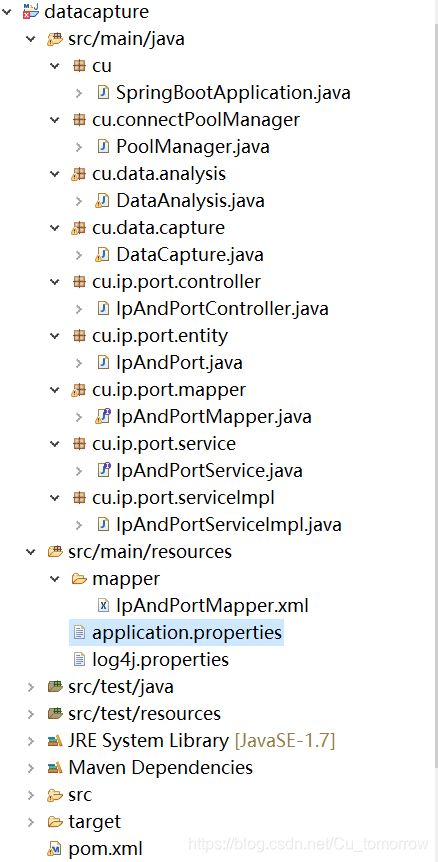
- 我的目录结构(service接口和实现层省略了没有贴出来):
- 下面上几张效果图:
HttpClient(请求数据):
创建httpclient(介绍两种方式):
方式一:
CloseableHttpClient httpclient = HttpClients.createDefault();方式二(使用连接池获取httpclient):
//创建连接池管理器
 PoolingHttpClientConnectionManager cm = new PoolingHttpClientConnectionManager();
 //设置最大连接数
 cm.setMaxTotal(200);
 //设置访问每个网站得最大连接数,不影响其它网站得访问
 cm.setDefaultMaxPerRoute(20);
 //返回httpclient
 return HttpClients.custom().setConnectionManager(cm).build();
生成URI(控制台打印出来可以看到是自动生成?来连接参数):
URIBuilder uriBuilder = new URIBuilder("http://www.baidu.com/s").// 设置参数
    setParameter("ie", "utf-8").// 第一个参数
    setParameter("f", "8").// 第二个参数
    setParameter("wd", "test");// 第三个参数
  URI uri = uriBuilder.build();
声明请求方式get/post(传入String类型参数,可以直接放入自己拼接的字符串URL):
HttpGet httpGet = new HttpGet(uri);
HttpPost httpPost = new HttpPost("https://www.xicidaili.com/nn/" + id);
配置请求参数以及代理IP:
// 代理IP设置,代理 ip查询地址:https://www.xicidaili.com/
  HttpHost httoHost = new HttpHost("118.181.226.166",44640);
  // 配置请求参数
  RequestConfig config = RequestConfig.custom().setConnectionRequestTimeout(3000).// 3秒,重连接池获取连接最长时间
    setConnectTimeout(5000).// 创建连接最长时间
    setSocketTimeout(20 * 1000).// 20秒,数据传输最长时间
    // setProxy(httoHost).// 设置代理
    build();
  httpGet.setConfig(config);
设置用户代理信息:
httpGet.setHeader("User-Agent",
    "Mozilla/5.0 (Windows NT 10.0; Win64; x64) AppleWebKit/537.36 (KHTML, like Gecko) Chrome/70.0.3538.102 Safari/537.36 Edge/18.18363");
使用httpclient发起请求,判断状态码,并获取数据:
CloseableHttpResponse response = httpclient.execute(httpGet);
  // 判断状态码是否为200
  if (response.getStatusLine().getStatusCode() == 200) {
   // 获取响应数据
   HttpEntity entity = response.getEntity();
   String string = EntityUtils.toString(entity, "UTF-8");
   // 存入本地
   FileUtils.writeStringToFile(new File("C:/Users/17210/Desktop/test2.html"), string, "utf-8");
   }
   response.close();
  httpclient.close();
Jsoup解析筛选数据:
注:jsoup也能实现请求,但是不大好使,下面举个例子
//第一个参数为URL类型,第二个应该是超时时间
Document dom = Jsoup.parse(url, timeoutMillis);
用jsoup读取本地html,并获取需要的内容:
注:之所以前面存入本地是为了方便查看返回的html结构,以此来寻找特征筛选需要的内容
方式一(不如方式二好使,看看就行):
String html = FileUtils.readFileToString(new File("C:/Users/17210/Desktop/test.html"), "utf-8");
  Document dom = Jsoup.parse(html);
  // 通过ID获取具体元素得id
  String Idtext = dom.getElementById("foot").id();
  // 直接解析dom中得元素,通过标签获取多个元素得文本
  String Tagtext = dom.getElementsByTag("title").first().text();
  // 通过属性获取多个元素的多个或单个属性值,文本内容,id
  Attributes Attrtext = dom.getElementsByAttribute("onclick").first().attributes();//默认取得全部匹配的属性值
  String strings = Attrtext.toString();
  String Attrtext1 = dom.getElementsByAttributeValue("onclick","return false;").get(2).attr("key");
  //获取元素html的string字符串
  String Attrtext2 = dom.getElementsByAttributeValueMatching("onclick","这里写正则表达式").get(2).html();
  // 通过属性获取第一个元素的多个或单个class名字
  String Classtext = dom.getElementsByClass("feedback").first().className();
  Set<String> Classtext2 = dom.getElementsByClass("feedback").first().classNames();
方式二,通过选择器的cssquery查找:
//通过标签名选择获取元素,对获取到的元素操作同上
Elements Tagname = dom.select("title");
String text = Tagname.first().text();
//名命空间查找:c|if查找通过httpclient+jsoup爬取代理ip网址上面的ip和端口,并存入数据库:
最近学到了springboot和mybatis于是就用这个框架去实现了。
请求的地址:“https://www.xicidaili.com/nn/” + id
id为网站分页显示的页码,也是方法传入的参数。
创建实体,用来存放ip和port:
@Component
public class IpAndPort {
 private int id;
 private String ip;
 private int port;
/**
这里是get和set方法
**/
}
筛选html中的ip和port并存入数据库:
@Component
public class DataAnalysis {
 @Resource
 private IpAndPortMapper andPortMapper;
 @Resource
 private IpAndPort andPort;
 public void GetIP() throws IOException {
String html = FileUtils.readFileToString(new File("C:/Users/17210/Desktop/test2.html"), "utf-8");
  Document dom = Jsoup.parse(html);
for(org.jsoup.nodes.Element el:dom.select("img[alt=Cn][src]")) {
   String ip = el.parent().nextElementSibling().text();
   String port = el.parent().nextElementSibling().nextElementSibling().text();
   int port2=Integer.valueOf(port).intValue();//将字符串port变成int
   andPort.setIp(ip);
   andPort.setPort(port2);
   andPortMapper.save(andPort);//调用save方法存入数据库
   System.out.println("ip地址为:"+ip+"port为"+port2+"------保存至数据库成功");
   }
   }
   }
mapper和mapper.xml(采用mapper动态代理,无需手动实现接口):
@Repository
//@Mapper // 表明当前接口是一个Mapper,被Mybatis框架扫描,也在springboot配置自动扫描,就不用在这里声明了。
public interface IpAndPortMapper {
 List<IpAndPort> findAll();
 IpAndPort findById(Integer id);
 void save(IpAndPort ipAndPort);
 void update(IpAndPort ipAndPort);
 void delete(Integer id);
}
<mapper namespace="cu.ip.port.mapper.IpAndPortMapper">//注意这里的namespace是匹配的接口,别错了
 <select id="findAll" resultType="ipAndPort">
  select * from ip_port</select>

  <select id="findById" parameterType="Int" resultType="ipAndPort">
  select * from ip_port where id=#{id}</select>

  <insert id="save" parameterType="ipAndPort">
  INSERT into ip_port
  (ip,port) VALUES (#{ip},#{port})</insert>

  <update id="update" parameterType="ipAndPort">
  update ip_port set
  ip=#{ip},port=#{port}
  where id=#{id}
 </update>

 <delete id="delete" parameterType="Int">
    delete from ip_port where
  id=#{id}</delete>
配置application.properties:
#数据库MySQL
spring.datasource.driver-class-name=com.mysql.cj.jdbc.Driver
spring.datasource.password=root
spring.datasource.username=root
spring.datasource.url=jdbc:mysql://127.0.0.1/test?useUnicode=true&characterEncoding=UTF-8&serverTimezone=UTC
#Mybatis
#扫描--实体,而不是mapper接口
mybatis.type-aliases-package=cu.ip.port.entity
#扫描.xml
mybatis.mapper-locations=classpath:mapper/*Mapper.xml
筛选数据库中的有效代理IP,并实现代理IP访问:
注:主要思路,捕获连接超时异常,然后迭代调用当前方法,传入的参数变为id+1去数据库查找下一条有效信息
@Component
public class DataCapture {
 @Resource
 private IpAndPortService andPortService;
public HttpGet httpGet = new HttpGet("https://www.xicidaili.com/nn/");
 @Resource
 public IpAndPort proxy;
 public String ip;
 public int port;
 public void dataCaptureWithProxy(int id) {
  // 使用连接池获取httpclient
  CloseableHttpClient httpclient = PoolManager.GetHpptClient();
  proxy = andPortService.findById(id);
  ip = proxy.getIp();
  port = proxy.getPort();
  HttpHost httoHost = new HttpHost(ip, port);
  // 配置请求参数
  RequestConfig config = RequestConfig.custom().setConnectionRequestTimeout(3000).// 3秒,重连接池获取连接最长时间
    setConnectTimeout(10000)//创建连接最长时间
    setSocketTimeout(10 * 1000).// 210秒,数据传输最长时间
    setProxy(httoHost).// 设置代理
    build();
  httpGet.setConfig(config);
  // 设置用户代理信息
  httpGet.setHeader("User-Agent",
    "Mozilla/5.0 (Windows NT 10.0; Win64; x64) AppleWebKit/537.36 (KHTML, like Gecko) Chrome/70.0.3538.102 Safari/537.36 Edge/18.18363");
    // 使用httpclient发起请求,获得response
  try {
   CloseableHttpResponse response = httpclient.execute(httpGet);
   if (response.getStatusLine().getStatusCode() == 200) {
    System.out.println("有效代理IP,IP地址为:" + ip + "端口号为:" + port);
    //这里可以继续迭代,对有效代理做其他处理
    dataCaptureWithProxy(id + 1);
   }
   response.close();
   httpclient.close();
  } catch (SocketTimeoutException | ConnectTimeoutException ex) {
   System.out.println("请求连接超时"+ "当前id为:"+id);
   dataCaptureWithProxy(id + 1);
  } catch (Exception ex) {
   System.out.println("请求异常,异常信息:" + ex.getMessage() + ","
     + "当前id为:"+id+"正在尝试下一条IP");
   dataCaptureWithProxy(id + 1);//这里开始迭代
  }
 }
controller中的方法介绍:
@Controller
//@ResetController相当于加了个@response,返回文本内容而不是jsp跳转
public class IpAndPortController {
 @Resource
 private IpAndPortService andPortService;
 @Resource
 private DataAnalysis da;
 @Resource
 private DataCapture ca;
 //将数据库中的全部ip和port输出到浏览器页面
@GetMapping("/findAll")
 @ResponseBody
 public List<IpAndPort> findAll() {
  return andPortService.findAll();
 }
 //查询单条记录
 @GetMapping("/findById/{id}")
 public IpAndPort findById(@PathVariable("id") Integer id) {
  return andPortService.findById(id);
 }
//删除单条记录
@GetMapping("/delete/{id}")
 public void delete(@PathVariable("id") Integer id) {
  andPortService.delete(id);
 }
 //这个方法需要post请求,并将表单传入的参数映射成对象
 @PostMapping("/update")
 public void update(@RequestBody IpAndPort IpAndPort) {
  andPortService.update(IpAndPort);
 }
 //这个方法执行数据插入方法,即将桌面刚刚存入的html进行筛选并存入数据库,
 //当定页面获取到的数据正常后可以在前面将获取到的数据进行直接筛选保存
 @GetMapping("/do")
 @ResponseBody
 public String statrt() {
  try {
   da.GetIP();
  } catch (IOException e) {
   // TODO Auto-generated catch block
   e.printStackTrace();
  }
  return  "数据插入数据库成功!";
 }
 //这个方法执行数据抓取,并存入桌面,当肯定抓取到的数据没有问题时可以省略,
 在前面改为直接筛选并存入数据库
 @GetMapping("/find/{id}")
 @ResponseBody
 public String findip(@PathVariable("id") String id) throws Exception {
  try {
   ca.dataCaputure(id);
  } catch (IOException e) {
   // TODO Auto-generated catch block
   e.printStackTrace();
  }
  return  "数据成功复制到桌面!";
 }
//这个方法用于筛选数据库中有效的IP和port
//页面传过来的参数为数据库中查询的起始地址
 @GetMapping("/getProxyIp/{id}")
 @ResponseBody
 public String getProxyIp(@PathVariable("id") int id) throws Exception {
   ca.dataCaptureWithProxy(id);
  return  "请在控制台查看查询结构"
 }
我的目录结构(service接口和实现层省略了没有贴出来):

pom.xml依赖—application.properties在上面目录3中配置mapper代理时贴出来了:
<!-- 添加父工程 -->
 <parent>
  <groupId>org.springframework.boot</groupId>
  <artifactId>spring-boot-starter-parent</artifactId>
  <version>1.5.10.RELEASE</version>
 </parent>

<dependency>
   <groupId>org.apache.httpcomponents</groupId>
   <artifactId>httpcore</artifactId>
   <version>4.4.10</version>
  </dependency>

<dependency>
   <groupId>org.apache.httpcomponents</groupId>
   <artifactId>httpclient</artifactId>
   <version>4.5.6</version>
  </dependency>
<dependency>
   <groupId>org.slf4j</groupId>
   <artifactId>slf4j-api</artifactId>
   <version>1.7.21</version>
  </dependency>
  <!-- 添加web开发得支持 -->
   <dependency>
    <groupId>org.springframework.boot</groupId>
    <artifactId>spring-boot-starter-web</artifactId>
   </dependency>
   <dependency>
    <groupId>org.jsoup</groupId>
    <artifactId>jsoup</artifactId>
    <version>1.10.2</version>
   </dependency>
   <!-- 文字处理 -->
   <dependency>
    <groupId>org.apache.commons</groupId>
    <artifactId>commons-lang3</artifactId>
    <version>3.8.1</version>
   </dependency>
   <!-- 文件处理 -->
   <dependency>
    <groupId>commons-io</groupId>
    <artifactId>commons-io</artifactId>
    <version>2.6</version>
   </dependency>
   <!-- mysql连接依赖 -->
   <dependency>
    <groupId>mysql</groupId>
    <artifactId>mysql-connector-java</artifactId>
    <version>8.0.15</version>
   </dependency>
   <!-- mybatis依赖 -->
   <dependency>
    <groupId>org.mybatis.spring.boot</groupId>
    <artifactId>mybatis-spring-boot-starter</artifactId>
    <version>2.0.0</version>
   </dependency>
下面上几张效果图:
注:本人也是刚开始接触springboot,代码有些地方不规范,欢迎指正!

