上下文一直是计算机中难理解的概念,在知乎的一个问题下面有个很通俗易懂的回答:
每一段程序都有很多外部变量。只有像 Add 这种简单的函数才是没有外部变量的。一旦你的一段程序有了外部变量,这段程序就不完整,不能独立运行。你为了使他们运行,就要给所有的外部变量一个一个写一些值进去。这些值的集合就叫
上下文(context)。
–– vzch
比如,在 flask 中,视图函数(views.py)需要知道它执行的请求信息(请求的 url,参数,方法等)以及应用信息(应用中初始化的数据库等),才能够正确运行和给出相应的返回。
最直观地做法是把这些信息封装成一个对象,作为参数传递给视图函数。但是这样的话,所有的视图函数都需要添加对应的参数,即使该函数内部并没有使用到它。
flask 的做法是把这些信息作为类似**全局变量的东西**,视图函数需要的时候,可以使用 from flask import request 获取。但是这些对象和全局变量不同的是——它们必须是动态的,因为在多线程或者多协程的情况下,每个线程或者协程获取的都是自己独特的对象,不会互相干扰。
Context(上下文)
Request Context 请求上下文
Request:请求的对象,封装了 Http 请求(environ)的内容Session:根据请求中的 cookie,重新载入该访问者相关的会话信息。
App Context 程序上下文
current_app:当前激活程序的程序实例g:处理请求时用作临时存储的对象。每次请求都会重设这个变量
生命周期
current_app的生命周期最长,只要当前程序实例还在运行,都不会失效。Request和g的生命周期为一次请求期间,当请求处理完成后,生命周期也就完结了Session就是传统意义上的 session 。只要它还未失效(用户未关闭浏览器、没有超过设定的失效时间),那么不同的请求会共用同样的 session。
处理流程
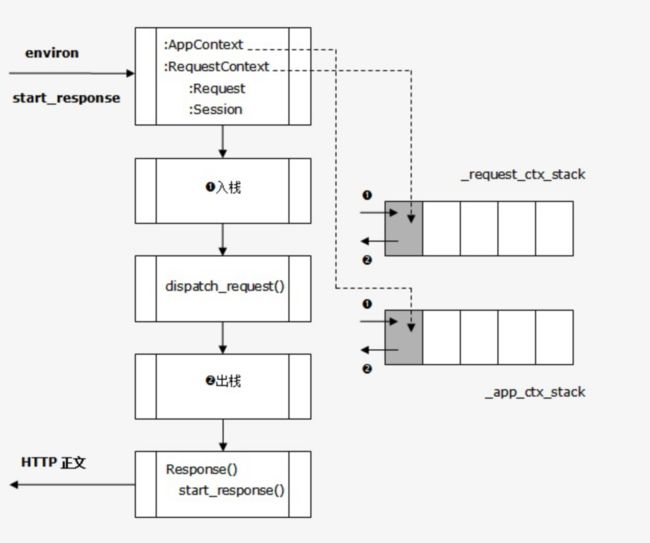
创建上下文入栈请求分发上下文对象出栈响应WSGI
第一步:创建上下文
Flask 根据 WSGI Server 封装的请求信息(存放在environ),新建 RequestContext 对象 和 AppContext 对象
# 声明对象
# LocalStack  LocalProxy 都由 Werkzeug 提供
# 我们不深究他的细节,那又是另外一个故事了,我们只需知道他的作用就行了
# LocalStack 是栈结构,可以将对象推入、弹出
# 也可以快速拿到栈顶对象。当然,所有的修改都只在本线程可见。
_request_ctx_stack = LocalStack()
_app_ctx_stack = LocalStack()

# 如果调用一个 LocalStack 实例, 能返回一个 LocalProxy 对象
# 这个对象始终指向这个 LocalStack 实例的栈顶元素。
# 如果栈顶元素不存在,访问这个 LocalProxy 的时候会抛出 RuntimeError 异常
# LocalProxy 对象你只需暂时理解为栈里面的元素即可了
current_app = LocalProxy(_find_app)
request = LocalProxy(partial(_lookup_req_object, 'request'))
session = LocalProxy(partial(_lookup_req_object, 'session'))
g = LocalProxy(partial(_lookup_app_object, 'g'))
部分 RequestContext 源码
# RequestContext
class RequestContext(object):
    def __init__(self, app, environ, request=None):
        self.app = app
        if request is None:
                request = app.request_class(environ)
        self.request = request
        self.url_adapter = app.create_url_adapter(self.request)
        self.flashes = None
        self.session = None
部分 AppContext 源码
#AppContext
class AppContext(object):
    def __init__(self, app):
        self.app = app
        self.url_adapter = app.create_url_adapter(None)
        self.g = app.app_ctx_globals_class()
self._refcnt = 0这里需要注意的是,RequestContext 在初始化的时候,当前 Flask 的实例作为参数被传进来。虽然每次的请求处理都会创建一个 RequestContext 对象,但是每一次传入的 app 参数却是同一个。通过这个机制,可以使得:
由同一个 Flask 实例所创建的
RequestContext,其成员变量 app 都是同一个 Flask 实例对象 。实现了多个RequestContext对应同一个current_app的目的。
第二步:入栈
将 RequestContext 对象 push 进 _request_ctx_stack 里面。
在这次请求期间,访问 request、session 对象将指向这个栈的栈顶元素
class RequestContext(object):
    def push(self):
        ....
        _app_ctx_stack.push(self)
        appcontext_pushed.send(self.app)
AppContext 对象 push 进 _app_ctx_stack里面。
在这次请求期间,访问 g 对象将指向这个栈的栈顶元素
class AppContext(object):
    def push(self):
        ....
        _request_ctx_stack.push(self)
第三步:请求分发
response = self.full_dispatch_request()Flask 将调用 full_dispatch_request 函数进行请求的分发,之所以不用给参数,是因为我们可以通过 request 对象获得这次请求的信息。full_dispatch_request 将根据请求的 url 找到对应的蓝本里面的视图函数,并生成一个 response 对象。注意的是,在请求之外的时间,访问 request 对象是无效的,因为 request 对象依赖请求期间的 _request_ctx_stack 栈。
第四步:上下文对象出栈
这次 HTTP 的响应已经生成了,就不需要两个上下文对象了。分别将两个上下文对象出栈,为下一次的 HTTP 请求做出准备。
第五步:响应 WSGI
调用 Response 对象,向 WSGI Server 返回其结果作为 HTTP 正文。Response 对象是一个可调用对象,当调用发生时,将首先执行 WSGI 服务器传入的 start_response() 函数,发送状态码和 HTTP 报文头。
最后再来看下 Flask 处理请求的 wsgi_app 函数:
# environ: WSGI Server 封装的 HTTP 请求信息
# start_response: WSGI Server 提供的函数,调用可以发送状态码和 HTTP 报文头
def wsgi_app(self, environ, start_response):
    # 根据 environ 创建上下文
    ctx = self.request_context(environ)
    error = None
    try:
        try:
            # 把当前的 request context,app context 绑定到当前的 context
            ctx.push()
            # 根据请求的 URL,分发请求,经过视图函数处理后返回响应对象
            response = self.full_dispatch_request()
        except Exception as e:
            error = e
            response = self.make_response(self.handle_exception(e))
        except:
            error = sys.exc_info()[1]
            raise
        return response(environ, start_response)
    finally:
        if self.should_ignore_error(error):
            error = None
        # 最后出栈
        ctx.auto_pop(error)
ctx.py 源码
代码信息:
总共代码行数:468 行,
有效行数:184 行,
注释:187 行,
空行:97 行
从这里可以看出 flask 是如此简约而不简单的微框架,可见一斑。
三个 class,分别为:
_AppCtxGlobals(): 一个“纯对象” A plain object,应用上下文存储数据的命名空间AppContext(): application context 应用上下文,隐式地绑定 application 对象到当前线程或 greenlet, 类似于RequestContext绑定请求信息一样。当请求上下文被创建的时候,应用上下文也会被隐式的创建,但应用不会存在于单个应用上下文的顶部
class AppContext(object):
    """The application context binds an application object implicitly
    to the current thread or greenlet, similar to how the
    :class:`RequestContext` binds request information.  The application
    context is also implicitly created if a request context is created
    but the application is not on top of the individual application
    context.
    """

    def __init__(self, app):
        self.app = app
        self.url_adapter = app.create_url_adapter(None)
        self.g = app.app_ctx_globals_class()

        # Like request context, app contexts can be pushed multiple times
        # but there a basic "refcount" is enough to track them.
self._refcnt = 0RequestContext():request context 请求上下文,包括了所有请求相关的信息。在刚发生请求的时候就会创建请求上下文并将它推到_request_ctx_stack堆中,当请求结束时会被删除。它会为所提供的 WSGI 环境创建 URL 适配器和请求对象。
class RequestContext(object):
    """The request context contains all request relevant information.  It is
    created at the beginning of the request and pushed to the
    `_request_ctx_stack` and removed at the end of it.  It will create the
    URL adapter and request object for the WSGI environment provided.

    Do not attempt to use this class directly, instead use
    :meth:`~flask.Flask.test_request_context` and
    :meth:`~flask.Flask.request_context` to create this object.

    When the request context is popped, it will evaluate all the
    functions registered on the application for teardown execution
    (:meth:`~flask.Flask.teardown_request`).

    The request context is automatically popped at the end of the request
    for you.  In debug mode the request context is kept around if
    exceptions happen so that interactive debuggers have a chance to
    introspect the data.  With 0.4 this can also be forced for requests
    that did not fail and outside of ``DEBUG`` mode.  By setting
    ``'flask._preserve_context'`` to ``True`` on the WSGI environment the
    context will not pop itself at the end of the request.  This is used by
    the :meth:`~flask.Flask.test_client` for example to implement the
    deferred cleanup functionality.

    You might find this helpful for unittests where you need the
    information from the context local around for a little longer.  Make
    sure to properly :meth:`~werkzeug.LocalStack.pop` the stack yourself in
    that situation, otherwise your unittests will leak memory.
    """

    def __init__(self, app, environ, request=None, session=None):
        self.app = app
        if request is None:
            request = app.request_class(environ)
        self.request = request
        self.url_adapter = None
        try:
            self.url_adapter = app.create_url_adapter(self.request)
        except HTTPException as e:
            self.request.routing_exception = e
        self.flashes = None
        self.session = session

        # Request contexts can be pushed multiple times and interleaved with
        # other request contexts.  Now only if the last level is popped we
        # get rid of them.  Additionally if an application context is missing
        # one is created implicitly so for each level we add this information
        self._implicit_app_ctx_stack = []

        # indicator if the context was preserved.  Next time another context
        # is pushed the preserved context is popped.
        self.preserved = False

        # remembers the exception for pop if there is one in case the context
        # preservation kicks in.
        self._preserved_exc = None

        # Functions that should be executed after the request on the response
        # object.  These will be called before the regular "after_request"
        # functions.
        self._after_request_functions = []

        if self.url_adapter is not None:
            self.match_request()
注: A plain object:非常轻量,主要用来归集一些属性方便访问。
四个 def,分别为:
after_this_request():在该请求之后执行一个函数,这对于修改 response 响应对象很有用。它被传递给 response 对象并且必须返回相同或一个新的函数
@app.route('/')
def index():
    @after_this_request
    def add_header(response):
        response.headers['X-Foo'] = 'Parachute'  ## 响应头中插入一个值
        return response
return 'Hello World!'copy_current_request_context():一个辅助函数,装饰器,用来保留当前 request context。在与 greenlet 一起使用时非常有用。当函数被调用的时刻,会创建并推入被请求上下文复本装饰后函数,当前 session 也会同时被包含在已复制的请求上下文中
import gevent
from flask import copy_current_request_context

@app.route('/')
def index():
    @copy_current_request_context
    def do_some_work():
        # do some work here, it can access flask.request or
        # flask.session like you would otherwise in the view function.
        ...
    gevent.spawn(do_some_work)
return 'Regular response'has_request_context():如果你有需要测试的代码,该函数可以被使用。例如,如果请求对象可用,你或许想利用请求信息;但如果不可用,利用请求信息会失败has_app_context():与has_request_context类似,只是这个用于 application context。你可以使用对current_app对象的 boolean 检查来代替它
参考:
- https://www.jianshu.com/p/2a2407f66438
- https://zhuanlan.zhihu.com/p/32457833
- https://blog.tonyseek.com/post/the-context-mechanism-of-flask/
