RabbitMq入门(五)交换器 Topic(主题,规则匹配)
目录
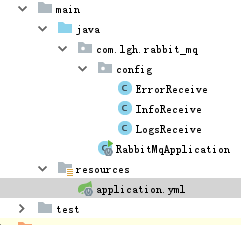
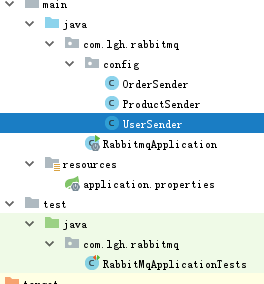
首先创建两个项目
配置yml文件
编写消息接收者代码
编写消息发送者代码
测试
以此场景需求进行举例
首先创建两个项目
rabbitmq_topic_consumer 消息接收者和 rabbitmq_topic_provider消息发送者
配置yml文件
rabbitmq_topic_consumer 消息接收者
spring:
  rabbitmq:
    host: localhost
    port: 5672
    username: guest
    password: guest

#设置交换器的名称
mq.config.exchange: log.topic

#info队列名称
mq.config.queue.info: log.info

#error队列名称
mq.config.queue.error: log.error

#log队列名称
mq.config.queue.logs: log.all
rabbitmq_topic_provider消息发送者
发送者只需配置发送给哪个交换器就可以了
spring:
    rabbitmq:
        host: localhost
        port: 5672
        username: guest
        password: guest

#设置交换器的名称
mq.config.exchange: log.topic
编写消息接收者代码
创建三个类
*(星)可以替代一个字。
#(井号)可以替换零个或多个单词。
ErrorReceive.java
package com.lgh.rabbit_mq.config;

import org.springframework.amqp.core.ExchangeTypes;
import org.springframework.amqp.rabbit.annotation.*;
import org.springframework.stereotype.Component;

/**
 * 消息接收者
 * @RabbitListener  bindings:绑定队列
 * @QueueBinding    value:绑定队列的名称
 *                  exchange:配置交换器
 *
 * @Queue           value:配置队列名称
 *                  autoDelete:是否是一个可删除的临时队列
 *
 * @Exchange        value:为交换器起个名称
 *                  type:指定具体的交换器类型
 */
@Component
@RabbitListener(
        bindings=@QueueBinding(
                value=@Queue(
                        value="${mq.config.queue.error}",
                        autoDelete="true"),
                exchange=@Exchange(
                        value="${mq.config.exchange}",
                        type=ExchangeTypes.TOPIC),
                key="*.log.error"))
public class ErrorReceive {

    @RabbitHandler
    public void process(String msg) {
        System.out.println("error........receiver:" + msg);
    }
}
InfoReceive.java
package com.lgh.rabbit_mq.config;

import org.springframework.amqp.core.ExchangeTypes;
import org.springframework.amqp.rabbit.annotation.*;
import org.springframework.stereotype.Component;

/**
 * 消息接收者
 * @RabbitListener  bindings:绑定队列
 * @QueueBinding    value:绑定队列的名称
 *                  exchange:配置交换器
 *
 * @Queue           value:配置队列名称
 *                  autoDelete:是否是一个可删除的临时队列
 *
 * @Exchange        value:为交换器起个名称
 *                  type:指定具体的交换器类型
 */
@Component
@RabbitListener(
        bindings=@QueueBinding(
                value=@Queue(
                        value="${mq.config.queue.info}",
                        autoDelete="true"),
                exchange=@Exchange(
                        value="${mq.config.exchange}",
                        type=ExchangeTypes.TOPIC),
                key="*.log.info"))
public class InfoReceive {

    @RabbitHandler
    public void process(String msg) {
        System.out.println("Info........receiver:" + msg);
    }
}
LogsReceive.java
package com.lgh.rabbit_mq.config;

import org.springframework.amqp.core.ExchangeTypes;
import org.springframework.amqp.rabbit.annotation.*;
import org.springframework.stereotype.Component;

/**
 * 消息接收者
 * @RabbitListener  bindings:绑定队列
 * @QueueBinding    value:绑定队列的名称
 *                  exchange:配置交换器
 *
 * @Queue           value:配置队列名称
 *                  autoDelete:是否是一个可删除的临时队列
 *
 * @Exchange        value:为交换器起个名称
 *                  type:指定具体的交换器类型
 */
@Component
@RabbitListener(
        bindings=@QueueBinding(
                value=@Queue(
                        value="${mq.config.queue.logs}",
                        autoDelete="true"),
                exchange=@Exchange(
                        value="${mq.config.exchange}",
                        type=ExchangeTypes.TOPIC),
                key="*.log.*"))
public class LogsReceive {

    @RabbitHandler
    public void process(String msg) {
        System.out.println("All........receiver:" + msg);
    }
}
编写消息发送者代码
创建三个类
OrderSender.java
package com.lgh.rabbitmq.config;

import org.springframework.amqp.core.AmqpTemplate;
import org.springframework.beans.factory.annotation.Autowired;
import org.springframework.beans.factory.annotation.Value;
import org.springframework.stereotype.Component;

/**
 *   消息发送者
 **/
@Component
public class OrderSender {

    @Autowired
    private AmqpTemplate rabbitAmqpTemplate;

    //exchange交换器名称
    @Value("${mq.config.exchange}")
    private String exchange;

    /*
        发送消息的方法
    */
    public void send(String msg){
        //向消息队列发送消息
        // 参数一:交换器名称。
        // 参数二:路由键
        // 参数三:消息
        this.rabbitAmqpTemplate.convertAndSend(this.exchange,"order. log.debug","product.log.debug....."+msg);

        this.rabbitAmqpTemplate.convertAndSend(this.exchange,"order.log.info","product.log.info....."+msg);

        this.rabbitAmqpTemplate.convertAndSend(this.exchange,"order.log.warn","product.log.warn....."+msg);

        this.rabbitAmqpTemplate.convertAndSend(this.exchange,"order.log.error","product.log.error....."+msg);
    }

}
ProductSender.java
package com.lgh.rabbitmq.config;

import org.springframework.amqp.core.AmqpTemplate;
import org.springframework.beans.factory.annotation.Autowired;
import org.springframework.beans.factory.annotation.Value;
import org.springframework.stereotype.Component;

/**
 *   消息发送者
 **/
@Component
public class ProductSender {

    @Autowired
    private AmqpTemplate rabbitAmqpTemplate;

    //exchange交换器名称
    @Value("${mq.config.exchange}")
    private String exchange;

    /*
        发送消息的方法
    */
    public void send(String msg){
        //向消息队列发送消息
        // 参数一:交换器名称。
        // 参数二:路由键
        // 参数三:消息
        this.rabbitAmqpTemplate.convertAndSend(this.exchange,"user. log.debug","product.log.debug....."+msg);

        this.rabbitAmqpTemplate.convertAndSend(this.exchange,"user.log.info","product.log.info....."+msg);

        this.rabbitAmqpTemplate.convertAndSend(this.exchange,"user.log.warn","product.log.warn....."+msg);

        this.rabbitAmqpTemplate.convertAndSend(this.exchange,"user.log.error","product.log.error....."+msg);
    }

}
UserSender.java
package com.lgh.rabbitmq.config;

import org.springframework.amqp.core.AmqpTemplate;
import org.springframework.beans.factory.annotation.Autowired;
import org.springframework.beans.factory.annotation.Value;
import org.springframework.stereotype.Component;

/**
 *   消息发送者
 **/
@Component
public class UserSender {

    @Autowired
    private AmqpTemplate rabbitAmqpTemplate;

    //exchange交换器名称
    @Value("${mq.config.exchange}")
    private String exchange;

    /*
        发送消息的方法
    */
    public void send(String msg){
        //向消息队列发送消息
        // 参数一:交换器名称。
        // 参数二:路由键
        // 参数三:消息
        this.rabbitAmqpTemplate.convertAndSend(this.exchange,"user. log.debug","user.log.debug....."+msg);

        this.rabbitAmqpTemplate.convertAndSend(this.exchange,"user.log.info","user.log.info....."+msg);

        this.rabbitAmqpTemplate.convertAndSend(this.exchange,"user.log.warn","user.log.warn....."+msg);

        this.rabbitAmqpTemplate.convertAndSend(this.exchange,"user.log.error","user.log.error....."+msg);
    }

}
测试
测试类
package com.lgh.rabbitmq;

import com.lgh.rabbitmq.config.OrderSender;
import com.lgh.rabbitmq.config.ProductSender;
import com.lgh.rabbitmq.config.UserSender;
import org.junit.Test;
import org.junit.runner.RunWith;
import org.springframework.beans.factory.annotation.Autowired;
import org.springframework.boot.test.context.SpringBootTest;
import org.springframework.test.context.junit4.SpringRunner;

@RunWith(SpringRunner.class)
@SpringBootTest
public class RabbitMqApplicationTests {

	@Autowired
	UserSender userSender;

	@Autowired
	ProductSender productSender;

	@Autowired
	OrderSender orderSender;

	@Test
	public void contextLoads() {
		userSender.send("userSender.....");

		productSender.send("productSender.....");

		orderSender.send("orderSender.....");
	}


}
启动接收者项目
启动测试方法
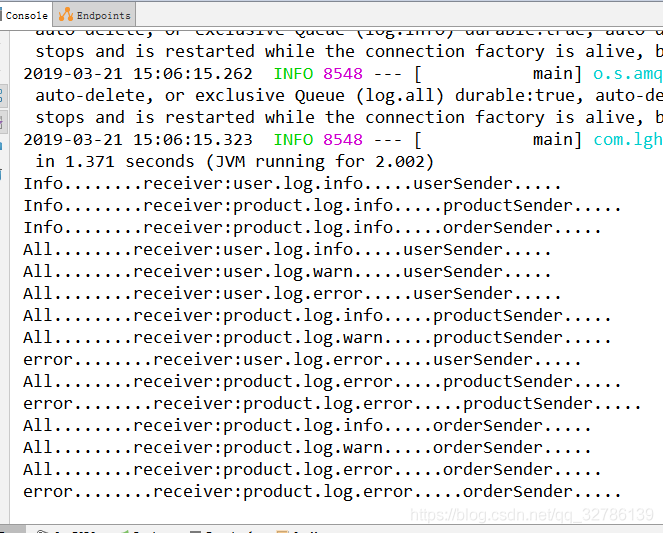
测试结果


