搭建springcloud框架最小系统
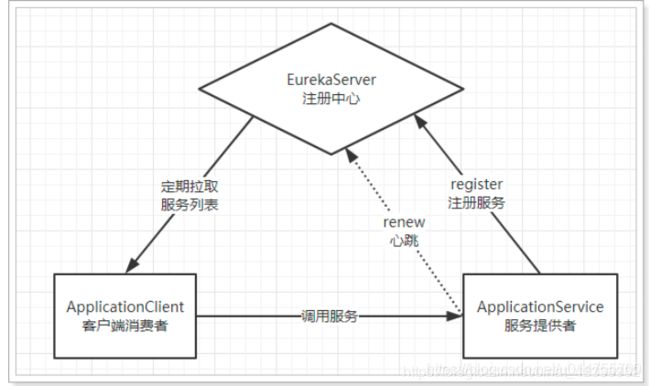
一,原理图:
•Eureka:就是服务注册中心(可以是一个集群),对外暴露自己的地址
•提供者:启动后向Eureka注册自己信息(地址,提供什么服务)
•消费者:向Eureka订阅服务,Eureka会将对应服务的所有提供者地址列表发送给消费者,并且定期更新
•心跳(续约):提供者定期通过http方式向Eureka刷新自己的状态
2 创建EurekaServer注册中心
2.1创建springboot项目及配置
![]()
![]() 也可以使用eclipse工具创建,创建之后pom.xml文件 如下所示,
也可以使用eclipse工具创建,创建之后pom.xml文件 如下所示,
2.2配置文件application.yml
server:
port: 8888
eureka:
instance:
hostname: localhost
client:
register-with-eureka: false
fetch-registry: false
serviceUrl:
defaultZone: http://${eureka.instance.hostname}:${server.port}/eureka
2.3 启动类添加注解:开启Eureka
@SpringBootApplication
@EnableEurekaServer//声明这是一个EurekaServer
public class AmlEurekaApplication {
public static void main(String[] args) {
SpringApplication.run(AmlEurekaApplication.class, args);
}
}
2.4 启动服务,并访问:启动http://127.0.0.1:8888/,出现以下界面则说明配置eureka成功
![]()
3 服务提供方的实现
3.1创建普通springboot项目
其pom.xml文件为:
4.2 配置文件application.yml文件为
server:
port: 8889
spring:
application:
name: aml-service-demo ##踩坑2,配置中心根据这个name来识别服务的类别,如下图所示
main:
allow-bean-definition-overriding: true
eureka:
client:
service-url:
defaultZone: http://127.0.0.1:8888/eureka/
instance:
prefer-ip-address: true
ip-address: 127.0.0.1
2.3 启动类添加注解:开启Eureka
@SpringBootApplication
@EnableEurekaServer//声明这是一个EurekaServer
public class AmlEurekaApplication {
public static void main(String[] args) {
SpringApplication.run(AmlEurekaApplication.class, args);
}
}
2.4 启动服务
@SpringBootApplication
@EnableEurekaClient //开启EurekaClient功能
public class AmlServiceDemoApplication {
public static void main(String[] args) {
SpringApplication.run(AmlServiceDemoApplication.class, args);
}
}
2.5 创建一个简单调用接口
@RestController
@RequestMapping("user")
public class HelloController {
@GetMapping(value = "/{name}")
public String helloName(@PathVariable("name") String name) {
return "Hello" + name;
}
2.6 启动服务,下面两种情况都出现的,说明EurekaClient成功
(1)EurekaServer中显示相关信息
(2) 浏览器中输入http://127.0.0.1:8889/user/springcloud显示
4 服务消费方的实现
4.1创建普通springboot项目
其pom.xml文件和EurekaServer只有一个属性有差别
4.2
配置类配置Eureka注册信息
server:
port: 8890
spring:
application:
name: consumer # 应用名称
eureka:
client:
service-url: # EurekaServer地址
defaultZone: http://127.0.0.1:8888/eureka
instance:
prefer-ip-address: true # 当其它服务获取地址时提供ip而不是hostname
ip-address: 127.0.0.1 # 指定自己的ip信息,不指定的话会自己寻找
4.3启动类为
@SpringBootApplication
@EnableDiscoveryClient
public class AmlConsumerDemoApplication {
@Bean
public RestTemplate restTemplate() {
return new RestTemplate();
}
public static void main(String[] args) {
SpringApplication.run(AmlConsumerDemoApplication.class, args);
}
}
4.4调用接口类为
@RestController
@RequestMapping("/consume")
public class ConsumerController {
@Autowired
private RestTemplate restTemplate;
@Autowired
private DiscoveryClient discoveryClient;
@GetMapping
public String consume(@RequestParam("id") String id) {
//1、 根据user-service获取user-serivce 的集群的信息
List
//名称保持一致
//2、由于我们没有集群,只有一个,所以直接取出第一个
ServiceInstance instance = instances.get(0);
//3、拼接URL
String url = "http://"+instance.getHost()+":"+instance.getPort()+"/user/"+id;
// 使用restTemplate发起请求
ResponseEntity
// 获取返回对象
String body = entity.getBody();
return body;
}
}
5 验证
在浏览器中输入http://127.0.0.1:8890/consume?id=springcloud1,消费端会从配置中心获取服务端的地址,并调用相关方法,效果如下:


