2019独角兽企业重金招聘Python工程师标准>>> ![]()
一、背景
java jdk提供了一系列解决并发冲突的锁和工具,ReentrantLock为可重入独占锁。 要从哪里开始,因为这个其实要讲起了很多。
1.1 先来个简单的使用例子来入门吧。
public class Locktest {

    /**
     * 测试Lock的使用。在方法中使用Lock,可以避免使用Synchronized关键字。
     */
    public static class LockTest {

        Lock lock = new ReentrantLock();// 锁
        double value = 0d; // 值
        int addtimes = 0;

        /**
         * 增加value的值,该方法的操作分为2步,而且相互依赖,必须实现在一个事务中
         * 所以该方法必须同步,以前的做法是在方法声明中使用Synchronized关键字。
         * @throws InterruptedException
         */
        public void addValue(double v) throws InterruptedException {
            lock.lock();// 取得锁
            System.out.println("LockTest to addValue: " + v + "   "
                    + System.currentTimeMillis());

            this.value += v;
            Thread.sleep(1000);
            this.addtimes++;
            lock.unlock();// 释放锁
        }

        public Double getValue() {
            return this.value;
        }

    }

    public static void main(String[] args) throws InterruptedException, ExecutionException, TimeoutException {
        final LockTest lockTest = new LockTest();
        Runnable run = new Runnable(){

            @Override
            public void run() {
                try {
                    lockTest.addValue(1);
                } catch (InterruptedException e) {
                    // TODO Auto-generated catch block
                    e.printStackTrace();
                }

            }

        };
        for(int i=0;i<100;i++){
            new Thread(run).start();
        }
为了保证value 和addtimes 的操作在addValue函数中是原子操作,且最后的值是正确的,加了一把ReentrantLock锁。
那么接下来我们来分析下ReentrantLock是如何实现的?
看源码分析前建议可以先从最后总结开始,从宏观上有一个大致认识。
二、ReentrantLock 源码分析
ReetrantLock在jdkjava.util.concurrent.locks包下,实现接口Lock
2.1 使用过程
a Lock lock = new ReentrantLock();// 锁
b lock.lock(); //获取锁 2
/**
* 业务逻辑,保证只有一个线程同时执行
**/
c lock.unlock() //释放锁  3
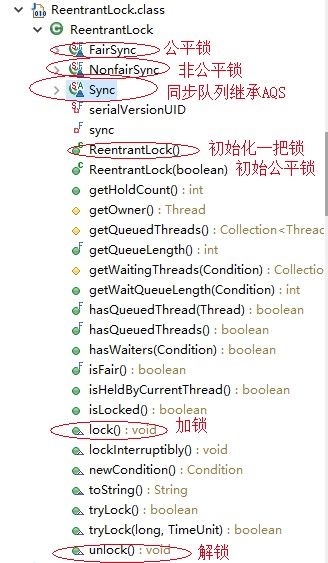
2.2 ReentrantLock的内部结构
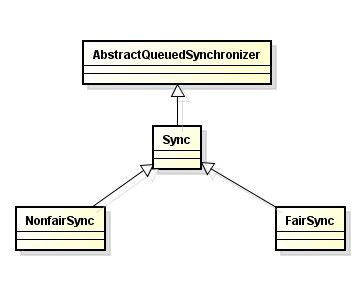
2.3 AQS、Sync、FairSync、NonfairSync 类图关系
如图所示: 由三个内部类Sync、FairSync、NonfairSync,关系如下,都是基于AbstractQueuedSynchronizer实现,后面简称AQS,所以可以知道,jdk锁的实现AQS是关键
2.3 初始化锁实例(默认是非公平锁)
/**
    * Creates an instance of {@code ReentrantLock}.
     * This is equivalent to using {@code ReentrantLock(false)}.
    */
    public ReentrantLock() {
        sync = new NonfairSync();
    }
可以指定 new ReentrantLock(true); 为公平锁
 public ReentrantLock(boolean fair) {
        sync = fair ? new FairSync() : new NonfairSync();
    }
2.4 lock.lock() 获取锁流程
public void lock() {
        sync.lock();
    }
2.4.1 FairSync ,公平锁lock
 static final class FairSync extends Sync {
        private static final long serialVersionUID = -3000897897090466540L;

        final void lock() {
            acquire(1); //直接调用获取锁方法acquire,按照正常的程序拿锁,进入队列
        }
...
}
2.4.2 NonfairSync,非公平锁lock
非公平锁会先直接去抢占,然后在acquire
   static final class NonfairSync extends Sync {
       private static final long serialVersionUID = 7316153563782823691L;
    final void lock() {
        if (compareAndSetState(0, 1)) //先尝试插队直接去拿锁,更改state状态为1,如果成功则把Owner线程设置为当前线程,则表示成功获得锁
            setExclusiveOwnerThread(Thread.currentThread());
        else //插队失败则按照公平锁方式一样,排队获取
            acquire(1);
    }
    //尝试获取锁后面再讲
    protected final boolean tryAcquire(int acquires) {
        return nonfairTryAcquire(acquires);
    }
}
2.4.2.1 compareAndSetState
为AQS一方法,底层调用CAS,将state公共变量更改为1。
protected final boolean compareAndSetState(int expect, int update) {
        // See below for intrinsics setup to support this
        return unsafe.compareAndSwapInt(this, stateOffset, expect, update);
    }
2.4.2.1.2 AQS架构
AQS是JUC重要的同步器,所有的锁基于整个同步器实现协调,这里简单的介绍下,有兴趣后面再重点分析 主要由以下几个重要部分组成
- Node 节点
- head 头节点
- tail 尾节点
- state 当前锁的状态
- acquire(int arg) 获取锁
- acquireQueued(final Node node, int arg) 获取锁队列
- addWaiter(Node mode) 加入等待队列
- release(int) 释放锁
- unparkSuccessor(Node) 唤醒继任节点
- ConditionObject 条件对象,功能类似wait/notify
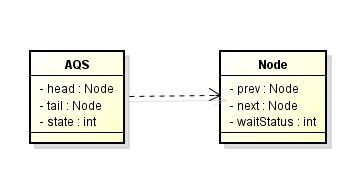
state是关键,volatile int state;用volatile修饰。当为0时表示锁是空闲,可以获取锁,当大于0时表示获得锁。 独占锁时大于0表示锁的重入次数,共享锁时,state共当前共享线程个数。
node是一个双向链表,有Node、prev、next、head、tail组成,该链表被称之CHL队列(FIFO) 如上图
2.4.3 acquire()内部实现
acquire流程经过以下步骤:
- tryAquire 先尝试快速获取锁
- addWaiter 加入队列放置队尾
- acquireQueue 从队列中获取锁,同样也会先尝试tryAcquire
- selfInterrupt() 如果被中断,则中断
 public final void acquire(int arg) {
   // 1.先尝试 tryAcquire 获取锁,具体实现后面再详细讲解,
   // 2.再addWaiter 加入队尾等待,acquireQueued放入同步队列
         if (!tryAcquire(arg) &&
             acquireQueued(addWaiter(Node.EXCLUSIVE), arg))
             selfInterrupt();
    }
公平锁与最大区别在tryAcquire,以下分析两则tryAcquire源码
2.4.3.1 FairSync.tryAcquire()
公平锁尝试获取锁实现(OwnerThread为以获得锁的线程)
 protected final boolean tryAcquire(int acquires) {
            final Thread current = Thread.currentThread();//当前前程
            int c = getState();//获取当前锁状态
            if (c == 0) {//当锁空闲时
            判断前置节点为空,则调用cas将state设置成1,当前线程设置成OwnerThread,获取锁成功,true返回
                if (!hasQueuedPredecessors() &&
                    compareAndSetState(0, acquires)) {
                    setExclusiveOwnerThread(current);
                    return true;
                }
            }//Ownerthread为当前线程时,+1,以下为重入锁的逻辑
            else if (current == getExclusiveOwnerThread()) {
                int nextc = c + acquires;
                if (nextc < 0)
                    throw new Error("Maximum lock count exceeded");
                setState(nextc);//设置state值,+1
                return true;//返回true获取锁
            }
            return false;
        }
2.4.3.2 NonfairSync.tryAcquire()
非公平锁tryAcquire实现
protected final boolean tryAcquire(int acquires) {
            return nonfairTryAcquire(acquires);
        }
final boolean nonfairTryAcquire(int acquires) { final Thread current = Thread.currentThread();//获取当前线程 int c = getState();//get到state锁状态 if (c == 0) {//锁空闲,可以获取锁 //通过CAS将state状态更改成 if (compareAndSetState(0, acquires)) { setExclusiveOwnerThread(current); return true; } } else if (current == getExclusiveOwnerThread()) { int nextc = c + acquires; if (nextc < 0) // overflow throw new Error("Maximum lock count exceeded"); setState(nextc); return true; } return false; }
2.4.3.3 addWaiter 实现
//创建与当前线程队列的节点和给定锁模式(独占、共享)
//新节点node从队尾加入,设置成功则把新节点设置成尾节点tail,并将原tail.next 指向node
/**
     * Creates and enqueues node for current thread and given mode.
     *
     * @param mode Node.EXCLUSIVE for exclusive, Node.SHARED for shared
     * @return the new node // 返回新的节点
     */
    private Node addWaiter(Node mode) {
    // new 一个新节点,设置当前线程和独占模式exclusive
        Node node = new Node(Thread.currentThread(), mode);
        // Try the fast path of enq; backup to full enq on failure
        Node pred = tail;//tail节点赋值给pred,用于后面交换
        if (pred != null) {//如果原尾节点存在
            node.prev = pred; //将新节点的上一个指针指向原尾节点
            if (compareAndSetTail(pred, node)) {//新节点node通过CAS设置成新tail节点
                pred.next = node;//原tail节点的下一个指针指向新的尾节点tail
                return node;//返回新节点,即也是新尾节点
            }
        }
        enq(node);//假如原尾节点为空或者compareAndSetTail失败再次enq放入尾节点
        return node;
    }
//空队列,首先必须初始化,插入队列尾部,返回当前节点上一个节点
/**
    * Inserts node into queue, initializing if necessary. See picture above.
    * @param node the node to insert
    * @return node's predecessor
    */
   private Node enq(final Node node) {
       for (;;) {
           Node t = tail;
           if (t == null) { // Must initialize
               if (compareAndSetHead(new Node()))
                   tail = head;
           } else {
               node.prev = t;
               if (compareAndSetTail(t, node)) {
                   t.next = node;
                   return t;
               }
           }
       }
   }
2.4.3.4 acquireQueued 实现
获取锁的关键
//
/**
     * Acquires in exclusive uninterruptible mode for thread already in
     * queue. Used by condition wait methods as well as acquire.
     *
     * @param node the node
     * @param arg the acquire argument
     * @return {@code true} if interrupted while waiting
     */
    final boolean acquireQueued(final Node node, int arg) {
        boolean failed = true; //设置标志位,如果为true 则会被中断
        try {
            boolean interrupted = false;
            for (;;) {//自旋
                //当前节点node已经通过addWaiter设置为tail了,定义p为tail上一个节点
                final Node p = node.predecessor();
               //如果p为head节点,则才有资格尝试调用tryAcquire获取锁
                if (p == head && tryAcquire(arg)) {
               //获取锁成功则当前节点设置成head,setHead中已将node.prev = null;指向前置节点设置成null了,不再指向原head
                    setHead(node);
               //将原head节点next指向null,这个时候,原head将是一个孤立的node,有利于gc回收
                    p.next = null; // help GC
                    failed = false;//获取成功标志
                    return interrupted;
                }
              //1、获取锁失败后,只有被unpark唤醒的waitStatus状态为Node.SIGNAL才可以被阻塞;2、阻塞当前线程,返回中断状态
                if (shouldParkAfterFailedAcquire(p, node) &&
                    parkAndCheckInterrupt()) //阻塞当前线程,返回中断状态,为true,则返回
                    interrupted = true;//如果阻塞线程被中断则设置true,下次for循环进来被return interrupted;
            }
        } finally {
            if (failed)//如果失败则取消该节点获取锁
                cancelAcquire(node);
        }
    }
2.4.3.5 shouldParkAfterFailedAcquire
// CANCELLED = 1
// SIGNAL = -1
// CONDITION = -2
// NORMAL = 0
private static boolean shouldParkAfterFailedAcquire(Node pred, Node node) {
    // 前一个节点的状态(注意:不是当前节点)
    int ws = pred.waitStatus;
    if (ws < 0)
        // waitStatus<0,也就是前面的节点还没有获得到锁,那么返回true,表示当前节点(线程)就应该park()了。
        return true;
    if (ws > 0) {
        // waitStatus>0,也就是前一个节点被CANCELLED了,那么就将前一个节点去掉,递归此操作直到所有前一个节点的waitStatus<=0,进行4
        do {
            node.prev = pred = pred.prev;
        } while (pred.waitStatus > 0);
        pred.next = node;
    } else {
        // waitStatus=0,修改前一个节点状态位为SINGAL,表示后面有节点等待你处理,需要根据它的等待状态来决定是否该park()
        compareAndSetWaitStatus(pred, ws, Node.SIGNAL);
    }
    // ws<0才需要park(),ws>=0都返回false,表示线程不应该park()
    return false;
}
2.5 lock.unlock() 解锁流程
2.5.1 release
 public final boolean release(int arg) {
          //尝试释放锁,设置AQS state状态,如果为0则返回true,如果解锁成功则唤醒head的下一个节点,让其获得锁
         if (tryRelease(arg)) {
             Node h = head;//head 赋给h,中间变量用于后面交换
             //存在头节点,waitStatus 为1 -1 -2 -3,唤醒下一个节点
             if (h != null && h.waitStatus != 0)
                unparkSuccessor(h);//唤醒下一个节点
             return true;
        }
         return false;
     }
2.5.2 tryRelease
   protected final boolean tryRelease(int releases) {
        int c = getState() - releases;//当前状态state,独占表示重入次数-1
        //当前线程不是独占OwnerThread,则抛出异常,因为lock和unlock是一对,必须保证释放锁的线程为当前获得锁的线程
        if (Thread.currentThread() != getExclusiveOwnerThread())
            throw new IllegalMonitorStateException();
        boolean free = false;
        if (c == 0) {//如果等于0表示解锁成功,OwnerThread设置null 如果是重入锁要多次解锁,直到0
            free = true;
            setExclusiveOwnerThread(null);
        }
        setState(c);//设置AQS state状态,如果是重入锁要多长解锁
        return free;
    }
2.5.2 unparkSuccessor
如果一个存在,唤醒节点的next
   /**
     * Wakes up node's successor, if one exists.
     *
     * @param node the node
     */
    private void unparkSuccessor(Node node) {
        /*
         * If status is negative (i.e., possibly needing signal) try
         * to clear in anticipation of signalling.  It is OK if this
         * fails or if status is changed by waiting thread.
         */
        int ws = node.waitStatus; //head节点等待状态,
        // 此时node是需要释放锁的头节点
        // 清空头节点的waitStatus,也就是不需要锁了,这里修改成功失败无所谓
        if (ws < 0)//设置0表明已经获得锁
            compareAndSetWaitStatus(node, ws, 0);

        /*
         * Thread to unpark is held in successor, which is normally
         * just the next node.  But if cancelled or apparently null,
         * traverse backwards from tail to find the actual
         * non-cancelled successor.
         */
        Node s = node.next;
  //如果不存在下一个节点或者线程已中断或已取消
// 从头节点的下一个节点开始寻找继任节点,当且仅当继任结点的waitStatus<=0才是有效继任节点,否则将这些waitStatus>0(也就是CANCELLED的节点)从AQS队列中剔除
        if (s == null || s.waitStatus > 0) {
            s = null;
          //从队尾开始往前任找,直到node.next,过滤掉中断的结点
            for (Node t = tail; t != null && t != node; t = t.prev)
                if (t.waitStatus <= 0)
                    s = t;
        }
        if (s != null) //下一个节点存在则直接唤醒
            LockSupport.unpark(s.thread);
    }
2.5.3 AQS waitStatus状态位说明
- CANCELLED:因为超时或者中断,结点会被设置为取消状态,被取消状态的结点不应该去竞争锁,只能保持取消状态不变,不能转换为其他状态。处于这种状态的结点会被踢出队列,被GC回收;
- SIGNAL:表示这个结点的继任结点被阻塞了,到时需要通知它;
- CONDITION:表示这个结点在条件队列中,因为等待某个条件而被阻塞;
- PROPAGATE:使用在共享模式头结点有可能牌处于这种状态,表示锁的下一次获取可以无条件传播;
- 0:None of the above,新结点会处于这种状态。
static final int CANCELLED =  1;
static final int SIGNAL    = -1;
static final int CONDITION = -2;
static final int PROPAGATE = -3;
三、基于CAS自己实现一个简单的独占锁
LockSupport为阻塞线程提供基础的功能,它由一对park和unpark组成,park会阻塞当前线程(获取许可,线程默认许可被占用了),unpark“唤醒”等待线程(释放许可);相当于信号量,park拿到才可以运行。 简而言之,是用mutex和condition保护了一个_counter的变量,当park时,这个变量置为了0,当unpark时,这个变量置为1。
LockSupport.park();  停止
System.out.println("======");
乐观的独占锁(类似ReentrantLock) SimpleExclusiveLock .java
package com.concurrent; import java.util.ArrayList; import java.util.List; import java.util.concurrent.atomic.AtomicBoolean; import java.util.concurrent.locks.LockSupport; /** * 简单乐观独占锁 */ public class SimpleExclusiveLock { /** * 独占锁标记 true 锁不可用 false 锁可用 */ private AtomicBoolean state = new AtomicBoolean(false); Listqueue = new ArrayList ();//阻塞队列 public boolean lock() { if (!state.get()&&state.compareAndSet(false, true)) {//取锁成功不会阻塞,程序会继续执行 return true; // 利用CAS } else { System.out.println("queue.add and park "+Thread.currentThread()); queue.add(Thread.currentThread());//加入阻塞队列 LockSupport.park();//阻塞线程 System.out.println("park after "+Thread.currentThread()); return false; } } public boolean unLock() { if (state.get()) { System.out.println("queue.remove and unpark "+Thread.currentThread()); queue.remove(Thread.currentThread());//从队列里移除 if (state.compareAndSet(true, false)) {// 利用CAS if(!queue.isEmpty()){ System.out.println("unpark "+queue.get(0).getName()); LockSupport.unpark((Thread) queue.get(0));//唤醒第一个等待线程 System.out.println("unpark after "+queue.get(0).getName()); } return true; } return false; } else { return false; } } }
SimpleExclusiveLockTest .java
使用
package com.concurrent;

public class SimpleExclusiveLockTest {
    public static SimpleExclusiveLock lock = new SimpleExclusiveLock(); // 独占锁
    public static volatile int            i    = 0;                            // 保证可见性

    public class RunnableTask implements Runnable {

        @Override
        public void run() {
            while (true) {
                try {
                    lock.lock();//加锁
                    i += 1;
                    System.out.println("thread name:"+ Thread.currentThread().getName() +" i="+ i);
                    try {
                        Thread.currentThread().sleep(1000);
                    } catch (InterruptedException e) {
                        e.printStackTrace();
                    }
                } finally {
                    lock.unLock();//释放锁

                }
            }
        }
    }

    public void runTask() {
        for (int i = 0; i < 100; i++) {
            new Thread(new RunnableTask(),"thread"+ i).start();
        }


    }

    public static void main(String[] args) {
        SimpleExclusiveLockTest test = new SimpleExclusiveLockTest();
        test.runTask();

    }
}
四、总结
JUC(Java Util Concurrency)仅用简单的park, unpark和CAS指令就实现了各种高级同步数据结构,而且效率很高,令人惊叹。
以下我从宏观角度描述获取锁和解锁流程
锁的状态是由AQS.state控制,加锁和解锁都会感知和变更此变量,当为0时表示锁是空闲,可以获取锁,当大于0时表示获得锁。 独占锁时大于0表示锁的重入次数,共享锁时,state共当前共享线程个数。
4.1 公平锁与非公平锁区别在两点
- 非公平锁在lock 时首先先去抢占
- 然后都会进去acquire流程,在此流程中区别就在tryAcquire中
4.2 acquire总流程
acquire流程经过以下步骤:
- tryAquire 先尝试快速获取锁
- addWaiter 加入队列放置队尾
- acquireQueue 从队列中获取锁,同样也会先尝试tryAcquire
- selfInterrupt() 如果被中断,则中断
4.1.1 FairSync acquire流程
4.1.2 Nonfair acquire流程
与公平锁acquire唯一区别在tryAcquire流程中,不用要求前置节点是head节点,则表示tail可以直接去抢占锁,如果抢占失败后面的流程与公平一致。
4.2 release 解锁流程
解锁流程比较简单,解锁节点肯定是head,因为head持有锁
- 先将state减1,如果结果是0,返回true执行第二步,这里可能存在重入锁,所以依然大于0.
- 通过unparkSuccessor 唤醒下一个节点


