xcode自动选择证书 Setting up Xcode to automatically manage your provisioning profiles
从xcode3时代习惯了手动选择证书,即 Provisioning Profile和 Code Signing Identify.
而随着团队扩大,应用量增多,需要管理的证书也越来越多,每次从长长的list中寻找需要的那个证书,心情都有点忧伤。
而苹果也给出了更合适的解决方案,xcode 自动选择provisioning profile。这个方案的好处在于,更换证书、团队使用证书不同等情况下,无需再重新设置证书信息。
这个方案最核心的部分,就是设置工程的build settings。
以ios工程为例,以下列出最核心步骤:
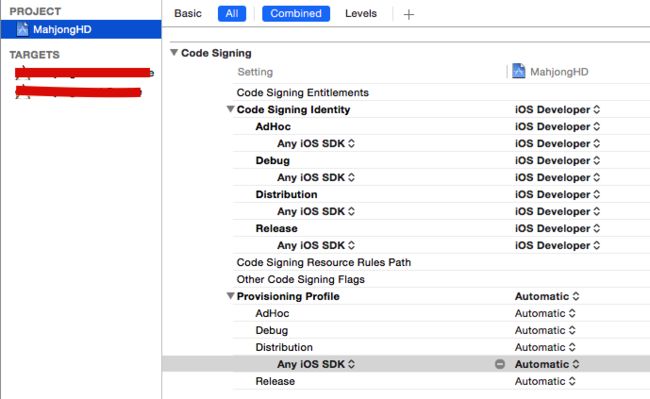
- Project -> Build Settings 中,
Provisioning Profile 全部选择 Automatic,
Code Signing Identify 全部选择 iOS Developer
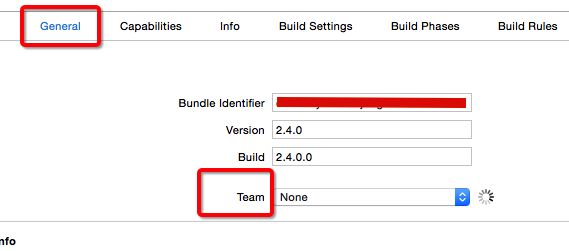
2.Target -> General 中,
Team 设置为 None
3.Target -> Build Settings 中,
Provisioning Profile 全部选择 Automatic,
Code Signing Identify 全部选择 iOS Developer
4.Target -> General 中,
Team 重新设置为 你的团队
大功告成!
Q1.这里有一个疑问,就是证书全部勾选为iOS Developer,提交itunesconnect怎么办?
A.使用Xcode的archive,然后使用Xcode提交itunesconnect。Xcode会对安装包重新签名
Q2.重新安装证书后怎么办?
A.Xcode会自动重新选择合适的证书
Q3.更换bundle id后,需要重新设置吗?
A.更换bundle id,Xcode仍会自动选择合适证书
Q4.有特殊需求,需要打包distribution但不提交itunesconnect,怎么办?
A.特殊情况时,手动选择以下Target的证书。打包完后再设置回来
Q5.上述操作步骤是否有顺序要求?
A.根据苹果官方文档描述,Team必须在重置证书前设置为None,在重置证书后设置为团队。Note: It's just as important to set Target > General > Team to None before reverting all the code signing build settings to their defaults, as it is to set it back to the value of your team afterwards.
原文地址
Technical Q&A QA1814
Setting up Xcode to automatically manage your provisioning profiles
Q: How do I configure my Xcode project to use automatic provisioning?
A: Many developers who are maintaining older apps may have specific selections for their code signing build settings; this Q&A discusses how to opt into Xcode’s automatic provisioning by reverting those build settings to their defaults. This topic applies to both iOS and Mac app development.
Xcode’s automatic provisioning is the preferred way to code sign apps during both development and distribution. In addition, it is the only process documented in the App Distribution Guide. Opting into automatic provisioning means that you will no longer supply choices for the Code Signing Identity or Provisioning Profile build settings, and this allows Xcode to make the best choice for you.
Follow these steps to use Xcode’s automatic provisioning:
Set the project level code signing build settings to their defaults:
Navigate to the Project > Build Settings tab.
Set the Provisioning Profile build setting to Automatic for all build configurations.
Set the Code Signing Identity build setting:
Set to iOS Developer for all build configurations in iOS projects.
Set to Mac Developer or Developer ID, as appropriate, for all build configurations in OS X projects.
Set the targets’ code signing build settings to their defaults:
Set the Target > General > Team to None.
Important: For Mac apps, also set Target > General > “Signing” to None.
Change the Provisioning Profile build setting to Automatic for all build configurations.
Set the Code Signing Identity build setting:
Set to iOS Developer for all build configurations in iOS targets.
Set to Mac Developer or Developer ID, as appropriate, for all build configurations in OS X targets.
Return to the Target > General tab for all of your app’s targets and set the Team using these steps:
For Mac apps, set Target > General > “Signing” to Mac App Store.
Set the Target > General > Team to your team.
Note: It’s just as important to set Target > General > Team to None before reverting all the code signing build settings to their defaults, as it is to set it back to the value of your team afterwards.
Compare your project with the figures below that illustrate correct configuration for automatic provisioning.
Figure 1 Build settings of an iOS project correctly configured for automatic provisioning.
Figure 2 Build settings of an OS X project correctly configured for automatic provisioning.
Figure 3 Target > General > Team of an iOS project correctly configured for automatic provisioning.
Figure 4 Target > General > Team of an OS X project correctly configured for automatic provisioning.
Important: Finally, after making these changes, Xcode should be restarted.
Once you have switched over to letting Xcode manage your applications provisioning profiles, capabilities should now be added to your project using the Capabilities pane in the project editor for your target. When you add capabilities to your app using Xcode, Xcode automatically configures your project to use them. Xcode edits the entitlements and information property list files for you and adds technology-specific frameworks as needed. For entitlements to take effect, Xcode creates code signing and provisioning assets for your team and sets your code signing build settings for you. Xcode creates a wildcard App ID and explicit App ID, if needed, to enable the app services you choose.
You can easily identify any Xcode-managed provisioning profiles in the Member Center that use an explicit App ID because they will begin with the text “iOS Team Provisioning Profile:” followed by the bundle ID. Xcode 5 requires that you create your own distribution profile in the Member Center. Xcode 6 will create any distribution certificates or distribution provisioning profiles that are required. When Xcode creates a distribution provisioning profile, the name of the distribution provisioning profile begins with the text XC: followed by the App ID. If you are using a wildcard App ID, the name of the distribution provisioning profile is XC:*.


