从Zigbee协议栈底层添加自己的按键配置
本实验是基于ZStack-CC2530-2.5.1a版本的协议栈来进行实验的,整个实验需要改动hal_board_cfg.h、hal_board_cfg.h、hal_key.c、hal_key.h和自己定义的Coordinator.c这5个文件。
注意:添加自己的按键时尽量不要修改协议栈里面的按键程序,自己另行添加即可。
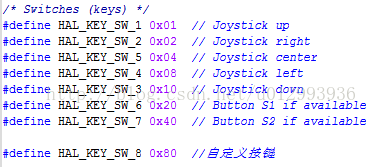
1、hal_key.h
在/* Switches (keys) */下面添加自己的按键定义
#define HAL_KEY_SW_8 0x80
图1:
----------------------------------------------------------------------------------------
2、hal_board_cfg.h
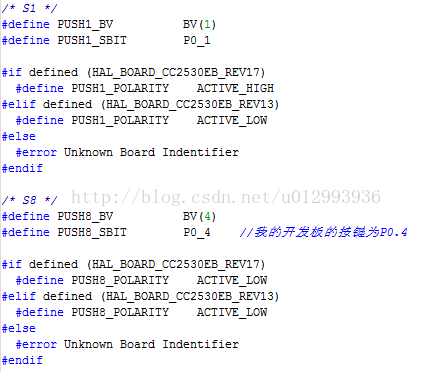
在/* S6 */
#define PUSH1_BV BV(1)
#define PUSH1_SBIT P0_1
#if defined (HAL_BOARD_CC2530EB_REV17)
#define PUSH1_POLARITY ACTIVE_LOW
#elif defined (HAL_BOARD_CC2530EB_REV13)
#define PUSH1_POLARITY ACTIVE_LOW
#else
#error Unknown Board Indentifier
#endif
下面模仿/* S6 */下的程序定义自己的按键值:
/* S8 */
#define PUSH8_BV BV(4)//修改
#define PUSH8_SBIT P0_4//修改
#if defined (HAL_BOARD_CC2530EB_REV17)
#define PUSH8_POLARITY ACTIVE_HIGH
#elif defined (HAL_BOARD_CC2530EB_REV13)
#define PUSH8_POLARITY ACTIVE_LOW
#else
#error Unknown Board Indentifier
#endif
图2:
-------------------------------------------------------------------------------------------------------------
在/* ----------- Push Buttons ---------- */
#define HAL_PUSH_BUTTON1() (PUSH1_POLARITY (PUSH1_SBIT))
#define HAL_PUSH_BUTTON2() (PUSH2_POLARITY (PUSH2_SBIT))
#define HAL_PUSH_BUTTON3() (0)
#define HAL_PUSH_BUTTON4() (0)
#define HAL_PUSH_BUTTON5() (0)
#define HAL_PUSH_BUTTON6() (0)
下定义自己的按键函数
#define HAL_PUSH_BUTTON8() (PUSH8_POLARITY (PUSH8_SBIT))
图3:
----------------------------------------------------------------------------------------------------------------
hal_key.c
在/* SW_6 is at P0.1 */
#define HAL_KEY_SW_6_PORT P0
#define HAL_KEY_SW_6_BIT BV(1)
#define HAL_KEY_SW_6_SEL P0SEL
#define HAL_KEY_SW_6_DIR P0DIR
/* edge interrupt */
#define HAL_KEY_SW_6_EDGEBIT BV(0)
#define HAL_KEY_SW_6_EDGE HAL_KEY_FALLING_EDGE
/* SW_6 interrupts */
#define HAL_KEY_SW_6_IEN IEN1 /* CPU interrupt mask register */
#define HAL_KEY_SW_6_IENBIT BV(5) /* Mask bit for all of Port_0 */
#define HAL_KEY_SW_6_ICTL P0IEN /* Port Interrupt Control register */
#define HAL_KEY_SW_6_ICTLBIT BV(1) /* P0IEN - P0.1 enable/disable bit */
#define HAL_KEY_SW_6_PXIFG P0IFG /* Interrupt flag at source */
下模仿/* SW_6 is at P0.1 */建立自己的按键函数
#define HAL_KEY_SW_8_PORT P0
#define HAL_KEY_SW_8_BIT BV(4) //修改
#define HAL_KEY_SW_8_SEL P0SEL
#define HAL_KEY_SW_8_DIR P0DIR
/* edge interrupt */
#define HAL_KEY_SW_8_EDGEBIT BV(0)
#define HAL_KEY_SW_8_EDGE HAL_KEY_FALLING_EDGE
/* SW_8 interrupts */
#define HAL_KEY_SW_8_IEN IEN1 /* CPU interrupt mask register */
#define HAL_KEY_SW_8_IENBIT BV(5) /* Mask bit for all of Port_0 */
#define HAL_KEY_SW_8_ICTL P0IEN /* Port Interrupt Control register */
#define HAL_KEY_SW_8_ICTLBIT BV(4) //修改
#define HAL_KEY_SW_8_PXIFG P0IFG /* Interrupt flag at source */
图4:
-------------------------------------------------------------------------------------------------------------
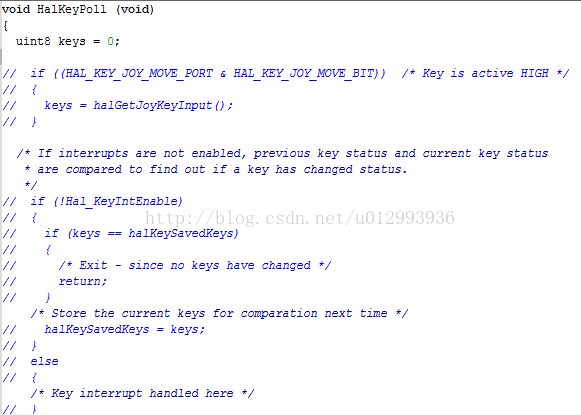
注意:将
void HalKeyPoll (void)中的
// if ((HAL_KEY_JOY_MOVE_PORT & HAL_KEY_JOY_MOVE_BIT)) /* Key is active HIGH */
// {
// keys = halGetJoyKeyInput();
// }
/* If interrupts are not enabled, previous key status and current key status
* are compared to find out if a key has changed status.
*/
// if (!Hal_KeyIntEnable)
// {
// if (keys == halKeySavedKeys)
// {
/* Exit - since no keys have changed */
// return;
// }
/* Store the current keys for comparation next time */
// halKeySavedKeys = keys;
// }
// else
// {
/* Key interrupt handled here */
// }
图5:
全部注释掉,因为它会对我们设定的按键产生干扰,具体情况我也不知道...
然后再在内模仿:
if (HAL_PUSH_BUTTON1())
{
keys |= HAL_KEY_SW_6;
}
{
keys |= HAL_KEY_SW_6;
}
添加 :
if (HAL_PUSH_BUTTON8())
{
keys |= HAL_KEY_SW_8;
}
图6:
-------------------------------------------------------------------------------------------------------------
OnBard.c
将
void InitBoard( uint8 level )
{
if ( level == OB_COLD )
{
// IAR does not zero-out this byte below the XSTACK.
*(uint8 *)0x0 = 0;
// Interrupts off
osal_int_disable( INTS_ALL );
// Check for Brown-Out reset
ChkReset();
}
else // !OB_COLD
{
/* Initialize Key stuff */
HalKeyConfig(HAL_KEY_INTERRUPT_DISABLE, OnBoard_KeyCallback); //修改此处
}
}
{
if ( level == OB_COLD )
{
// IAR does not zero-out this byte below the XSTACK.
*(uint8 *)0x0 = 0;
// Interrupts off
osal_int_disable( INTS_ALL );
// Check for Brown-Out reset
ChkReset();
}
else // !OB_COLD
{
/* Initialize Key stuff */
HalKeyConfig(HAL_KEY_INTERRUPT_DISABLE, OnBoard_KeyCallback); //修改此处
}
}
改为:
HalKeyConfig(HAL_KEY_INTERRUPT_ENABLE, OnBoard_KeyCallback);
记得在任务初始化函数中加入
RegisterForKeys( GenericApp_TaskID ); //注册按键事件
图7:
最后再在Coordinator.c中的
uint16 GenericApp_ProcessEvent( uint8 task_id, uint16 events )
添加事件及其处理函数
case KEY_CHANGE:
GenericApp_HandleKeys( ((keyChange_t *)MSGpkt)->state, ((keyChange_t *)MSGpkt)->keys );
再在
static void GenericApp_HandleKeys( uint8 shift, uint8 keys )
{
zAddrType_t dstAddr;
if ( keys & HAL_KEY_SW_1 )
{
}
if ( keys & HAL_KEY_SW_2 )
{
}
if ( keys & HAL_KEY_SW_3 )
{
}
if ( keys & HAL_KEY_SW_4 )
{
}
if ( keys & HAL_KEY_SW_8 )
//添加自己的按键及其处理函数
{
HalLedSet(HAL_LED_1, HAL_LED_MODE_FLASH);
}
}
最后烧到开发板中即可,祝大家实验成功。


