【cocos2dx】成员精灵(组合)的getboundingbox问题
首先,我设定读者们都对cocos2dx的坐标系有一定的了解了。
没有的话,给个官方文档的链接,讲得比较明白
http://www.cocos.com/doc/article/index?type=cocos2d-x&url=/doc/cocos-docs-master/manual/framework/native/v3/coordinate-system/zh.md
好了,现在都了解了cocos2dx坐标系了。
我引入一个问题:我要设计一个子弹类。做法是,子弹类bullet公共继承自Node,然后有一个成员变量Sprite* m_pPic显示外观(从不调用setPosition())。在bullet的某个函数里面通过addChild()来绑定这个精灵。
//省略了很多代码
//.h
class bullet : public Node{
private:
	Sprite* m_pPic;
}
//.cpp
bool bullet::init(){
	m_pPic = nullptr;
	return true;
}
void bullet::bindSprite(Sprite* p){
	m_pPic = p;
	this->addChild(m_pPic);
}
const Sprite* bullet::getSprite() const{
	return this->m_pPic;
}
子弹要打中敌人,我们就简单利用getBoundingBox()来进行碰撞检测好了。然后再利用碰撞盒子提供的接口进行碰撞检测。
后我们惊讶的发现,根本没有奏效!
为此,我们检测一下出了什么问题。
bullet* p_bullet = bullet::create();
p_bullet ->setPosition(Point(50, 50));
this->addChild(p_bullet);

auto m_pPic= Sprite::create(StringUtils::format("eat.png"));
p_bullet -> bindSprite (m_pPic);
Rect r = p_bullet ->getSprite()->getBoundingBox();

CCLOG("posBulletX:%f,posBulletY:%f",p_bullet->getPositionX(),p_bullet->getPositionY());
CCLOG("posPicSpriteX:%f,posPicSpriteY:%f",p_bullet->getSprite ()->getPositionX(),p_bullet -> getSprite ()->getPositionY());
CCLOG("getMinX:%f,getMinY:%f,getMaxX:%f,getMaxY:%f",r.getMinX(), r.getMinY(), r.getMaxX(), r.getMaxY());
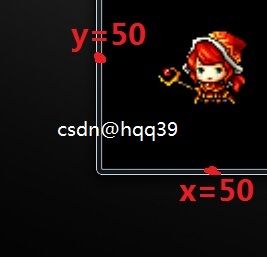
我创建了一个子弹(嗯,这个子弹比较可爱),让子弹定位到(50,50)的位置,前面约定了外观精灵Sprite* m_pPic从来没有调用过setPosition(),那么m_pPic->getPosition();应该是(0,0)。那getBoundingBox()呢

在日志中我们发现,子弹的坐标=(50,56)和getPosition()=(0,0)符合我们的预期,但是m_pPic-> getSprite ()->getBoundingBox却不是。
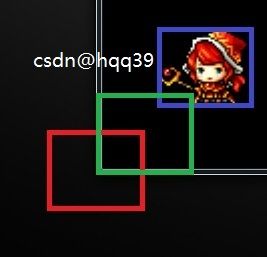
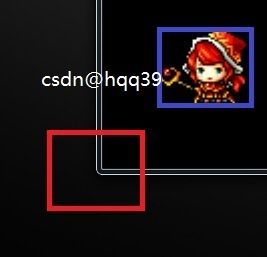
也就是,我们所想要的是蓝色的区域,但是返回的是红色的区域。
头疼了,我们去看看getBoundingBox是怎么回事吧
//CCNode.h
/**
 * Returns an AABB (axis-aligned bounding-box) in its parent's coordinate system.
 *
 * @return An AABB (axis-aligned bounding-box) in its parent's coordinate system
 */
virtual Rect getBoundingBox() const;

//CCNode.cpp
Rect Node::getBoundingBox() const
{
    Rect rect(0, 0, _contentSize.width, _contentSize.height);
    return RectApplyAffineTransform(rect, getNodeToParentAffineTransform());
}
看cpp里面的第一句Rectrect(0, 0, _contentSize.width, _contentSize.height);这里是获取了节点的contentSize,逻辑大小。可以想象,它的尺寸跟getBoundingBox是一样的,唯一的区别就是坐标,也就是位置。还是用这个例子的话,contentSize就是绿色框。

第二句return RectApplyAffineTransform(rect, getNodeToParentAffineTransform());
按理来说是将绿色框转换成蓝色框。但是我们却转成了红色的,为什么呢。来辨认单词:
RectApplyAffineTransform:Rect应用仿射变换。
getNodeToParentAffineTransform:获取从父(节点)仿射变换的节点,就是基于父节点进行仿射变换
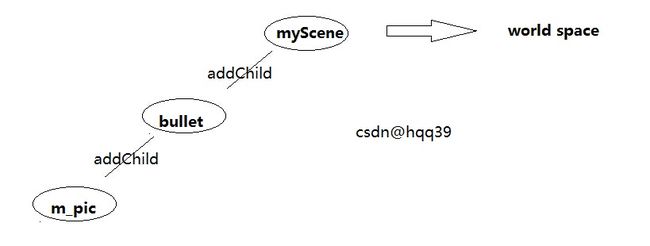
(仿射变换的含义请自行百度,在这里的仿射变换只是涉及矩阵的平移)这是到目前为止,我们的整个cocos2dx项目的结构简单示意图。只有一个bullet对象,它有一个Sprite*成员,显示了一个妹子。
再回来看实际结果,我们调用的是m_pPic->getBoundingBox()获取到的结果本应该是坐标为(0,0)才获取到的红色区域,但是我想要的是bullet坐标(50,50)所得到的蓝色区域。
是巧合么?不是巧合,(0,0)刚好就是m_pPic->getPosition的结果,(50,50)则是bullet->getPosition。换句话说, cocos2dx提供的getBoundingBox是基于相对坐标getPosition())来仿射变换的。也就是源码中的这句:returnRectApplyAffineTransform(rect, getNodeToParentAffineTransform());中的【ToParent】
我们比较常接触的是节点坐标的转换接口比如convertToWorldSpace。那么这个getBoundingBox能不能基于绝对坐标的来仿射变换。
然后在CCNode.cpp里面还真找到了。getNodeToWorldAffineTransform();【ToWorld】
怎么使用呢。那么是不是可以把getBoundingBox()源码里面的
returnRectApplyAffineTransform(rect, getNodeToParentAffineTransform());//【ToParent】
改为
returnRectApplyAffineTransform(rect, getNodeToWorldAffineTransform());//【ToWorld】
就好了呢?
这里不推荐直接改引擎,除非真的有bug或者有特殊需求,但这里getBoundingBox明显没有bug。
另外有一点,getBoundingBox是虚函数。
那么我们可以在bullet里面覆盖它。
//bullet.h
virtual Rect getBoundingBox() const override;
// bullet.cpp
Rect bullet::getBoundingBox() const
{
// m_box = Rect(0, 0, m_pPic ->getContentSize().width, m_pPic ->getContentSize().height);
// m_box是m_pPic的contentSize
return RectApplyAffineTransform(m_box, m_pPic->getNodeToWorldAffineTransform());
}
注意,我是在bullet里面覆盖了getBoundingBox,但是实现我却是对m_pPic进行操作。因为我们需要的是m_pPic的boundingBox。
这样我们就能把bullet的成员精灵的getBoundingBox问题解决了。
回到原来的问题。
开头的代码我们是这么调用的Rect r = p_bullet ->getSprite()->getBoundingBox();,既然我们在bullet里面覆盖getBoundingBox()了,那么就改成Rect r = p_bullet ->getBoundingBox();
这回对了,可以做简单的碰撞检测啦。

顺带一提,getNodeToWorldAffineTransform的实现其实就是多次调用getNodeToParentAffineTransform,,如果我们的项目有层中层(layer->addChild(otherLayer))结构的话,ToWorld版可能就不是好选择了,为了能定位到想要的层(layer),而应该手动的设置调用多次的ToParent版。不过一般层中层都是弹出消息或者小窗口的,也不怎么会需要到getBoundingBox。
//getNodeToWorldAffineTransform部分代码
for (Node *p = _parent; p != nullptr; p = p->getParent())
{
    t = p->getNodeToParentTransform() * t;
}
继续提问:如果不想去纠结什么getNodeToWorldAffineTransform来转换碰撞盒子的话,怎么解决这个问题。
方法一:首先我们知道,成员精灵的getBoundingBox(bullet->getSprite()->getBoundingBox())是有问题的了,那我们就覆盖它,覆盖之后里面怎么实现,可以用我这篇提供的方法,也可以自己算,因为getBoundingBox的实现就是仿射变换得到的,说白了也是算出来的。只需要四则运算就可以了。
方法二:不想再写代码去覆盖怎么办,bullet是继承自Node的,Node有个默认版本的getBoundingBox,能用它么。
默认版本的getBoundingBox的代码上面贴出来了,我再贴一次
Rect Node::getBoundingBox() const//默认的getBoundingBox
{
    Rect rect(0, 0, _contentSize.width, _contentSize.height);
    return RectApplyAffineTransform(rect, getNodeToParentAffineTransform());
}
如果bullet对象调用getBoundingBox会怎么样,得到的是Rect::ZERO,就是没有大小。因为节点Node的contentSize为0,也就是_contentSize.width为0,_contentSize.height也为0。那好办,我们改变它的contentSize,让它等于成员精灵的contentSize。这回对了吧?
p_bullet ->setContentSize(p_bullet->getSprite()->getContentSize());太无情了,居然歪了。这是怎么回事?
如果读者有尝试过自己手动计算getBoundingBox的话,那么你应该会发现,getBoundingBox其实还跟锚点getAnchorPoint()有关系的,也就是说同时涉及到position和anchorPoint。因为锚点,其实也是一种相对位置的概念。(坐标系真是无情)
最直观的就是位于(0,0)的时候。

所以只要把成员精灵的锚点设置成(0,0)就好了


