SIFT角点检测原理以及SIFT源码分析,vs+python环境配置
SIFT角点检测原理以及SIFT源码分析
导言:
sift角点检测在Opencv3以上包含在opencv_contrib包中,大家可以去Gitbub自行下载对应的版本此处给出下载链接https://github.com/opencv/opencv_contrib/releases
选择自己对应的opencv版本下载完成后大家可以参考https://blog.csdn.net/cosmispower/article/details/60601151然后进行编译,请大家千万注意加粗字体部分内容,一步一步操作。记住一点,一定要在OPENCV_ENABLE_NOFREE处勾选,然后再MODLES_PATH上填上下载好的opencv_contrib。否则会有版权的问题出现,本人已经踩过一次坑,希望后面的小伙伴不会有问题。其余步骤按照博客中的操作就好

vs配置+python配置
在vs的配置和上述博客中的方法一致,提醒一点:一定要把在lib文件夹编译好的G:\Program Files (x86)\opencv\opencv\build\install\x64\vc14\bin文件夹下所有的.dll文件复制到自己电脑c盘中system32文件夹下。在vs中配置lib文件时一定要仔细检查是否所有文件都添加到库中。
python的配置相对简单。找到install文件夹下的python文件夹,把cv2文件夹下的python-3.5(我用的3.5,如果你是其他版本就会生成对应版本的文件夹)下的.pyd分别复制到安装python文件夹下的Dlls和G:\Program Files\python\Lib\site-packages文件夹下,并把文件夹G:\Program Files\python\Lib\site-packages下的改成cv2.pyd如果不改在pycharm下写代码的时候没有自动提示,然后还要把G:\Program Files (x86)\opencv\opencv\build\bin\Release中的.dll文件复制到python安装目录下的Dlls文件夹中这样一来就可以非常愉快的使用了。下面给出Opencv4.0的两个测试代码
python代码
import numpy as np
import cv2
from matplotlib import pyplot as plt

imgname1 = '01.jpg'
imgname2 = '01-1.jpg'

sift = cv2.xfeatures2d.SIFT_create()

img1 = cv2.imread(imgname1)
gray1 = cv2.cvtColor(img1, cv2.COLOR_BGR2GRAY) #灰度处理图像
kp1, des1 = sift.detectAndCompute(img1,None)   #des是描述子

img2 = cv2.imread(imgname2)
gray2 = cv2.cvtColor(img2, cv2.COLOR_BGR2GRAY)#灰度处理图像
kp2, des2 = sift.detectAndCompute(img2,None)  #des是描述子

hmerge = np.hstack((gray1, gray2)) #水平拼接
cv2.imshow("gray", hmerge) #拼接显示为gray
# img3 = cv2.drawKeypoints(img1,kp1,img1,color=(255,0,255)) #画出特征点,并显示为红色圆圈
# img4 = cv2.drawKeypoints(img2,kp2,img2,color=(255,0,255)) #画出特征点,并显示为红色圆圈
# hmerge = np.hstack((img3, img4)) #水平拼接
# cv2.imshow("point", hmerge) #拼接显示为gray
# cv2.waitKey(0)
# BFMatcher解决匹配
bf = cv2.BFMatcher()
matches = bf.knnMatch(des1,des2, k=2)
# 调整ratio
good = []
for m,n in matches:
    if m.distance < 0.75*n.distance:
        good.append([m])

img5 = cv2.drawMatchesKnn(img1,kp1,img2,kp2,matches,None,flags=2)
cv2.imshow("BFmatch", img5)
cv2.waitKey(0)
cv2.destroyAllWindows()
c++测试代码
#include "opencv2/opencv.hpp"
#include"opencv2/xfeatures2d.hpp"


using namespace cv;
using namespace std;

int main() {
	Mat img = imread("01.jpg");
	cvtColor(img, img, COLOR_BGR2GRAY);
	Ptr<Feature2D> sift = xfeatures2d::SIFT::create();
	vector<KeyPoint> keypoints;
	Mat descriptors;

	sift->detectAndCompute(img, noArray(), keypoints, descriptors);
	drawKeypoints(img, keypoints, descriptors, Scalar(0, 255, 255));
	imshow("Result", descriptors);
	waitKey(0);

	return 0;
}
如果环境已经配置好的话接下来就可以愉快的玩耍了。下面进入正题SIFT特征检测
SIFT特征检测
问题背景的提出:同一个物体在光照情况,物体距离,遮挡情况,旋转变换在一张图片上都会出现不一样的特征,我们人眼能够非常容易地辨识那是什么,不管它离我们多远,不管它旋转了多少角度。但是对于计算机来说却非常地困难,传统地机器视觉给我们提出了一种方法。SIFT尺度不变特征转换,还有一个改进算法叫SURF,相比于SIFT有更高地计算速度,但是基础还是SIFT。在此对SIFT进行学习,并且总结一下自己地看法。
SIFT(尺度不变特征转换,Scale-Invariant Feature Transform)应用范围:目标识别,自动导航,图像拼接,手势识别,视频跟踪。(该方法已申请专利,不能随意使用)
SIFT算法分为四个阶段
- 尺度空间的极值检测(对应人看远的物体和近的物体它们大小是不一样的,尺度不变性)
- 特征点的定位(寻找一定的特征点)
- 方向角度的确定(方向不变性)
- 特征点的描述。(怎么去描述这一个具有方向不变性和尺度不变性的特征?)
尺度不变性:
如果我们要描述一个物体,它在不同尺度空间的状态,比如说我们对于一幅森林的图片来说我们想描述叶子还是树,如果要描述树我们就会去除一定的叶子干扰,但是同时又不能引进新的干扰,所以我们首先进行高斯模糊(图像和高斯核卷积得到的结果),对图像进行一定的平滑处理。

其中g(是公式中的西格玛)表示的是尺度空间,它表示的是图像模糊的程度,值越大图像越模糊,越小越接近原图。如下图分别是在 g=2和g=4的结果


这样一来就构建了一层不同尺度空间的图像,但是这些是远远不够的。透视原理在图像中是最为常见的,所以说同一个物体离相机的远近会改变它的大小,所以为了使计算机成功的辨识出不同尺度下的特征还要对图像进行缩放处理。这里采用高斯金字塔(一种图像缩小的方式)的方式对图像进行处理。

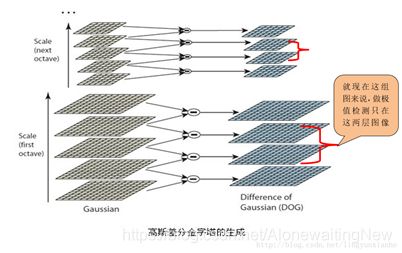
然后同样对降采样的结果进行高斯模糊。然后还是作DOG。然后在不同的尺度空间下会得到不同的DOG差分图像,一般组数为log(min(m,n))-a 其中m和n表示他图像的cols and rows,a为一个固定的常数,一般取2或者3.用图谱的结构可以表示为:


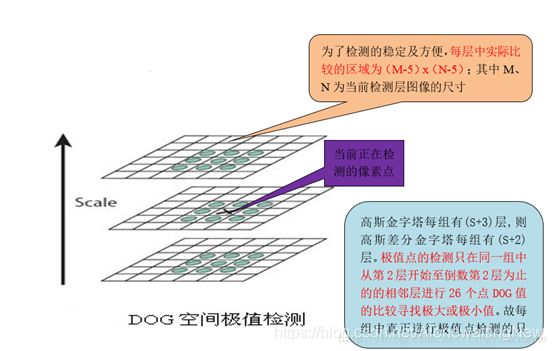
 有了高斯差分后的图像后就是要寻找极值点了,在极值点的搜索的时候不仅仅要在所在的尺度空间图像上搜索还需要在他图像的领域内搜素,如下图所示

小结:
每一组中有6幅图像,两两相减能够得到5幅差分后的图像,特征点的检测需要和前后图像对比,所以一头一尾无法对比,最终只有第2,3,4幅DOG图像进行了极值的搜索。
特征点的定位
通过上一步的搜索我们已经可以获取到极值点了,这些极值点只是候选的特征点。因此需要对候选的极值点进行提取,下面将有一大波的数学推导。图像是离散的,如何找到精确定位呢?对离散的点进行拟合,从而获取更精确的亚像素特征点,类似SubPixel()函数
使用泰勒级数展开式作为拟合函数。假设一个点的尺度图像坐标为x=(x,y,σ)t,因此我们需要三维函数的泰勒展开:


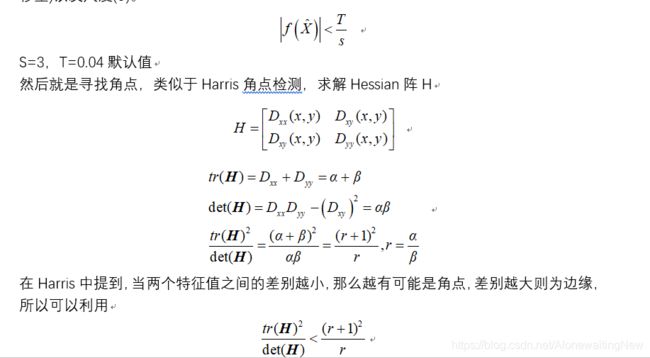
 其中, X^代表相对插值中心的偏移量,当它在任一维度上的偏移量大于0.5时(即x或y或 σ),意味着插值中心已经偏移到它的邻近点上,所以必须改变当前关键点的位置。同时在新的位置上反复插值直到收敛;也有可能超出所设定的迭代次数或者超出图像边界的范围,此时这样的点应该删除,在Lowe中进行了5次迭代。另外,过小的点易受噪声的干扰而变得不稳定,所以将 小于某个经验值(Lowe论文中使用0.03,Rob Hess等人实现时使用0.04/S)的极值点删除。同时,在此过程中获取特征点的精确位置(原位置加上拟合的偏移量)以及尺度(σ)。


方向的确定(方向不变性)
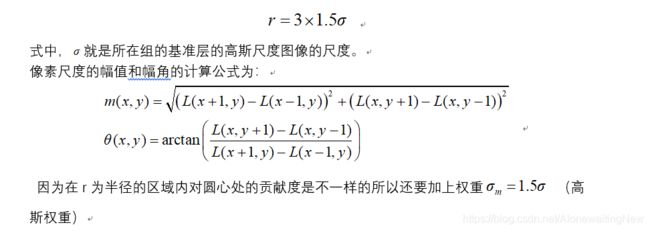
经过上述步骤,图像已经实现在不同的尺度下具有尺度不变性的特点。下面就是要描述其旋转不变性。为了描述旋转不变性还需要特征点分配一个方向角度,也就需要更具检测到的特征点所在的高斯尺度图像的局部结构求得一个方向基准。而所谓的局部结构指的是在高斯尺度图像中以特征点为中心,以R为半径的区域内计算所有像素的幅角和幅值,半径R为:
 在完成特征点领域的梯度计算后,还要应用梯度方向直方图来统计领域内像素的梯度幅角所对应的幅值大小。具体做法是把一个圆的区域分成36份,每10度作为一个方向,求出每个方向的幅值和绘制成直方图,寻找直方图中最大值则作为该特征的主方向。在进行这一步操作之前还要对梯度方向进行平滑处理,公式为:

特征点的描述
通过以上的步骤已经找到了SIFT特征点位置、尺度和方向信息,下面就需要使用一组向量来描述关键点也就是生成特征点描述子,这个描述符不只包含特征点,也含有特征点周围对其有贡献的像素点。描述子应具有较高的独立性,以保证匹配率。
特征描述符的生成大致有三个步骤:
- 校正旋转主方向,确保旋转不变性。
- 生成描述子,最终形成一个128维的特征向量
- 归一化处理,将特征向量长度进行归一化处理,进一步去除光照的影响。
为了保证特征矢量的旋转不变性,要以特征点为中心,在附近邻域内将坐标轴旋转θ(特征点的主方向)角度,即将坐标轴旋转为特征点的主方向。旋转后邻域内像素的新坐标为:

旋转后以主方向为中心取 8×8的窗口。下图所示,左图的中央为当前关键点的位置,每个小格代表为关键点邻域所在尺度空间的一个像素,求取每个像素的梯度幅值与梯度方向,箭头方向代表该像素的梯度方向,长度代表梯度幅值,然后利用高斯窗口对其进行加权运算。最后在每个4×4的小块上绘制8个方向的梯度直方图,计算每个梯度方向的累加值,即可形成一个种子点,如右图所示。每个特征点由4个种子点组成,每个种子点有8个方向的向量信息。这种邻域方向性信息联合增强了算法的抗噪声能力,同时对于含有定位误差的特征匹配也提供了比较理性的容错性。
 与求主方向不同,此时每个种子区域的梯度直方图在0-360之间划分为8个方向区间,每个区间为45度,即每个种子点有8个方向的梯度强度信息。
在实际的计算过程中,为了增强匹配的稳健性,Lowe建议对每个关键点使用4×4共16个种子点来描述,这样一个关键点就可以产生128维的SIFT特征向量。
 通过对特征点周围的像素进行分块,计算块内梯度直方图,生成具有独特性的向量,这个向量是该区域图像信息的一种抽象,具有唯一性。
源码分析,整个源码在opencv_contrib中xfeature2d/src/sift.cpp中的sift.cpp文件中
现在就把源码中的各个部分拿出来分析(由于该方法有专利保护,在此声明,仅作为学习使用,未有任何商业企图)
首先是声明定义部分
namespace cv
{
namespace xfeatures2d
{

#ifdef OPENCV_ENABLE_NONFREE

/*!
 SIFT implementation.

 The class implements SIFT algorithm by D. Lowe.
 */
class SIFT_Impl : public SIFT  //定义一个类,继承自SIFT
{
public:
    explicit SIFT_Impl( int nfeatures = 0, int nOctaveLayers = 3,
                          double contrastThreshold = 0.04, double edgeThreshold = 10,
                          double sigma = 1.6);//构造函数,实现SIFT的参数初始化

    //! returns the descriptor size in floats (128)
    int descriptorSize() const CV_OVERRIDE;

    //! returns the descriptor type
    int descriptorType() const CV_OVERRIDE;

    //! returns the default norm type
    int defaultNorm() const CV_OVERRIDE;

    //! finds the keypoints and computes descriptors for them using SIFT algorithm.
    //! Optionally it can compute descriptors for the user-provided keypoints
    void detectAndCompute(InputArray img, InputArray mask,
                    std::vector<KeyPoint>& keypoints,
                    OutputArray descriptors,
                    bool useProvidedKeypoints = false) CV_OVERRIDE;
//构建高斯金字塔函数
    void buildGaussianPyramid( const Mat& base, std::vector<Mat>& pyr, int nOctaves ) const;
    //构建DOG金字塔
    void buildDoGPyramid( const std::vector<Mat>& pyr, std::vector<Mat>& dogpyr ) const;
    //在尺度空间内寻找极值
    void findScaleSpaceExtrema( const std::vector<Mat>& gauss_pyr, const std::vector<Mat>& dog_pyr,
                               std::vector<KeyPoint>& keypoints ) const;

protected:
    CV_PROP_RW int nfeatures;
    CV_PROP_RW int nOctaveLayers;
    CV_PROP_RW double contrastThreshold;
    CV_PROP_RW double edgeThreshold;
    CV_PROP_RW double sigma;
};
//sift的创建方法
Ptr<SIFT> SIFT::create( int _nfeatures, int _nOctaveLayers,
                     double _contrastThreshold, double _edgeThreshold, double _sigma )
{
    return makePtr<SIFT_Impl>(_nfeatures, _nOctaveLayers, _contrastThreshold, _edgeThreshold, _sigma);
}
下面主要介绍几个主要的函数,详细的参数意义和初始化可以自己在源文件中查看
createInitialImage函数,创建基层图像。主要进行一个高斯平滑处理,通过线性插值放大图像。
static Mat createInitialImage( const Mat& img, bool doubleImageSize, float sigma )
{
    Mat gray, gray_fpt;//定义输入图像
    //如果图像是彩色的则转换成灰度
    if( img.channels() == 3 || img.channels() == 4 )
    {
        cvtColor(img, gray, COLOR_BGR2GRAY);
        //将转换后的灰度图复制到gray_fpt中
        gray.convertTo(gray_fpt, DataType<sift_wt>::type, SIFT_FIXPT_SCALE, 0);
    }
    else
        img.convertTo(gray_fpt, DataType<sift_wt>::type, SIFT_FIXPT_SCALE, 0);

    float sig_diff;

    if( doubleImageSize )//是否需要扩大图像的长宽尺寸
    {
    //SIFT_INIT_SIGMA=0.5,SIFT_INIT_SIGMA*2=1,扩大2倍后的尺度
        sig_diff = sqrtf( std::max(sigma * sigma - SIFT_INIT_SIGMA * SIFT_INIT_SIGMA * 4, 0.01f) );
        Mat dbl;
#if DoG_TYPE_SHORT
//利用双线性插值把图像扩大2倍
        resize(gray_fpt, dbl, Size(gray_fpt.cols*2, gray_fpt.rows*2), 0, 0, INTER_LINEAR_EXACT);
#else
        resize(gray_fpt, dbl, Size(gray_fpt.cols*2, gray_fpt.rows*2), 0, 0, INTER_LINEAR);
#endif
//高斯平滑处理
        GaussianBlur(dbl, dbl, Size(), sig_diff, sig_diff);
        return dbl;
    }
    else
    {
    //如果不要扩大的话,直接高斯平滑后输出
        sig_diff = sqrtf( std::max(sigma * sigma - SIFT_INIT_SIGMA * SIFT_INIT_SIGMA, 0.01f) );
        GaussianBlur(gray_fpt, gray_fpt, Size(), sig_diff, sig_diff);
        return gray_fpt;
    }
}
buildGaussianPyramid构建高斯金字塔,结果保存在vector<>pyr中
void SIFT_Impl::buildGaussianPyramid( const Mat& base, std::vector<Mat>& pyr, int nOctaves ) const
{
//计算各层图像中好似标准差
    std::vector<double> sig(nOctaveLayers + 3);
    //定义高斯金子塔的总层数
    pyr.resize(nOctaves*(nOctaveLayers + 3));

    // precompute Gaussian sigmas using the following formula:
    //  \sigma_{total}^2 = \sigma_{i}^2 + \sigma_{i-1}^2
    sig[0] = sigma;
    //计算K的值k=2^(1/s)
    double k = std::pow( 2., 1. / nOctaveLayers );
    //计算每层中西格玛(g)值得大小,分别对应g0,kg0,k^2g0.....
    for( int i = 1; i < nOctaveLayers + 3; i++ )
    {
    //前一层得sigma值
        double sig_prev = std::pow(k, (double)(i-1))*sigma;
         //当前层得sigma值
        double sig_total = sig_prev*k;
        //高斯函数得标准差
        sig[i] = std::sqrt(sig_total*sig_total - sig_prev*sig_prev);
    }
//遍历高斯金字塔得所有层建立高斯金字塔
    for( int o = 0; o < nOctaves; o++ )
    {
        for( int i = 0; i < nOctaveLayers + 3; i++ )
        {
            Mat& dst = pyr[o*(nOctaveLayers + 3) + i];
            if( o == 0  &&  i == 0 )
            //如果是第0层直接把createInitialImage赋值给它
                dst = base;
            // base of new octave is halved image from end of previous octave
            else if( i == 0 )
            {
            //如果不是进行降采样
                const Mat& src = pyr[(o-1)*(nOctaveLayers + 3) + nOctaveLayers];
                resize(src, dst, Size(src.cols/2, src.rows/2),
                       0, 0, INTER_NEAREST);
            }
            else
            {
            //其他情况提取当前层得前一层作高斯平滑处理
                const Mat& src = pyr[o*(nOctaveLayers + 3) + i-1];
                GaussianBlur(src, dst, Size(), sig[i], sig[i]);
            }
        }
    }
}
构建DOG金字塔,直接两幅不同得高斯模糊图像的相减值
//创建一个 buildDoGPyramidComputer类,用来实现DOG金字塔得计算
class buildDoGPyramidComputer : public ParallelLoopBody
{
public:
    buildDoGPyramidComputer(
        int _nOctaveLayers,
        const std::vector<Mat>& _gpyr,
        std::vector<Mat>& _dogpyr)
        : nOctaveLayers(_nOctaveLayers),
          gpyr(_gpyr),
          dogpyr(_dogpyr) { }

    void operator()( const cv::Range& range ) const CV_OVERRIDE
    {
        const int begin = range.start;
        const int end = range.end;

        for( int a = begin; a < end; a++ )
        {
            const int o = a / (nOctaveLayers + 2);
            const int i = a % (nOctaveLayers + 2);
			//	获取一张处理后得图片
            const Mat& src1 = gpyr[o*(nOctaveLayers + 3) + i];
            //	获取前张之后得处理后得图片
            const Mat& src2 = gpyr[o*(nOctaveLayers + 3) + i + 1];
            Mat& dst = dogpyr[o*(nOctaveLayers + 2) + i];
             //	图片直接相减,结果保存在dst中
            subtract(src2, src1, dst, noArray(), DataType<sift_wt>::type);
        }
    }

private:
    int nOctaveLayers;
    const std::vector<Mat>& gpyr;
    std::vector<Mat>& dogpyr;
};
//调用前一个类实现DOG,结果保存在gpyr中
void SIFT_Impl::buildDoGPyramid( const std::vector<Mat>& gpyr, std::vector<Mat>& dogpyr ) const
{
    int nOctaves = (int)gpyr.size()/(nOctaveLayers + 3);
    dogpyr.resize( nOctaves*(nOctaveLayers + 2) );

    parallel_for_(Range(0, nOctaves * (nOctaveLayers + 2)), buildDoGPyramidComputer(nOctaveLayers, gpyr, dogpyr));
}
findScaleSpaceExtrema在尺度空间内寻找极值,和上面的套路类似,首先创建了一个用来计算的类
class findScaleSpaceExtremaComputer : public ParallelLoopBody
{
public:
//构造函数,参数的初始化
    findScaleSpaceExtremaComputer(
        int _o,
        int _i,
        int _threshold,
        int _idx,
        int _step,
        int _cols,
        int _nOctaveLayers,
        double _contrastThreshold,
        double _edgeThreshold,
        double _sigma,
        const std::vector<Mat>& _gauss_pyr,
        const std::vector<Mat>& _dog_pyr,
        TLSData<std::vector<KeyPoint> > &_tls_kpts_struct)

        : o(_o),
          i(_i),
          threshold(_threshold),
          idx(_idx),
          step(_step),
          cols(_cols),
          nOctaveLayers(_nOctaveLayers),
          contrastThreshold(_contrastThreshold),
          edgeThreshold(_edgeThreshold),
          sigma(_sigma),
          gauss_pyr(_gauss_pyr),
          dog_pyr(_dog_pyr),
          tls_kpts_struct(_tls_kpts_struct) { }
    void operator()( const cv::Range& range ) const CV_OVERRIDE
    {
        const int begin = range.start;
        const int end = range.end;

        static const int n = SIFT_ORI_HIST_BINS;
        float hist[n];

        const Mat& img = dog_pyr[idx];//DOG金字塔当前的索引值
        const Mat& prev = dog_pyr[idx-1];//DOG金字塔前一层的索引值
        const Mat& next = dog_pyr[idx+1];//DOG金字塔后一层的索引值

        std::vector<KeyPoint> *tls_kpts = tls_kpts_struct.get();
         //遍历当前图像的所有像素,对上下层图像进行对比求最大值,则为极值
        KeyPoint kpt;
        for( int r = begin; r < end; r++)
        {   //DOG金字塔当前层的当前行的指针
            const sift_wt* currptr = img.ptr<sift_wt>(r);
            //DOG金字塔下层的当前行的指针
            const sift_wt* prevptr = prev.ptr<sift_wt>(r);
             //DOG金字塔上层的当前行的指针
            const sift_wt* nextptr = next.ptr<sift_wt>(r);

            for( int c = SIFT_IMG_BORDER; c < cols-SIFT_IMG_BORDER; c++)
            {
                sift_wt val = currptr[c];

                // find local extrema with pixel accuracy
                //局部定位精确极值点
                //下面的逻辑判断被“或”分成了两个部分前一个满足像素》0,在3*3*3的空间里找到最大值,若《0则找最小值
                if( std::abs(val) > threshold &&
                   ((val > 0 && val >= currptr[c-1] && val >= currptr[c+1] &&
                     val >= currptr[c-step-1] && val >= currptr[c-step] && val >= currptr[c-step+1] &&
                     val >= currptr[c+step-1] && val >= currptr[c+step] && val >= currptr[c+step+1] &&
                     val >= nextptr[c] && val >= nextptr[c-1] && val >= nextptr[c+1] &&
                     val >= nextptr[c-step-1] && val >= nextptr[c-step] && val >= nextptr[c-step+1] &&
                     val >= nextptr[c+step-1] && val >= nextptr[c+step] && val >= nextptr[c+step+1] &&
                     val >= prevptr[c] && val >= prevptr[c-1] && val >= prevptr[c+1] &&
                     val >= prevptr[c-step-1] && val >= prevptr[c-step] && val >= prevptr[c-step+1] &&
                     val >= prevptr[c+step-1] && val >= prevptr[c+step] && val >= prevptr[c+step+1]) ||
                    (val < 0 && val <= currptr[c-1] && val <= currptr[c+1] &&
                     val <= currptr[c-step-1] && val <= currptr[c-step] && val <= currptr[c-step+1] &&
                     val <= currptr[c+step-1] && val <= currptr[c+step] && val <= currptr[c+step+1] &&
                     val <= nextptr[c] && val <= nextptr[c-1] && val <= nextptr[c+1] &&
                     val <= nextptr[c-step-1] && val <= nextptr[c-step] && val <= nextptr[c-step+1] &&
                     val <= nextptr[c+step-1] && val <= nextptr[c+step] && val <= nextptr[c+step+1] &&
                     val <= prevptr[c] && val <= prevptr[c-1] && val <= prevptr[c+1] &&
                     val <= prevptr[c-step-1] && val <= prevptr[c-step] && val <= prevptr[c-step+1] &&
                     val <= prevptr[c+step-1] && val <= prevptr[c+step] && val <= prevptr[c+step+1])))
                {
                    int r1 = r, c1 = c, layer = i;
                    if( !adjustLocalExtrema(dog_pyr, kpt, o, layer, r1, c1,
                                            nOctaveLayers, (float)contrastThreshold,
                                            (float)edgeThreshold, (float)sigma) )
                        continue;
                    float scl_octv = kpt.size*0.5f/(1 << o);
                    float omax = calcOrientationHist(gauss_pyr[o*(nOctaveLayers+3) + layer],
                                                     Point(c1, r1),
                                                     cvRound(SIFT_ORI_RADIUS * scl_octv),
                                                     SIFT_ORI_SIG_FCTR * scl_octv,
                                                     hist, n);
                    float mag_thr = (float)(omax * SIFT_ORI_PEAK_RATIO);
                    for( int j = 0; j < n; j++ )
                    {
                        int l = j > 0 ? j - 1 : n - 1;
                        int r2 = j < n-1 ? j + 1 : 0;

                        if( hist[j] > hist[l]  &&  hist[j] > hist[r2]  &&  hist[j] >= mag_thr )
                        {
                            float bin = j + 0.5f * (hist[l]-hist[r2]) / (hist[l] - 2*hist[j] + hist[r2]);
                            bin = bin < 0 ? n + bin : bin >= n ? bin - n : bin;
                            kpt.angle = 360.f - (float)((360.f/n) * bin);
                            if(std::abs(kpt.angle - 360.f) < FLT_EPSILON)
                                kpt.angle = 0.f;
                            {
                                tls_kpts->push_back(kpt);
                            }
                        }
                    }
                }
            }
        }
    }
private:
    int o, i;
    int threshold;
    int idx, step, cols;
    int nOctaveLayers;
    double contrastThreshold;
    double edgeThreshold;
    double sigma;
    const std::vector<Mat>& gauss_pyr;
    const std::vector<Mat>& dog_pyr;
    TLSData<std::vector<KeyPoint> > &tls_kpts_struct;
};

//
// Detects features at extrema in DoG scale space.  Bad features are discarded
// based on contrast and ratio of principal curvatures.
void SIFT_Impl::findScaleSpaceExtrema( const std::vector<Mat>& gauss_pyr, const std::vector<Mat>& dog_pyr,
                                  std::vector<KeyPoint>& keypoints ) const
{
    const int nOctaves = (int)gauss_pyr.size()/(nOctaveLayers + 3);
    const int threshold = cvFloor(0.5 * contrastThreshold / nOctaveLayers * 255 * SIFT_FIXPT_SCALE);

    keypoints.clear();
    TLSData<std::vector<KeyPoint> > tls_kpts_struct;

    for( int o = 0; o < nOctaves; o++ )
        for( int i = 1; i <= nOctaveLayers; i++ )
        {
            const int idx = o*(nOctaveLayers+2)+i;
            const Mat& img = dog_pyr[idx];
            const int step = (int)img.step1();
            const int rows = img.rows, cols = img.cols;

            parallel_for_(Range(SIFT_IMG_BORDER, rows-SIFT_IMG_BORDER),
                findScaleSpaceExtremaComputer(
                    o, i, threshold, idx, step, cols,
                    nOctaveLayers,
                    contrastThreshold,
                    edgeThreshold,
                    sigma,
                    gauss_pyr, dog_pyr, tls_kpts_struct));
        }

    std::vector<std::vector<KeyPoint>*> kpt_vecs;
    tls_kpts_struct.gather(kpt_vecs);
    for (size_t i = 0; i < kpt_vecs.size(); ++i) {
        keypoints.insert(keypoints.end(), kpt_vecs[i]->begin(), kpt_vecs[i]->end());
    }
}
好吧,太累了,如果有需要的话等待下次更新(可以在下方留言,留言的人不多,就不更新了,任性)
例程
上方已经有一个小例程,不想写了。头疼