Author: Zuguang Gu ( [email protected] )
翻译:诗翔
Date: 2018-10-30
图形注释非常常用。热图注释唯一相同的特征是它们对齐热图的列或行。HeatmapAnnotation类用户定义列和行的注释。
列注释
简单注释
一个简单的注释定义为一个包含离散类或者连续值的向量。因为简单的注释使用向量代表,所以多个简单的注释可以指定为数据框。一个简单的颜色注释可以指定带颜色向量的到col或颜色映射函数,这取决于简单注释是离散还是连续值。
在热图中,简单注释使用网格行代表。
HeatmapAnnotation类也有draw()方法。draw()用于内部使用,这里我们用它进行说明。
library(ComplexHeatmap)
library(circlize)

df = data.frame(type = c(rep("a", 5), rep("b", 5)))
ha = HeatmapAnnotation(df = df)
ha
## A HeatmapAnnotation object with 1 annotation.
##
## An annotation with discrete color mapping
## name: type
## position: column
## show legend: TRUE
颜色注释可以指定为一个带名字的列表。
ha = HeatmapAnnotation(df = df, col = list(type = c("a" =  "red", "b" = "blue")))
ha
## A HeatmapAnnotation object with 1 annotation.
##
## An annotation with discrete color mapping
## name: type
## position: column
## show legend: TRUE

draw(ha, 1:10)
连续注释可以使用颜色映射函数。
ha = HeatmapAnnotation(df = data.frame(age = sample(1:20, 10)),
    col = list(age = colorRamp2(c(0, 20), c("white", "red"))))
ha

## A HeatmapAnnotation object with 1 annotation.
##
## An annotation with continuous color mapping
## name: age
## position: column
## show legend: TRUE
draw(ha, 1:10)
NA值得颜色通过na_col设置。
df2 = data.frame(type = c(rep("a", 5), rep("b", 5)),
                age = sample(1:20, 10))
df2$type[5] = NA
df2$age[5] = NA
ha = HeatmapAnnotation(df = df2,
  col = list(type = c("a" =  "red", "b" = "blue"),
             age = colorRamp2(c(0, 20), c("white", "red"))),
  na_col = "grey")
draw(ha, 1:10)
使用数据框放置超过一个注释。
df = data.frame(type = c(rep("a", 5), rep("b", 5)),
                age = sample(1:20, 10))
ha = HeatmapAnnotation(df = df,
    col = list(type = c("a" = "red", "b" = "blue"),
               age = colorRamp2(c(0, 20), c("white", "red")))
)
ha
## A HeatmapAnnotation object with 2 annotations.
##
## An annotation with discrete color mapping
## name: type
## position: column
## show legend: TRUE
##
## An annotation with continuous color mapping
## name: age
## position: column
## show legend: TRUE
draw(ha, 1:10)
独立的注释也可以指定为向量。
ha = HeatmapAnnotation(type = c(rep("a", 5), rep("b", 5)),
                       age = sample(1:20, 10),
    col = list(type = c("a" = "red", "b" = "blue"),
               age = colorRamp2(c(0, 20), c("white", "red")))
)
ha
## A HeatmapAnnotation object with 2 annotations.
##
## An annotation with discrete color mapping
## name: type
## position: column
## show legend: TRUE
##
## An annotation with continuous color mapping
## name: age
## position: column
## show legend: TRUE
draw(ha, 1:10)
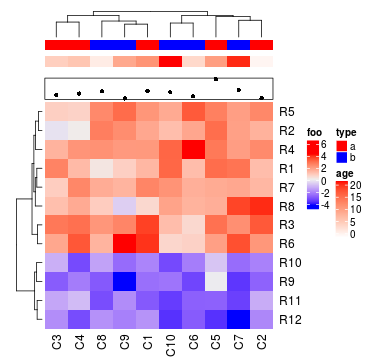
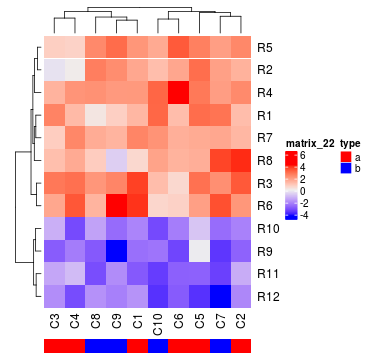
为了将列注释放到热图中,指定Heatmap()中的top_annotation和bottom_annotation参数。
ha1 = HeatmapAnnotation(df = df,
    col = list(type = c("a" = "red", "b" = "blue"),
               age = colorRamp2(c(0, 20), c("white", "red")))
)
ha2 = HeatmapAnnotation(df = data.frame(age = sample(1:20, 10)),
    col = list(age = colorRamp2(c(0, 20), c("white", "red"))))

set.seed(123)
mat = matrix(rnorm(80, 2), 8, 10)
mat = rbind(mat, matrix(rnorm(40, -2), 4, 10))
rownames(mat) = paste0("R", 1:12)
colnames(mat) = paste0("C", 1:10)

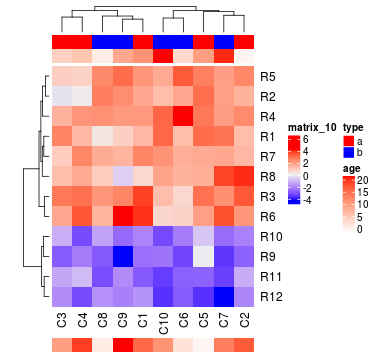
Heatmap(mat, top_annotation = ha1, bottom_annotation = ha2)
复杂注释
除了简单的注释,也有复杂注释。复杂注释通常表示为自定义的图形函数。实际上,对每一个列注释,都会有一个等待图形的viewport(grid知识?)。这里定义的注释函数定义如何将图形放到视点。函数的唯一参数是列的索引,该索引已经根据列聚类调整。
在下面的例子中,创建一个点注释。请注意我们如何定义xscale让点的位置对应于列中点的位置。
value = rnorm(10)
column_anno = function(index) {
    n = length(index)
    # since middle of columns are in 1, 2, ..., n and each column has width 1
    # then the most left should be 1 - 0.5 and the most right should be n + 0.5
    pushViewport(viewport(xscale = c(0.5, n + 0.5), yscale = range(value)))
    # since order of columns will be adjusted by clustering, here we also
    # need to change the order by `[index]`
    grid.points(index, value[index], pch = 16, default.unit = "native")
    # this is very important in order not to mess up the layout
    upViewport()
}
ha = HeatmapAnnotation(points = column_anno)  # here the name is arbitrary
ha

## A HeatmapAnnotation object with 1 annotation.
##
## An annotation with self-defined function
## name: points
## position: column

draw(ha, 1:10)
上面的代码仅仅用于说明。你不需要自己定义一个点注释,包里面已经提供了几种点注释生成器,如anno_points或anno_barplot()。
anno_points()anno_barplot()anno_boxplot()anno_histogram()anno_density()anno_text()
这些函数的输入值都非常直观。它应该是一个数值向量、一个矩阵或列表,或是一个字符串向量。
ha = HeatmapAnnotation(points = anno_points(value))
draw(ha, 1:10)
ha = HeatmapAnnotation(barplot = anno_barplot(value))
draw(ha, 1:10)
anno_boxplot()为矩阵的每一列生成一个箱线图。
ha = HeatmapAnnotation(boxplot = anno_boxplot(mat))
draw(ha, 1:10)
你可以混合简单注释和复杂注释。
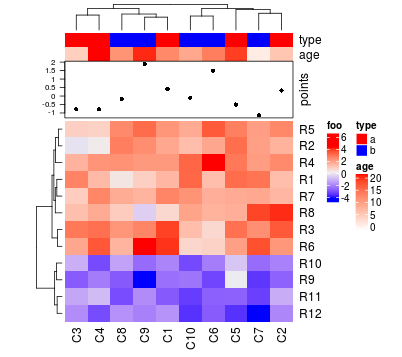
ha = HeatmapAnnotation(df = df,
                       points = anno_points(value),
    col = list(type = c("a" = "red", "b" = "blue"),
               age = colorRamp2(c(0, 20), c("white", "red"))))
ha

## A HeatmapAnnotation object with 3 annotations.
##
## An annotation with discrete color mapping
## name: type
## position: column
## show legend: TRUE
##
## An annotation with continuous color mapping
## name: age
## position: column
## show legend: TRUE
##
## An annotation with self-defined function
## name: points
## position: column
draw(ha, 1:10)
因为简单注释可以指定为向量,因此你可以按任何顺序排列注释。
ha = HeatmapAnnotation(type = c(rep("a", 5), rep("b", 5)),
                       points = anno_points(value),
                       age = sample(1:20, 10),
                       bars = anno_barplot(value),
    col = list(type = c("a" = "red", "b" = "blue"),
               age = colorRamp2(c(0, 20), c("white", "red"))))
ha
## A HeatmapAnnotation object with 4 annotations.
##
## An annotation with discrete color mapping
## name: type
## position: column
## show legend: TRUE
##
## An annotation with self-defined function
## name: points
## position: column
##
## An annotation with continuous color mapping
## name: age
## position: column
## show legend: TRUE
##
## An annotation with self-defined function
## name: bars
## position: column

draw(ha, 1:10)
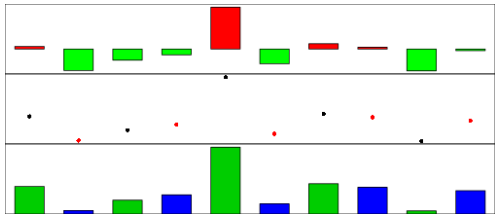
对于一些anno_*函数,可以通过gp参数设置图形参数。下面说明如何在anno_barplot()中指定baseline。
ha = HeatmapAnnotation(barplot1 = anno_barplot(value, baseline = 0, gp = gpar(fill = ifelse(value > 0, "red", "green"))),
                       points = anno_points(value, gp = gpar(col = rep(1:2, 5))),
                       barplot2 = anno_barplot(value, gp = gpar(fill = rep(3:4, 5))))
ha
## A HeatmapAnnotation object with 3 annotations.
##
## An annotation with self-defined function
## name: barplot1
## position: column
##
## An annotation with self-defined function
## name: points
## position: column
##
## An annotation with self-defined function
## name: barplot2
## position: column
draw(ha, 1:10)
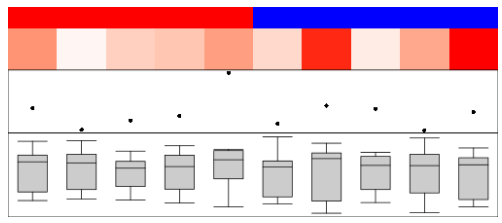
如果注释超过一个,你可以通过annotation_height参数的值控制每个注释的高度,该值必须要么是数值要么是unit对象。
# set annotation height as relative values
ha = HeatmapAnnotation(df = df, points = anno_points(value), boxplot = anno_boxplot(mat),
    col = list(type = c("a" = "red", "b" = "blue"),
               age = colorRamp2(c(0, 20), c("white", "red"))),
    annotation_height = c(1, 2, 3, 4))
draw(ha, 1:10)
# set annotation height as absolute units
ha = HeatmapAnnotation(df = df, points = anno_points(value), boxplot = anno_boxplot(mat),
    col = list(type = c("a" = "red", "b" = "blue"),
               age = colorRamp2(c(0, 20), c("white", "red"))),
    annotation_height = unit.c((unit(1, "npc") - unit(4, "cm"))*0.5, (unit(1, "npc") - unit(4, "cm"))*0.5,
        unit(2, "cm"), unit(2, "cm")))
draw(ha, 1:10)
构建的注释,你可以将它们添加到热图上。你可以通过top_annotaiton_height和bottom_annotation_height控制注释的高度。
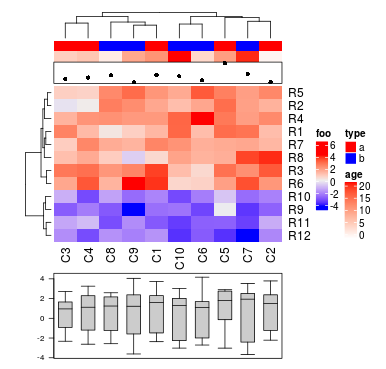
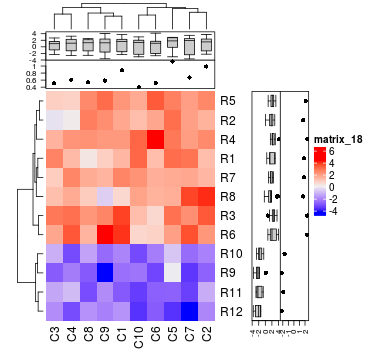
如果注释比较高,为它们添加轴是比较好的,anno_points()、anno_barplot()和anno_boxplot()支持轴。
ha = HeatmapAnnotation(df = df, points = anno_points(value),
    col = list(type = c("a" = "red", "b" = "blue"),
               age = colorRamp2(c(0, 20), c("white", "red"))))
ha_boxplot = HeatmapAnnotation(boxplot = anno_boxplot(mat, axis = TRUE))
Heatmap(mat, name = "foo", top_annotation = ha, bottom_annotation = ha_boxplot,
    bottom_annotation_height = unit(3, "cm"))
每个注释的间隔可以使用HeatmapAnnotation()中的gap参数。
ha = HeatmapAnnotation(df = df, points = anno_points(value), gap = unit(c(2, 4), "mm"),
    col = list(type = c("a" = "red", "b" = "blue"),
               age = colorRamp2(c(0, 20), c("white", "red"))))
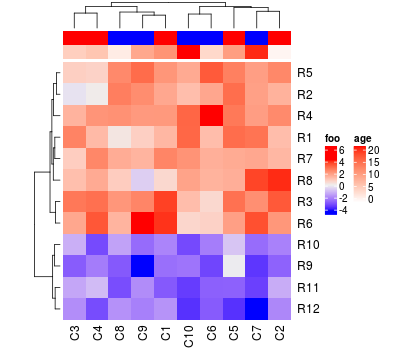
Heatmap(mat, name = "foo", top_annotation = ha)
创建注释对象时你可以通过设置show_legend为FALSE抑制图例的显示。
ha = HeatmapAnnotation(df = df, show_legend = c(FALSE, TRUE),
    col = list(type = c("a" = "red", "b" = "blue"),
               age = colorRamp2(c(0, 20), c("white", "red"))))
Heatmap(mat, name = "foo", top_annotation = ha)
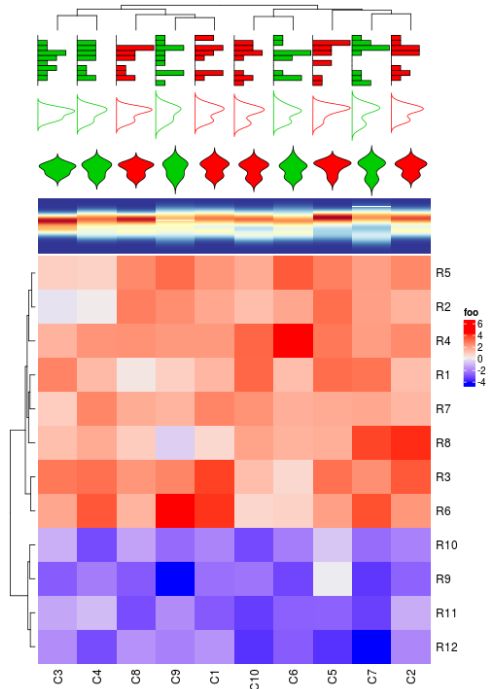
anno_histogram()和anno_density()支持各种显示数据分布的注释。
ha_mix_top = HeatmapAnnotation(histogram = anno_histogram(mat, gp = gpar(fill = rep(2:3, each = 5))),
    density_line = anno_density(mat, type = "line", gp = gpar(col = rep(2:3, each = 5))),
    violin = anno_density(mat, type = "violin", gp = gpar(fill = rep(2:3, each = 5))),
    heatmap = anno_density(mat, type = "heatmap"))
Heatmap(mat, name = "foo", top_annotation = ha_mix_top, top_annotation_height = unit(8, "cm"))
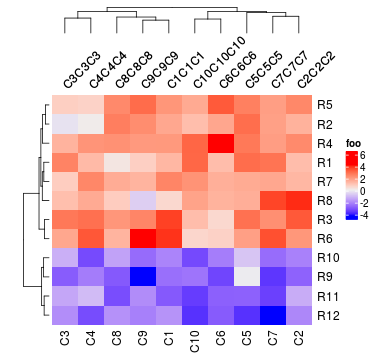
文字也是一种图形注释,anno_text()提供了该功能。
long_cn = do.call("paste0", rep(list(colnames(mat)), 3))  # just to construct long text
ha_rot_cn = HeatmapAnnotation(text = anno_text(long_cn, rot = 45, just = "left", offset = unit(2, "mm")))
Heatmap(mat, name = "foo", top_annotation = ha_rot_cn, top_annotation_height = unit(2, "cm"))
行注释
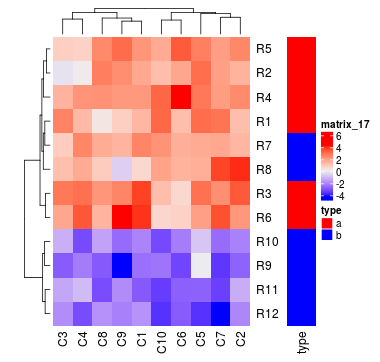
行注释也是由HeatmapAnnotation类定义,但需要指定which为row。
df = data.frame(type = c(rep("a", 6), rep("b", 6)))
ha = HeatmapAnnotation(df = df, col = list(type = c("a" = "red", "b" = "blue")),
    which = "row", width = unit(1, "cm"))
draw(ha, 1:12)
帮助函数rowAnnotation()与HeatmapAnnotation(..., which = "row")相同。
ha = rowAnnotation(df = df, col = list(type = c("a" = "red", "b" = "blue")), width = unit(1, "cm"))
anno_*函数同样可以用于行注释,但也需要指定which = "row"。
ha = rowAnnotation(points = anno_points(runif(10), which = "row"))
类似于rowAnnotation(),下面的帮助函数已经设置好了为行注释。
row_anno_points()row_anno_barplot()row_anno_boxplot()row_anno_histogram()row_anno_density()row_anno_text()
相似地,可以组合多个行注释。
ha_combined = rowAnnotation(df = df, boxplot = row_anno_boxplot(mat),
    col = list(type = c("a" = "red", "b" = "blue")),
    annotation_width = c(1, 3))
draw(ha_combined, 1:12)
(行注释的特性基本与列注释相似,所以一些描述性的内容我就跳过了。)
混合热图和行注释
使用+操作符。
ha = rowAnnotation(df = df, col = list(type = c("a" = "red", "b" = "blue")),
    width = unit(1, "cm"))
ht1 = Heatmap(mat, name = "ht1")
ht2 = Heatmap(mat, name = "ht2")
ht1 + ha + ht2
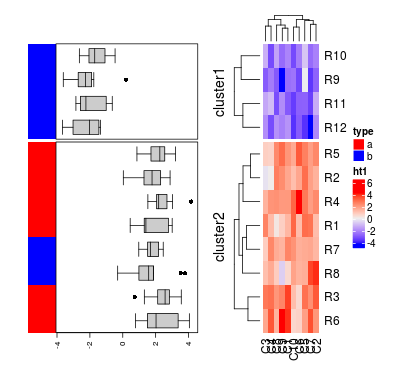
如果主热图中设置了km或者split,那么行注释也会切分。
ht1 = Heatmap(mat, name = "ht1", km = 2)
ha = rowAnnotation(df = df, col = list(type = c("a" = "red", "b" = "blue")),
    boxplot = row_anno_boxplot(mat, axis = TRUE),
    annotation_width = unit(c(1, 5), "cm"))
ha + ht1
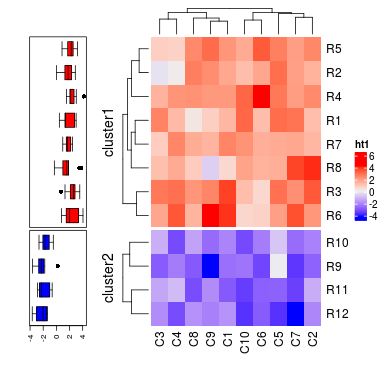
当应用了行切分,注释函数的图形参数可以指定为行切片一样的长度。
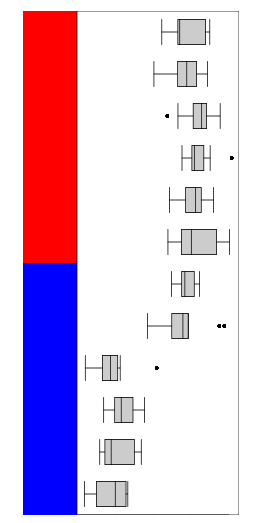
ha = rowAnnotation(boxplot = row_anno_boxplot(mat, gp = gpar(fill = c("red", "blue"))),
    width = unit(2, "cm"))
ha + ht1
我们可以调整行标题的长度和位置。
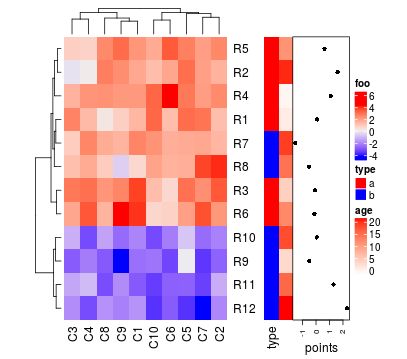
draw(ha + ht1, row_dend_side = "left", row_sub_title_side = "right")
自定义行注释
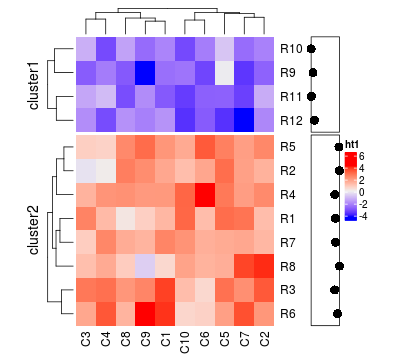
自定义行注释与自定义列注释类似。
value = rowMeans(mat)
row_anno = function(index) {
    n = length(index)
    pushViewport(viewport(xscale = range(value), yscale = c(0.5, n + 0.5)))
    grid.rect()
    # recall row order will be adjusted, here we specify `value[index]`
    grid.points(value[index], seq_along(index), pch = 16, default.unit = "native")
    upViewport()
}
ha = rowAnnotation(points = row_anno, width = unit(1, "cm"))
ht1 + ha
对于自定义注释函数,可以指定第二个参数k提供当前行切片的索引。
row_anno = function(index, k) {
    n = length(index)
    col = c("blue", "red")[k]
    pushViewport(viewport(xscale = range(value), yscale = c(0.5, n + 0.5)))
    grid.rect()
    grid.points(value[index], seq_along(index), pch = 16, default.unit = "native", gp = gpar(col = col))
    upViewport()
}
ha = rowAnnotation(points = row_anno, width = unit(1, "cm"))
ht1 + ha
0行热图
如果你仅仅想要可视化你矩阵的元数据,你可以设置一个0行的矩阵。这种情况下,只允许一个热图。
ha = HeatmapAnnotation(df = data.frame(value = runif(10), type = rep(letters[1:2], 5)),
    barplot = anno_barplot(runif(10)),
    points = anno_points(runif(10)))
zero_row_mat = matrix(nrow = 0, ncol = 10)
colnames(zero_row_mat) = letters[1:10]
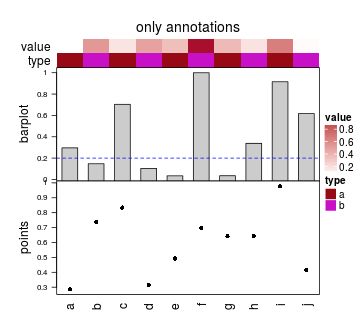
Heatmap(zero_row_mat, top_annotation = ha, column_title = "only annotations")
这个特性在你想要比较多个度量时很有用。下面图形的轴和标签都是通过热图修饰进行添加。
ha = HeatmapAnnotation(df = data.frame(value = runif(10), type = rep(letters[1:2], 5)),
    barplot = anno_barplot(runif(10), axis = TRUE),
    points = anno_points(runif(10), axis = TRUE),
    annotation_height = unit(c(0.5, 0.5, 4, 4), "cm"))
zero_row_mat = matrix(nrow = 0, ncol = 10)
colnames(zero_row_mat) = letters[1:10]
ht = Heatmap(zero_row_mat, top_annotation = ha, column_title = "only annotations")
draw(ht, padding = unit(c(2, 20, 2, 2), "mm"))
decorate_annotation("value", {grid.text("value", unit(-2, "mm"), just = "right")})
decorate_annotation("type", {grid.text("type", unit(-2, "mm"), just = "right")})
decorate_annotation("barplot", {
    grid.text("barplot", unit(-10, "mm"), just = "bottom", rot = 90)
    grid.lines(c(0, 1), unit(c(0.2, 0.2), "native"), gp = gpar(lty = 2, col = "blue"))
})
decorate_annotation("points", {
    grid.text("points", unit(-10, "mm"), just = "bottom", rot = 90)
})
0列热图
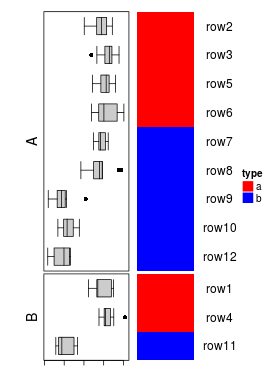
如果用户仅仅想要排列行注释列表,可以使用0列热图。
ha_boxplot = rowAnnotation(boxplot = row_anno_boxplot(mat), width = unit(3, "cm"))
ha = rowAnnotation(df = df, col = list(type = c("a" = "red", "b" = "blue")), width = unit(2, "cm"))
text = paste0("row", seq_len(nrow(mat)))
ha_text = rowAnnotation(text = row_anno_text(text), width = max_text_width(text))
nr = nrow(mat)
Heatmap(matrix(nrow = nr, ncol = 0), split = sample(c("A", "B"), nr, replace = TRUE)) +
    ha_boxplot + ha + ha_text
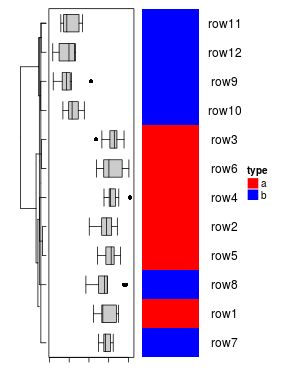
或者将树状图添加到行注释。
dend = hclust(dist(mat))
Heatmap(matrix(nrow = nr, ncol = 0), cluster_rows = dend) +
    ha_boxplot + ha + ha_text
使用热图而不是简单的行注释
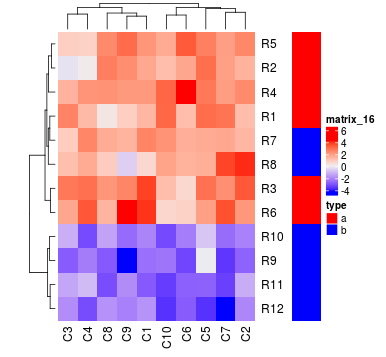
最后,如果你的行注释是简单的注释,我推荐你使用热图替代。下面两种方法生成相似的图形。
df = data.frame(type = c(rep("a", 6), rep("b", 6)))
Heatmap(mat) + rowAnnotation(df = df, col = list(type = c("a" = "red", "b" = "blue")),
    width = unit(1, "cm"))
Heatmap(mat) + Heatmap(df, name = "type", col = c("a" = "red", "b" = "blue"),
    width = unit(1, "cm"))
注释轴
使用axis和axis_side进行控制。
ha1 = HeatmapAnnotation(b1 = anno_boxplot(mat, axis = TRUE),
    p1 = anno_points(colMeans(mat), axis = TRUE))
ha2 = rowAnnotation(b2 = row_anno_boxplot(mat, axis = TRUE),
    p2 = row_anno_points(rowMeans(mat), axis = TRUE), width = unit(2, "cm"))
Heatmap(mat, top_annotation = ha1, top_annotation_height = unit(2, "cm")) + ha2
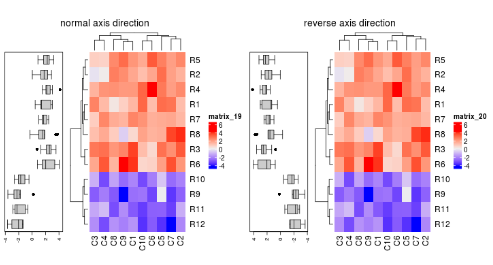
行注释数据的方向是从左到右,有些用户觉得会很奇怪,我们开源逆转轴方向。
pushViewport(viewport(layout = grid.layout(nr = 1, nc = 2)))
pushViewport(viewport(layout.pos.row = 1, layout.pos.col = 1))
ha = rowAnnotation(boxplot = row_anno_boxplot(mat, axis = TRUE), width = unit(3, "cm"))
ht_list = ha + Heatmap(mat)
draw(ht_list, column_title = "normal axis direction", newpage = FALSE)
upViewport()

pushViewport(viewport(layout.pos.row = 1, layout.pos.col = 2))
ha = rowAnnotation(boxplot = row_anno_boxplot(mat, axis = TRUE, axis_direction = "reverse"),
    width = unit(3, "cm"))
ht_list = ha + Heatmap(mat)
draw(ht_list, column_title = "reverse axis direction", newpage = FALSE)
upViewport(2)
堆叠条形图
foo1 = matrix(abs(rnorm(20)), ncol = 2)
foo1[1, ] = -foo1[1, ]
column_ha = HeatmapAnnotation(foo1 = anno_barplot(foo1, axis = TRUE))
foo2 = matrix(abs(rnorm(24)), ncol = 2)
row_ha = rowAnnotation(foo2 = row_anno_barplot(foo2, axis = TRUE, axis_side = "top",
    gp = gpar(fill = c("red", "blue"))), width = unit(2, "cm"))
Heatmap(mat, top_annotation = column_ha, top_annotation_height = unit(2, "cm"), km = 2) + row_ha
参考 this section
添加堆叠条形图图例。
添加注释名
df = data.frame(type = c(rep("a", 5), rep("b", 5)),
                age = sample(1:20, 10))
value = rnorm(10)
ha = HeatmapAnnotation(df = df, points = anno_points(value, axis = TRUE),
    col = list(type = c("a" = "red", "b" = "blue"),
               age = colorRamp2(c(0, 20), c("white", "red"))),
    annotation_height = unit(c(0.5, 0.5, 2), "cm"),
    show_annotation_name = TRUE,
    annotation_name_offset = unit(2, "mm"),
    annotation_name_rot = c(0, 0, 90))
Heatmap(mat, name = "foo", top_annotation = ha)
或行注释名:
df = data.frame(type = c(rep("a", 6), rep("b", 6)),
                age = sample(1:20, 12))
value = rnorm(12)
ha = rowAnnotation(df = df, points = row_anno_points(value, axis = TRUE),
    col = list(type = c("a" = "red", "b" = "blue"),
               age = colorRamp2(c(0, 20), c("white", "red"))),
    annotation_width = unit(c(0.5, 0.5, 2), "cm"),
    show_annotation_name = c(TRUE, FALSE, TRUE),
    annotation_name_offset = unit(c(2, 2, 8), "mm"),
    annotation_name_rot = c(90, 90, 0))
ht = Heatmap(mat, name = "foo") + ha
draw(ht, padding = unit(c(4, 2, 2, 2), "mm"))
调整列名位置
当添加列注释时,列名放在热图主体下面,这会让显示不太好看。
ha = HeatmapAnnotation(type = df$type,
    col = list(type = c("a" = "red", "b" = "blue")))
Heatmap(mat, bottom_annotation = ha)
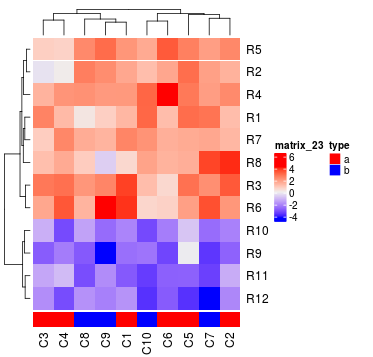
为了解决这个问题,我们可以将列名变为列注释。
ha = HeatmapAnnotation(type = df$type,
    colname = anno_text(colnames(mat), rot = 90, just = "right", offset = unit(1, "npc") - unit(2, "mm")),
    col = list(type = c("a" = "red", "b" = "blue")),
    annotation_height = unit.c(unit(5, "mm"), max_text_width(colnames(mat)) + unit(2, "mm")))
Heatmap(mat, show_column_names = FALSE, bottom_annotation = ha)
这样我们就能够控制各种列名文本显示效果了。
标记一些行或列
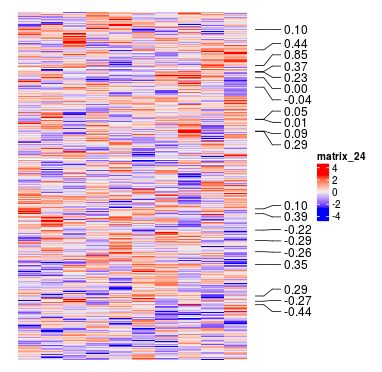
新的注释函数anno_link()用户连接标签和热图子集。这样我们就可以添加一些感兴趣的标签了。
mat = matrix(rnorm(10000), nr = 1000)
rownames(mat) = sprintf("%.2f", rowMeans(mat))
subset = sample(1000, 20)
labels = rownames(mat)[subset]
Heatmap(mat, show_row_names = FALSE, show_row_dend = FALSE, show_column_dend = FALSE) +
rowAnnotation(link = row_anno_link(at = subset, labels = labels),
  width = unit(1, "cm") + max_text_width(labels))
这里unit(1, "cm")是线段的宽度
存在两个快捷函数:row_anno_link()和column_anno_link()。
会话信息
sessionInfo()
## R version 3.5.1 Patched (2018-07-12 r74967)
## Platform: x86_64-pc-linux-gnu (64-bit)
## Running under: Ubuntu 16.04.5 LTS
##
## Matrix products: default
## BLAS: /home/biocbuild/bbs-3.8-bioc/R/lib/libRblas.so
## LAPACK: /home/biocbuild/bbs-3.8-bioc/R/lib/libRlapack.so
##
## locale:
##  [1] LC_CTYPE=en_US.UTF-8       LC_NUMERIC=C               LC_TIME=en_US.UTF-8
##  [4] LC_COLLATE=C               LC_MONETARY=en_US.UTF-8    LC_MESSAGES=en_US.UTF-8
##  [7] LC_PAPER=en_US.UTF-8       LC_NAME=C                  LC_ADDRESS=C
## [10] LC_TELEPHONE=C             LC_MEASUREMENT=en_US.UTF-8 LC_IDENTIFICATION=C
##
## attached base packages:
##  [1] stats4    parallel  grid      stats     graphics  grDevices utils     datasets  methods
## [10] base
##
## other attached packages:
##  [1] dendextend_1.9.0      dendsort_0.3.3        cluster_2.0.7-1       IRanges_2.16.0
##  [5] S4Vectors_0.20.0      BiocGenerics_0.28.0   HilbertCurve_1.12.0   circlize_0.4.4
##  [9] ComplexHeatmap_1.20.0 knitr_1.20            markdown_0.8
##
## loaded via a namespace (and not attached):
##  [1] mclust_5.4.1           Rcpp_0.12.19           mvtnorm_1.0-8          lattice_0.20-35
##  [5] png_0.1-7              class_7.3-14           assertthat_0.2.0       mime_0.6
##  [9] R6_2.3.0               GenomeInfoDb_1.18.0    plyr_1.8.4             evaluate_0.12
## [13] ggplot2_3.1.0          highr_0.7              pillar_1.3.0           GlobalOptions_0.1.0
## [17] zlibbioc_1.28.0        rlang_0.3.0.1          lazyeval_0.2.1         diptest_0.75-7
## [21] kernlab_0.9-27         whisker_0.3-2          GetoptLong_0.1.7       stringr_1.3.1
## [25] RCurl_1.95-4.11        munsell_0.5.0          compiler_3.5.1         pkgconfig_2.0.2
## [29] shape_1.4.4            nnet_7.3-12            tidyselect_0.2.5       gridExtra_2.3
## [33] tibble_1.4.2           GenomeInfoDbData_1.2.0 viridisLite_0.3.0      crayon_1.3.4
## [37] dplyr_0.7.7            MASS_7.3-51            bitops_1.0-6           gtable_0.2.0
## [41] magrittr_1.5           scales_1.0.0           stringi_1.2.4          XVector_0.22.0
## [45] viridis_0.5.1          flexmix_2.3-14         bindrcpp_0.2.2         robustbase_0.93-3
## [49] fastcluster_1.1.25     HilbertVis_1.40.0      rjson_0.2.20           RColorBrewer_1.1-2
## [53] tools_3.5.1            fpc_2.1-11.1           glue_1.3.0             trimcluster_0.1-2.1
## [57] DEoptimR_1.0-8         purrr_0.2.5            colorspace_1.3-2       GenomicRanges_1.34.0
## [61] prabclus_2.2-6         bindr_0.1.1            modeltools_0.2-22


