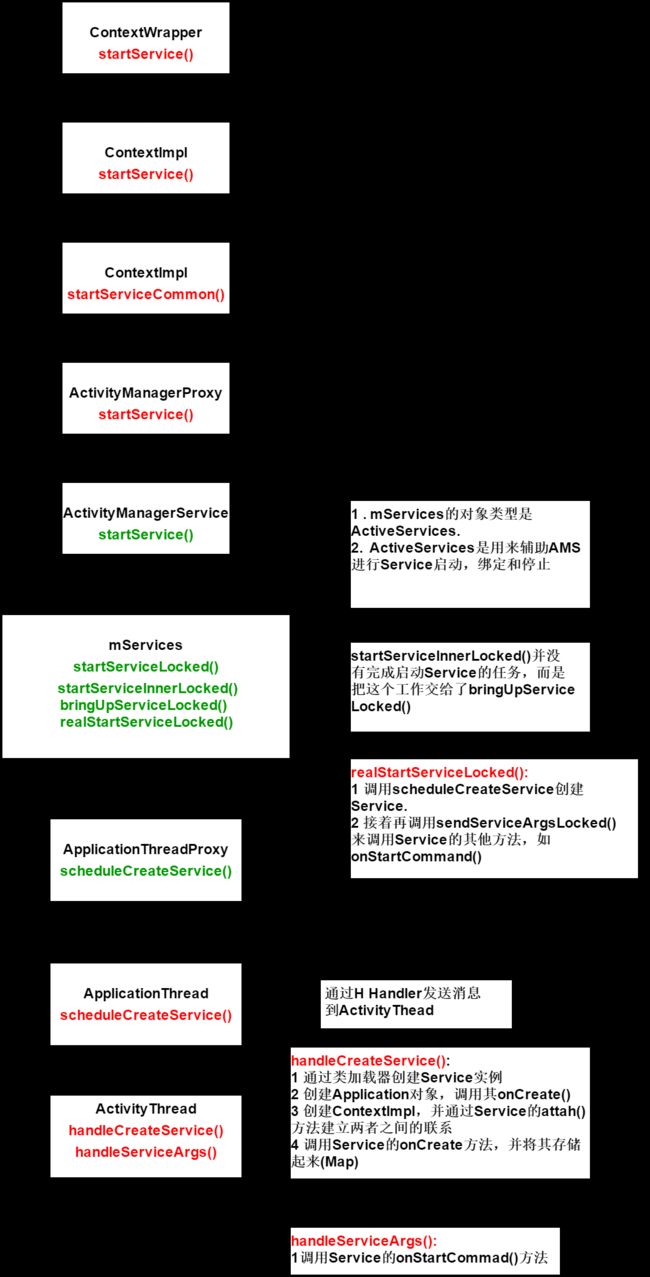
参考资料-老罗
一:startService的流程
二:补充-启动Service所在的新进程
因为对于Service我们可以在AndroidManifest.xml文件中指定Android:process属性为其它,比如:remote。这样系统就为Service另起一个进程,并让Service运行在其中。这样就需要创建一个进程,系统为Service创建进程是在bringUpServiceLocked()中。
bringUpServiceLocked():通过startProcessLocked()来创建一个新的进程,以便加载自定义的Service类。最后将这个ServiceRecord保存在成员变量mPendingServices列表中,后面会用到。
public final class ActivityManagerService extends ActivityManagerNative
                            implements Watchdog.Monitor, BatteryStatsImpl.BatteryCallback {

    ......

    private final boolean bringUpServiceLocked(ServiceRecord r,
                    int intentFlags, boolean whileRestarting) {

        ......

        final String appName = r.processName;

        ......

        // Not running -- get it started, and enqueue this service record
        // to be executed when the app comes up.
        if (startProcessLocked(appName, r.appInfo, true, intentFlags,
                    "service", r.name, false) == null) {

            ......

            return false;
        }

        if (!mPendingServices.contains(r)) {
            mPendingServices.add(r);
        }

        return true;

    }

    ......

}
ActivityManagerService.startProcessLocked(): 调用Process.start()创建一个新的进程,指定新的进程运行ActivityThread类,
public final class ActivityManagerService extends ActivityManagerNative
                            implements Watchdog.Monitor, BatteryStatsImpl.BatteryCallback {

    ......

    private final void startProcessLocked(ProcessRecord app,
                String hostingType, String hostingNameStr) {

        ......

        try {

            ......

            int pid = Process.start("android.app.ActivityThread",
                            mSimpleProcessManagement ? app.processName : null, uid, uid,
                            gids, debugFlags, null);

            ......

            if (pid == 0 || pid == MY_PID) {

                ......

            } else if (pid > 0) {
                app.pid = pid;
                app.removed = false;
                synchronized (mPidsSelfLocked) {
                    this.mPidsSelfLocked.put(pid, app);
                    ......
                }
            } else {

                ......
            }

        } catch (RuntimeException e) {

            ......

        }

    }

    ......

}
Process.start(): 新建一个进程,然后导入android.app.ActivityThread这个类,然后执行它的main函数。
ActivityThread.main(): 已经是在上一步创建的新进程里面了,即这里的进程是用来启动服务的,在Android应用程序中,每一个进程对应一个ActivityThread实例,所以,这个函数会创建一个thread实例,然后调用ActivityThread.attach函数进一步处理。
public static final void main(String[] args) {

        ......

        Looper.prepareMainLooper();

        ......

        ActivityThread thread = new ActivityThread();
        thread.attach(false);

        ......

        Looper.loop();

        ......

        thread.detach();


    }
ActivityThread.attach(): 调用ActivityManagerNative.getDefault函数得到ActivityManagerService的远程接口,即ActivityManagerProxy,接着调用它的attachApplication函数。
private final void attach(boolean system) {

        ......

        if (!system) {

            ......

            IActivityManager mgr = ActivityManagerNative.getDefault();
            try {
                mgr.attachApplication(mAppThread);
            } catch (RemoteException ex) {
            }
        } else {

            ......

        }

        ......
ActivityManagerProxy.attachApplication:Binder跨进程
ActivityManagerService.attachApplication():通过调用attachApplicationLocked函数进一步处理。
public final class ActivityManagerService extends ActivityManagerNative
                            implements Watchdog.Monitor, BatteryStatsImpl.BatteryCallback {

    ......

    public final void attachApplication(IApplicationThread thread)
    {
        synchronized (this) {
            int callingPid = Binder.getCallingPid();
            final long origId = Binder.clearCallingIdentity();
            attachApplicationLocked(thread, callingPid);
            Binder.restoreCallingIdentity(origId);
        }
    }

    ......

}
ActivityManagerService.attachApplicationLocked`():前面新进程的pid值作为key值保存了一个ProcessRecord在mPidsSelfLocked列表中,这里先把它取出来,存放在本地变量app中,并且将app.processName保存在本地变量processName中。
在成员变量mPendingServices中,保存了一个ServiceRecord,这里通过进程uid和进程名称将它找出来,然后通过realStartServiceLocked函数来进一步处理。
public final class ActivityManagerService extends ActivityManagerNative
                        implements Watchdog.Monitor, BatteryStatsImpl.BatteryCallback {

    ......

    private final boolean attachApplicationLocked(IApplicationThread thread,
            int pid) {
        // Find the application record that is being attached...  either via
        // the pid if we are running in multiple processes, or just pull the
        // next app record if we are emulating process with anonymous threads.
        ProcessRecord app;
        if (pid != MY_PID && pid >= 0) {
            synchronized (mPidsSelfLocked) {
                app = mPidsSelfLocked.get(pid);
            }
        } else if (mStartingProcesses.size() > 0) {
            app = mStartingProcesses.remove(0);
            app.setPid(pid);
        } else {
            app = null;
        }

        ......


        String processName = app.processName;

        ......

        app.thread = thread;

        ......

        boolean badApp = false;

        ......

        // Find any services that should be running in this process...
        if (!badApp && mPendingServices.size() > 0) {
            ServiceRecord sr = null;
            try {
                for (int i=0; i
二:ActivityManagerService启动
ActivityManagerService:简称AMS,服务端对象,负责系统中所有Activity的生命周期。它的启动是在frameworks/base/services/java/com/android/server/SystemServer.java文件里面进行启动的。
主要步骤
(1)通过ActivityManagerService.main()来创建一个ActivityManagerService对象
(2)通过 ActivityManagerService.setSystemProcess()把这个ActivityManagerService实例添加到ServiceManager中去。
class ServerThread extends Thread {

    ......

    @Override
    public void run() {

        ......

        // Critical services...
        try {

            ......

            context = ActivityManagerService.main(factoryTest);

            ......

            ActivityManagerService.setSystemProcess();

            ......

        } catch (RuntimeException e) {
            Slog.e("System", "Failure starting core service", e);
        }

        ......

    }

    ......

}
ActivityManagerService.setSystemProcess():把ActivityManagerService实例添加到ServiceManager中去。
public final class ActivityManagerService extends ActivityManagerNative
        implements Watchdog.Monitor, BatteryStatsImpl.BatteryCallback {

    ......

    static ActivityManagerService mSelf;

    ......

    public static void setSystemProcess() {
        try {
            ActivityManagerService m = mSelf;

            ServiceManager.addService("activity", m);

            ......

        } catch (PackageManager.NameNotFoundException e) {
            ......
        }
    }

    ......

    public static final Context main(int factoryTest) {

        ......

        ActivityManagerService m = thr.mService;
        mSelf = m;

        ......

    }

